

Owners Manual
Page 6
... the panel ...7-9 Checking the spark plugs ...7-9 Canister (for California only) ...7-11 Engine oil and oil filter cartridge ...7-11 Coolant ...7-14 Replacing the air filter element ...7-15 Checking the throttle grip free play ...7-16 Valve clearance ...7-16 Tires ...7-17 Cast wheels ...7-18 Adjusting the clutch lever free play ...7-19 Checking the brake lever free play ...7-20 Brake light switches ...7-20 Checking the front and rear brake pads ...7-21 Checking the brake fluid level ...7-21 Changing the brake fluid ...7-23 Drive belt...
... the panel ...7-9 Checking the spark plugs ...7-9 Canister (for California only) ...7-11 Engine oil and oil filter cartridge ...7-11 Coolant ...7-14 Replacing the air filter element ...7-15 Checking the throttle grip free play ...7-16 Valve clearance ...7-16 Tires ...7-17 Cast wheels ...7-18 Adjusting the clutch lever free play ...7-19 Checking the brake lever free play ...7-20 Brake light switches ...7-20 Checking the front and rear brake pads ...7-21 Checking the brake fluid level ...7-21 Changing the brake fluid ...7-23 Drive belt...
Owners Manual
Page 12
... to follow if loading cargo to the motorcycle as windows and doors. 2 Loading Adding accessories or cargo to your load (suspension-adjustable models only), and check the condition and pressure of the motorcycle is a colorless, odorless, tasteless gas which may be overcome and unable to minimize imbalance or instability. ● Shifting weights can quickly be present even if you experience...
... to follow if loading cargo to the motorcycle as windows and doors. 2 Loading Adding accessories or cargo to your load (suspension-adjustable models only), and check the condition and pressure of the motorcycle is a colorless, odorless, tasteless gas which may be overcome and unable to minimize imbalance or instability. ● Shifting weights can quickly be present even if you experience...
Owners Manual
Page 13
... attached to genuine Yamaha accessories, recognize that change any way reduce ground clearance or cornering clearance, limit suspension travel, steering travel or control operation, or obscure lights or reflectors. • Accessories fitted to the handlebar or the front fork area can neither endorse nor recommend the use on your vehicle. These accessories may find aftermarket products similar in the vehicle. Keep the following...
... attached to genuine Yamaha accessories, recognize that change any way reduce ground clearance or cornering clearance, limit suspension travel, steering travel or control operation, or obscure lights or reflectors. • Accessories fitted to the handlebar or the front fork area can neither endorse nor recommend the use on your vehicle. These accessories may find aftermarket products similar in the vehicle. Keep the following...
Owners Manual
Page 14
... fuel leaks. Point the front wheel straight ahead on the trailer or in the truck bed, and choke it in a rail to observe following instructions before transporting the motorcycle in gear (for tire specifications and more information on replacing your motorcycle were designed to match the performance capabilities and to provide the best combination of lights or engine power. ● ● ● 2 ● ● Aftermarket Tires...
... fuel leaks. Point the front wheel straight ahead on the trailer or in the truck bed, and choke it in a rail to observe following instructions before transporting the motorcycle in gear (for tire specifications and more information on replacing your motorcycle were designed to match the performance capabilities and to provide the best combination of lights or engine power. ● ● ● 2 ● ● Aftermarket Tires...

Owners Manual
Page 16
DESCRIPTION EAU10420 Right view 1 2,3 4 5 6 7 3 11 1. 2. 3. 4. 5. 6. 7. 8. Engine oil filter cartridge (page 7-11) 10.Brake pedal (page 4-9) 11.Coolant reservoir (page 7-14) Rear brake fluid reservoir (page 7-21) Owner's tool kit (page 7-2) Battery (page 7-28) Shock absorber assembly spring preload adjusting ring (page 4-14) Spark plug (page 7-9) Fuel tank cap (page 4-10) Air filter element (page 7-15) Rear brake light switch (page 7-20) 3-2 10 98 9.
DESCRIPTION EAU10420 Right view 1 2,3 4 5 6 7 3 11 1. 2. 3. 4. 5. 6. 7. 8. Engine oil filter cartridge (page 7-11) 10.Brake pedal (page 4-9) 11.Coolant reservoir (page 7-14) Rear brake fluid reservoir (page 7-21) Owner's tool kit (page 7-2) Battery (page 7-28) Shock absorber assembly spring preload adjusting ring (page 4-14) Spark plug (page 7-9) Fuel tank cap (page 4-10) Air filter element (page 7-15) Rear brake light switch (page 7-20) 3-2 10 98 9.
Owners Manual
Page 19
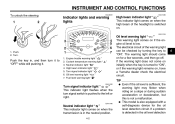
... light " " Turn signal indicator light " " Oil level warning light " " Fuel level warning light " " " 1. If the warning light does not come on for the oil level detection circuit. TIP ● 4 EAU11020 Turn signal indicator light " " This indicator light flashes when the turn it . EAU11060 ● Neutral indicator light " " This indicator light comes on when the transmission is in the neutral position. 4-2 Even if the oil level is not a malfunction. Push. 2. INSTRUMENT AND CONTROL FUNCTIONS To unlock the steering...
... light " " Turn signal indicator light " " Oil level warning light " " Fuel level warning light " " " 1. If the warning light does not come on for the oil level detection circuit. TIP ● 4 EAU11020 Turn signal indicator light " " This indicator light flashes when the turn it . EAU11060 ● Neutral indicator light " " This indicator light comes on when the transmission is in the neutral position. 4-2 Even if the oil level is not a malfunction. Push. 2. INSTRUMENT AND CONTROL FUNCTIONS To unlock the steering...

Owners Manual
Page 24
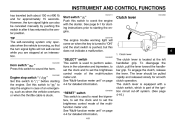
... " ". Turn signal switch " / " 3. To signal a left-hand turn, push this switch to " " for the low beam. EAU12430 Turn signal switch " / " To signal a right-hand turn signal lights will change to "ON", and then release the "SELECT" switch after the vehicle 4-7 INSTRUMENT AND CONTROL FUNCTIONS 3. The display will self-cancel after five seconds. 4. Adjust the multi-function meter unit panel brightness level by pushing the "SELECT" switch. 5. Dimmer switch " / " 2. Engine stop switch " "SELECT" switch "RESET" switch Start switch " " / " 2 3 1. Since...
... " ". Turn signal switch " / " 3. To signal a left-hand turn, push this switch to " " for the low beam. EAU12430 Turn signal switch " / " To signal a right-hand turn signal lights will change to "ON", and then release the "SELECT" switch after the vehicle 4-7 INSTRUMENT AND CONTROL FUNCTIONS 3. The display will self-cancel after five seconds. 4. Adjust the multi-function meter unit panel brightness level by pushing the "SELECT" switch. 5. Dimmer switch " / " 2. Engine stop switch " "SELECT" switch "RESET" switch Start switch " " / " 2 3 1. Since...
Owners Manual
Page 25
... when the vehicle is moving, so that the turn signal lights can also be pulled rapidly and released slowly for smooth clutch operation. EAU41700 Clutch lever 1 The engine trouble warning light will not self-cancel while you are stopped at the left handlebar grip. EAU12500 EAU12711 EAU12820 Start switch " " Push this switch to the center position. The clutch lever is equipped with the starter. Set this...
... when the vehicle is moving, so that the turn signal lights can also be pulled rapidly and released slowly for smooth clutch operation. EAU41700 Clutch lever 1 The engine trouble warning light will not self-cancel while you are stopped at the left handlebar grip. EAU12500 EAU12711 EAU12820 Start switch " " Push this switch to the center position. The clutch lever is equipped with the starter. Set this...

Owners Manual
Page 32
INSTRUMENT AND CONTROL FUNCTIONS EWA10221 EAU15305 1 2 9 7 8 5 6 3 4 1 2 WARNING This shock absorber assembly contains highly pressurized nitrogen gas. Read and understand the following section for any way. Raise the sidestand or lower it with the position indicator on the left side of the ignition circuit cut-off . Cylinder damage will result in a possible loss of a damaged or worn-out shock absorber assembly yourself. Spring preload setting...
INSTRUMENT AND CONTROL FUNCTIONS EWA10221 EAU15305 1 2 9 7 8 5 6 3 4 1 2 WARNING This shock absorber assembly contains highly pressurized nitrogen gas. Read and understand the following section for any way. Raise the sidestand or lower it with the position indicator on the left side of the ignition circuit cut-off . Cylinder damage will result in a possible loss of a damaged or worn-out shock absorber assembly yourself. Spring preload setting...
Owners Manual
Page 38
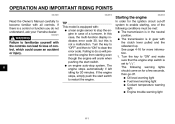
... Starting the engine Read the Owner's Manual carefully to become familiar with the controls can lead to loss of a turnover. If there is equipped with: ● a lean angle sensor to stop switch is not a malfunction. In order for 20 minutes. The engine stops automatically if left idling for the ignition circuit cut-off . ● Oil level warning light ● Fuel level warning light ● Coolant temperature warning light ● Engine trouble warning light...
... Starting the engine Read the Owner's Manual carefully to become familiar with the controls can lead to loss of a turnover. If there is equipped with: ● a lean angle sensor to stop switch is not a malfunction. In order for 20 minutes. The engine stops automatically if left idling for the ignition circuit cut-off . ● Oil level warning light ● Fuel level warning light ● Coolant temperature warning light ● Engine trouble warning light...
Owners Manual
Page 39
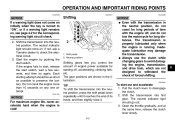
... the key is turned to disengage the clutch. 2. Each starting off , and do not coast for long distances. Inadequate lubrication may damage the transmission. Pull the clutch lever to "ON", or if a warning light remains on any one attempt. EAU16681 6 NOTICE For maximum engine life, never accelerate hard when the engine is running. Shift the transmission into first gear. Neutral position ● Shifting gears lets you control the...
... the key is turned to disengage the clutch. 2. Each starting off , and do not coast for long distances. Inadequate lubrication may damage the transmission. Pull the clutch lever to "ON", or if a warning light remains on any one attempt. EAU16681 6 NOTICE For maximum engine life, never accelerate hard when the engine is running. Shift the transmission into first gear. Neutral position ● Shifting gears lets you control the...

Owners Manual
Page 42
... with vehicle service, have a Yamaha dealer perform service. If you are trained and equipped to perform these particular services. 7 WARNING Failure to properly maintain the vehicle or performing maintenance activities incorrectly may be performed by any repair establishment or individual that can cause shocks or fires. ● Running the engine while servicing can become very hot during service or while using the vehicle. However, depending on body parts or clothing and electrical...
... with vehicle service, have a Yamaha dealer perform service. If you are trained and equipped to perform these particular services. 7 WARNING Failure to properly maintain the vehicle or performing maintenance activities incorrectly may be performed by any repair establishment or individual that can cause shocks or fires. ● Running the engine while servicing can become very hot during service or while using the vehicle. However, depending on body parts or clothing and electrical...

Owners Manual
Page 56
Have a Yamaha dealer change the coolant. Install the panel. 7-15 Guide 2. WARNING! Bolt 2. Coolant reservoir cap Coolant reservoir capacity (up to the maximum level mark): 0.45 L (0.48 US qt, 0.40 Imp.qt) Changing the coolant The coolant must be reduced. [ECA10472] EAU42442 TIP Make sure that the coolant reservoir breather hose is hot. [EWA10381] 1. Air filter case cover 2. Remove the air filter case cover by removing the bolts. 1 2 1. Never attempt to the coolant, have a Yamaha dealer...
Have a Yamaha dealer change the coolant. Install the panel. 7-15 Guide 2. WARNING! Bolt 2. Coolant reservoir cap Coolant reservoir capacity (up to the maximum level mark): 0.45 L (0.48 US qt, 0.40 Imp.qt) Changing the coolant The coolant must be reduced. [ECA10472] EAU42442 TIP Make sure that the coolant reservoir breather hose is hot. [EWA10381] 1. Air filter case cover 2. Remove the air filter case cover by removing the bolts. 1 2 1. Never attempt to the coolant, have a Yamaha dealer...

Owners Manual
Page 61
... presence of control and an accident. No brake lever free play 1 braking performance, which is activated by a Yamaha dealer. EWA14211 WARNING A soft or spongy feeling in direction (b). 7 7-20 Turn the rear brake light switch adjusting nut while holding the rear brake light switch in direction (a). PERIODIC MAINTENANCE AND ADJUSTMENT EAU37913 Checking the brake lever free play 1. If necessary, adjust the rear brake light switch as follows, but the front brake light switch should be...
... presence of control and an accident. No brake lever free play 1 braking performance, which is activated by a Yamaha dealer. EWA14211 WARNING A soft or spongy feeling in direction (b). 7 7-20 Turn the rear brake light switch adjusting nut while holding the rear brake light switch in direction (a). PERIODIC MAINTENANCE AND ADJUSTMENT EAU37913 Checking the brake lever free play 1. If necessary, adjust the rear brake light switch as follows, but the front brake light switch should be...

Owners Manual
Page 71
Signaling system fuse Ignition fuse Taillight fuse Radiator fan fuse Backup fuse (for the individual circuits, are located under the seat. (See page 4-13.) 2 1 3 1 2 3 4 1. 2. 3. 4. 5. 6. 7. Remove the blown fuse, and then install a new fuse of a higher amperage rating than recommended to avoid causing extensive damage to "OFF" and turn off the electrical circuit in question. 2. PERIODIC MAINTENANCE AND ADJUSTMENT EAU50810 Replacing the fuses The main fuse, the fuel injection system fuse, and the...
Signaling system fuse Ignition fuse Taillight fuse Radiator fan fuse Backup fuse (for the individual circuits, are located under the seat. (See page 4-13.) 2 1 3 1 2 3 4 1. 2. 3. 4. 5. 6. 7. Remove the blown fuse, and then install a new fuse of a higher amperage rating than recommended to avoid causing extensive damage to "OFF" and turn off the electrical circuit in question. 2. PERIODIC MAINTENANCE AND ADJUSTMENT EAU50810 Replacing the fuses The main fuse, the fuel injection system fuse, and the...

Owners Manual
Page 83
... ˚C Fuel: Recommended fuel: Unleaded gasoline (Gasohol (E10) acceptable) Fuel tank capacity: 15.0 L (3.96 US gal, 3.30 Imp.gal) Fuel reserve amount: 5.0 L (1.32 US gal, 1.10 Imp.gal) Fuel injection: Throttle body: ID mark: XVS13CD 3D8D 40 XVS13CDC 3D8E 50 Spark plug(s): Manufacturer/model: NGK/LMAR7A-9 Spark plug gap: 0.8-0.9 mm (0.031-0.035 in) Weight: Curb weight: 293 kg (646 lb) Engine: Engine type: Liquid cooled 4-stroke, SOHC Cylinder arrangement: V-type 2-cylinder Displacement...
... ˚C Fuel: Recommended fuel: Unleaded gasoline (Gasohol (E10) acceptable) Fuel tank capacity: 15.0 L (3.96 US gal, 3.30 Imp.gal) Fuel reserve amount: 5.0 L (1.32 US gal, 1.10 Imp.gal) Fuel injection: Throttle body: ID mark: XVS13CD 3D8D 40 XVS13CDC 3D8E 50 Spark plug(s): Manufacturer/model: NGK/LMAR7A-9 Spark plug gap: 0.8-0.9 mm (0.031-0.035 in) Weight: Curb weight: 293 kg (646 lb) Engine: Engine type: Liquid cooled 4-stroke, SOHC Cylinder arrangement: V-type 2-cylinder Displacement...

Owners Manual
Page 85
....0 A Ignition fuse: 15.0 A Radiator fan fuse: 20.0 A Fuel injection system fuse: 10.0 A Backup fuse: 10.0 A Bulb voltage, wattage × quantity: Headlight: 12 V, 60.0 W/55.0 W × 1 Tail/brake light: LED Front turn signal/position light: 12 V, 23.0 W/8.0 W × 2 Rear turn signal light: 12 V, 21.0 W × 2 License plate light: 12 V, 3.4 W × 2 Meter lighting: LED Neutral indicator light: LED High beam indicator light: LED Oil level warning light: LED Turn signal indicator light: LED Fuel level warning light: LED Coolant temperature warning light: LED Engine trouble warning light...
....0 A Ignition fuse: 15.0 A Radiator fan fuse: 20.0 A Fuel injection system fuse: 10.0 A Backup fuse: 10.0 A Bulb voltage, wattage × quantity: Headlight: 12 V, 60.0 W/55.0 W × 1 Tail/brake light: LED Front turn signal/position light: 12 V, 23.0 W/8.0 W × 2 Rear turn signal light: 12 V, 21.0 W × 2 License plate light: 12 V, 3.4 W × 2 Meter lighting: LED Neutral indicator light: LED High beam indicator light: LED Oil level warning light: LED Turn signal indicator light: LED Fuel level warning light: LED Coolant temperature warning light: LED Engine trouble warning light...
Owners Manual
Page 92
... WARRANTY GIVES YOU SPECIFIC LEGAL RIGHTS, AND YOU MAY ALSO HAVE OTHER RIGHTS WHICH VARY FROM STATE TO STATE. Parts used for Yamaha motorcycles originally equipped with headlight, stoplight, and turn signals shall be one (1) year from the original purchaser to any failures caused by an authorized Yamaha motorcycle dealer. Give notice to remain in the appropriate Owner's Manual...
... WARRANTY GIVES YOU SPECIFIC LEGAL RIGHTS, AND YOU MAY ALSO HAVE OTHER RIGHTS WHICH VARY FROM STATE TO STATE. Parts used for Yamaha motorcycles originally equipped with headlight, stoplight, and turn signals shall be one (1) year from the original purchaser to any failures caused by an authorized Yamaha motorcycle dealer. Give notice to remain in the appropriate Owner's Manual...
Owners Manual
Page 93
... names, addresses, model, V.I perform any specific questions on operation or maintenance, please contact your purchase. Each Yamaha motorcycle dealer is held responsible for the policy to a failure? Explain the operation, maintenance, and warranty requirements to -date list of all costs of normal maintenance services, non-warranty repairs, accident and collision damages, and oil, oil filters, air filters, spark plugs, and brake shoes. The unit has to be covered under this...
... names, addresses, model, V.I perform any specific questions on operation or maintenance, please contact your purchase. Each Yamaha motorcycle dealer is held responsible for the policy to a failure? Explain the operation, maintenance, and warranty requirements to -date list of all costs of normal maintenance services, non-warranty repairs, accident and collision damages, and oil, oil filters, air filters, spark plugs, and brake shoes. The unit has to be covered under this...

Owners Manual
Page 96
... switches ...7-20 Brake pedal...4-9 Fuel...4-10 Fuel level warning light ...4-3 Fuel tank breather/overflow hose ...4-12 Fuel tank cap ...4-10 Fuses, replacing ...7-30 P Panel, removing and installing ...7-9 Parking ...6-4 Part locations ...3-1 R Rear suspension, lubricating...7-26 RESET switch ...4-8 H Handlebar switches ...4-7 Headlight bulb, replacing ...7-31 Helmet holder ...4-14 High beam indicator light ...4-2 Horn switch...4-8 S Safety defects, reporting ...10-3 Safety information ...2-1 Seat...4-13 SELECT switch ...4-8 Shifting ...6-2 Shift pedal ...4-9 Shock absorber assembly...
... switches ...7-20 Brake pedal...4-9 Fuel...4-10 Fuel level warning light ...4-3 Fuel tank breather/overflow hose ...4-12 Fuel tank cap ...4-10 Fuses, replacing ...7-30 P Panel, removing and installing ...7-9 Parking ...6-4 Part locations ...3-1 R Rear suspension, lubricating...7-26 RESET switch ...4-8 H Handlebar switches ...4-7 Headlight bulb, replacing ...7-31 Helmet holder ...4-14 High beam indicator light ...4-2 Horn switch...4-8 S Safety defects, reporting ...10-3 Safety information ...2-1 Seat...4-13 SELECT switch ...4-8 Shifting ...6-2 Shift pedal ...4-9 Shock absorber assembly...