
Owners Manual
Page 6
... ...7-23 Lubricating the rear suspension ...7-24 Checking the front fork ...7-24 Checking the steering ...7-25 Checking the wheel bearings ...7-25 Battery ...7-25 Replacing the fuses ...7-27 Replacing a headlight bulb ...7-28 Tail/brake light ...7-30 Replacing a turn signal light bulb ...7-30 TABLE OF CONTENTS LOCATION OF IMPORTANT LABELS ...1-1 SAFETY INFORMATION ...2-1 DESCRIPTION ...3-1 Left view ...3-1 Right view ...3-2 Controls and instruments...3-3 INSTRUMENT AND CONTROL FUNCTIONS ...4-1 Main switch/steering lock ...4-1 Indicator lights and warning lights ...4-2 Multi-function meter...
... ...7-23 Lubricating the rear suspension ...7-24 Checking the front fork ...7-24 Checking the steering ...7-25 Checking the wheel bearings ...7-25 Battery ...7-25 Replacing the fuses ...7-27 Replacing a headlight bulb ...7-28 Tail/brake light ...7-30 Replacing a turn signal light bulb ...7-30 TABLE OF CONTENTS LOCATION OF IMPORTANT LABELS ...1-1 SAFETY INFORMATION ...2-1 DESCRIPTION ...3-1 Left view ...3-1 Right view ...3-2 Controls and instruments...3-3 INSTRUMENT AND CONTROL FUNCTIONS ...4-1 Main switch/steering lock ...4-1 Indicator lights and warning lights ...4-2 Multi-function meter...
Owners Manual
Page 13
... to the handlebar, front fork, or front fender. Here, along with no connection to the motorcycle as windows and doors. Check accessory mounts and cargo restraints frequently. • Properly adjust the suspension for your load (suspension-adjustable models only), and check the condition and pressure of your motorcycle: The total weight of the operator, passenger, accessories and cargo must not exceed the maximum...
... to the handlebar, front fork, or front fender. Here, along with no connection to the motorcycle as windows and doors. Check accessory mounts and cargo restraints frequently. • Properly adjust the suspension for your load (suspension-adjustable models only), and check the condition and pressure of your motorcycle: The total weight of the operator, passenger, accessories and cargo must not exceed the maximum...
Owners Manual
Page 14
... to you and others . If electrical accessories exceed the capacity of the motorcycle's electrical system, an electric failure could result, which could cause a dangerous loss of lights or engine power. ● 2 Aftermarket Tires and Rims The tires and rims that would impair the performance of potential safety hazards to the handlebar or front fork area, they must be appropriate. Other tires, rims, sizes, and combinations may also cause...
... to you and others . If electrical accessories exceed the capacity of the motorcycle's electrical system, an electric failure could result, which could cause a dangerous loss of lights or engine power. ● 2 Aftermarket Tires and Rims The tires and rims that would impair the performance of potential safety hazards to the handlebar or front fork area, they must be appropriate. Other tires, rims, sizes, and combinations may also cause...
Owners Manual
Page 17
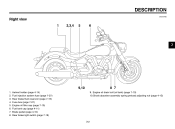
Helmet holder (page 4-14) Fuel injection system fuse (page 7-27) Rear brake fluid reservoir (page 7-19) Fuse box (page 7-27) Engine oil filler cap (page 7-10) Fuel tank cap (page 4-11) Brake pedal (page 4-10) Rear brake light switch (page 7-18) 3-2 8 7 9. Engine oil drain bolt (oil tank) (page 7-10) 10.Shock absorber assembly spring preload adjusting nut (page 4-15) DESCRIPTION EAU10420 Right view 1 2,3,4 5 6 3 9,10 1. 2. 3. 4. 5. 6. 7. 8.
Helmet holder (page 4-14) Fuel injection system fuse (page 7-27) Rear brake fluid reservoir (page 7-19) Fuse box (page 7-27) Engine oil filler cap (page 7-10) Fuel tank cap (page 4-11) Brake pedal (page 4-10) Rear brake light switch (page 7-18) 3-2 8 7 9. Engine oil drain bolt (oil tank) (page 7-10) 10.Shock absorber assembly spring preload adjusting nut (page 4-15) DESCRIPTION EAU10420 Right view 1 2,3,4 5 6 3 9,10 1. 2. 3. 4. 5. 6. 7. 8.
Owners Manual
Page 19
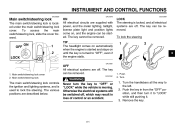
TIP The headlight comes on automatically when the engine is started . To lock the steering 1 2 4 1. The key can be removed. Push. 2. Remove the key. 4-1 The key can be removed. Main switch/steering lock cover 2. Main switch/steering lock OFF All electrical systems are off . The main switch/steering lock controls the ignition and lighting systems, and is used to "OFF" or "LOCK" while the vehicle is locked, and all the way to "LOCK" while still pushing it. 3. To...
TIP The headlight comes on automatically when the engine is started . To lock the steering 1 2 4 1. The key can be removed. Push. 2. Remove the key. 4-1 The key can be removed. Main switch/steering lock cover 2. Main switch/steering lock OFF All electrical systems are off . The main switch/steering lock controls the ignition and lighting systems, and is used to "OFF" or "LOCK" while the vehicle is locked, and all the way to "LOCK" while still pushing it. 3. To...
Owners Manual
Page 20
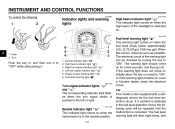
... headlight is switched on , have a Yamaha dealer check the electrical circuit. TIP This model is also equipped with a selfdiagnosis device for a few seconds, and then go off. Neutral indicator light " " High beam indicator light " " Right turn signal indicator light " " Left turn signal indicator light " " Engine trouble warning light " " Fuel level warning light " " EAU11030 Turn signal indicator lights " " and " " The corresponding indicator light flashes when the turn it to "OFF" while still pushing it. 1. 2. 3. 4. 5. 6. EAU11060 Fuel level warning light...
... headlight is switched on , have a Yamaha dealer check the electrical circuit. TIP This model is also equipped with a selfdiagnosis device for a few seconds, and then go off. Neutral indicator light " " High beam indicator light " " Right turn signal indicator light " " Left turn signal indicator light " " Engine trouble warning light " " Fuel level warning light " " EAU11030 Turn signal indicator lights " " and " " The corresponding indicator light flashes when the turn it to "OFF" while still pushing it. 1. 2. 3. 4. 5. 6. EAU11060 Fuel level warning light...
Owners Manual
Page 27
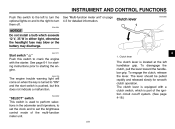
... perform selections in either light, otherwise the headlight fuse may blow or the battery may discharge. EAU12820 Clutch lever NOTICE Do not install a bulb which is part of the multi-function meter unit. 4-9 The clutch lever is pushed, but this switch to the left handlebar grip. ECA15321 See "Multi-function meter unit" on when the key is turned to starting the engine. INSTRUMENT AND CONTROL...
... perform selections in either light, otherwise the headlight fuse may blow or the battery may discharge. EAU12820 Clutch lever NOTICE Do not install a bulb which is part of the multi-function meter unit. 4-9 The clutch lever is pushed, but this switch to the left handlebar grip. ECA15321 See "Multi-function meter unit" on when the key is turned to starting the engine. INSTRUMENT AND CONTROL...

Owners Manual
Page 30
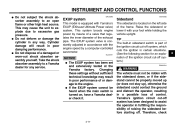
... a lot of leaded gasoline will extend spark plug life and reduce maintenance costs. Handle gasoline with a clean, dry, soft cloth, since fuel may deteriorate painted surfaces or plastic parts. [ECA10071] 4. Maximum fuel level 3. Fuel tank filler tube 2. EWA15151 Recommended fuel: Premium unleaded gasoline only Fuel tank capacity: 17.0 L (4.49 US gal, 3.74 Imp.gal) Fuel reserve amount (when the fuel level warning light comes on): 3.0 L (0.79 US gal...
... a lot of leaded gasoline will extend spark plug life and reduce maintenance costs. Handle gasoline with a clean, dry, soft cloth, since fuel may deteriorate painted surfaces or plastic parts. [ECA10071] 4. Maximum fuel level 3. Fuel tank filler tube 2. EWA15151 Recommended fuel: Premium unleaded gasoline only Fuel tank capacity: 17.0 L (4.49 US gal, 3.74 Imp.gal) Fuel reserve amount (when the fuel level warning light comes on): 3.0 L (0.79 US gal...
Owners Manual
Page 35
... the engine. This may result in sidestand switch is located on , have a Yamaha dealer check it with the engine speed by means of a valve that regulates the inner diameter of control. ECA10191 Sidestand The sidestand is part of raising the sidestand before starting off system, which cuts the ignition in poor damping performance. WARNING The vehicle must not be ridden with Yamaha's EXUP (EXhaust Ultimate Power valve...
... the engine. This may result in sidestand switch is located on , have a Yamaha dealer check it with the engine speed by means of a valve that regulates the inner diameter of control. ECA10191 Sidestand The sidestand is part of raising the sidestand before starting off system, which cuts the ignition in poor damping performance. WARNING The vehicle must not be ridden with Yamaha's EXUP (EXhaust Ultimate Power valve...

Owners Manual
Page 42
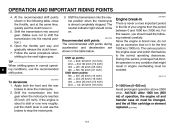
... equipped with all controls. OPERATION AND IMPORTANT RIDING POINTS EAU15951 EAU47150 EAU16247 Starting the engine Read the Owner's Manual carefully to become familiar with : ● a lean angle sensor to stop the engine in case of a turnover. Turn the key to "OFF" and then to "ON" to " ". The following conditions must be met: ● The transmission is in gear with the clutch lever pulled...
... equipped with all controls. OPERATION AND IMPORTANT RIDING POINTS EAU15951 EAU47150 EAU16247 Starting the engine Read the Owner's Manual carefully to become familiar with : ● a lean angle sensor to stop the engine in case of a turnover. Turn the key to "OFF" and then to "ON" to " ". The following conditions must be met: ● The transmission is in gear with the clutch lever pulled...

Owners Manual
Page 43
... the engine, transmission, and drive train, which are shown in the neutral position, do not coast for long periods of engine power available for long distances. OPERATION AND IMPORTANT RIDING POINTS 2. Shift the transmission into the neutral position. Shift pedal 2. If not, ask a Yamaha dealer to disengage the clutch. 2. Start the engine by pushing the start switch. Open the throttle gradually, and at the same time, release the clutch lever...
... the engine, transmission, and drive train, which are shown in the neutral position, do not coast for long periods of engine power available for long distances. OPERATION AND IMPORTANT RIDING POINTS 2. Shift the transmission into the neutral position. Shift pedal 2. If not, ask a Yamaha dealer to disengage the clutch. 2. Start the engine by pushing the start switch. Open the throttle gradually, and at the same time, release the clutch lever...
Owners Manual
Page 44
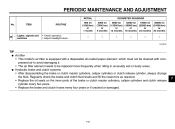
OPERATION AND IMPORTANT RIDING POINTS 4. TIP When shifting gears in normal operating conditions, use the brakes to stall or runs very roughly, pull the clutch lever in the life of operation, the engine oil and transfer case oil must be changed, and the oil filter cartridge or element replaced. [ECA10892] 6-3 Shift the transmission into the neutral position.) 6. Since the engine is never a more important period in and use...
OPERATION AND IMPORTANT RIDING POINTS 4. TIP When shifting gears in normal operating conditions, use the brakes to stall or runs very roughly, pull the clutch lever in the life of operation, the engine oil and transfer case oil must be changed, and the oil filter cartridge or element replaced. [ECA10892] 6-3 Shift the transmission into the neutral position.) 6. Since the engine is never a more important period in and use...
Owners Manual
Page 53
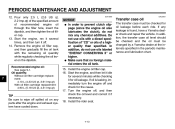
... the brake and clutch fluid levels and fill the reservoirs as required. • Replace the oil seals on the inner parts of the brake or clutch master cylinders, caliper cylinders and clutch release cylinder every two years. • Replace the brake and clutch hoses every four years or if cracked or damaged. 7 7-8 Hydraulic brake and clutch systems • After disassembling the brake or clutch master cylinders, caliper cylinders or clutch release cylinder, always change the fluid. PERIODIC MAINTENANCE...
... the brake and clutch fluid levels and fill the reservoirs as required. • Replace the oil seals on the inner parts of the brake or clutch master cylinders, caliper cylinders and clutch release cylinder every two years. • Replace the brake and clutch hoses every four years or if cracked or damaged. 7 7-8 Hydraulic brake and clutch systems • After disassembling the brake or clutch master cylinders, caliper cylinders or clutch release cylinder, always change the fluid. PERIODIC MAINTENANCE...
Owners Manual
Page 58
... parts after the engine and exhaust system have a Yamaha dealer check and repair the vehicle. Do not use oils labeled "ENERGY CONSERVING II" or higher. Turn the engine off . 14. PERIODIC MAINTENANCE AND ADJUSTMENT 12. Install the engine oil filler cap. 16. Install the rider seat. 7-13 In addition, the transfer case oil level should be checked and the oil must be changed by a Yamaha dealer at...
... parts after the engine and exhaust system have a Yamaha dealer check and repair the vehicle. Do not use oils labeled "ENERGY CONSERVING II" or higher. Turn the engine off . 14. PERIODIC MAINTENANCE AND ADJUSTMENT 12. Install the engine oil filler cap. 16. Install the rider seat. 7-13 In addition, the transfer case oil level should be checked and the oil must be changed by a Yamaha dealer at...
Owners Manual
Page 72
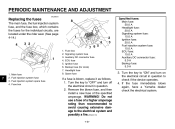
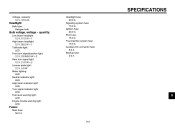
... Yamaha dealer check the electrical system. Main fuse Fuel injection system fuse Fuel injection system spare fuse Fuse box 1. 2. 3. 4. 5. 6. 7. 8. WARNING! PERIODIC MAINTENANCE AND ADJUSTMENT EAU38373 Replacing the fuses The main fuse, the fuel injection system fuse, and the fuse box, which contains the fuses for clock) Headlight fuse Spare fuse Specified fuses: Main fuse: 50.0 A Headlight fuse: 20.0 A Signaling system fuse: 15.0 A Ignition fuse: 20.0 A Fuel injection system fuse: 15.0 A ECU fuse: 15.0 A Auxiliary DC connector fuse: 5.0 A Backup fuse: 5.0 A If a fuse is blown, replace...
... Yamaha dealer check the electrical system. Main fuse Fuel injection system fuse Fuel injection system spare fuse Fuse box 1. 2. 3. 4. 5. 6. 7. 8. WARNING! PERIODIC MAINTENANCE AND ADJUSTMENT EAU38373 Replacing the fuses The main fuse, the fuel injection system fuse, and the fuse box, which contains the fuses for clock) Headlight fuse Spare fuse Specified fuses: Main fuse: 50.0 A Headlight fuse: 20.0 A Signaling system fuse: 15.0 A Ignition fuse: 20.0 A Fuel injection system fuse: 15.0 A ECU fuse: 15.0 A Auxiliary DC connector fuse: 5.0 A Backup fuse: 5.0 A If a fuse is blown, replace...
Owners Manual
Page 83
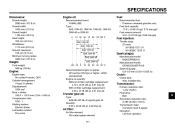
...) Fuel injection: Throttle body: ID mark: XV19SB 1D71 01 XV19SBC 1D72 11 Spark plug(s): Manufacturer/model: NGK/DPR8EA-9 Manufacturer/model: DENSO/X24EPR-U9 Spark plug gap: 0.8-0.9 mm (0.031-0.035 in) Weight: Curb weight: 340 kg (750 lb) Engine: Engine type: Air cooled 4-stroke, OHV Cylinder arrangement: V-type 2-cylinder Displacement: 1854 cm³ Bore × stroke: 100.0 × 118.0 mm (3.94 × 4.65 in) Compression ratio: 9.50 : 1 Starting system: Electric starter Lubrication...
...) Fuel injection: Throttle body: ID mark: XV19SB 1D71 01 XV19SBC 1D72 11 Spark plug(s): Manufacturer/model: NGK/DPR8EA-9 Manufacturer/model: DENSO/X24EPR-U9 Spark plug gap: 0.8-0.9 mm (0.031-0.035 in) Weight: Curb weight: 340 kg (750 lb) Engine: Engine type: Air cooled 4-stroke, OHV Cylinder arrangement: V-type 2-cylinder Displacement: 1854 cm³ Bore × stroke: 100.0 × 118.0 mm (3.94 × 4.65 in) Compression ratio: 9.50 : 1 Starting system: Electric starter Lubrication...
Owners Manual
Page 85
..., capacity: 12 V, 12.0 Ah Headlight: Bulb type: Halogen bulb Bulb voltage, wattage × quantity: Low beam headlight: 12 V, 51.0 W × 1 High beam headlight: 12 V, 55.0 W × 1 Tail/brake light: LED Front turn signal/position light: 12 V, 23 W/8.0 W × 2 Rear turn signal light: 12 V, 21.0 W × 2 License plate light: 12 V, 5.0 W Meter lighting: LED Neutral indicator light: LED High beam indicator light: LED Turn signal indicator light: LED Fuel level warning light: LED Engine trouble warning light: LED Headlight fuse: 20.0 A Signaling system fuse: 15.0 A Ignition fuse: 20...
..., capacity: 12 V, 12.0 Ah Headlight: Bulb type: Halogen bulb Bulb voltage, wattage × quantity: Low beam headlight: 12 V, 51.0 W × 1 High beam headlight: 12 V, 55.0 W × 1 Tail/brake light: LED Front turn signal/position light: 12 V, 23 W/8.0 W × 2 Rear turn signal light: 12 V, 21.0 W × 2 License plate light: 12 V, 5.0 W Meter lighting: LED Neutral indicator light: LED High beam indicator light: LED Turn signal indicator light: LED Fuel level warning light: LED Engine trouble warning light: LED Headlight fuse: 20.0 A Signaling system fuse: 15.0 A Ignition fuse: 20...
Owners Manual
Page 92
...-7 THE PERIOD OF WARRANTY for non-Yamaha-authorized renting, leasing or other than those used in the appropriate Owner's Manual, and 2. d) Lack of charge, repair or replace any failures caused by this service. STREET AND ENDURO MOTORCYCLE LIMITED WARRANTY Yamaha Motor Corporation, U.S.A. Parts used for Yamaha motorcycles originally equipped with headlight, stoplight, and turn signals shall be charged for inspection and repairs at the time of purchase...
...-7 THE PERIOD OF WARRANTY for non-Yamaha-authorized renting, leasing or other than those used in the appropriate Owner's Manual, and 2. d) Lack of charge, repair or replace any failures caused by this service. STREET AND ENDURO MOTORCYCLE LIMITED WARRANTY Yamaha Motor Corporation, U.S.A. Parts used for Yamaha motorcycles originally equipped with headlight, stoplight, and turn signals shall be charged for inspection and repairs at the time of purchase...

Owners Manual
Page 93
... and/or tie-down. The warranty is limited to repair of oil, sustained high rpm, full-throttle, operating the machine with federal law. 10 10-8 Yes, if you have any specific questions on your warranty card, your new motorcycle, please advise us of normal maintenance services, non-warranty repairs, accident and collision damages, and oil, oil filters, air filters, spark plugs, and brake shoes. Q. A. What responsibility does my...
... and/or tie-down. The warranty is limited to repair of oil, sustained high rpm, full-throttle, operating the machine with federal law. 10 10-8 Yes, if you have any specific questions on your warranty card, your new motorcycle, please advise us of normal maintenance services, non-warranty repairs, accident and collision damages, and oil, oil filters, air filters, spark plugs, and brake shoes. Q. A. What responsibility does my...
Owners Manual
Page 96
...Fuel level warning light ...4-2 Fuel tank breather/overflow hose ...4-13 Fuel tank cap ...4-11 Fuses, replacing ...7-27 P Parking ...6-4 Part locations ...3-1 B Battery...7-25 Brake and clutch fluid levels, checking ...7-19 Brake and clutch fluids, changing ...7-20 Brake and clutch levers, checking and lubricating ...7-23 Brake and shift pedals, checking and lubricating ...7-22 Brake lever...4-10 Brake lever free play, checking...7-17 Brake light switches ...7-18 Brake pedal...4-10 R Rear suspension, lubricating...7-24 Rider seat...4-14 H Handlebar switches ...4-8 Headlight bulb, replacing...
...Fuel level warning light ...4-2 Fuel tank breather/overflow hose ...4-13 Fuel tank cap ...4-11 Fuses, replacing ...7-27 P Parking ...6-4 Part locations ...3-1 B Battery...7-25 Brake and clutch fluid levels, checking ...7-19 Brake and clutch fluids, changing ...7-20 Brake and clutch levers, checking and lubricating ...7-23 Brake and shift pedals, checking and lubricating ...7-22 Brake lever...4-10 Brake lever free play, checking...7-17 Brake light switches ...7-18 Brake pedal...4-10 R Rear suspension, lubricating...7-24 Rider seat...4-14 H Handlebar switches ...4-8 Headlight bulb, replacing...