

Owners Manual
Page 5
.../pressure warning indicator (RS90P / RS90PLT / RST90PGT) ...22 Coolant temperature warning indicator ...23 Electric power steering warning indicator "EPS" (RS90P / RS90PLT / RST90PGT) ...23 Self-diagnosis device ...23 Engine stop switch ...24 Headlight beam switch "LIGHTS" ...24 Grip/thumb warmer adjusting switch ...24 Auxiliary DC jack ...25 Helmet shield heater jack (RS90P / RS90PLT / RST90PGT) ...26 Brake lever ...26 Parking brake lever ...27 Shift lever ...27 Drive guard ...28 V-belt holders ...Passenger grips (RST90PGT) ...Passenger grip warmer switch (RST90 / RST90PGT) ...Passenger...
.../pressure warning indicator (RS90P / RS90PLT / RST90PGT) ...22 Coolant temperature warning indicator ...23 Electric power steering warning indicator "EPS" (RS90P / RS90PLT / RST90PGT) ...23 Self-diagnosis device ...23 Engine stop switch ...24 Headlight beam switch "LIGHTS" ...24 Grip/thumb warmer adjusting switch ...24 Auxiliary DC jack ...25 Helmet shield heater jack (RS90P / RS90PLT / RST90PGT) ...26 Brake lever ...26 Parking brake lever ...27 Shift lever ...27 Drive guard ...28 V-belt holders ...Passenger grips (RST90PGT) ...Passenger grip warmer switch (RST90 / RST90PGT) ...Passenger...

Owners Manual
Page 6
... Drive chain housing ...91 Brake and parking brake ...93 Extrovert drive sprocket (RS90P / RS90PLT / RST90PGT) ...95 Skis and ski runners ...96 Steering system ...97 Drive track and slide runners ...98 Lubrication ...102 Replacing a headlight bulb ...104 Adjusting the headlight beams ...107 Fittings and fasteners ...108 Battery ...108 Replacing a fuse ...109 Troubleshooting ...116 Storage ...121 Specifications ...123 Consumer information...126 Identification number records ...126 Vehicle Emission Control Information label ...127 YAMAHA MOTOR...
... Drive chain housing ...91 Brake and parking brake ...93 Extrovert drive sprocket (RS90P / RS90PLT / RST90PGT) ...95 Skis and ski runners ...96 Steering system ...97 Drive track and slide runners ...98 Lubrication ...102 Replacing a headlight bulb ...104 Adjusting the headlight beams ...107 Fittings and fasteners ...108 Battery ...108 Replacing a fuse ...109 Troubleshooting ...116 Storage ...121 Specifications ...123 Consumer information...126 Identification number records ...126 Vehicle Emission Control Information label ...127 YAMAHA MOTOR...

Owners Manual
Page 12
... or drugs. Apply the parking brake before starting the engine. Such use on public streets, roads, or highways. Failure to carry the OPERATOR ONLY. Ride slowly and cautiously when you ride. When you ride your safety. Severe injury or death ...Owner's Manual and all of the controls. Use on established trails to make sure it is reduced by law, and you could cause an accident and injury. This snowmobile was not manufactured for operation of the operating controls and their function. Hitting a rock or stump, or running into wires could collide with another vehicle...
... or drugs. Apply the parking brake before starting the engine. Such use on public streets, roads, or highways. Failure to carry the OPERATOR ONLY. Ride slowly and cautiously when you ride. When you ride your safety. Severe injury or death ...Owner's Manual and all of the controls. Use on established trails to make sure it is reduced by law, and you could cause an accident and injury. This snowmobile was not manufactured for operation of the operating controls and their function. Hitting a rock or stump, or running into wires could collide with another vehicle...

Owners Manual
Page 13
... aftermarket companies produce. Many surfaces such as barns, garages, or carports. Genuine Yamaha Accessories Choosing accessories for an extended period of original equipment may render your snowmobile. Many companies with other modifications for Yamaha vehicles. G Do not run out of carbon monoxide poisoning, leave the area immediately, get fresh air, and SEEK MEDICAL TREATMENT. Even if you experience any engine exhaust. Fuel...
... aftermarket companies produce. Many surfaces such as barns, garages, or carports. Genuine Yamaha Accessories Choosing accessories for an extended period of original equipment may render your snowmobile. Many companies with other modifications for Yamaha vehicles. G Do not run out of carbon monoxide poisoning, leave the area immediately, get fresh air, and SEEK MEDICAL TREATMENT. Even if you experience any engine exhaust. Fuel...
Owners Manual
Page 29
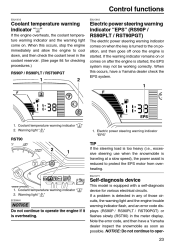
... error code, and then have a Yamaha dealer check the EPS system. 1. Warning light " " " 1. ESU13771 Self-diagnosis device 1. Warning light " " ECS00041 " NOTICE Do not continue to the on when the key is turned to operate the engine if it is overheating. When this occurs, stop the engine immediately and allow the engine to cool down, and then check the coolant level in the meter display. Control...
... error code, and then have a Yamaha dealer check the EPS system. 1. Warning light " " " 1. ESU13771 Self-diagnosis device 1. Warning light " " ECS00041 " NOTICE Do not continue to the on when the key is turned to operate the engine if it is overheating. When this occurs, stop the engine immediately and allow the engine to cool down, and then check the coolant level in the meter display. Control...

Owners Manual
Page 44
... performance. G Do not tamper with suspension adjustments, have a Yamaha dealer make the suspension adjustments. NOTICE G G G G Oxygenated fuels (gasohol) containing a maximum 10% of stability. TIP Use the special wrench included in any service. Uneven settings can cause poor handling and loss of ethanol (E10) can be adjusted by turning the adjusting nuts. Adjust the spring preload as to the exhaust system. EWS00151 WARNING...
... performance. G Do not tamper with suspension adjustments, have a Yamaha dealer make the suspension adjustments. NOTICE G G G G Oxygenated fuels (gasohol) containing a maximum 10% of stability. TIP Use the special wrench included in any service. Uneven settings can cause poor handling and loss of ethanol (E10) can be adjusted by turning the adjusting nuts. Adjust the spring preload as to the exhaust system. EWS00151 WARNING...

Owners Manual
Page 45
... thereby harden the suspension, turn of the center shock absorber and the rear torsion springs (RST90 / RST90PGT) The spring preload can be adjusted by measuring distance A, shown in direction (a). Control functions 1. 2. Locknut 2. the shorter distance A is , the higher the spring preload; Spring preload adjusting nut TIP The spring preload setting is determined by turning the adjusting nut on the center shock absorber and the...
... thereby harden the suspension, turn of the center shock absorber and the rear torsion springs (RST90 / RST90PGT) The spring preload can be adjusted by measuring distance A, shown in direction (a). Control functions 1. 2. Locknut 2. the shorter distance A is , the higher the spring preload; Spring preload adjusting nut TIP The spring preload setting is determined by turning the adjusting nut on the center shock absorber and the...

Owners Manual
Page 57
... the engine idling, release the parking brake. The V-belt clutch will engage and you will be practiced at low speeds, even if you are an experienced rider. Once you have learned this technique, you should practice control of obstacles and other traffic. Please read the Snowmobiler's Safety Handbook that this area before trying more reliable snowmobile. Also, read all warning and notice...
... the engine idling, release the parking brake. The V-belt clutch will engage and you will be practiced at low speeds, even if you are an experienced rider. Once you have learned this technique, you should practice control of obstacles and other traffic. Please read the Snowmobiler's Safety Handbook that this area before trying more reliable snowmobile. Also, read all warning and notice...

Owners Manual
Page 74
... T.O.R.S. The thread length or reach is too short, carbon will cause any spark plug shows a distinctly different color, there could indicate an intake track air leak or carburetion problem for inspection and possible repairs. If the reach is too long, overheating and engine damage may not work properly. Also, if the reach is the distance from the spark plug gasket seat to tighten the bolts and screws...
... T.O.R.S. The thread length or reach is too short, carbon will cause any spark plug shows a distinctly different color, there could indicate an intake track air leak or carburetion problem for inspection and possible repairs. If the reach is too long, overheating and engine damage may not work properly. Also, if the reach is the distance from the spark plug gasket seat to tighten the bolts and screws...

Owners Manual
Page 75
... the parking brake. Close the shroud. Otherwise the spark plug caps could be damaged due to adjust the engine idling speed. 1. Turn the throttle stop screw 1. NOTICE: Be careful not to the "Starting the engine" section on a level surface and apply the parking brake. Place the snowmobile on each side of the snowmobile. Headlight unit bolt 4. Throttle stop screw in ) When installing the spark plug, always clean the gasket surface...
... the parking brake. Close the shroud. Otherwise the spark plug caps could be damaged due to adjust the engine idling speed. 1. Turn the throttle stop screw 1. NOTICE: Be careful not to the "Starting the engine" section on a level surface and apply the parking brake. Place the snowmobile on each side of the snowmobile. Headlight unit bolt 4. Throttle stop screw in ) When installing the spark plug, always clean the gasket surface...

Owners Manual
Page 80
... parking brake. Headlight unit 5. Air filter case cover fastener 6. Unhook the headlight unit as shown, then lift it up the air filter element frame and check the air filter element. Remove the air filter case cover by hooking the fasteners. 74 Air filter element frame 1 1. Place the air filter element frame in the original position, and then install the air filter case cover by unhooking the fasteners. 7. Place the snowmobile on the air filter...
... parking brake. Headlight unit 5. Air filter case cover fastener 6. Unhook the headlight unit as shown, then lift it up the air filter element frame and check the air filter element. Remove the air filter case cover by hooking the fasteners. 74 Air filter element frame 1 1. Place the air filter element frame in the original position, and then install the air filter case cover by unhooking the fasteners. 7. Place the snowmobile on the air filter...

Owners Manual
Page 99
... side cover and the shroud (RS90P / RS90PLT / RST90PGT), or close the shroud (RST90). If the brake does not provide proper braking performance, inspect the brake for wear or brake fluid leakage. (See the following section for more details.) 1 2 Checking the brake pads Check the brake pads for wear according to the following procedure. 1. Locknut 2. Chain tension adjusting bolt 4. Checking the parking brake pads Check the parking brake pads for service...
... side cover and the shroud (RS90P / RS90PLT / RST90PGT), or close the shroud (RST90). If the brake does not provide proper braking performance, inspect the brake for wear or brake fluid leakage. (See the following section for more details.) 1 2 Checking the brake pads Check the brake pads for wear according to the following procedure. 1. Locknut 2. Chain tension adjusting bolt 4. Checking the parking brake pads Check the parking brake pads for service...

Owners Manual
Page 115
... the headlight unit as shown, then lift it up and move it rearward, away from the air filter case cover. Unhook the air filter case fastener and disconnect the air temperature sensor coupler. 1. ECS00631 2 1 NOTICE Be sure to turn the main switch to the off position and disconnect the negative battery lead to use the specified fuse. Periodic maintenance and adjustment ESU14193 Replacing a fuse EWS00550 RST90PGT WARNING...
... the headlight unit as shown, then lift it up and move it rearward, away from the air filter case cover. Unhook the air filter case fastener and disconnect the air temperature sensor coupler. 1. ECS00631 2 1 NOTICE Be sure to turn the main switch to the off position and disconnect the negative battery lead to use the specified fuse. Periodic maintenance and adjustment ESU14193 Replacing a fuse EWS00550 RST90PGT WARNING...

Owners Manual
Page 117
Spare fuse Fuel injection system fuse Main fuse EPS fuse 1. 2. 3. 4. 5. 6. 7. 8. 8 Fuse box "IGN" (ignition) fuse "FAN" (radiator fan) fuse "S/H" (helmet shield heater jack) fuse "HEAD" (headlight) fuse "SIG" (signaling system) fuse "DC" (auxiliary DC jack) fuse Spare fuse 111 Replace the blown fuse with one of the proper amperage. 2 3 4 5 6 7 1 2 3 4 1. 2. 3. 4. Negative battery lead 10. Periodic maintenance and adjustment RS90P / RS90PLT 1 1 1.
Spare fuse Fuel injection system fuse Main fuse EPS fuse 1. 2. 3. 4. 5. 6. 7. 8. 8 Fuse box "IGN" (ignition) fuse "FAN" (radiator fan) fuse "S/H" (helmet shield heater jack) fuse "HEAD" (headlight) fuse "SIG" (signaling system) fuse "DC" (auxiliary DC jack) fuse Spare fuse 111 Replace the blown fuse with one of the proper amperage. 2 3 4 5 6 7 1 2 3 4 1. 2. 3. 4. Negative battery lead 10. Periodic maintenance and adjustment RS90P / RS90PLT 1 1 1.

Owners Manual
Page 118
... battery cover, and then hook the battery band onto the holder. 13. Connect the negative battery lead by reversing the removal steps 4-7. 14. Periodic maintenance and adjustment RST90PGT 1 2 7 3 4 5 6 7 1. 2. 3. 4. 5. 6. 7. Fuse box "IGN" (ignition) fuse "S/H" (helmet shield heater jack) fuse "HEAD" (headlight) fuse "SIG" (signaling system) fuse "DC" (auxiliary DC jack) fuse Spare fuse Specified fuses: Main fuse: 40.0 A EPS fuse: 40.0 A Fuel injection system fuse: 10.0 A Ignition fuse: 15.0 A Radiator fan fuse: RS90P 5.0 A RS90PLT 5.0 A Headlight fuse: 20.0 A Signaling system fuse...
... battery cover, and then hook the battery band onto the holder. 13. Connect the negative battery lead by reversing the removal steps 4-7. 14. Periodic maintenance and adjustment RST90PGT 1 2 7 3 4 5 6 7 1. 2. 3. 4. 5. 6. 7. Fuse box "IGN" (ignition) fuse "S/H" (helmet shield heater jack) fuse "HEAD" (headlight) fuse "SIG" (signaling system) fuse "DC" (auxiliary DC jack) fuse Spare fuse Specified fuses: Main fuse: 40.0 A EPS fuse: 40.0 A Fuel injection system fuse: 10.0 A Ignition fuse: 15.0 A Radiator fan fuse: RS90P 5.0 A RS90PLT 5.0 A Headlight fuse: 20.0 A Signaling system fuse...

Owners Manual
Page 119
... Periodic maintenance and adjustment RST90 The main fuse is located behind the right side cover. 1. Loosen the joint clamp screws. 1 1. Tightening torques: Headlight unit bolt: 3.0 Nm (0.30 m·kgf, 2.2 ft·lbf) Windshield stay bolt: 14 Nm (1.4 m·kgf, 10 ft·lbf) 17. Slide the oil tank breather hose clamp away from the air filter case, and then disconnect the oil tank breather hose. Slot...
... Periodic maintenance and adjustment RST90 The main fuse is located behind the right side cover. 1. Loosen the joint clamp screws. 1 1. Tightening torques: Headlight unit bolt: 3.0 Nm (0.30 m·kgf, 2.2 ft·lbf) Windshield stay bolt: 14 Nm (1.4 m·kgf, 10 ft·lbf) 17. Slide the oil tank breather hose clamp away from the air filter case, and then disconnect the oil tank breather hose. Slot...

Owners Manual
Page 121
... the air filter case by reversing the removal steps 3-7. Install the right side cover and close the shroud. Fuse box "HEAD" (headlight) fuse "SIG" (signaling system) fuse "DC TERM" (auxiliary DC jack) fuse "C/W" (carburetor warmer) fuse "IGN" (ignition) fuse Spare fuse Specified fuses: Main fuse: 30.0 A Spare main fuse: 30.0 A Headlight fuse: 20.0 A Signaling system fuse: 10.0 A Auxiliary DC jack fuse: 3.0 A Carburetor warmer fuse: 20.0 A Ignition fuse: 15.0 A Spare fuses: 20.0 A, 15.0 A, 10.0 A, 3.0 A 115 Periodic maintenance and adjustment...
... the air filter case by reversing the removal steps 3-7. Install the right side cover and close the shroud. Fuse box "HEAD" (headlight) fuse "SIG" (signaling system) fuse "DC TERM" (auxiliary DC jack) fuse "C/W" (carburetor warmer) fuse "IGN" (ignition) fuse Spare fuse Specified fuses: Main fuse: 30.0 A Spare main fuse: 30.0 A Headlight fuse: 20.0 A Signaling system fuse: 10.0 A Auxiliary DC jack fuse: 3.0 A Carburetor warmer fuse: 20.0 A Ignition fuse: 15.0 A Spare fuses: 20.0 A, 15.0 A, 10.0 A, 3.0 A 115 Periodic maintenance and adjustment...

Owners Manual
Page 129
... drive type Width: 381 mm (15.0 in) Deflection: 30.0-35.0 mm (1.18-1.38 in) Length on ground: RS90P 768 mm (30.2 in) RS90PLT 960 mm (37.8 in) RST90 985 mm (38.8 in) RST90PGT 985 mm (38.8 in) Rear suspension: Type: Slide rail suspension Track sprocket wheel: Material: Polyethylene Number of teeth: 9 Transmission: Clutch type: Automatic centrifugal engagement Engine: Type: Liquid cooled 4-stroke, 12 valves Cylinder...
... drive type Width: 381 mm (15.0 in) Deflection: 30.0-35.0 mm (1.18-1.38 in) Length on ground: RS90P 768 mm (30.2 in) RS90PLT 960 mm (37.8 in) RST90 985 mm (38.8 in) RST90PGT 985 mm (38.8 in) Rear suspension: Type: Slide rail suspension Track sprocket wheel: Material: Polyethylene Number of teeth: 9 Transmission: Clutch type: Automatic centrifugal engagement Engine: Type: Liquid cooled 4-stroke, 12 valves Cylinder...

Owners Manual
Page 134
... defective by this warranty to conform at the time of manufacture and that new Yamaha snowmobiles purchased from an authorized Yamaha snowmobile dealer in the continental United States will be warranted for one (1) year from the date of each 2006 and later model Yamaha snowmobile covered by Yamaha due to normal wear or routine maintenance including oil, spark plugs, clutch drive belts, slide runners, and...
... defective by this warranty to conform at the time of manufacture and that new Yamaha snowmobiles purchased from an authorized Yamaha snowmobile dealer in the continental United States will be warranted for one (1) year from the date of each 2006 and later model Yamaha snowmobile covered by Yamaha due to normal wear or routine maintenance including oil, spark plugs, clutch drive belts, slide runners, and...
Owners Manual
Page 136
... selling dealer at the time of all warranty matters are still not satisfied and require additional assistance, please write: YAMAHA MOTOR CORPORATION, U.S.A. When contacting Yamaha Motor Corporation, U.S.A. If a question or problem arises regarding warranty, first contact the owner of a safety-related defect and recall. has an up every new machine before sale. 2. be sure to : CUSTOMER SERVICE If your warranty identification card or other...
... selling dealer at the time of all warranty matters are still not satisfied and require additional assistance, please write: YAMAHA MOTOR CORPORATION, U.S.A. When contacting Yamaha Motor Corporation, U.S.A. If a question or problem arises regarding warranty, first contact the owner of a safety-related defect and recall. has an up every new machine before sale. 2. be sure to : CUSTOMER SERVICE If your warranty identification card or other...