
Owners Manual
Page 5
.../pressure warning indicator (RS90P / RS90PLT / RST90PGT) ...22 Coolant temperature warning indicator ...23 Electric power steering warning indicator "EPS" (RS90P / RS90PLT / RST90PGT) ...23 Self-diagnosis device ...23 Engine stop switch ...24 Headlight beam switch "LIGHTS" ...24 Grip/thumb warmer adjusting switch ...24 Auxiliary DC jack ...25 Helmet shield heater jack (RS90P / RS90PLT / RST90PGT) ...26 Brake lever ...26 Parking brake lever ...27 Shift lever ...27 Drive guard ...28 V-belt holders ...Passenger grips (RST90PGT) ...Passenger grip warmer switch (RST90 / RST90PGT) ...Passenger...
.../pressure warning indicator (RS90P / RS90PLT / RST90PGT) ...22 Coolant temperature warning indicator ...23 Electric power steering warning indicator "EPS" (RS90P / RS90PLT / RST90PGT) ...23 Self-diagnosis device ...23 Engine stop switch ...24 Headlight beam switch "LIGHTS" ...24 Grip/thumb warmer adjusting switch ...24 Auxiliary DC jack ...25 Helmet shield heater jack (RS90P / RS90PLT / RST90PGT) ...26 Brake lever ...26 Parking brake lever ...27 Shift lever ...27 Drive guard ...28 V-belt holders ...Passenger grips (RST90PGT) ...Passenger grip warmer switch (RST90 / RST90PGT) ...Passenger...

Owners Manual
Page 6
... Drive chain housing ...91 Brake and parking brake ...93 Extrovert drive sprocket (RS90P / RS90PLT / RST90PGT) ...95 Skis and ski runners ...96 Steering system ...97 Drive track and slide runners ...98 Lubrication ...102 Replacing a headlight bulb ...104 Adjusting the headlight beams ...107 Fittings and fasteners ...108 Battery ...108 Replacing a fuse ...109 Troubleshooting ...116 Storage ...121 Specifications ...123 Consumer information...126 Identification number records ...126 Vehicle Emission Control Information label ...127 YAMAHA MOTOR...
... Drive chain housing ...91 Brake and parking brake ...93 Extrovert drive sprocket (RS90P / RS90PLT / RST90PGT) ...95 Skis and ski runners ...96 Steering system ...97 Drive track and slide runners ...98 Lubrication ...102 Replacing a headlight bulb ...104 Adjusting the headlight beams ...107 Fittings and fasteners ...108 Battery ...108 Replacing a fuse ...109 Troubleshooting ...116 Storage ...121 Specifications ...123 Consumer information...126 Identification number records ...126 Vehicle Emission Control Information label ...127 YAMAHA MOTOR...
Owners Manual
Page 12
... overheat the brake disc and reduce braking ability. Use on public streets, roads, or highways. Safety information ESU10193 As the vehicle's owner, you could cause an accident and injury. Your ability to inspect or maintain the vehicle properly in safe operating condition. Failure to operate the snowmobile is prohibited by the influence of control. Apply the parking brake before starting the engine. This...
... overheat the brake disc and reduce braking ability. Use on public streets, roads, or highways. Safety information ESU10193 As the vehicle's owner, you could cause an accident and injury. Your ability to inspect or maintain the vehicle properly in safe operating condition. Failure to operate the snowmobile is prohibited by the influence of control. Apply the parking brake before starting the engine. This...
Owners Manual
Page 13
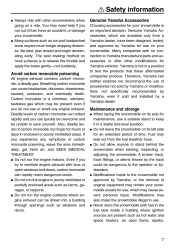
... time. G Do not run the engine indoors. Do not leave the snowmobile on its side for maintenance, use of carbon monoxide can linger for hours or days in enclosed or poorly-ventilated areas. Many surfaces such as windows and doors. Genuine Yamaha Accessories Choosing accessories for use . Genuine Yamaha Accessories, which are present such as hot water and space heaters, an open windows and doors...
... time. G Do not run the engine indoors. Do not leave the snowmobile on its side for maintenance, use of carbon monoxide can linger for hours or days in enclosed or poorly-ventilated areas. Many surfaces such as windows and doors. Genuine Yamaha Accessories Choosing accessories for use . Genuine Yamaha Accessories, which are present such as hot water and space heaters, an open windows and doors...
Owners Manual
Page 29
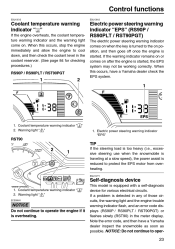
... at a slow speed), the power assist is started , the EPS system may not be working correctly. This model is overheating. NOTICE: Do not continue to operate the engine if it is equipped with a self-diagnosis device for checking procedures.) RS90P / RS90PLT / RST90PGT Electric power steering warning indicator "EPS" (RS90P / RS90PLT / RST90PGT) The electric power steering warning indicator comes on when the key is turned to the on...
... at a slow speed), the power assist is started , the EPS system may not be working correctly. This model is overheating. NOTICE: Do not continue to operate the engine if it is equipped with a self-diagnosis device for checking procedures.) RS90P / RS90PLT / RST90PGT Electric power steering warning indicator "EPS" (RS90P / RS90PLT / RST90PGT) The electric power steering warning indicator comes on when the key is turned to the on...
Owners Manual
Page 44
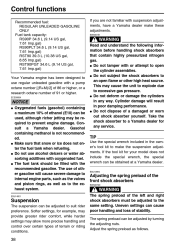
... cylinder assemblies. Make sure that contain highly pressurized nitrogen gas. If the tool kit for your model does not include the special wrench, the special wrench can be required to prevent engine damage. ESU10894 Adjusting the spring preload of the front shock absorbers EWS00720 WARNING The spring preload of 91 or higher. G Do not deform or damage the cylinders in poor damping performance...
... cylinder assemblies. Make sure that contain highly pressurized nitrogen gas. If the tool kit for your model does not include the special wrench, the special wrench can be required to prevent engine damage. ESU10894 Adjusting the spring preload of the front shock absorbers EWS00720 WARNING The spring preload of 91 or higher. G Do not deform or damage the cylinders in poor damping performance...
Owners Manual
Page 45
... center shock absorber and the adjusters on the rear torsion springs. Distance A 3. To decrease the spring preload and thereby soften the suspension, turn the adjusting nut in direction (b). 3. To decrease the spring preload and thereby soften the suspension, turn the adjusting nut in direction (b). 1. Spring preload adjusting nut TIP The spring preload setting is , the lower the spring preload. Spring preload adjusting nut 2. Center shock absorber 1. Locknut 2. Spring...
... center shock absorber and the adjusters on the rear torsion springs. Distance A 3. To decrease the spring preload and thereby soften the suspension, turn the adjusting nut in direction (b). 3. To decrease the spring preload and thereby soften the suspension, turn the adjusting nut in direction (b). 1. Spring preload adjusting nut TIP The spring preload setting is , the lower the spring preload. Spring preload adjusting nut 2. Center shock absorber 1. Locknut 2. Spring...
Owners Manual
Page 57
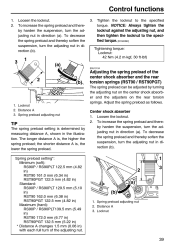
.... The beginning operator should practice control of obstacles and other traffic. As you are an experienced rider. Operation Pay particular attention to accelerate. With the engine idling, release the parking brake. The V-belt clutch will engage and you will be practiced at low speeds, even if you do so, put your upper body into the turn and lean your weight on page 6.
.... The beginning operator should practice control of obstacles and other traffic. As you are an experienced rider. Operation Pay particular attention to accelerate. With the engine idling, release the parking brake. The V-belt clutch will engage and you will be practiced at low speeds, even if you do so, put your upper body into the turn and lean your weight on page 6.
Owners Manual
Page 74
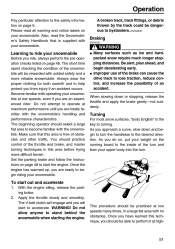
... the spark plugs can indicate the condition of spark plug. 1. Spark plug reach Before installing any spark plug shows a distinctly different color, there could indicate an intake track air leak or carburetion problem for a snowmobile that cylinder. may result. If the reach is being ridden normally. Consult a Yamaha dealer before closing the shroud and installing the right side cover. WARNING Be sure to a Yamaha dealer for inspection and possible repairs...
... the spark plugs can indicate the condition of spark plug. 1. Spark plug reach Before installing any spark plug shows a distinctly different color, there could indicate an intake track air leak or carburetion problem for a snowmobile that cylinder. may result. If the reach is being ridden normally. Consult a Yamaha dealer before closing the shroud and installing the right side cover. WARNING Be sure to a Yamaha dealer for inspection and possible repairs...

Owners Manual
Page 75
.... NOTICE Make sure that the spark plug caps are securely installed. Adjusting the engine idling speed (RST90) 1. 2. Turn the throttle stop screw 1. Headlight unit bolt 4. Otherwise the spark plug caps could be damaged due to scratch the snowmobile when moving the headlight unit. [ECS00920] 1 1. Open the shroud. Throttle stop screw in ) When installing the spark plug, always clean the gasket surface. Periodic maintenance and adjustment Spark plug gap: 0.7-0.8 mm (0.028-0.031...
.... NOTICE Make sure that the spark plug caps are securely installed. Adjusting the engine idling speed (RST90) 1. 2. Turn the throttle stop screw 1. Headlight unit bolt 4. Otherwise the spark plug caps could be damaged due to scratch the snowmobile when moving the headlight unit. [ECS00920] 1 1. Open the shroud. Throttle stop screw in ) When installing the spark plug, always clean the gasket surface. Periodic maintenance and adjustment Spark plug gap: 0.7-0.8 mm (0.028-0.031...
Owners Manual
Page 80
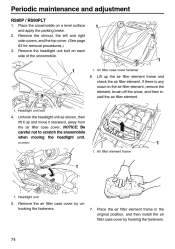
... maintenance and adjustment RS90P / RS90PLT 1. 2. Place the snowmobile on a level surface and apply the parking brake. Headlight unit 5. Remove the air filter case cover by hooking the fasteners. 74 Air filter case cover fastener 6. Unhook the headlight unit as shown, then lift it up the air filter element frame and check the air filter element. Lift up and move it rearward, away from the air filter case cover. Headlight unit bolt 4. Air filter element...
... maintenance and adjustment RS90P / RS90PLT 1. 2. Place the snowmobile on a level surface and apply the parking brake. Headlight unit 5. Remove the air filter case cover by hooking the fasteners. 74 Air filter case cover fastener 6. Unhook the headlight unit as shown, then lift it up the air filter element frame and check the air filter element. Lift up and move it rearward, away from the air filter case cover. Headlight unit bolt 4. Air filter element...
Owners Manual
Page 99
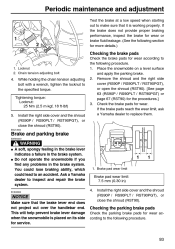
... when the snowmobile is working properly. Periodic maintenance and adjustment Test the brake at a low speed when starting out to inspect and repair the brake system. 1. Install the right side cover and the shroud (RS90P / RS90PLT / RST90PGT), or close the shroud (RST90). Chain tension adjusting bolt 4. If the brake does not provide proper braking performance, inspect the brake for wear or brake fluid leakage. (See the...
... when the snowmobile is working properly. Periodic maintenance and adjustment Test the brake at a low speed when starting out to inspect and repair the brake system. 1. Install the right side cover and the shroud (RS90P / RS90PLT / RST90PGT), or close the shroud (RST90). Chain tension adjusting bolt 4. If the brake does not provide proper braking performance, inspect the brake for wear or brake fluid leakage. (See the...
Owners Manual
Page 115
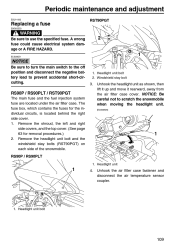
... headlight unit bolt and the windshield stay bolts (RST90PGT) on each side of the snowmobile. Headlight unit bolt 2. Unhook the air filter case fastener and disconnect the air temperature sensor coupler. 1. ECS00631 2 1 NOTICE Be sure to turn the main switch to the off position and disconnect the negative battery lead to prevent accidental short-circuiting. 1. Headlight unit 1 4. RS90P / RS90PLT / RST90PGT The main fuse and the fuel...
... headlight unit bolt and the windshield stay bolts (RST90PGT) on each side of the snowmobile. Headlight unit bolt 2. Unhook the air filter case fastener and disconnect the air temperature sensor coupler. 1. ECS00631 2 1 NOTICE Be sure to turn the main switch to the off position and disconnect the negative battery lead to prevent accidental short-circuiting. 1. Headlight unit 1 4. RS90P / RS90PLT / RST90PGT The main fuse and the fuel...
Owners Manual
Page 117
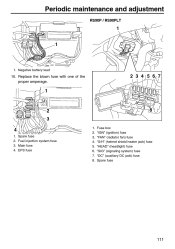
Periodic maintenance and adjustment RS90P / RS90PLT 1 1 1. Spare fuse Fuel injection system fuse Main fuse EPS fuse 1. 2. 3. 4. 5. 6. 7. 8. 8 Fuse box "IGN" (ignition) fuse "FAN" (radiator fan) fuse "S/H" (helmet shield heater jack) fuse "HEAD" (headlight) fuse "SIG" (signaling system) fuse "DC" (auxiliary DC jack) fuse Spare fuse 111 Negative battery lead 10. Replace the blown fuse with one of the proper amperage. 2 3 4 5 6 7 1 2 3 4 1. 2. 3. 4.
Periodic maintenance and adjustment RS90P / RS90PLT 1 1 1. Spare fuse Fuel injection system fuse Main fuse EPS fuse 1. 2. 3. 4. 5. 6. 7. 8. 8 Fuse box "IGN" (ignition) fuse "FAN" (radiator fan) fuse "S/H" (helmet shield heater jack) fuse "HEAD" (headlight) fuse "SIG" (signaling system) fuse "DC" (auxiliary DC jack) fuse Spare fuse 111 Negative battery lead 10. Replace the blown fuse with one of the proper amperage. 2 3 4 5 6 7 1 2 3 4 1. 2. 3. 4.
Owners Manual
Page 118
...ignition) fuse "S/H" (helmet shield heater jack) fuse "HEAD" (headlight) fuse "SIG" (signaling system) fuse "DC" (auxiliary DC jack) fuse Spare fuse Specified fuses: Main fuse: 40.0 A EPS fuse: 40.0 A Fuel injection system fuse: 10.0 A Ignition fuse: 15.0 A Radiator fan fuse: RS90P 5.0 A RS90PLT 5.0 A Headlight fuse: 20.0 A Signaling system fuse: RS90P 3.0 A RS90PLT 3.0 A RST90PGT 7.5 A Auxiliary DC jack fuse: 3.0 A Helmet shield heater jack fuse: 3.0 A Spare fuses: RS90P / RS90PLT 20.0 A, 15.0 A, 10.0 A, 5.0 A, 3.0 A RST90PGT 20.0 A, 15.0 A, 10.0 A, 7.5 A, 3.0 A 11. Install the battery cover...
...ignition) fuse "S/H" (helmet shield heater jack) fuse "HEAD" (headlight) fuse "SIG" (signaling system) fuse "DC" (auxiliary DC jack) fuse Spare fuse Specified fuses: Main fuse: 40.0 A EPS fuse: 40.0 A Fuel injection system fuse: 10.0 A Ignition fuse: 15.0 A Radiator fan fuse: RS90P 5.0 A RS90PLT 5.0 A Headlight fuse: 20.0 A Signaling system fuse: RS90P 3.0 A RS90PLT 3.0 A RST90PGT 7.5 A Auxiliary DC jack fuse: 3.0 A Helmet shield heater jack fuse: 3.0 A Spare fuses: RS90P / RS90PLT 20.0 A, 15.0 A, 10.0 A, 5.0 A, 3.0 A RST90PGT 20.0 A, 15.0 A, 10.0 A, 7.5 A, 3.0 A 11. Install the battery cover...
Owners Manual
Page 119
... torques: Headlight unit bolt: 3.0 Nm (0.30 m·kgf, 2.2 ft·lbf) Windshield stay bolt: 14 Nm (1.4 m·kgf, 10 ft·lbf) 17. Slide the oil tank breather hose clamp away from the air filter case, and then disconnect the oil tank breather hose. The fuse box, which contains the fuses for removal procedures.) 3. Unhook the air filter case fastener. 1 2 1. Air filter case fastener 4. Projection 15. Joint clamp screw...
... torques: Headlight unit bolt: 3.0 Nm (0.30 m·kgf, 2.2 ft·lbf) Windshield stay bolt: 14 Nm (1.4 m·kgf, 10 ft·lbf) 17. Slide the oil tank breather hose clamp away from the air filter case, and then disconnect the oil tank breather hose. The fuse box, which contains the fuses for removal procedures.) 3. Unhook the air filter case fastener. 1 2 1. Air filter case fastener 4. Projection 15. Joint clamp screw...
Owners Manual
Page 121
... engine. 2 3 7 4 5 6 12. Fuse box "HEAD" (headlight) fuse "SIG" (signaling system) fuse "DC TERM" (auxiliary DC jack) fuse "C/W" (carburetor warmer) fuse "IGN" (ignition) fuse Spare fuse Specified fuses: Main fuse: 30.0 A Spare main fuse: 30.0 A Headlight fuse: 20.0 A Signaling system fuse: 10.0 A Auxiliary DC jack fuse: 3.0 A Carburetor warmer fuse: 20.0 A Ignition fuse: 15.0 A Spare fuses: 20.0 A, 15.0 A, 10.0 A, 3.0 A 115 Install the air filter case by reversing the removal steps 3-7. Connect the negative battery lead. 11. Install the right side cover...
... engine. 2 3 7 4 5 6 12. Fuse box "HEAD" (headlight) fuse "SIG" (signaling system) fuse "DC TERM" (auxiliary DC jack) fuse "C/W" (carburetor warmer) fuse "IGN" (ignition) fuse Spare fuse Specified fuses: Main fuse: 30.0 A Spare main fuse: 30.0 A Headlight fuse: 20.0 A Signaling system fuse: 10.0 A Auxiliary DC jack fuse: 3.0 A Carburetor warmer fuse: 20.0 A Ignition fuse: 15.0 A Spare fuses: 20.0 A, 15.0 A, 10.0 A, 3.0 A 115 Install the air filter case by reversing the removal steps 3-7. Connect the negative battery lead. 11. Install the right side cover...
Owners Manual
Page 129
... drive type Width: 381 mm (15.0 in) Deflection: 30.0-35.0 mm (1.18-1.38 in) Length on ground: RS90P 768 mm (30.2 in) RS90PLT 960 mm (37.8 in) RST90 985 mm (38.8 in) RST90PGT 985 mm (38.8 in) Rear suspension: Type: Slide rail suspension Track sprocket wheel: Material: Polyethylene Number of teeth: 9 Transmission: Clutch type: Automatic centrifugal engagement Engine: Type: Liquid cooled 4-stroke, 12 valves Cylinder...
... drive type Width: 381 mm (15.0 in) Deflection: 30.0-35.0 mm (1.18-1.38 in) Length on ground: RS90P 768 mm (30.2 in) RS90PLT 960 mm (37.8 in) RST90 985 mm (38.8 in) RST90PGT 985 mm (38.8 in) Rear suspension: Type: Slide rail suspension Track sprocket wheel: Material: Polyethylene Number of teeth: 9 Transmission: Clutch type: Automatic centrifugal engagement Engine: Type: Liquid cooled 4-stroke, 12 valves Cylinder...
Owners Manual
Page 134
... of each 2006 and later model Yamaha snowmobile covered by this warranty shall include parts replaced due to normal wear or routine maintenance including oil, spark plugs, clutch drive belts, slide runners, and track. All Models Thirty (30) months from the date of Yamaha Motor Corporation, U.S.A. You may locate your nearest authorized Yamaha dealer through your local telephone directory. All Yamaha snowmobile clutch components are not qualitatively equivalent...
... of each 2006 and later model Yamaha snowmobile covered by this warranty shall include parts replaced due to normal wear or routine maintenance including oil, spark plugs, clutch drive belts, slide runners, and track. All Models Thirty (30) months from the date of Yamaha Motor Corporation, U.S.A. You may locate your nearest authorized Yamaha dealer through your local telephone directory. All Yamaha snowmobile clutch components are not qualitatively equivalent...
Owners Manual
Page 136
... the owner of your purchase. Mail to: CUSTOMER SERVICE If your snowmobile model name, engine serial number, dealer number (or dealer's name) as it to : 1. CHANGE OF ADDRESS The federal government requires each Yamaha snowmobile dealer is compiled from the purchase registrations sent to your satisfaction at the time of sale, and upon your request at the time of a safety...
... the owner of your purchase. Mail to: CUSTOMER SERVICE If your snowmobile model name, engine serial number, dealer number (or dealer's name) as it to : 1. CHANGE OF ADDRESS The federal government requires each Yamaha snowmobile dealer is compiled from the purchase registrations sent to your satisfaction at the time of sale, and upon your request at the time of a safety...