
Owners Manual
Page 6
... INSTRUMENT AND CONTROL FUNCTIONS ...4-1 Main switch ...4-1 Indicator lights and warning lights ...4-2 Multi-function display ...4-5 Handlebar switches ...4-7 Throttle lever ...4-13 Speed limiter ...4-13 Front brake lever ...4-14 Brake pedal and rear brake lever ...4-14 Drive select lever ...4-15 Fuel tank cap ...4-15 Fuel ...4-16 Seat ...4-18 Storage compartments ...4-19 Front carrier ...4-22 Rear carrier ...4-22 Adjusting the front and rear shock absorber assemblies ...4-22 Auxiliary DC jack ...4-23 PRE-OPERATION CHECKS ...5-1 Fuel ...5-3 Engine oil ...5-3 Final gear oil ...5-3 Differential...
... INSTRUMENT AND CONTROL FUNCTIONS ...4-1 Main switch ...4-1 Indicator lights and warning lights ...4-2 Multi-function display ...4-5 Handlebar switches ...4-7 Throttle lever ...4-13 Speed limiter ...4-13 Front brake lever ...4-14 Brake pedal and rear brake lever ...4-14 Drive select lever ...4-15 Fuel tank cap ...4-15 Fuel ...4-16 Seat ...4-18 Storage compartments ...4-19 Front carrier ...4-22 Rear carrier ...4-22 Adjusting the front and rear shock absorber assemblies ...4-22 Auxiliary DC jack ...4-23 PRE-OPERATION CHECKS ...5-1 Fuel ...5-3 Engine oil ...5-3 Final gear oil ...5-3 Differential...

Owners Manual
Page 7
... the radiator grills ...8-20 Checking the spark plug ...8-20 Engine oil and oil filter cartridge ...8-22 Final gear oil ...8-27 Differential gear oil ...8-29 Coolant ...8-32 Cleaning the air filter element ...8-39 Cleaning the spark arrester ...8-42 V-belt case drain plug ...8-44 Adjusting the throttle lever free play ...8-45 Valve clearance ...8-46 Adjusting the drive select lever safety system cable ...8-46 Brakes ...8-46 Checking the front and rear brake pads ...8-46 Checking the rear brake hose protectors ...8-47 Checking the brake fluid...
... the radiator grills ...8-20 Checking the spark plug ...8-20 Engine oil and oil filter cartridge ...8-22 Final gear oil ...8-27 Differential gear oil ...8-29 Coolant ...8-32 Cleaning the air filter element ...8-39 Cleaning the spark arrester ...8-42 V-belt case drain plug ...8-44 Adjusting the throttle lever free play ...8-45 Valve clearance ...8-46 Adjusting the drive select lever safety system cable ...8-46 Brakes ...8-46 Checking the front and rear brake pads ...8-46 Checking the rear brake hose protectors ...8-47 Checking the brake fluid...
Owners Manual
Page 8
...55 Lubricating the steering shaft ...8-56 Battery ...8-56 Replacing a fuse ...8-59 Replacing a headlight bulb ...8-61 Adjusting a headlight beam ...8-63 Replacing the tail/brake light bulb ...8-63 Removing a wheel ...8-64 Installing a wheel ...8-65 Troubleshooting ...8-66 Troubleshooting charts ...8-67 CLEANING AND STORAGE...9-1 Cleaning ...9-1 Storage ...9-2 SPECIFICATIONS ...10-1 CONSUMER INFORMATION...11-1 Identification numbers ...11-1 Noise regulation ...11-4 Maintenance record ...11-5 YAMAHA MOTOR CORPORATION, U.S.A. ATV LIMITED WARRANTY ...11-6 YAMAHA EXTENDED SERVICE (Y.E.S.) ...11...
...55 Lubricating the steering shaft ...8-56 Battery ...8-56 Replacing a fuse ...8-59 Replacing a headlight bulb ...8-61 Adjusting a headlight beam ...8-63 Replacing the tail/brake light bulb ...8-63 Removing a wheel ...8-64 Installing a wheel ...8-65 Troubleshooting ...8-66 Troubleshooting charts ...8-67 CLEANING AND STORAGE...9-1 Cleaning ...9-1 Storage ...9-2 SPECIFICATIONS ...10-1 CONSUMER INFORMATION...11-1 Identification numbers ...11-1 Noise regulation ...11-4 Maintenance record ...11-5 YAMAHA MOTOR CORPORATION, U.S.A. ATV LIMITED WARRANTY ...11-6 YAMAHA EXTENDED SERVICE (Y.E.S.) ...11...
Owners Manual
Page 15
... operating condition. Always follow the inspection and maintenance procedures and schedules described in this manual. Never open the throttle suddenly. Check the terrain carefully before attempting to turn at high speed. Never attempt to turn at faster speeds and never turn the ATV around on level ground. Always use proper procedures if you start up any hill until you use the proper gear...
... operating condition. Always follow the inspection and maintenance procedures and schedules described in this manual. Never open the throttle suddenly. Check the terrain carefully before attempting to turn at high speed. Never attempt to turn at faster speeds and never turn the ATV around on level ground. Always use proper procedures if you start up any hill until you use the proper gear...
Owners Manual
Page 23
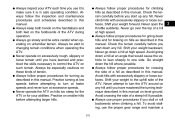
... EPS motor from overheating. G When the On-Command differential gear lock switch is reduced to "LOCK" or "4WD", the indicator " " and the indicator light "DIFF. The electrical circuit of the warning light can be working correctly. G If the steering load is too heavy (i.e., excessive steering use when the ATV is traveling at a slow speed), the power assist is set to lock or unlock. 4 On-Command four-wheel-drive indicator " ", On-Command differential gear lock...
... EPS motor from overheating. G When the On-Command differential gear lock switch is reduced to "LOCK" or "4WD", the indicator " " and the indicator light "DIFF. The electrical circuit of the warning light can be working correctly. G If the steering load is too heavy (i.e., excessive steering use when the ATV is traveling at a slow speed), the power assist is set to lock or unlock. 4 On-Command four-wheel-drive indicator " ", On-Command differential gear lock...
Owners Manual
Page 32
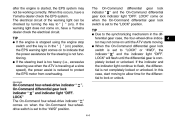
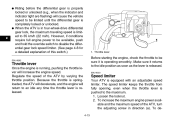
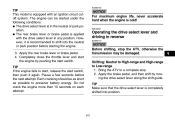
... engine power available and the maximum speed of the ATV, turn the adjusting screw in four-wheel-drive differential gear lock, the maximum traveling speed is limited to the maximum. 1. Regulate the speed of this switch.) 2WD 4WD 1 1. EBU18323 Speed limiter Your ATV is running, pushing the throttle lever will increase the engine speed. Throttle lever EBU18282 Throttle lever Once the engine is equipped with an adjustable speed limiter. Before starting the engine, check the throttle...
... engine power available and the maximum speed of the ATV, turn the adjusting screw in four-wheel-drive differential gear lock, the maximum traveling speed is limited to the maximum. 1. Regulate the speed of this switch.) 2WD 4WD 1 1. EBU18323 Speed limiter Your ATV is running, pushing the throttle lever will increase the engine speed. Throttle lever EBU18282 Throttle lever Once the engine is equipped with an adjustable speed limiter. Before starting the engine, check the throttle...
Owners Manual
Page 37
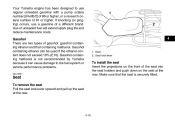
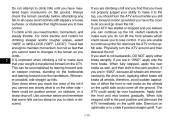
Your Yamaha engine has been designed to the fuel system or vehicle performance problems. EBU18881 4 1. If knocking (or pinging) occurs, use regular unleaded gasoline with a pump octane number [(R+M)/2] of 86 or higher, or a research octane number of a different brand. Gasohol containing methanol is securely fitted. 4-18 Seat lock lever Seat To remove the seat Pull the seat lock lever upward and pull up the seat at...
Your Yamaha engine has been designed to the fuel system or vehicle performance problems. EBU18881 4 1. If knocking (or pinging) occurs, use regular unleaded gasoline with a pump octane number [(R+M)/2] of 86 or higher, or a research octane number of a different brand. Gasohol containing methanol is securely fitted. 4-18 Seat lock lever Seat To remove the seat Pull the seat lock lever upward and pull up the seat at...

Owners Manual
Page 42
... the engine is running and the light switch is located at the front right side of a damaged or worn out shock absorber assembly yourself. Set the light switch to "OFF". 2. Start the engine. (See page 6-1.) 4. 4 1. Open the auxiliary DC jack cap, and then insert the accessory power plug into the jack. 4-23 WARNING The rear shock absorber assembly contains highly pressurized nitrogen gas. Special wrench Shock absorber cylinder damage could also result in any service.
... the engine is running and the light switch is located at the front right side of a damaged or worn out shock absorber assembly yourself. Set the light switch to "OFF". 2. Start the engine. (See page 6-1.) 4. 4 1. Open the auxiliary DC jack cap, and then insert the accessory power plug into the jack. 4-23 WARNING The rear shock absorber assembly contains highly pressurized nitrogen gas. Special wrench Shock absorber cylinder damage could also result in any service.
Owners Manual
Page 53
... pushing the start switch, then push it is recommended to preserve battery energy. Apply the rear brake lever or brake pedal. 4. Completely close the throttle lever and start the engine by moving the drive select lever along the shift guide. Pause a few seconds before starting the engine. 3. The engine can be started under the following conditions: G The drive select lever is cold! Do not crank the engine more than...
... pushing the start switch, then push it is recommended to preserve battery energy. Apply the rear brake lever or brake pedal. 4. Completely close the throttle lever and start the engine by moving the drive select lever along the shift guide. Pause a few seconds before starting the engine. 3. The engine can be started under the following conditions: G The drive select lever is cold! Do not crank the engine more than...
Owners Manual
Page 54
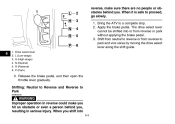
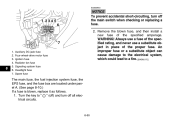
Bring the ATV to park and vice versa by moving the drive select lever along the shift guide. 3. Shifting: Neutral to Reverse and Reverse to proceed, go slowly. 1. Drive select lever L (Low-range) H (High-range) N (Neutral) R (Reverse) P (Park) 2 3 4 5 6 reverse, make you hit an... park without applying the brake pedal. 3. When you shift into or from reverse to a complete stop. 2. L H N R P 6 1. 2. 3. 4. 5. 6. Release the brake pedal, and then open the throttle lever gradually. The drive select lever cannot be shifted into 6-3 When it is safe to Park EWB00720 WARNING ...
Bring the ATV to park and vice versa by moving the drive select lever along the shift guide. 3. Shifting: Neutral to Reverse and Reverse to proceed, go slowly. 1. Drive select lever L (Low-range) H (High-range) N (Neutral) R (Reverse) P (Park) 2 3 4 5 6 reverse, make you hit an... park without applying the brake pedal. 3. When you shift into or from reverse to a complete stop. 2. L H N R P 6 1. 2. 3. 4. 5. 6. Release the brake pedal, and then open the throttle lever gradually. The drive select lever cannot be shifted into 6-3 When it is safe to Park EWB00720 WARNING ...
Owners Manual
Page 71
... or vice versa without coming to make turns quickly and easily. ATV could go out of an accident. The centrifugal clutch will start the engine. Improper use of the brakes can cause the tires to park position and follow proper procedures for your ATV. Therefore, unless the wheel on page 6-1 to start to turn at faster speeds. Make sure that this Owner's Manual.
... or vice versa without coming to make turns quickly and easily. ATV could go out of an accident. The centrifugal clutch will start the engine. Improper use of the brakes can cause the tires to park position and follow proper procedures for your ATV. Therefore, unless the wheel on page 6-1 to start to turn at faster speeds. Make sure that this Owner's Manual.
Owners Manual
Page 74
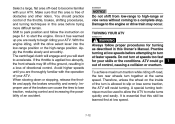
... you start to do not lift the front wheels which could come off . Turn 7-15 For more traction and control for you to changes in the terrain as you have the room to roll backwards, DO NOT apply either the front or rear brake as well, and then shift to the park position ...continue up hills. When fully stopped, apply the rear brake as the wheels on the uphill side. When fully stopped, shift to the park position. To climb a hill, you are too steep for climbing steeper and/or rougher slopes, select "4WD" or 4WD-LOCK ("DIFF. LOCK"). It is important when climbing a hill to a...
... you start to do not lift the front wheels which could come off . Turn 7-15 For more traction and control for you to changes in the terrain as you have the room to roll backwards, DO NOT apply either the front or rear brake as well, and then shift to the park position ...continue up hills. When fully stopped, apply the rear brake as the wheels on the uphill side. When fully stopped, shift to the park position. To climb a hill, you are too steep for climbing steeper and/or rougher slopes, select "4WD" or 4WD-LOCK ("DIFF. LOCK"). It is important when climbing a hill to a...
Owners Manual
Page 142
... " " (off) and turn off all electrical circuits. 8-60 WARNING! Remove the blown fuse, and then install a new fuse of the proper fuse. Auxiliary DC jack fuse Four-wheel-drive motor fuse Ignition fuse Radiator fan fuse Signaling system fuse Headlight fuse Spare fuse The main fuse, the fuel injection system fuse, the EPS fuse, and the fuse box are located under panel A. (See page 8-10.) If a fuse is blown, replace it as follows. 1. Always use a fuse of the specified rating, and never use...
... " " (off) and turn off all electrical circuits. 8-60 WARNING! Remove the blown fuse, and then install a new fuse of the proper fuse. Auxiliary DC jack fuse Four-wheel-drive motor fuse Ignition fuse Radiator fan fuse Signaling system fuse Headlight fuse Spare fuse The main fuse, the fuel injection system fuse, the EPS fuse, and the fuse box are located under panel A. (See page 8-10.) If a fuse is blown, replace it as follows. 1. Always use a fuse of the specified rating, and never use...
Owners Manual
Page 143
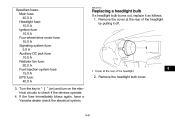
... again, have a Yamaha dealer check the electrical system. Remove the headlight bulb cover. 8-61 EBU27443 Replacing a headlight bulb If a headlight bulb burns out, replace it off. 1. Turn the key to " " (on) and turn on the electrical circuits to check if the devices operate. 4. Cover at the rear of the headlight 8 2. Specified fuses: Main fuse: 40.0 A Headlight fuse: 10.0 A Ignition fuse: 10.0 A Four-wheel-drive motor fuse: 10.0 A Signaling system fuse: 5.0 A Auxiliary DC jack fuse: 10.0 A Radiator fan fuse: 20.0 A Fuel injection system fuse: 15.0 A EPS fuse: 40.0 A 3.
... again, have a Yamaha dealer check the electrical system. Remove the headlight bulb cover. 8-61 EBU27443 Replacing a headlight bulb If a headlight bulb burns out, replace it off. 1. Turn the key to " " (on) and turn on the electrical circuits to check if the devices operate. 4. Cover at the rear of the headlight 8 2. Specified fuses: Main fuse: 40.0 A Headlight fuse: 10.0 A Ignition fuse: 10.0 A Four-wheel-drive motor fuse: 10.0 A Signaling system fuse: 5.0 A Auxiliary DC jack fuse: 10.0 A Radiator fan fuse: 20.0 A Fuel injection system fuse: 15.0 A EPS fuse: 40.0 A 3.
Owners Manual
Page 151
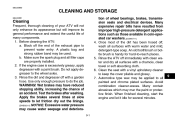
... immediately with clean water and dry all surfaces with a garden hose. WARNING! Wet brakes may be used. Avoid combination cleaner-waxes. EBU25860 CLEANING AND STORAGE EBU25881 Cleaning Frequent, thorough cleaning of your ATV will not only enhance its appearance but will improve its general performance and extend the useful life of wheel bearings, brakes, transmission seals and electrical devices. Do not...
... immediately with clean water and dry all surfaces with a garden hose. WARNING! Wet brakes may be used. Avoid combination cleaner-waxes. EBU25860 CLEANING AND STORAGE EBU25881 Cleaning Frequent, thorough cleaning of your ATV will not only enhance its appearance but will improve its general performance and extend the useful life of wheel bearings, brakes, transmission seals and electrical devices. Do not...
Owners Manual
Page 154
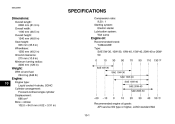
...SPECIFICATIONS Dimensions: Overall length: 2065 mm (81.3 in) Overall width: 1180 mm (46.5 in) Overall height: 1240 mm (48.8 in) Seat height: 905 mm (35.6 in) Wheelbase: 1250 mm (49.2 in) Ground clearance: 275 mm (10.8 in) Minimum turning radius: 3200 mm (126 in) Compression ratio: 9.20 : 1 Starting system: Electric starter Lubrication system: Wet sump Engine oil... Weight: With oil and fuel: 294.0 kg (648 lb) SAE 5W-30 SAE 10W-30 SAE 10W-40 SAE 15W-40 SAE 20W-40 SAE 20W-50 Engine: 10 Engine type: Liquid cooled 4-stroke, SOHC Cylinder arrangement: Forward-inclined single cylinder ...
...SPECIFICATIONS Dimensions: Overall length: 2065 mm (81.3 in) Overall width: 1180 mm (46.5 in) Overall height: 1240 mm (48.8 in) Seat height: 905 mm (35.6 in) Wheelbase: 1250 mm (49.2 in) Ground clearance: 275 mm (10.8 in) Minimum turning radius: 3200 mm (126 in) Compression ratio: 9.20 : 1 Starting system: Electric starter Lubrication system: Wet sump Engine oil... Weight: With oil and fuel: 294.0 kg (648 lb) SAE 5W-30 SAE 10W-30 SAE 10W-40 SAE 15W-40 SAE 20W-40 SAE 20W-50 Engine: 10 Engine type: Liquid cooled 4-stroke, SOHC Cylinder arrangement: Forward-inclined single cylinder ...

Owners Manual
Page 158
Headlight fuse: 10.0 A Signaling system fuse: 5.0 A Ignition fuse: 10.0 A Auxiliary DC jack fuse: 10.0 A Four-wheel-drive motor fuse: 10.0 A Radiator fan fuse: 20.0 A 10 10-5
Headlight fuse: 10.0 A Signaling system fuse: 5.0 A Ignition fuse: 10.0 A Auxiliary DC jack fuse: 10.0 A Four-wheel-drive motor fuse: 10.0 A Radiator fan fuse: 20.0 A 10 10-5
Owners Manual
Page 164
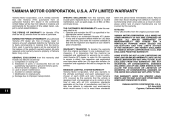
... strain, neglect, or abuse. SPECIFIC EXCLUSIONS from this service. Operate and maintain the ATV as spark plugs, oil, oil filter, air filter, and brake shoes. An inspection and registration fee will , free of manufacture and that it not to conform at the time of sale with all apparent defects within the period listed immediately below. MAKES NO OTHER WARRANTY OF ANY KIND, EXPRESSED...
... strain, neglect, or abuse. SPECIFIC EXCLUSIONS from this service. Operate and maintain the ATV as spark plugs, oil, oil filter, air filter, and brake shoes. An inspection and registration fee will , free of manufacture and that it not to conform at the time of sale with all apparent defects within the period listed immediately below. MAKES NO OTHER WARRANTY OF ANY KIND, EXPRESSED...
Owners Manual
Page 165
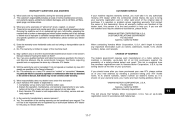
... of normal maintenance services, non-warranty repairs, accident and collision damages, and oil, oil filters, air filters, spark plugs, and brake shoes. Yes, if you must take it is limited to Yamaha Motor Corporation, U.S.A. No. However, if a particular failure is compiled from the purchase registrations sent to repair of the dealership. CUSTOMER RELATIONS DEPARTMENT P.O. What are my responsibility during the warranty period? Does the warranty cover incidental costs...
... of normal maintenance services, non-warranty repairs, accident and collision damages, and oil, oil filters, air filters, spark plugs, and brake shoes. Yes, if you must take it is limited to Yamaha Motor Corporation, U.S.A. No. However, if a particular failure is compiled from the purchase registrations sent to repair of the dealership. CUSTOMER RELATIONS DEPARTMENT P.O. What are my responsibility during the warranty period? Does the warranty cover incidental costs...
Owners Manual
Page 169
... compartments ...4-19 T Tail/brake light bulb, replacing ...8-63 Throttle lever ...4-13, 5-4 Throttle lever free play, adjusting ...8-45 Tires ...5-4 Troubleshooting ...8-66 Troubleshooting charts ...8-67 O On-Command differential gear lock switch ...4-10 On-Command four-wheel-drive switch ...4-9 Override switch ...4-8 Owner's manual and tool kit ...8-2 P Panels, removing and installing ...8-10 Park indicator light ...4-2 Parking ...6-5 Parking on a slope ...6-5 Part locations ...3-1 V Valve clearance ...8-46 V-belt case drain plug ...8-44 Vehicle Emission Control Information label ...11...
... compartments ...4-19 T Tail/brake light bulb, replacing ...8-63 Throttle lever ...4-13, 5-4 Throttle lever free play, adjusting ...8-45 Tires ...5-4 Troubleshooting ...8-66 Troubleshooting charts ...8-67 O On-Command differential gear lock switch ...4-10 On-Command four-wheel-drive switch ...4-9 Override switch ...4-8 Owner's manual and tool kit ...8-2 P Panels, removing and installing ...8-10 Park indicator light ...4-2 Parking ...6-5 Parking on a slope ...6-5 Part locations ...3-1 V Valve clearance ...8-46 V-belt case drain plug ...8-44 Vehicle Emission Control Information label ...11...