
Owners Manual
Page 6
... INSTRUMENT AND CONTROL FUNCTIONS ...4-1 Main switch ...4-1 Indicator lights and warning lights ...4-2 Multi-function display ...4-5 Handlebar switches ...4-7 Throttle lever ...4-13 Speed limiter ...4-13 Front brake lever ...4-14 Brake pedal and rear brake lever ...4-14 Drive select lever ...4-15 Fuel tank cap ...4-15 Fuel ...4-16 Seat ...4-18 Storage compartments ...4-19 Front carrier ...4-22 Rear carrier ...4-22 Adjusting the front and rear shock absorber assemblies ...4-22 Auxiliary DC jack ...4-23 PRE-OPERATION CHECKS ...5-1 Fuel ...5-3 Engine oil ...5-3 Final gear oil ...5-3 Differential...
... INSTRUMENT AND CONTROL FUNCTIONS ...4-1 Main switch ...4-1 Indicator lights and warning lights ...4-2 Multi-function display ...4-5 Handlebar switches ...4-7 Throttle lever ...4-13 Speed limiter ...4-13 Front brake lever ...4-14 Brake pedal and rear brake lever ...4-14 Drive select lever ...4-15 Fuel tank cap ...4-15 Fuel ...4-16 Seat ...4-18 Storage compartments ...4-19 Front carrier ...4-22 Rear carrier ...4-22 Adjusting the front and rear shock absorber assemblies ...4-22 Auxiliary DC jack ...4-23 PRE-OPERATION CHECKS ...5-1 Fuel ...5-3 Engine oil ...5-3 Final gear oil ...5-3 Differential...
Owners Manual
Page 7
... the radiator grills ...8-22 Checking the spark plug ...8-22 Engine oil and oil filter cartridge ...8-24 Final gear oil ...8-28 Differential gear oil ...8-31 Coolant ...8-33 Cleaning the air filter element ...8-39 Cleaning the spark arrester ...8-43 V-belt case drain plug ...8-44 Adjusting the throttle lever free play ...8-45 Valve clearance ...8-46 Adjusting the drive select lever safety system cable ...8-46 Brakes ...8-46 Checking the front and rear brake pads ...8-46 Checking the rear brake hose protectors ...8-47 Checking the brake fluid...
... the radiator grills ...8-22 Checking the spark plug ...8-22 Engine oil and oil filter cartridge ...8-24 Final gear oil ...8-28 Differential gear oil ...8-31 Coolant ...8-33 Cleaning the air filter element ...8-39 Cleaning the spark arrester ...8-43 V-belt case drain plug ...8-44 Adjusting the throttle lever free play ...8-45 Valve clearance ...8-46 Adjusting the drive select lever safety system cable ...8-46 Brakes ...8-46 Checking the front and rear brake pads ...8-46 Checking the rear brake hose protectors ...8-47 Checking the brake fluid...
Owners Manual
Page 8
... the wheel hub bearings ...8-55 Checking the stabilizer bushes ...8-55 Lubricating the rear knuckle pivots ...8-55 Lubricating the steering shaft ...8-56 Battery ...8-56 Replacing a fuse ...8-59 Replacing a headlight bulb ...8-61 Adjusting a headlight beam ...8-63 Replacing the tail/brake light bulb ...8-63 Removing a wheel ...8-64 Installing a wheel ...8-65 Troubleshooting ...8-66 Troubleshooting charts ...8-67 CLEANING AND STORAGE...9-1 Cleaning ...9-1 Storage ...9-2 SPECIFICATIONS ...10-1 CONSUMER INFORMATION...11-1 Identification numbers ...11-1 Noise regulation ...11-4 Maintenance record...
... the wheel hub bearings ...8-55 Checking the stabilizer bushes ...8-55 Lubricating the rear knuckle pivots ...8-55 Lubricating the steering shaft ...8-56 Battery ...8-56 Replacing a fuse ...8-59 Replacing a headlight bulb ...8-61 Adjusting a headlight beam ...8-63 Replacing the tail/brake light bulb ...8-63 Removing a wheel ...8-64 Installing a wheel ...8-65 Troubleshooting ...8-66 Troubleshooting charts ...8-67 CLEANING AND STORAGE...9-1 Cleaning ...9-1 Storage ...9-2 SPECIFICATIONS ...10-1 CONSUMER INFORMATION...11-1 Identification numbers ...11-1 Noise regulation ...11-4 Maintenance record...
Owners Manual
Page 14
... to changing terrain conditions when operating the ATV. Always follow proper procedures for turning as described in this manual on hills as described in safe operating condition. Never open the throttle suddenly. Practice on the footboards of a steep hill if possible. Avoid going down a hill at excessive speeds. Shift your weight forward. Never attempt to turn at high speed. Avoid...
... to changing terrain conditions when operating the ATV. Always follow proper procedures for turning as described in this manual on hills as described in safe operating condition. Never open the throttle suddenly. Practice on the footboards of a steep hill if possible. Avoid going down a hill at excessive speeds. Shift your weight forward. Never attempt to turn at high speed. Avoid...
Owners Manual
Page 22
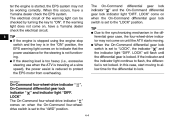
... indicator light "DIFF. The electrical circuit of the warning light can be working correctly. G When the On-Command differential gear lock switch is set to lock. In this occurs, have a Yamaha dealer check the electrical circuit. 4 TIP If the engine is stopped using the engine stop switch and the key is in the differential gear case, the four-wheel-drive indicator may not be checked by turning the key to the "4WD" position...
... indicator light "DIFF. The electrical circuit of the warning light can be working correctly. G When the On-Command differential gear lock switch is set to lock. In this occurs, have a Yamaha dealer check the electrical circuit. 4 TIP If the engine is stopped using the engine stop switch and the key is in the differential gear case, the four-wheel-drive indicator may not be checked by turning the key to the "4WD" position...
Owners Manual
Page 26
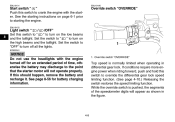
... the figure. 4-8 If conditions require more engine power when riding forward, push and hold this should happen, remove the battery and recharge it. Override switch "OVERRIDE" Top speed is pushed, the segments of time, otherwise the battery may discharge to the point that the starter motor will appear as shown in differential gear lock. See page 8-56 for an extended period of the speedometer...
... the figure. 4-8 If conditions require more engine power when riding forward, push and hold this should happen, remove the battery and recharge it. Override switch "OVERRIDE" Top speed is pushed, the segments of time, otherwise the battery may discharge to the point that the starter motor will appear as shown in differential gear lock. See page 8-56 for an extended period of the speedometer...
Owners Manual
Page 31
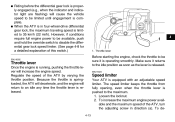
... engine power available and the maximum speed of the ATV by varying the throttle position. Make sure it is operating smoothly. G G Riding before the differential gear lock is properly engaged (e.g., when the indicator and indicator light are flashing) will return to an idle any time the throttle lever is released. Regulate the speed of the ATV, turn the adjusting screw in four-wheel-drive differential gear lock, the maximum traveling speed...
... engine power available and the maximum speed of the ATV by varying the throttle position. Make sure it is operating smoothly. G G Riding before the differential gear lock is properly engaged (e.g., when the indicator and indicator light are flashing) will return to an idle any time the throttle lever is released. Regulate the speed of the ATV, turn the adjusting screw in four-wheel-drive differential gear lock, the maximum traveling speed...
Owners Manual
Page 36
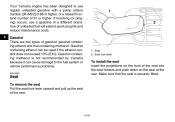
... fuel will extend spark plug life and reduce maintenance costs. 4 Gasohol There are two types of 91 or higher. Gasohol containing ethanol can cause damage to use a gasoline of the seat into the seat holders and push down on the seat at the rear. Your Yamaha engine has been designed to the fuel system or vehicle performance problems. EBU18881 1. Seat lock lever Seat To remove the seat Pull the seat lock...
... fuel will extend spark plug life and reduce maintenance costs. 4 Gasohol There are two types of 91 or higher. Gasohol containing ethanol can cause damage to use a gasoline of the seat into the seat holders and push down on the seat at the rear. Your Yamaha engine has been designed to the fuel system or vehicle performance problems. EBU18881 1. Seat lock lever Seat To remove the seat Pull the seat lock...
Owners Manual
Page 51
... lever is completely shifted into the neutral or park position before the next attempt. G The rear brake lever or brake pedal is recommended to a complete stop the ATV, otherwise the transmission may be started under the following conditions: G The drive select lever is cold! Pause a few seconds before starting the engine. 3. Bring the ATV to shift into position. 6 6-2 However, it again...
... lever is completely shifted into the neutral or park position before the next attempt. G The rear brake lever or brake pedal is recommended to a complete stop the ATV, otherwise the transmission may be started under the following conditions: G The drive select lever is cold! Pause a few seconds before starting the engine. 3. Bring the ATV to shift into position. 6 6-2 However, it again...
Owners Manual
Page 52
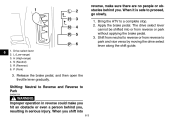
...drive select lever along the shift guide. 3. Shift from neutral to reverse or from reverse or park without applying the brake pedal. 3. When you , resulting in serious injury. L H N R P 6 1. 2. 3. 4. 5. 6. Shifting: Neutral to Reverse and Reverse to proceed, go slowly. 1. When it is safe to Park EWB00720 WARNING... Improper operation in reverse could make sure there are no people or obstacles behind you shift into or from reverse to a complete stop. 2. Release the brake pedal, and then open the throttle lever gradually. Drive select lever L...
...drive select lever along the shift guide. 3. Shift from neutral to reverse or from reverse or park without applying the brake pedal. 3. When you , resulting in serious injury. L H N R P 6 1. 2. 3. 4. 5. 6. Shifting: Neutral to Reverse and Reverse to proceed, go slowly. 1. When it is safe to Park EWB00720 WARNING... Improper operation in reverse could make sure there are no people or obstacles behind you shift into or from reverse to a complete stop. 2. Release the brake pedal, and then open the throttle lever gradually. Drive select lever L...
Owners Manual
Page 69
... the operation of the throttle, brakes, shifting procedures, and turning techniques in this area before attempting to turn at faster speeds. Shift to park position and follow proper procedures for your ATV. Once it has warmed up you are ready to the engine or drive train may lift off -road, the two rear wheels turn at speeds too fast for turning as described in a loss...
... the operation of the throttle, brakes, shifting procedures, and turning techniques in this area before attempting to turn at faster speeds. Shift to park position and follow proper procedures for your ATV. Once it has warmed up you are ready to the engine or drive train may lift off -road, the two rear wheels turn at speeds too fast for turning as described in a loss...
Owners Manual
Page 72
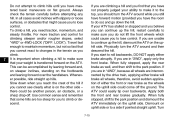
...weight is transferred forward on the ATV. It is on the other side - If you need traction, momentum, and steady throttle. Apply both the front and rear brakes gradually. In all cases avoid inclines with slippery or loose surfaces, or obstacles that some hills are unable to the park position. LOCK...stalled or stopped and you believe you start to lose control. Turn 7-15 To climb a hill, you are in "4WD", because all wheels, therefore, avoid sudden application of the hill if you to changes in "2WD", apply only the front brake. there could easily tip over the ...
...weight is transferred forward on the ATV. It is on the other side - If you need traction, momentum, and steady throttle. Apply both the front and rear brakes gradually. In all cases avoid inclines with slippery or loose surfaces, or obstacles that some hills are unable to the park position. LOCK...stalled or stopped and you believe you start to lose control. Turn 7-15 To climb a hill, you are in "4WD", because all wheels, therefore, avoid sudden application of the hill if you to changes in "2WD", apply only the front brake. there could easily tip over the ...
Owners Manual
Page 140
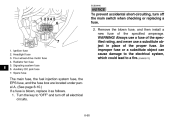
... Ignition fuse Headlight fuse Four-wheel-drive motor fuse Radiator fan fuse Signaling system fuse Auxiliary DC jack fuse Spare fuse The main fuse, the fuel injection system fuse, the EPS fuse, and the fuse box are located under panel A. (See page 8-10.) If a fuse is blown, replace it as follows. 1. WARNING! Turn the key to a fire. [EWB02172] 8 1. 2. 3. 4. 5. 6. 7. Remove the blown fuse, and then install a new fuse of the proper fuse. ECB00640 NOTICE To prevent accidental short-circuiting, turn off the main switch when...
... Ignition fuse Headlight fuse Four-wheel-drive motor fuse Radiator fan fuse Signaling system fuse Auxiliary DC jack fuse Spare fuse The main fuse, the fuel injection system fuse, the EPS fuse, and the fuse box are located under panel A. (See page 8-10.) If a fuse is blown, replace it as follows. 1. WARNING! Turn the key to a fire. [EWB02172] 8 1. 2. 3. 4. 5. 6. 7. Remove the blown fuse, and then install a new fuse of the proper fuse. ECB00640 NOTICE To prevent accidental short-circuiting, turn off the main switch when...
Owners Manual
Page 141
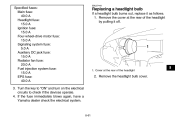
... follows. 1. Turn the key to "ON" and turn on the electrical circuits to check if the devices operate. 4. Cover at the rear of the headlight 8 2. If the fuse immediately blows again, have a Yamaha dealer check the electrical system. EBU27443 Replacing a headlight bulb If a headlight bulb burns out, replace it off. 1. Specified fuses: Main fuse: 40.0 A Headlight fuse: 15.0 A Ignition fuse: 15.0 A Four-wheel-drive motor fuse: 15.0 A Signaling system fuse: 5.0 A Auxiliary DC jack fuse: 15.0 A Radiator fan fuse: 20.0 A Fuel injection system fuse: 15.0 A EPS fuse: 40...
... follows. 1. Turn the key to "ON" and turn on the electrical circuits to check if the devices operate. 4. Cover at the rear of the headlight 8 2. If the fuse immediately blows again, have a Yamaha dealer check the electrical system. EBU27443 Replacing a headlight bulb If a headlight bulb burns out, replace it off. 1. Specified fuses: Main fuse: 40.0 A Headlight fuse: 15.0 A Ignition fuse: 15.0 A Four-wheel-drive motor fuse: 15.0 A Signaling system fuse: 5.0 A Auxiliary DC jack fuse: 15.0 A Radiator fan fuse: 20.0 A Fuel injection system fuse: 15.0 A EPS fuse: 40...
Owners Manual
Page 149
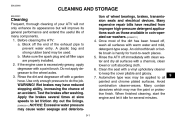
... expensive repair bills have reduced stopping ability, increasing the chance of wheel bearings, brakes, transmission seals and electrical devices. EBU25860 CLEANING AND STORAGE EBU25881 Cleaning Frequent, thorough cleaning of your ATV will not only enhance its appearance but will improve its general performance and extend the useful life of the exhaust pipe to prevent water entry. Clean the seat with a garden hose. Rinse...
... expensive repair bills have reduced stopping ability, increasing the chance of wheel bearings, brakes, transmission seals and electrical devices. EBU25860 CLEANING AND STORAGE EBU25881 Cleaning Frequent, thorough cleaning of your ATV will not only enhance its appearance but will improve its general performance and extend the useful life of the exhaust pipe to prevent water entry. Clean the seat with a garden hose. Rinse...
Owners Manual
Page 152
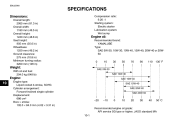
...SPECIFICATIONS Dimensions: Overall length: 2065 mm (81.3 in) Overall width: 1180 mm (46.5 in) Overall height: 1240 mm (48.8 in) Seat height: 905 mm (35.6 in) Wheelbase: 1250 mm (49.2 in) Ground clearance: 275 mm (10.8 in) Minimum turning radius: 3200 mm (126 in) Compression ratio: 9.20 :1 Starting system: Electric starter Lubrication system: Wet sump Engine oil... Weight: With oil and fuel: 294.0 kg (648 lb) SAE 5W-30 SAE 10W-30 SAE 10W-40 SAE 15W-40 SAE 20W-40 SAE 20W-50 Engine: 10 Engine type: Liquid cooled 4-stroke, SOHC Cylinder arrangement: Forward-inclined single cylinder Displacement...
...SPECIFICATIONS Dimensions: Overall length: 2065 mm (81.3 in) Overall width: 1180 mm (46.5 in) Overall height: 1240 mm (48.8 in) Seat height: 905 mm (35.6 in) Wheelbase: 1250 mm (49.2 in) Ground clearance: 275 mm (10.8 in) Minimum turning radius: 3200 mm (126 in) Compression ratio: 9.20 :1 Starting system: Electric starter Lubrication system: Wet sump Engine oil... Weight: With oil and fuel: 294.0 kg (648 lb) SAE 5W-30 SAE 10W-30 SAE 10W-40 SAE 15W-40 SAE 20W-40 SAE 20W-50 Engine: 10 Engine type: Liquid cooled 4-stroke, SOHC Cylinder arrangement: Forward-inclined single cylinder Displacement...

Owners Manual
Page 156
Headlight fuse: 15.0 A Signaling system fuse: 5.0 A Ignition fuse: 15.0 A Auxiliary DC jack fuse: 15.0 A Four-wheel-drive motor fuse: 15.0 A Radiator fan fuse: 20.0 A 10 10-5
Headlight fuse: 15.0 A Signaling system fuse: 5.0 A Ignition fuse: 15.0 A Auxiliary DC jack fuse: 15.0 A Four-wheel-drive motor fuse: 15.0 A Radiator fan fuse: 20.0 A 10 10-5

Owners Manual
Page 162
... owner's manual; 2. Lack of each 2006 and later model Yamaha ATV covered by this warranty to any failures caused by an authorized Yamaha ATV dealer. Give notice to genuine Yamaha parts. emissions standards applicable at the time of any part adjudged defective by this warranty shall include any subsequent purchaser(s), it is designed, built, and equipped so as spark plugs, oil, oil filter, air filter, and brake shoes. YAMAHA MOTOR...
... owner's manual; 2. Lack of each 2006 and later model Yamaha ATV covered by this warranty to any failures caused by an authorized Yamaha ATV dealer. Give notice to genuine Yamaha parts. emissions standards applicable at the time of any part adjudged defective by this warranty shall include any subsequent purchaser(s), it is designed, built, and equipped so as spark plugs, oil, oil filter, air filter, and brake shoes. YAMAHA MOTOR...
Owners Manual
Page 163
... are my responsibility during the warranty period? These terms are still not satisfied and require additional assistance, please write: YAMAHA MOTOR CORPORATION U.S.A. Yes. The remainder of the dealership. CUSTOMER RELATIONS DEPARTMENT P.O. If you should move after you are general and overlap each manufacturer of normal maintenance services, non-warranty repairs, accident and collision damages, and oil, oil filters, air filters, spark plugs, and brake shoes.
... are my responsibility during the warranty period? These terms are still not satisfied and require additional assistance, please write: YAMAHA MOTOR CORPORATION U.S.A. Yes. The remainder of the dealership. CUSTOMER RELATIONS DEPARTMENT P.O. If you should move after you are general and overlap each manufacturer of normal maintenance services, non-warranty repairs, accident and collision damages, and oil, oil filters, air filters, spark plugs, and brake shoes.
Owners Manual
Page 168
... compartments ...4-19 T Tail/brake light bulb, replacing ...8-63 Throttle lever ...4-13, 5-4 Throttle lever free play, adjusting ...8-45 Tires ...5-4 Troubleshooting ...8-66 Troubleshooting charts ...8-67 O On-Command differential gear lock switch ...4-10 On-Command four-wheel-drive switch ...4-9 Override switch ...4-8 Owner's manual and tool kit ...8-2 P Panels, removing and installing ...8-10 Park indicator light ...4-2 Parking ...6-5 Parking on a slope ...6-5 Part locations ...3-1 V Valve clearance ...8-46 V-belt case drain plug ...8-44 Vehicle Emission Control Information label ...11...
... compartments ...4-19 T Tail/brake light bulb, replacing ...8-63 Throttle lever ...4-13, 5-4 Throttle lever free play, adjusting ...8-45 Tires ...5-4 Troubleshooting ...8-66 Troubleshooting charts ...8-67 O On-Command differential gear lock switch ...4-10 On-Command four-wheel-drive switch ...4-9 Override switch ...4-8 Owner's manual and tool kit ...8-2 P Panels, removing and installing ...8-10 Park indicator light ...4-2 Parking ...6-5 Parking on a slope ...6-5 Part locations ...3-1 V Valve clearance ...8-46 V-belt case drain plug ...8-44 Vehicle Emission Control Information label ...11...