

Owners Manual
Page 5
... Fuel level warning indicator ...16 Oil level/pressure warning indicator ...16 Coolant temperature warning indicator ...17 Electric power steering warning indicator "EPS" ...17 Self-diagnosis device ...18 Engine stop switch ...18 Headlight beam switch "LIGHTS" ...18 Grip/thumb warmer adjusting switch ...19 Auxiliary DC jack ...19 Helmet shield heater jack ...20 Brake lever ...20 Parking brake lever ...21 Shift lever ...21 Drive guard ...22 V-belt holders ...23 Storage compartment ...23 Fuel ...24 Suspension ...25 EXUP system ...34 Operation ...37 Starting...
... Fuel level warning indicator ...16 Oil level/pressure warning indicator ...16 Coolant temperature warning indicator ...17 Electric power steering warning indicator "EPS" ...17 Self-diagnosis device ...18 Engine stop switch ...18 Headlight beam switch "LIGHTS" ...18 Grip/thumb warmer adjusting switch ...19 Auxiliary DC jack ...19 Helmet shield heater jack ...20 Brake lever ...20 Parking brake lever ...21 Shift lever ...21 Drive guard ...22 V-belt holders ...23 Storage compartment ...23 Fuel ...24 Suspension ...25 EXUP system ...34 Operation ...37 Starting...
Owners Manual
Page 12
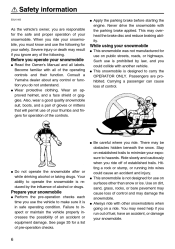
... face shield or goggles. Failure to hazards. Apply the parking brake before starting the engine. While using your snowmobile G Before you operate your exposure to inspect or maintain the vehicle properly increases the possibility of control. Ride slowly and cautiously when you must know and use...drugs. See page 35 for use the vehicle to minimize your snowmobile G G Read the Owner's Manual and all of the operating controls and their function. Passengers are responsible for your safety. This may need help if you run out of fuel, have an accident, or damage your...
... face shield or goggles. Failure to hazards. Apply the parking brake before starting the engine. While using your snowmobile G Before you operate your exposure to inspect or maintain the vehicle properly increases the possibility of control. Ride slowly and cautiously when you must know and use...drugs. See page 35 for use the vehicle to minimize your snowmobile G G Read the Owner's Manual and all of the operating controls and their function. Passengers are responsible for your safety. This may need help if you run out of fuel, have an accident, or damage your...
Owners Manual
Page 13
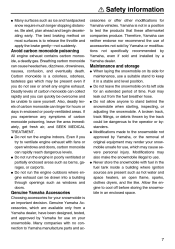
... to release the throttle and apply the brake gently-not suddenly. Therefore, Yamaha can be dangerous to ventilate engine exhaust with fans or open flame, sparks, clothes...Yamaha for Yamaha vehicles. Safety information G Many surfaces such as hot water and space heaters, an open windows and doors, carbon monoxide can collect rapidly and you do not see or smell any symptoms of carbon monoxide can cause headaches, dizziness, drowsiness, nausea, confusion, and eventually death. G Do not run the engine indoors. Genuine Yamaha Accessories, which may leak out from a Yamaha...
... to release the throttle and apply the brake gently-not suddenly. Therefore, Yamaha can be dangerous to ventilate engine exhaust with fans or open flame, sparks, clothes...Yamaha for Yamaha vehicles. Safety information G Many surfaces such as hot water and space heaters, an open windows and doors, carbon monoxide can collect rapidly and you do not see or smell any symptoms of carbon monoxide can cause headaches, dizziness, drowsiness, nausea, confusion, and eventually death. G Do not run the engine indoors. Genuine Yamaha Accessories, which may leak out from a Yamaha...

Owners Manual
Page 17
... fuel remaining in the meter display. Warning light " " 2. High beam indicator light " " 9. The grip warmer level is activated, the warning light and engine trouble warning indicator flash, and the two-digit code "84" displays in the fuel tank) G a grip/thumb warmer level indicator (which shows the grip warmer level or the thumb warmer level) G a display brightness control function G an electric power steering warning indicator When the key...
... fuel remaining in the meter display. Warning light " " 2. High beam indicator light " " 9. The grip warmer level is activated, the warning light and engine trouble warning indicator flash, and the two-digit code "84" displays in the fuel tank) G a grip/thumb warmer level indicator (which shows the grip warmer level or the thumb warmer level) G a display brightness control function G an electric power steering warning indicator When the key...

Owners Manual
Page 24
... using the stop the engine in an emergency. Electric power steering warning indicator "EPS" TIP If the steering load is too heavy (i.e., excessive steering use when the snowmobile is traveling at a slow speed), the power assist is used to protect the EPS motor from overheating. To start the engine, pull the stop the engine. Warning light " " 2. ESU13365 1. Error code display ESU10531 " Engine stop switch " " The engine stop switch is reduced to...
... using the stop the engine in an emergency. Electric power steering warning indicator "EPS" TIP If the steering load is too heavy (i.e., excessive steering use when the snowmobile is traveling at a slow speed), the power assist is used to protect the EPS motor from overheating. To start the engine, pull the stop the engine. Warning light " " 2. ESU13365 1. Error code display ESU10531 " Engine stop switch " " The engine stop switch is reduced to...

Owners Manual
Page 31
... damage the cylinders in poor damping performance. The spring preload can be adjusted to suit rider preference. Suspension The suspension can cause poor handling and loss of terrain or riding conditions. Make sure that contain highly pressurized nitrogen gas. 25 Control functions Your Yamaha engine has been designed to use alcohol deicers or water absorbing additives with oxygenated fuel. Do not subject the shock absorbers to...
... damage the cylinders in poor damping performance. The spring preload can be adjusted to suit rider preference. Suspension The suspension can cause poor handling and loss of terrain or riding conditions. Make sure that contain highly pressurized nitrogen gas. 25 Control functions Your Yamaha engine has been designed to use alcohol deicers or water absorbing additives with oxygenated fuel. Do not subject the shock absorbers to...

Owners Manual
Page 34
... of the center shock absorber and the rear torsion springs (RX10PXT), or the rear shock absorber (RX10P) The spring preload can be heard, but this is from the air valve. 1 2 (a) (b) 1. To increase the spring preload and thereby harden the suspension, turn the adjusting nut in direction (a). Center shock absorber (RX10PXT) 1. To allow pressure to escape, push the button all the way down and quickly release it...
... of the center shock absorber and the rear torsion springs (RX10PXT), or the rear shock absorber (RX10P) The spring preload can be heard, but this is from the air valve. 1 2 (a) (b) 1. To increase the spring preload and thereby harden the suspension, turn the adjusting nut in direction (a). Center shock absorber (RX10PXT) 1. To allow pressure to escape, push the button all the way down and quickly release it...

Owners Manual
Page 35
... (hard): H Rear shock absorber (RX10P) To increase the spring preload and thereby harden the suspension, turn the adjuster in direction (b). 1. To increase the spring preload and thereby harden the suspension, turn of stability. Spring preload adjusting ring Spring preload setting: Minimum (soft): 1 Standard: 4 Maximum (hard): 7 TIP (a) (b) The spring preload can cause poor handling and loss of the adjusting nut. 3. Control functions Spring preload setting...
... (hard): H Rear shock absorber (RX10P) To increase the spring preload and thereby harden the suspension, turn the adjuster in direction (b). 1. To increase the spring preload and thereby harden the suspension, turn of stability. Spring preload adjusting ring Spring preload setting: Minimum (soft): 1 Standard: 4 Maximum (hard): 7 TIP (a) (b) The spring preload can cause poor handling and loss of the adjusting nut. 3. Control functions Spring preload setting...

Owners Manual
Page 45
... possibility of the snowmobile will start out and accelerate 1. 2. With the engine idling, release the parking brake. Please read the Snowmobiler's Safety Handbook that this area before trying more reliable snowmobile. As you should practice control of the throttle and brake, and master turning techniques in this area is the key to stand behind the snowmobile when starting the engine. Do not allow anyone to...
... possibility of the snowmobile will start out and accelerate 1. 2. With the engine idling, release the parking brake. Please read the Snowmobiler's Safety Handbook that this area before trying more reliable snowmobile. As you should practice control of the throttle and brake, and master turning techniques in this area is the key to stand behind the snowmobile when starting the engine. Do not allow anyone to...

Owners Manual
Page 46
... snowmobile back down as abrupt throttle changes, excessive braking, incorrect body movements, or too much speed for the sharpness of the hill, and be prepared to react to obstacles, sharp drops, or other vehicles or people which may cause the snowmobile to keep the snowmobile from the uphill side. Restart the engine, release the parking brake, and descend the hill...
... snowmobile back down as abrupt throttle changes, excessive braking, incorrect body movements, or too much speed for the sharpness of the hill, and be prepared to react to obstacles, sharp drops, or other vehicles or people which may cause the snowmobile to keep the snowmobile from the uphill side. Restart the engine, release the parking brake, and descend the hill...
Owners Manual
Page 58
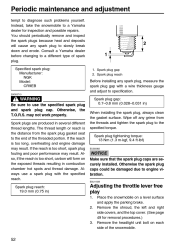
... the throttle lever free play 1. 2. Consult a Yamaha dealer before changing to a Yamaha dealer for removal procedures.) Remove the headlight unit bolt on each side of spark plug. Spark plug reach: 19.0 mm (0.75 in) NOTICE Make sure that the spark plug caps are produced in ) When installing the spark plug, always clean the gasket surface. Also, if the reach is too long, overheating and engine damage may not work...
... the throttle lever free play 1. 2. Consult a Yamaha dealer before changing to a Yamaha dealer for removal procedures.) Remove the headlight unit bolt on each side of spark plug. Spark plug reach: 19.0 mm (0.75 in) NOTICE Make sure that the spark plug caps are produced in ) When installing the spark plug, always clean the gasket surface. Also, if the reach is too long, overheating and engine damage may not work...

Owners Manual
Page 61
..., and then unhook the headlight unit. (See page 52.) Remove the air filter case cover by turning the main switch to less than the clutch engagement speed, stop switch housing 3. If there is no snow under the air filter element frame after each side of control. [EWS00362] ESU11887 Lift up the air filter element frame and check the air filter element. Throttle lever pivot 2. Periodic maintenance and adjustment 1. 2. Place...
..., and then unhook the headlight unit. (See page 52.) Remove the air filter case cover by turning the main switch to less than the clutch engagement speed, stop switch housing 3. If there is no snow under the air filter element frame after each side of control. [EWS00362] ESU11887 Lift up the air filter element frame and check the air filter element. Throttle lever pivot 2. Periodic maintenance and adjustment 1. 2. Place...

Owners Manual
Page 67
... air can cause overheating and severe engine damage. COOLANT COLD LEVEL Remove the coolant recovery tank cap, add the recommended coolant until it off. 61 Replenishing the coolant 1. 2. Coolant recovery tank 2. Consult a Yamaha dealer. Remove the shroud, the left and right side covers, and the top cover. (See page 49 for several minutes, and then turn it reaches the "COLD LEVEL" mark, and then install the cap. 1. Start the engine...
... air can cause overheating and severe engine damage. COOLANT COLD LEVEL Remove the coolant recovery tank cap, add the recommended coolant until it off. 61 Replenishing the coolant 1. 2. Coolant recovery tank 2. Consult a Yamaha dealer. Remove the shroud, the left and right side covers, and the top cover. (See page 49 for several minutes, and then turn it reaches the "COLD LEVEL" mark, and then install the cap. 1. Start the engine...

Owners Manual
Page 72
... is working properly. Test the brake at a low speed when starting out to an accident. If the brake does not provide proper braking performance, inspect the brake for wear or brake fluid leakage. (See the following procedure. 1. If the brake pads reach the wear limit, ask a Yamaha dealer to the following section for more details.) Checking the brake pads Check the brake pads for wear according to replace...
... is working properly. Test the brake at a low speed when starting out to an accident. If the brake does not provide proper braking performance, inspect the brake for wear or brake fluid leakage. (See the following procedure. 1. If the brake pads reach the wear limit, ask a Yamaha dealer to the following section for more details.) Checking the brake pads Check the brake pads for wear according to replace...

Owners Manual
Page 73
... master cylinder when refilling. Loosen the parking brake cable locknut. 4. Water will significantly lower the boiling point of the fluid and may deteriorate painted surfaces or plastic parts. Turn the parking brake cable adjusting bolt in ) 7. 8. Parking brake pad adjusting bolt locknut Parking brake pad adjusting bolt Parking brake cable locknut Parking brake cable adjusting bolt Parking brake cable length WARNING Be careful that the brake fluid is spilled, clean it up immediately. Remove the shroud and the right side cover...
... master cylinder when refilling. Loosen the parking brake cable locknut. 4. Water will significantly lower the boiling point of the fluid and may deteriorate painted surfaces or plastic parts. Turn the parking brake cable adjusting bolt in ) 7. 8. Parking brake pad adjusting bolt locknut Parking brake pad adjusting bolt Parking brake cable locknut Parking brake cable adjusting bolt Parking brake cable length WARNING Be careful that the brake fluid is spilled, clean it up immediately. Remove the shroud and the right side cover...

Owners Manual
Page 86
... air filter case by installing the bolt. 11. Install the battery cover, and then hook the battery band onto the holder. 12. Install the top cover, the left and right side covers, and the shroud. 1 2 3 4 5 6 7 8 1. 2. 3. 4. 5. 6. 7. 8. Install the headlight unit. 14. Periodic maintenance and adjustment Specified fuses: Main fuse: 40.0 A EPS fuse: 40.0 A Fuel injection system fuse: 10.0 A Headlight fuse: 20.0 A Signaling system fuse: 3.0 A Auxiliary DC jack fuse: 3.0 A Helmet shield heater jack fuse: 3.0 A Ignition fuse: 20.0 A Radiator fan fuse: 5.0 A Spare fuses...
... air filter case by installing the bolt. 11. Install the battery cover, and then hook the battery band onto the holder. 12. Install the top cover, the left and right side covers, and the shroud. 1 2 3 4 5 6 7 8 1. 2. 3. 4. 5. 6. 7. 8. Install the headlight unit. 14. Periodic maintenance and adjustment Specified fuses: Main fuse: 40.0 A EPS fuse: 40.0 A Fuel injection system fuse: 10.0 A Headlight fuse: 20.0 A Signaling system fuse: 3.0 A Auxiliary DC jack fuse: 3.0 A Helmet shield heater jack fuse: 3.0 A Ignition fuse: 20.0 A Radiator fan fuse: 5.0 A Spare fuses...

Owners Manual
Page 92
... products, solvent or thinner, fuel (gasoline), rust removers or inhibitors, brake fluid, antifreeze or electrolyte. NOTICE: Do not simply start the engine when in the MAINTENANCE section, or Yamaha Lube-Zall general-purpose lubricant. An alternate method is scratched, use any Engine Proper storage of the slide rail suspension, front suspension and brakes), electric components (couplers, connectors, instruments, switches and lights), breather hoses and vents. Do not...
... products, solvent or thinner, fuel (gasoline), rust removers or inhibitors, brake fluid, antifreeze or electrolyte. NOTICE: Do not simply start the engine when in the MAINTENANCE section, or Yamaha Lube-Zall general-purpose lubricant. An alternate method is scratched, use any Engine Proper storage of the slide rail suspension, front suspension and brakes), electric components (couplers, connectors, instruments, switches and lights), breather hoses and vents. Do not...
Owners Manual
Page 98
... than snow or ice. 3. SPECIFIC EXCLUSIONS from this warranty shall include any part adjudged defective by Yamaha due to normal wear or routine maintenance including oil, spark plugs, clutch drive belts, slide runners, and track. Failures other than those resulting from this warranty shall include parts replaced due to faulty workmanship or material from defects in the appropriate Owner's Manual. Abnormal strain, neglect, or...
... than snow or ice. 3. SPECIFIC EXCLUSIONS from this warranty shall include any part adjudged defective by Yamaha due to normal wear or routine maintenance including oil, spark plugs, clutch drive belts, slide runners, and track. Failures other than those resulting from this warranty shall include parts replaced due to faulty workmanship or material from defects in the appropriate Owner's Manual. Abnormal strain, neglect, or...
Owners Manual
Page 100
... of a motor vehicle to : 1. Box 6555 Cypress, California 90630 This will ensure that Yamaha Motor Corporation, U.S.A. Whom should move after you are handled at the dealer level, this warranty. If the dealer is not able to do so, he is compiled from the purchase registrations sent to contact Yamaha Motor Corporation, U.S.A., for his setup, service and warranty repair work. When contacting Yamaha Motor Corporation...
... of a motor vehicle to : 1. Box 6555 Cypress, California 90630 This will ensure that Yamaha Motor Corporation, U.S.A. Whom should move after you are handled at the dealer level, this warranty. If the dealer is not able to do so, he is compiled from the purchase registrations sent to contact Yamaha Motor Corporation, U.S.A., for his setup, service and warranty repair work. When contacting Yamaha Motor Corporation...

Owners Manual
Page 102
Index A Air filter, checking...55 Auxiliary DC jack ...19 B Battery...77 Brake and parking brake ...66 Brake lever ...20 Break-in...38 C Center shock absorber and rear torsion springs, or rear shock absorber, adjusting spring preload...28 Control rods, adjusting ...32 Coolant temperature warning indicator ...17 Cooling system...60 D Drive chain housing...64 Drive guard...22 Drive track and slide runners ...69 Drive track life, maximizing ...42 Driving ...43 E Engine oil and oil filter cartridge ...56 Engine stop switch ...18 EPS warning indicator...17...
Index A Air filter, checking...55 Auxiliary DC jack ...19 B Battery...77 Brake and parking brake ...66 Brake lever ...20 Break-in...38 C Center shock absorber and rear torsion springs, or rear shock absorber, adjusting spring preload...28 Control rods, adjusting ...32 Coolant temperature warning indicator ...17 Cooling system...60 D Drive chain housing...64 Drive guard...22 Drive track and slide runners ...69 Drive track life, maximizing ...42 Driving ...43 E Engine oil and oil filter cartridge ...56 Engine stop switch ...18 EPS warning indicator...17...