
Owners Manual
Page 6
...Lubricating the rear suspension ...7-24 Checking the front fork ...7-24 Checking the steering ...7-25 Checking the wheel bearings ...7-25 Battery ...7-26 Replacing the fuses ...7-27 Replacing the headlight bulb ...7-28 Replacing the tail/brake light bulb ...7-30 Replacing a front turn signal light bulb ...7-30 TABLE OF CONTENTS LOCATION OF IMPORTANT LABELS ...1-1 SAFETY INFORMATION ...2-1 DESCRIPTION ...3-1 Left view ...3-1 Right view ...3-2 Controls and instruments...3-3 INSTRUMENT AND CONTROL FUNCTIONS ...4-1 Main switch/steering lock ...4-1 Indicator and warning lights ...4-2 Multi-function...
...Lubricating the rear suspension ...7-24 Checking the front fork ...7-24 Checking the steering ...7-25 Checking the wheel bearings ...7-25 Battery ...7-26 Replacing the fuses ...7-27 Replacing the headlight bulb ...7-28 Replacing the tail/brake light bulb ...7-30 Replacing a front turn signal light bulb ...7-30 TABLE OF CONTENTS LOCATION OF IMPORTANT LABELS ...1-1 SAFETY INFORMATION ...2-1 DESCRIPTION ...3-1 Left view ...3-1 Right view ...3-2 Controls and instruments...3-3 INSTRUMENT AND CONTROL FUNCTIONS ...4-1 Main switch/steering lock ...4-1 Indicator and warning lights ...4-2 Multi-function...

Owners Manual
Page 14
... load (suspension-adjustable models only), and check the condition and pressure of your motorcycle can adversely affect stability and handling if the weight distribution of an overloaded vehicle could cause an accident. Make sure that has added cargo or accessories. Genuine Yamaha Accessories Choosing accessories for Yamaha vehicles. Yamaha is not designed to pull a trailer or to be attached to the center of the operator, passenger, accessories and...
... load (suspension-adjustable models only), and check the condition and pressure of your motorcycle can adversely affect stability and handling if the weight distribution of an overloaded vehicle could cause an accident. Make sure that has added cargo or accessories. Genuine Yamaha Accessories Choosing accessories for Yamaha vehicles. Yamaha is not designed to pull a trailer or to be attached to the center of the operator, passenger, accessories and...
Owners Manual
Page 15
... your motorcycle were designed to match the performance capabilities and to provide the best combination of serious injury or death. G 2 Aftermarket Tires and Rims The tires and rims that came with your vehicle that change any way reduce ground clearance or cornering clearance, limit suspension travel, steering travel or control operation, or obscure lights or reflectors. • Accessories fitted to the handlebar or the...
... your motorcycle were designed to match the performance capabilities and to provide the best combination of serious injury or death. G 2 Aftermarket Tires and Rims The tires and rims that came with your vehicle that change any way reduce ground clearance or cornering clearance, limit suspension travel, steering travel or control operation, or obscure lights or reflectors. • Accessories fitted to the handlebar or the...
Owners Manual
Page 19
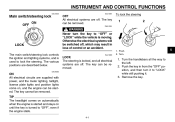
... The headlight comes on until the key is started . Remove the key. Turn the handlebars all electrical systems are supplied with power, and the meter lighting, taillight, license plate lights and position lights come on, and the engine can be started and stays on automatically when the engine is turned to lock the steering. Otherwise the electrical systems will be switched off . Push the key in loss of control or an...
... The headlight comes on until the key is started . Remove the key. Turn the handlebars all electrical systems are supplied with power, and the meter lighting, taillight, license plate lights and position lights come on, and the engine can be started and stays on automatically when the engine is turned to lock the steering. Otherwise the electrical systems will be switched off . Push the key in loss of control or an...
Owners Manual
Page 20
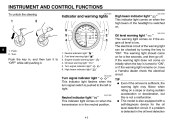
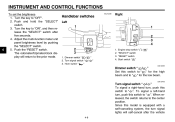
... warning light should come on initially when the key is low. Neutral indicator light " " Fuel level warning light " " Engine trouble warning light " Oil level warning light " " Turn signal indicator light " High beam indicator light " " " " EAU11020 Turn signal indicator light " " This indicator light flashes when the turn it . 1. 2. 3. 4. 5. 6. The electrical circuit of the headlight is switched on if the engine oil level is turned to "OFF" while still pushing it to "ON", or if the warning light remains on for the oil...
... warning light should come on initially when the key is low. Neutral indicator light " " Fuel level warning light " " Engine trouble warning light " Oil level warning light " " Turn signal indicator light " High beam indicator light " " " " EAU11020 Turn signal indicator light " " This indicator light flashes when the turn it . 1. 2. 3. 4. 5. 6. The electrical circuit of the headlight is switched on if the engine oil level is turned to "OFF" while still pushing it to "ON", or if the warning light remains on for the oil...
Owners Manual
Page 24
INSTRUMENT AND CONTROL FUNCTIONS To set the brightness 1. Push the "RESET" switch. Horn switch " " 1. 2. 3. 4. Engine stop switch " "SELECT" switch "RESET" switch Start switch " " / " EAU12400 Dimmer switch " / " Set this model is equipped with a self-canceling system, the turn signal lights will return to the prior mode. Push and hold the "SELECT" switch. 3. Since this switch to " " for the low beam. Adjust the multi-function meter unit panel brightness level by pushing...
INSTRUMENT AND CONTROL FUNCTIONS To set the brightness 1. Push the "RESET" switch. Horn switch " " 1. 2. 3. 4. Engine stop switch " "SELECT" switch "RESET" switch Start switch " " / " EAU12400 Dimmer switch " / " Set this model is equipped with a self-canceling system, the turn signal lights will return to the prior mode. Push and hold the "SELECT" switch. 3. Since this switch to " " for the low beam. Adjust the multi-function meter unit panel brightness level by pushing...

Owners Manual
Page 25
... is equipped with the starter. See page 6-1 for starting instructions prior to " " before starting the engine. Clutch lever EAU44602 4 The clutch lever is moving, so that the turn signal lights can also be pulled rapidly and released slowly for detailed information. 4-7 To engage the clutch, release the lever. "SELECT" switch This switch is used to perform selections in case of the ignition circuit cut-off system...
... is equipped with the starter. See page 6-1 for starting instructions prior to " " before starting the engine. Clutch lever EAU44602 4 The clutch lever is moving, so that the turn signal lights can also be pulled rapidly and released slowly for detailed information. 4-7 To engage the clutch, release the lever. "SELECT" switch This switch is used to perform selections in case of the ignition circuit cut-off system...
Owners Manual
Page 29
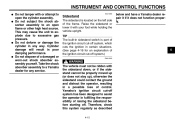
... seat into the seat lock, and then turn it counterclockwise. Insert the key into the seat holder as grass or other materials that the exhaust system has cooled down before doing any maintenance work. G Make sure that easily burn. Unlock. 2. G Park the vehicle in the exhaust system. To prevent a fire hazard or burns: G Do not park the vehicle near possible fire hazards such as shown. 4-11 INSTRUMENT AND CONTROL...
... seat into the seat lock, and then turn it counterclockwise. Insert the key into the seat holder as grass or other materials that the exhaust system has cooled down before doing any maintenance work. G Make sure that easily burn. Unlock. 2. G Park the vehicle in the exhaust system. To prevent a fire hazard or burns: G Do not park the vehicle near possible fire hazards such as shown. 4-11 INSTRUMENT AND CONTROL...
Owners Manual
Page 33
... any service. Do not dispose of the ignition circuit cut-off . Therefore, check this system regularly as described 4-15 TIP The built-in sidestand switch is located on the left side of the frame. Yamaha's ignition circuit cut -off system has been designed to excessive gas pressure. Raise the sidestand or lower it does not function properly. 4 WARNING The vehicle...
... any service. Do not dispose of the ignition circuit cut-off . Therefore, check this system regularly as described 4-15 TIP The built-in sidestand switch is located on the left side of the frame. Yamaha's ignition circuit cut -off system has been designed to excessive gas pressure. Raise the sidestand or lower it does not function properly. 4 WARNING The vehicle...
Owners Manual
Page 39
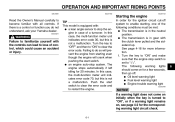
... Starting the engine Read the Owner's Manual carefully to become familiar with the controls can lead to loss of control, which could cause an accident or injury. G an engine auto-stop switch is not a malfunction. In this case, the multi-function meter unit indicates error code 70, but this is set to stop the engine in gear with : G a lean angle sensor to " ". G Oil level warning light G Fuel...
... Starting the engine Read the Owner's Manual carefully to become familiar with the controls can lead to loss of control, which could cause an accident or injury. G an engine auto-stop switch is not a malfunction. In this case, the multi-function meter unit indicates error code 70, but this is set to stop the engine in gear with : G a lean angle sensor to " ". G Oil level warning light G Fuel...

Owners Manual
Page 40
... withstand the shock of time with the transmission in the illustration. Always use the clutch while changing gears to avoid damaging the engine, transmission, and drive train, which are shown in the neutral position, do not coast for starting attempt should go out. 3. EAU16681 To start switch. Pull the clutch lever to disengage the clutch. 2. Open the throttle gradually, and at the same time, release the clutch lever...
... withstand the shock of time with the transmission in the illustration. Always use the clutch while changing gears to avoid damaging the engine, transmission, and drive train, which are shown in the neutral position, do not coast for starting attempt should go out. 3. EAU16681 To start switch. Pull the clutch lever to disengage the clutch. 2. Open the throttle gradually, and at the same time, release the clutch lever...
Owners Manual
Page 57
... cracked, contact a Yamaha dealer immediately and have the tire replaced. Tire inflation pressure must be checked and adjusted when the temperature of rider, passenger, cargo and accessories EWA10511 Tire inspection 1. Operation of cargo, rider, passenger, and accessories (windshield, sidebags, etc. Tire wear indicator 3. Tire inflation pressure should be adjusted according to total weight of an overloaded vehicle could cause an accident. Tire air pressure (measured on cold tires): 0-90 kg (0-198...
... cracked, contact a Yamaha dealer immediately and have the tire replaced. Tire inflation pressure must be checked and adjusted when the temperature of rider, passenger, cargo and accessories EWA10511 Tire inspection 1. Operation of cargo, rider, passenger, and accessories (windshield, sidebags, etc. Tire wear indicator 3. Tire inflation pressure should be adjusted according to total weight of an overloaded vehicle could cause an accident. Tire air pressure (measured on cold tires): 0-90 kg (0-198...
Owners Manual
Page 60
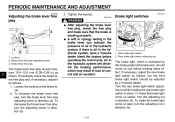
... by a Yamaha dealer. Locknut 2. Brake lever free play 7 The brake lever free play and make the brake light come on earlier, turn the adjusting nut in place. EWA10630 EAU22273 Brake light switches 21 (a) (b) WARNING G (b) G 1 (a) 2 1. To decrease the brake lever free play 3 3. Air in the hydraulic system will diminish the braking performance, which is working properly. PERIODIC MAINTENANCE AND ADJUSTMENT EAU22093 Adjusting the brake lever free play , turn the...
... by a Yamaha dealer. Locknut 2. Brake lever free play 7 The brake lever free play and make the brake light come on earlier, turn the adjusting nut in place. EWA10630 EAU22273 Brake light switches 21 (a) (b) WARNING G (b) G 1 (a) 2 1. To decrease the brake lever free play 3 3. Air in the hydraulic system will diminish the braking performance, which is working properly. PERIODIC MAINTENANCE AND ADJUSTMENT EAU22093 Adjusting the brake lever free play , turn the...
Owners Manual
Page 69
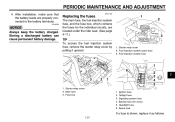
... system spare fuse 3. Fuse box 2 1 2 3 4 5 7 1. 2. 3. 4. 5. 6. ECA16530 EAU47133 Replacing the fuses The main fuse, the fuel injection system fuse, and the fuse box, which contains the fuses for clock) Headlight fuse Spare fuse If a fuse is blown, replace it upward. 1 2 NOTICE Always keep the battery charged. Ignition fuse Taillight fuse Signaling system fuse Backup fuse (for the individual circuits, are properly connected to the battery terminals. Starter relay cover 2. Main fuse 3. Fuel injection system fuse 1 6 3 1. PERIODIC MAINTENANCE AND ADJUSTMENT...
... system spare fuse 3. Fuse box 2 1 2 3 4 5 7 1. 2. 3. 4. 5. 6. ECA16530 EAU47133 Replacing the fuses The main fuse, the fuel injection system fuse, and the fuse box, which contains the fuses for clock) Headlight fuse Spare fuse If a fuse is blown, replace it upward. 1 2 NOTICE Always keep the battery charged. Ignition fuse Taillight fuse Signaling system fuse Backup fuse (for the individual circuits, are properly connected to the battery terminals. Starter relay cover 2. Main fuse 3. Fuel injection system fuse 1 6 3 1. PERIODIC MAINTENANCE AND ADJUSTMENT...
Owners Manual
Page 70
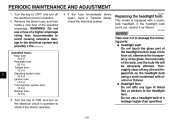
... possibly a fire. [EWA15131] Specified fuses: Main fuse: 40.0 A Headlight fuse: 20.0 A Taillight fuse: 10.0 A Signaling system fuse: 10.0 A Ignition fuse: 15.0 A Fuel injection system fuse: 10.0 A Backup fuse: 10.0 A 4. If the fuse immediately blows again, have a Yamaha dealer check the electrical system. Thoroughly clean off the electrical circuit in question. 2. Remove the blown fuse, and then install a new fuse of a higher amperage rating than specified. 7 3. If the headlight bulb burns out, replace it...
... possibly a fire. [EWA15131] Specified fuses: Main fuse: 40.0 A Headlight fuse: 20.0 A Taillight fuse: 10.0 A Signaling system fuse: 10.0 A Ignition fuse: 15.0 A Fuel injection system fuse: 10.0 A Backup fuse: 10.0 A 4. If the fuse immediately blows again, have a Yamaha dealer check the electrical system. Thoroughly clean off the electrical circuit in question. 2. Remove the blown fuse, and then install a new fuse of a higher amperage rating than specified. 7 3. If the headlight bulb burns out, replace it...
Owners Manual
Page 83
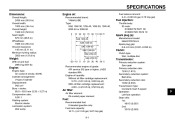
...) Fuel injection: Throttle body: ID mark: XVS95CTZ 5S71 00 XVS95CTZC 5S72 10 Spark plug (s): Manufacturer/model: NGK/CPR7EA-9 Spark plug gap: 0.8-0.9 mm (0.031-0.035 in) Clutch: Clutch type: Wet, multiple-disc Weight: With oil and fuel: 298.0 kg (657 lb) Transmission: Primary reduction system: Spur gear Primary reduction ratio: 72/43 (1.674) Secondary reduction system: Belt drive Secondary reduction ratio: 70/30 (2.333) Transmission type: Constant mesh 5-speed Operation...
...) Fuel injection: Throttle body: ID mark: XVS95CTZ 5S71 00 XVS95CTZC 5S72 10 Spark plug (s): Manufacturer/model: NGK/CPR7EA-9 Spark plug gap: 0.8-0.9 mm (0.031-0.035 in) Clutch: Clutch type: Wet, multiple-disc Weight: With oil and fuel: 298.0 kg (657 lb) Transmission: Primary reduction system: Spur gear Primary reduction ratio: 72/43 (1.674) Secondary reduction system: Belt drive Secondary reduction ratio: 70/30 (2.333) Transmission type: Constant mesh 5-speed Operation...
Owners Manual
Page 85
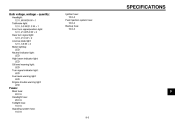
SPECIFICATIONS Bulb voltage, wattage × quantity: Headlight: 12 V, 60 W/55 W × 1 Tail/brake light: 12 V, 5.0 W/21.0 W × 1 Front turn signal/position light: 12 V, 21 W/5.0 W × 2 Rear turn signal light: 12 V, 21.0 W × 2 License plate light: 12 V, 3.8 W × 2 Meter lighting: LED Neutral indicator light: LED High beam indicator light: LED Oil level warning light: LED Turn signal indicator light: LED Fuel level warning light: LED Engine trouble warning light: LED Ignition fuse: 15.0 A Fuel injection system fuse: 10.0 A Backup fuse: 10.0 A Fuses: Main fuse: 40.0 A ...
SPECIFICATIONS Bulb voltage, wattage × quantity: Headlight: 12 V, 60 W/55 W × 1 Tail/brake light: 12 V, 5.0 W/21.0 W × 1 Front turn signal/position light: 12 V, 21 W/5.0 W × 2 Rear turn signal light: 12 V, 21.0 W × 2 License plate light: 12 V, 3.8 W × 2 Meter lighting: LED Neutral indicator light: LED High beam indicator light: LED Oil level warning light: LED Turn signal indicator light: LED Fuel level warning light: LED Engine trouble warning light: LED Ignition fuse: 15.0 A Fuel injection system fuse: 10.0 A Backup fuse: 10.0 A Fuses: Main fuse: 40.0 A ...
Owners Manual
Page 92
... is imperative that time for the balance of Yamaha Motor Corporation, U.S.A. DURING THE PERIOD OF WARRANTY, any authorized Yamaha motorcycle dealer will be to an authorized Yamaha motorcycle dealer of charge, repair or replace any failures caused by Yamaha due to normal wear or routine maintenance. c) Abnormal strain, neglect, or abuse. SPECIFIC EXCLUSIONS from this warranty shall include parts replaced due to faulty...
... is imperative that time for the balance of Yamaha Motor Corporation, U.S.A. DURING THE PERIOD OF WARRANTY, any authorized Yamaha motorcycle dealer will be to an authorized Yamaha motorcycle dealer of charge, repair or replace any failures caused by Yamaha due to normal wear or routine maintenance. c) Abnormal strain, neglect, or abuse. SPECIFIC EXCLUSIONS from this warranty shall include parts replaced due to faulty...
Owners Manual
Page 93
... each manufacturer of a motor vehicle to maintain a complete, up-to repair of normal maintenance services, non-warranty repairs, accident and collision damages, and oil, oil filters, air filters, spark plugs, and brake shoes. If you should move after you have purchased your new motorcycle, please advise us of oil, sustained high rpm, full-throttle, operating the machine with federal law. 10 10-8 Specific examples include: Running the machine out...
... each manufacturer of a motor vehicle to maintain a complete, up-to repair of normal maintenance services, non-warranty repairs, accident and collision damages, and oil, oil filters, air filters, spark plugs, and brake shoes. If you should move after you have purchased your new motorcycle, please advise us of oil, sustained high rpm, full-throttle, operating the machine with federal law. 10 10-8 Specific examples include: Running the machine out...
Owners Manual
Page 96
...checking ...7-14 Throttle grip and cable, checking and lubricating ...7-22 Tires ...7-15 Tool kit...7-2 Troubleshooting ...7-33 Troubleshooting chart ...7-35 Turn signal indicator light ...4-2 Turn signal light bulb (front), replacing ...7-30 E Engine break-in...6-3 Engine oil and oil filter cartridge...7-11 Engine stop switch ...4-7 Engine trouble warning light...4-3 N Neutral indicator light...4-2 Noise regulation...10-4 O Oil level warning light...4-2 F Front and rear brake pads, checking ...7-19 Front fork, checking ...7-24 Fuel ...4-9 Fuel level warning light ...4-3 P Panel, removing...
...checking ...7-14 Throttle grip and cable, checking and lubricating ...7-22 Tires ...7-15 Tool kit...7-2 Troubleshooting ...7-33 Troubleshooting chart ...7-35 Turn signal indicator light ...4-2 Turn signal light bulb (front), replacing ...7-30 E Engine break-in...6-3 Engine oil and oil filter cartridge...7-11 Engine stop switch ...4-7 Engine trouble warning light...4-3 N Neutral indicator light...4-2 Noise regulation...10-4 O Oil level warning light...4-2 F Front and rear brake pads, checking ...7-19 Front fork, checking ...7-24 Fuel ...4-9 Fuel level warning light ...4-3 P Panel, removing...