
Owners Manual
Page 6
...Front brake lever ...4-5 Brake pedal and rear brake lever ...4-5 Parking brake ...4-6 Drive select lever ...4-7 Recoil starter ...4-7 Fuel tank cap ...4-8 Fuel ...4-8 Fuel cock ...4-10 Starter (choke) ...4-11 Seat ...4-12 Storage compartment ...4-13 Front carrier ...4-14 Rear carrier ...4-14 Adjusting the front shock absorber assemblies ...4-14 Adjusting the rear shock absorber assembly ...4-15 PRE-OPERATION CHECKS ...5-1 Fuel ...5-3 Engine oil ...5-3 Final gear oil ...5-3 Front and rear brakes ...5-3 Throttle lever ...5-4 Tires ...5-4 Chassis fasteners ...5-5 Instruments, lights and switches...
...Front brake lever ...4-5 Brake pedal and rear brake lever ...4-5 Parking brake ...4-6 Drive select lever ...4-7 Recoil starter ...4-7 Fuel tank cap ...4-8 Fuel ...4-8 Fuel cock ...4-10 Starter (choke) ...4-11 Seat ...4-12 Storage compartment ...4-13 Front carrier ...4-14 Rear carrier ...4-14 Adjusting the front shock absorber assemblies ...4-14 Adjusting the rear shock absorber assembly ...4-15 PRE-OPERATION CHECKS ...5-1 Fuel ...5-3 Engine oil ...5-3 Final gear oil ...5-3 Front and rear brakes ...5-3 Throttle lever ...5-4 Tires ...5-4 Chassis fasteners ...5-5 Instruments, lights and switches...
Owners Manual
Page 7
... PERIODIC MAINTENANCE AND ADJUSTMENT...8-1 Owner's manual and tool kit ...8-1 Periodic maintenance chart for the emission control system ...8-3 General maintenance and lubrication chart ...8-5 Removing and installing the panel ...8-9 Checking the spark plug ...8-10 Engine oil and oil filter cartridge ...8-12 Final gear oil ...8-16 Cleaning the air filter element ...8-19 Cleaning the spark arrester ...8-22 V-belt cooling duct check hose ...8-23 V-belt case drain plug ...8-24 Adjusting the carburetor ...8-24 Adjusting the engine idling speed ...8-24 Adjusting the throttle...
... PERIODIC MAINTENANCE AND ADJUSTMENT...8-1 Owner's manual and tool kit ...8-1 Periodic maintenance chart for the emission control system ...8-3 General maintenance and lubrication chart ...8-5 Removing and installing the panel ...8-9 Checking the spark plug ...8-10 Engine oil and oil filter cartridge ...8-12 Final gear oil ...8-16 Cleaning the air filter element ...8-19 Cleaning the spark arrester ...8-22 V-belt cooling duct check hose ...8-23 V-belt case drain plug ...8-24 Adjusting the carburetor ...8-24 Adjusting the engine idling speed ...8-24 Adjusting the throttle...
Owners Manual
Page 8
... and lubricating the brake pedal ...8-35 Checking the wheel hub bearings ...8-35 Lubricating the steering shaft ...8-36 Battery ...8-36 Replacing a fuse ...8-39 Replacing a headlight bulb ...8-40 Adjusting a headlight beam ...8-42 Replacing the tail/brake light bulb ...8-42 Removing a wheel ...8-42 Installing a wheel ...8-43 Troubleshooting ...8-44 Troubleshooting chart ...8-45 CLEANING AND STORAGE...9-1 Cleaning ...9-1 Storage ...9-2 SPECIFICATIONS ...10-1 CONSUMER INFORMATION...11-1 Identification numbers ...11-1 Noise regulation ...11-4 Maintenance record ...11-5 YAMAHA MOTOR CORPORATION...
... and lubricating the brake pedal ...8-35 Checking the wheel hub bearings ...8-35 Lubricating the steering shaft ...8-36 Battery ...8-36 Replacing a fuse ...8-39 Replacing a headlight bulb ...8-40 Adjusting a headlight beam ...8-42 Replacing the tail/brake light bulb ...8-42 Removing a wheel ...8-42 Installing a wheel ...8-43 Troubleshooting ...8-44 Troubleshooting chart ...8-45 CLEANING AND STORAGE...9-1 Cleaning ...9-1 Storage ...9-2 SPECIFICATIONS ...10-1 CONSUMER INFORMATION...11-1 Identification numbers ...11-1 Noise regulation ...11-4 Maintenance record ...11-5 YAMAHA MOTOR CORPORATION...
Owners Manual
Page 14
... keep both hands on the handlebars and both feet on level ground. Practice turning at faster speeds and never turn the ATV around on hills as described in safe operating condition. G G G G Always follow the inspection and maintenance procedures and schedules described in this manual. Never climb hills with excessively slippery or loose surfaces. Check the terrain carefully before...
... keep both hands on the handlebars and both feet on level ground. Practice turning at faster speeds and never turn the ATV around on hills as described in safe operating condition. G G G G Always follow the inspection and maintenance procedures and schedules described in this manual. Never climb hills with excessively slippery or loose surfaces. Check the terrain carefully before...
Owners Manual
Page 18
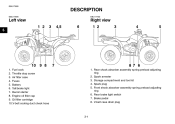
Spark arrester 3. Rear brake light switch 7. V-belt case drain plug 1. Fuses 5. Recoil starter 8. Spark plug 5. Brake pedal 8. Air filter case 4. Engine oil filler cap 9. Fuel cock 2. Tail/brake light 7. Rear shock absorber assembly spring preload adjusting ring 2. Throttle stop screw 3. Storage compartment and tool kit 4. Front shock absorber assembly spring preload adjusting ring 6. Oil filter cartridge 10.V-belt cooling duct check hose 3-1 Battery 6. EBU17680 DESCRIPTION EBU17690 EBU17700 Left view 3 Right view 1 2 3 4,5 6 1 2 3 4 5 10 9 8 7 8 7 6 1....
Spark arrester 3. Rear brake light switch 7. V-belt case drain plug 1. Fuses 5. Recoil starter 8. Spark plug 5. Brake pedal 8. Air filter case 4. Engine oil filler cap 9. Fuel cock 2. Tail/brake light 7. Rear shock absorber assembly spring preload adjusting ring 2. Throttle stop screw 3. Storage compartment and tool kit 4. Front shock absorber assembly spring preload adjusting ring 6. Oil filter cartridge 10.V-belt cooling duct check hose 3-1 Battery 6. EBU17680 DESCRIPTION EBU17690 EBU17700 Left view 3 Right view 1 2 3 4,5 6 1 2 3 4 5 10 9 8 7 8 7 6 1....
Owners Manual
Page 22
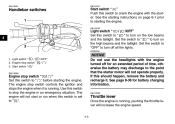
... Handlebar switches Start switch " " Push this switch to " " to turn on page 6-1 prior to starting the engine. Set the switch to "OFF" to turn off for battery charging information. EBU18282 Throttle lever Once the engine is running , pushing the throttle lever will not operate properly. See page 8-36 for an extended period of time, otherwise the battery may discharge to the point that the starter motor will increase the engine speed...
... Handlebar switches Start switch " " Push this switch to " " to turn on page 6-1 prior to starting the engine. Set the switch to "OFF" to turn off for battery charging information. EBU18282 Throttle lever Once the engine is running , pushing the throttle lever will not operate properly. See page 8-36 for an extended period of time, otherwise the battery may discharge to the point that the starter motor will increase the engine speed...
Owners Manual
Page 31
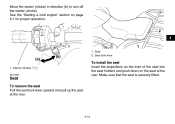
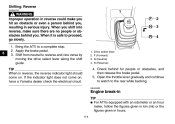
Seat 2. Starter (choke) " EBU18881 " Seat To remove the seat Pull the seat lock lever upward and pull up the seat at the rear. See the "Starting a cold engine" section on the seat at the rear. Make sure that the seat is securely fitted. 4-12 To install the seat Insert the projections on the front of the seat into the seat holders and push down on page 6-1 for proper operation. 4 1. Move the starter (choke) in direction (b) to turn off the starter (choke). Seat lock lever 1.
Seat 2. Starter (choke) " EBU18881 " Seat To remove the seat Pull the seat lock lever upward and pull up the seat at the rear. See the "Starting a cold engine" section on the seat at the rear. Make sure that the seat is securely fitted. 4-12 To install the seat Insert the projections on the front of the seat into the seat holders and push down on page 6-1 for proper operation. 4 1. Move the starter (choke) in direction (b) to turn off the starter (choke). Seat lock lever 1.

Owners Manual
Page 43
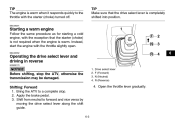
... , have a Yamaha dealer check the electrical circuit. G The rear brake lever is in death or serious injury. Use the starter (choke) in reference to the figure: Position (1): Cold engine start with ambient temperature below 5 °C (40 °F). 6-1 6 WARNING Read the Owner's Manual carefully to become familiar with the drive select lever in order to shift into the neutral position. EWB00631 1. However, it is a control or...
... , have a Yamaha dealer check the electrical circuit. G The rear brake lever is in death or serious injury. Use the starter (choke) in reference to the figure: Position (1): Cold engine start with ambient temperature below 5 °C (40 °F). 6-1 6 WARNING Read the Owner's Manual carefully to become familiar with the drive select lever in order to shift into the neutral position. EWB00631 1. However, it is a control or...
Owners Manual
Page 45
... the brake pedal. 3. Bring the ATV to a complete stop the ATV, otherwise the transmission may be damaged. EBU20291 TIP Make sure that the starter (choke) is not required when the engine is warm. Open the throttle lever gradually. Drive select lever F (Forward) N (Neutral) R (Reverse) 4. TIP The engine is completely shifted into position. Starting a warm engine Follow the same procedure as for starting a cold engine...
... the brake pedal. 3. Bring the ATV to a complete stop the ATV, otherwise the transmission may be damaged. EBU20291 TIP Make sure that the starter (choke) is not required when the engine is warm. Open the throttle lever gradually. Drive select lever F (Forward) N (Neutral) R (Reverse) 4. TIP The engine is completely shifted into position. Starting a warm engine Follow the same procedure as for starting a cold engine...
Owners Manual
Page 46
... person behind you . Shift from neutral to a complete stop. 2. If the indicator light does not come on , have a Yamaha dealer check the electrical circuit. F N R 2 3 4 6 1. 2. 3. 4. EBU20682 Engine break-in G TIP ...release the brake pedal. 5. Shifting: Reverse EWB00720 WARNING Improper operation in reverse could make sure there are no people or obstacles behind you , resulting in hours. 6-4 Bring the ATV to reverse and vice versa by moving the drive select lever along the shift guide. TIP When in reverse, the reverse indicator light should come on . Open the throttle...
... person behind you . Shift from neutral to a complete stop. 2. If the indicator light does not come on , have a Yamaha dealer check the electrical circuit. F N R 2 3 4 6 1. 2. 3. 4. EBU20682 Engine break-in G TIP ...release the brake pedal. 5. Shifting: Reverse EWB00720 WARNING Improper operation in reverse could make sure there are no people or obstacles behind you , resulting in hours. 6-4 Bring the ATV to reverse and vice versa by moving the drive select lever along the shift guide. TIP When in reverse, the reverse indicator light should come on . Open the throttle...
Owners Manual
Page 49
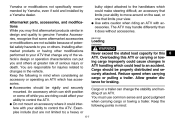
... or having other modifications performed to your view. EBU21061 Loading EWB00820 WARNING Never exceed the stated load capacity for braking. You must use common sense and good judgment when carrying cargo or towing a trailer. Yamaha or modifications not specifically recommended by Yamaha, even if sold and installed by a Yamaha dealer. G Accessories should be rigidly and securely mounted. Cargo should be properly distributed...
... or having other modifications performed to your view. EBU21061 Loading EWB00820 WARNING Never exceed the stated load capacity for braking. You must use common sense and good judgment when carrying cargo or towing a trailer. Yamaha or modifications not specifically recommended by Yamaha, even if sold and installed by a Yamaha dealer. G Accessories should be rigidly and securely mounted. Cargo should be properly distributed...
Owners Manual
Page 63
... upper body into the forward position, then release the parking brake. TURNING YOUR ATV EWB01771 WARNING Always follow the instruction on the inside of the turn is applied too abruptly, the front wheels may lift off the ground, resulting in this skill be used to allow the ATV to make the turn at low speeds before trying more difficult terrain. Use the throttle...
... upper body into the forward position, then release the parking brake. TURNING YOUR ATV EWB01771 WARNING Always follow the instruction on the inside of the turn is applied too abruptly, the front wheels may lift off the ground, resulting in this skill be used to allow the ATV to make the turn at low speeds before trying more difficult terrain. Use the throttle...
Owners Manual
Page 107
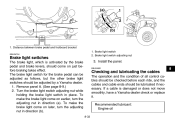
... the cables The operation and the condition of all control cables should be checked before braking takes effect. Brake light switch adjusting nut 3. Recommended lubricant: Engine oil 8 Remove panel A. (See page 8-9.) 2. Turn the brake light switch adjusting nut while holding the brake light switch in direction (b). 8-33 1. To make the brake light come on later, turn the adjusting nut in direction (a). To make the brake light come on just before each...
... the cables The operation and the condition of all control cables should be checked before braking takes effect. Brake light switch adjusting nut 3. Recommended lubricant: Engine oil 8 Remove panel A. (See page 8-9.) 2. Turn the brake light switch adjusting nut while holding the brake light switch in direction (b). 8-33 1. To make the brake light come on later, turn the adjusting nut in direction (a). To make the brake light come on just before each...
Owners Manual
Page 113
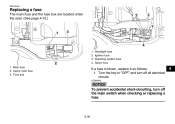
EBU25326 Replacing a fuse The main fuse and the fuse box are located under the seat. (See page 4-12.) 1. 2. 3. 4. 1. Fuse box Headlight fuse Ignition fuse Signaling system fuse Spare fuse If a fuse is blown, replace it as follows. 1. Spare main fuse 3. Turn the key to "OFF" and turn off all electrical circuits. ECB00640 8 NOTICE To prevent accidental short-circuiting, turn off the main switch when checking or replacing a fuse. 8-39 Main fuse 2.
EBU25326 Replacing a fuse The main fuse and the fuse box are located under the seat. (See page 4-12.) 1. 2. 3. 4. 1. Fuse box Headlight fuse Ignition fuse Signaling system fuse Spare fuse If a fuse is blown, replace it as follows. 1. Spare main fuse 3. Turn the key to "OFF" and turn off all electrical circuits. ECB00640 8 NOTICE To prevent accidental short-circuiting, turn off the main switch when checking or replacing a fuse. 8-39 Main fuse 2.
Owners Manual
Page 120
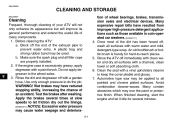
... the cover pliable and glossy. Use only enough pressure to -reach places. b. Make sure the spark plug and all painted and chrome plated surfaces. EBU25860 CLEANING AND STORAGE EBU25881 Cleaning Frequent, thorough cleaning of your ATV will not only enhance its appearance but will improve its general performance and extend the useful life of the exhaust pipe to prevent water entry...
... the cover pliable and glossy. Use only enough pressure to -reach places. b. Make sure the spark plug and all painted and chrome plated surfaces. EBU25860 CLEANING AND STORAGE EBU25881 Cleaning Frequent, thorough cleaning of your ATV will not only enhance its appearance but will improve its general performance and extend the useful life of the exhaust pipe to prevent water entry...

Owners Manual
Page 123
...SPECIFICATIONS Dimensions: Overall length: 1984 mm (78.1 in) Overall width: 1085 mm (42.7 in) Overall height: 1120 mm (44.1 in) Seat height: 827 mm (32.6 in) Wheelbase: 1233 mm (48.5 in) Ground clearance: 245 mm (9.6 in) Minimum turning radius: 3000 mm (118 in) Compression ratio: 9.20 :1 Starting system: Electric and recoil starter Lubrication system: Wet sump Engine oil... Weight: With oil and fuel: 245.0 kg (540 lb) SAE 5W-30 SAE 10W-30 SAE 10W-40 SAE 15W-40 SAE 20W-40 SAE 20W-50 Engine: Engine type: Air cooled 4-stroke, SOHC Cylinder arrangement: Forward-inclined single cylinder ...
...SPECIFICATIONS Dimensions: Overall length: 1984 mm (78.1 in) Overall width: 1085 mm (42.7 in) Overall height: 1120 mm (44.1 in) Seat height: 827 mm (32.6 in) Wheelbase: 1233 mm (48.5 in) Ground clearance: 245 mm (9.6 in) Minimum turning radius: 3000 mm (118 in) Compression ratio: 9.20 :1 Starting system: Electric and recoil starter Lubrication system: Wet sump Engine oil... Weight: With oil and fuel: 245.0 kg (540 lb) SAE 5W-30 SAE 10W-30 SAE 10W-40 SAE 15W-40 SAE 20W-40 SAE 20W-50 Engine: Engine type: Air cooled 4-stroke, SOHC Cylinder arrangement: Forward-inclined single cylinder ...
Owners Manual
Page 132
..., repair or replace any and all U.S. An inspection and registration fee will , free of purchase. f. Damage due to an authorized Yamaha ATV dealer of proper maintenance. Installation of parts or accessories that time for the balance of business. Lack of any part adjudged defective by : a. hereby warrants that it is designed, built, and equipped so as spark plugs, oil, oil filter, air filter...
..., repair or replace any and all U.S. An inspection and registration fee will , free of purchase. f. Damage due to an authorized Yamaha ATV dealer of proper maintenance. Installation of parts or accessories that time for the balance of business. Lack of any part adjudged defective by : a. hereby warrants that it is designed, built, and equipped so as spark plugs, oil, oil filter, air filter...
Owners Manual
Page 133
... United States. A. CUSTOMER RELATIONS DEPARTMENT P.O. This list is limited to any important information such as described in the Owner's Manual instead of normal maintenance services, non-warranty repairs, accident and collision damages, and oil, oil filters, air filters, spark plugs, and brake shoes. WARRANTY QUESTIONS AND ANSWERS Q. Q. Box 6555 Cypress, California 90630 Attention: Warranty Department This will ensure that failure may not be "voided" or "cancelled."
... United States. A. CUSTOMER RELATIONS DEPARTMENT P.O. This list is limited to any important information such as described in the Owner's Manual instead of normal maintenance services, non-warranty repairs, accident and collision damages, and oil, oil filters, air filters, spark plugs, and brake shoes. WARRANTY QUESTIONS AND ANSWERS Q. Q. Box 6555 Cypress, California 90630 Attention: Warranty Department This will ensure that failure may not be "voided" or "cancelled."
Owners Manual
Page 137
... ...8-35 Brakes ...8-27 Brakes, front and rear ...5-3 F Final gear oil ...5-3, 8-16 Fuel ...4-8, 5-3 Fuel cock ...4-10 Fuel tank cap ...4-8 Fuses, replacing ...8-39 H Handlebar switches ...4-3 Headlight beam, adjusting ...8-42 Headlight bulb, replacing ...8-40 C Cables, checking and lubricating ...8-33 Carburetor, adjusting ...8-24 Carrier, front ...4-14 Carrier, rear ...4-14 Chassis fasteners ...5-5 Cleaning ...9-1 I Identification numbers ...11-1 Indicator lights and warning light ...4-2 Instruments, lights and switches ...5-6 K Key identification number ...11-1 D Drive select lever...
... ...8-35 Brakes ...8-27 Brakes, front and rear ...5-3 F Final gear oil ...5-3, 8-16 Fuel ...4-8, 5-3 Fuel cock ...4-10 Fuel tank cap ...4-8 Fuses, replacing ...8-39 H Handlebar switches ...4-3 Headlight beam, adjusting ...8-42 Headlight bulb, replacing ...8-40 C Cables, checking and lubricating ...8-33 Carburetor, adjusting ...8-24 Carrier, front ...4-14 Carrier, rear ...4-14 Chassis fasteners ...5-5 Cleaning ...9-1 I Identification numbers ...11-1 Indicator lights and warning light ...4-2 Instruments, lights and switches ...5-6 K Key identification number ...11-1 D Drive select lever...
Owners Manual
Page 138
... control system ...8-3 Maintenance record ...11-5 Model label ...11-2 Start switch ...4-3 Steering shaft, lubricating ...8-36 Storage ...9-2 Storage compartment ...4-13 T Tail/brake light bulb, replacing ...8-42 Throttle cable free play, adjusting ...8-26 Throttle lever ...4-3, 5-4 Tires ...5-4 Troubleshooting ...8-44 Troubleshooting chart ...8-45 N Neutral indicator light ...4-2 Noise regulation ...11-4 O Oil temperature warning light ...4-2 Owner's manual and tool kit ...8-1 V Valve clearance ...8-26 V-belt case drain plug ...8-24 V-belt cooling duct check hose ...8-23 Vehicle Emission...
... control system ...8-3 Maintenance record ...11-5 Model label ...11-2 Start switch ...4-3 Steering shaft, lubricating ...8-36 Storage ...9-2 Storage compartment ...4-13 T Tail/brake light bulb, replacing ...8-42 Throttle cable free play, adjusting ...8-26 Throttle lever ...4-3, 5-4 Tires ...5-4 Troubleshooting ...8-44 Troubleshooting chart ...8-45 N Neutral indicator light ...4-2 Noise regulation ...11-4 O Oil temperature warning light ...4-2 Owner's manual and tool kit ...8-1 V Valve clearance ...8-26 V-belt case drain plug ...8-24 V-belt cooling duct check hose ...8-23 Vehicle Emission...