
Owners Manual
Page 6
... lights and warning light ...4-2 Handlebar switches ...4-3 Throttle lever ...4-5 Speed limiter ...4-6 Front brake lever ...4-6 Brake pedal and rear brake lever ...4-7 Parking brake ...4-8 Drive select lever ...4-8 Recoil starter ...4-9 Fuel tank cap ...4-9 Fuel ...4-10 Fuel cock ...4-12 Starter (choke) ...4-13 Seat ...4-13 Storage compartment ...4-14 Front carrier ...4-15 Rear carrier ...4-15 Adjusting the front shock absorber assemblies ...4-16 Adjusting the rear shock absorber assembly ...4-17 PRE-OPERATION CHECKS ...5-1 Fuel ...5-3 Engine oil ...5-3 Final gear oil ...5-3 Differential gear...
... lights and warning light ...4-2 Handlebar switches ...4-3 Throttle lever ...4-5 Speed limiter ...4-6 Front brake lever ...4-6 Brake pedal and rear brake lever ...4-7 Parking brake ...4-8 Drive select lever ...4-8 Recoil starter ...4-9 Fuel tank cap ...4-9 Fuel ...4-10 Fuel cock ...4-12 Starter (choke) ...4-13 Seat ...4-13 Storage compartment ...4-14 Front carrier ...4-15 Rear carrier ...4-15 Adjusting the front shock absorber assemblies ...4-16 Adjusting the rear shock absorber assembly ...4-17 PRE-OPERATION CHECKS ...5-1 Fuel ...5-3 Engine oil ...5-3 Final gear oil ...5-3 Differential gear...
Owners Manual
Page 7
......8-1 Owner's manual and tool kit ...8-1 Periodic maintenance chart for the emission control system ...8-3 General maintenance and lubrication chart ...8-5 Removing and installing the panel ...8-9 Checking the spark plug ...8-10 Engine oil and oil filter cartridge ...8-12 Final gear oil ...8-16 Changing the differential gear oil ...8-18 Cleaning the air filter element ...8-20 Cleaning the spark arrester ...8-23 V-belt cooling duct check hose ...8-24 V-belt case drain plug ...8-25 Adjusting the carburetor ...8-25 Adjusting the engine idling speed ...8-25 Adjusting the throttle cable...
......8-1 Owner's manual and tool kit ...8-1 Periodic maintenance chart for the emission control system ...8-3 General maintenance and lubrication chart ...8-5 Removing and installing the panel ...8-9 Checking the spark plug ...8-10 Engine oil and oil filter cartridge ...8-12 Final gear oil ...8-16 Changing the differential gear oil ...8-18 Cleaning the air filter element ...8-20 Cleaning the spark arrester ...8-23 V-belt cooling duct check hose ...8-24 V-belt case drain plug ...8-25 Adjusting the carburetor ...8-25 Adjusting the engine idling speed ...8-25 Adjusting the throttle cable...
Owners Manual
Page 8
... bearings ...8-37 Lubricating the steering shaft ...8-37 Battery ...8-38 Replacing a fuse ...8-40 Replacing a headlight bulb ...8-42 Adjusting a headlight beam ...8-43 Replacing the tail/brake light bulb ...8-44 Removing a wheel ...8-44 Installing a wheel ...8-44 Troubleshooting ...8-46 Troubleshooting chart ...8-47 CLEANING AND STORAGE...9-1 Cleaning ...9-1 Storage ...9-2 SPECIFICATIONS ...10-1 CONSUMER INFORMATION...11-1 Identification numbers ...11-1 Noise regulation ...11-4 Maintenance record ...11-5 YAMAHA MOTOR CORPORATION, U.S.A. ATV LIMITED WARRANTY ...11-6 YAMAHA EXTENDED SERVICE...
... bearings ...8-37 Lubricating the steering shaft ...8-37 Battery ...8-38 Replacing a fuse ...8-40 Replacing a headlight bulb ...8-42 Adjusting a headlight beam ...8-43 Replacing the tail/brake light bulb ...8-44 Removing a wheel ...8-44 Installing a wheel ...8-44 Troubleshooting ...8-46 Troubleshooting chart ...8-47 CLEANING AND STORAGE...9-1 Cleaning ...9-1 Storage ...9-2 SPECIFICATIONS ...10-1 CONSUMER INFORMATION...11-1 Identification numbers ...11-1 Noise regulation ...11-4 Maintenance record ...11-5 YAMAHA MOTOR CORPORATION, U.S.A. ATV LIMITED WARRANTY ...11-6 YAMAHA EXTENDED SERVICE...
Owners Manual
Page 14
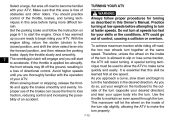
... attempting larger hills. Never open the throttle suddenly. Always follow proper procedures for going down a hill at excessive speeds. Always follow proper procedures for turning as described in this manual. Maintain a steady speed when climbing a hill. G 2 G G G G G Always inspect your ATV each time you start down any hill. Never attempt to changing terrain conditions when operating the ATV. G G G G Always follow...
... attempting larger hills. Never open the throttle suddenly. Always follow proper procedures for going down a hill at excessive speeds. Always follow proper procedures for turning as described in this manual. Maintain a steady speed when climbing a hill. G 2 G G G G G Always inspect your ATV each time you start down any hill. Never attempt to changing terrain conditions when operating the ATV. G G G G Always follow...
Owners Manual
Page 18
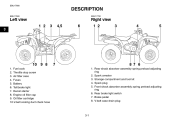
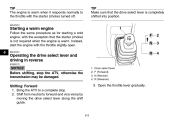
Spark arrester 3. Rear brake light switch 7. Air filter case 4. Tail/brake light 7. EBU17680 DESCRIPTION EBU17690 EBU17700 Left view 3 Right view 1 2 3 4,5 6 1 2 3 4 5 10 9 8 7 8 7 6 1. Storage compartment and tool kit 4. Spark plug 5. Fuses 5. Recoil starter 8. Fuel cock 2. Brake pedal 8. Battery 6. Engine oil filler cap 9. Front shock absorber assembly spring preload adjusting ring 6. Oil filter cartridge 10.V-belt cooling duct check hose 3-1 V-belt case drain plug 1. Throttle stop screw 3. Rear shock absorber assembly spring preload adjusting ring ...
Spark arrester 3. Rear brake light switch 7. Air filter case 4. Tail/brake light 7. EBU17680 DESCRIPTION EBU17690 EBU17700 Left view 3 Right view 1 2 3 4,5 6 1 2 3 4 5 10 9 8 7 8 7 6 1. Storage compartment and tool kit 4. Spark plug 5. Fuses 5. Recoil starter 8. Fuel cock 2. Brake pedal 8. Battery 6. Engine oil filler cap 9. Front shock absorber assembly spring preload adjusting ring 6. Oil filter cartridge 10.V-belt cooling duct check hose 3-1 V-belt case drain plug 1. Throttle stop screw 3. Rear shock absorber assembly spring preload adjusting ring ...

Owners Manual
Page 21
... transmission is overloaded. When this case, reduce the load to cool. The electrical circuit of the warning light can be checked by turning the key to "ON", with the engine stop the engine as soon as it to " ", and then pushing the start switch is out. In this occurs, stop switch set to cool. Neutral indicator light "N" Reverse indicator light "R" On-Command four-wheel-drive indicator light " Oil temperature warning light " " " Oil...
... transmission is overloaded. When this case, reduce the load to cool. The electrical circuit of the warning light can be checked by turning the key to "ON", with the engine stop the engine as soon as it to " ", and then pushing the start switch is out. In this occurs, stop switch set to cool. Neutral indicator light "N" Reverse indicator light "R" On-Command four-wheel-drive indicator light " Oil temperature warning light " " " Oil...
Owners Manual
Page 46
... forward and vice versa by moving the drive select lever along the shift guide. 1. 2. 3. 4. Open the throttle lever gradually. 6-3 Shifting: Forward 1. Shift from neutral to a complete stop the ATV, otherwise the transmission may be damaged. TIP The engine is completely shifted into position. Starting a warm engine Follow the same procedure as for starting a cold engine, with the exception that the...
... forward and vice versa by moving the drive select lever along the shift guide. 1. 2. 3. 4. Open the throttle lever gradually. 6-3 Shifting: Forward 1. Shift from neutral to a complete stop the ATV, otherwise the transmission may be damaged. TIP The engine is completely shifted into position. Starting a warm engine Follow the same procedure as for starting a cold engine, with the exception that the...
Owners Manual
Page 47
...a person behind for people or obstacles, and then release the brake pedal. 5. Apply the brake pedal. 3. If the indicator light does not come on , have a Yamaha dealer check the electrical circuit. EBU20682 Engine break-in TIP G For ATVs equipped with an ...light should come on . When it is safe to a complete stop. 2. F N R 2 3 4 1. 2. 3. 4. Bring the ATV to proceed, go slowly. 1. Shift from neutral to the rear while backing. Open the throttle lever gradually and continue to watch to reverse and vice versa by moving the drive select lever along the shift guide. Drive...
...a person behind for people or obstacles, and then release the brake pedal. 5. Apply the brake pedal. 3. If the indicator light does not come on , have a Yamaha dealer check the electrical circuit. EBU20682 Engine break-in TIP G For ATVs equipped with an ...light should come on . When it is safe to a complete stop. 2. F N R 2 3 4 1. 2. 3. 4. Bring the ATV to proceed, go slowly. 1. Shift from neutral to the rear while backing. Open the throttle lever gradually and continue to watch to reverse and vice versa by moving the drive select lever along the shift guide. Drive...
Owners Manual
Page 50
... which has accessories. Reduce speed when carrying cargo or pulling a trailer. You are not limited to) a heavy or 6-7 G bulky object attached to control the ATV. Overloading this ATV. Installing aftermarket products or having other modifications performed to your ATV that change the stability and handling of potential safety hazards to changes in mind: Keep the following points in the vehicle. G Accessories should...
... which has accessories. Reduce speed when carrying cargo or pulling a trailer. You are not limited to) a heavy or 6-7 G bulky object attached to control the ATV. Overloading this ATV. Installing aftermarket products or having other modifications performed to your ATV that change the stability and handling of potential safety hazards to changes in mind: Keep the following points in the vehicle. G Accessories should...
Owners Manual
Page 64
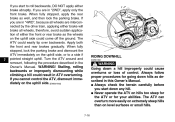
... let the wheel on page 6-1 to start to turn . Make sure that this Owner's Manual. The centrifugal clutch will engage and you approach a curve, slow down or stopping, release the throttle and apply the brakes smoothly and evenly. Set the parking brake and follow proper procedures for your upper body into the forward position, and then release the parking brake. TURNING YOUR ATV EWB01771 WARNING Always follow...
... let the wheel on page 6-1 to start to turn . Make sure that this Owner's Manual. The centrifugal clutch will engage and you approach a curve, slow down or stopping, release the throttle and apply the brakes smoothly and evenly. Set the parking brake and follow proper procedures for your upper body into the forward position, and then release the parking brake. TURNING YOUR ATV EWB01771 WARNING Always follow...
Owners Manual
Page 68
... over backwards. If you are in "4WD", because all wheels are in this Owner's Manual. If you are interconnected by the drive train, applying either brake will brake all wheels, therefore, avoid sudden application of control. Turn the ATV around and remount, following the procedure described in ATV overturning. When fully stopped, lock the parking brake and dismount the ATV immediately on hills...
... over backwards. If you are in "4WD", because all wheels are in this Owner's Manual. If you are interconnected by the drive train, applying either brake will brake all wheels, therefore, avoid sudden application of control. Turn the ATV around and remount, following the procedure described in ATV overturning. When fully stopped, lock the parking brake and dismount the ATV immediately on hills...
Owners Manual
Page 111
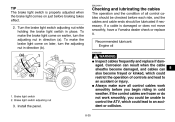
... and the condition of controls and lead to an accident or collision. 8 Recommended lubricant: Engine oil EWB02581 G G 1. Install the panel. 8-35 WARNING Inspect cables frequently and replace if damaged. Always make the brake light come on later, turn the adjusting nut in direction (b). Brake light switch adjusting nut 3. If a cable is properly adjusted when the brake light comes on just before braking takes effect. 2. Brake light switch 2. Corrosion can...
... and the condition of controls and lead to an accident or collision. 8 Recommended lubricant: Engine oil EWB02581 G G 1. Install the panel. 8-35 WARNING Inspect cables frequently and replace if damaged. Always make the brake light come on later, turn the adjusting nut in direction (b). Brake light switch adjusting nut 3. If a cable is properly adjusted when the brake light comes on just before braking takes effect. 2. Brake light switch 2. Corrosion can...
Owners Manual
Page 117
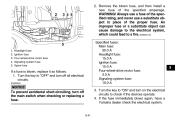
... a Yamaha dealer check the electrical system. 1. 2. 3. 4. 5. Headlight fuse Ignition fuse Four-wheel-drive motor fuse Signaling system fuse Spare fuse 8 If a fuse is blown, replace it as follows. 1. 2. Always use a fuse of the specified rating, and never use a substitute object in place of the specified amperage. WARNING! Remove the blown fuse, and then install a new fuse of the proper fuse. Turn the key to "OFF" and turn on the electrical circuits to a fire. [EWB02172] Specified fuses: Main fuse...
... a Yamaha dealer check the electrical system. 1. 2. 3. 4. 5. Headlight fuse Ignition fuse Four-wheel-drive motor fuse Signaling system fuse Spare fuse 8 If a fuse is blown, replace it as follows. 1. 2. Always use a fuse of the specified rating, and never use a substitute object in place of the specified amperage. WARNING! Remove the blown fuse, and then install a new fuse of the proper fuse. Turn the key to "OFF" and turn on the electrical circuits to a fire. [EWB02172] Specified fuses: Main fuse...

Owners Manual
Page 124
... brakes may cause water seepage and deteriora9-1 4. 5. 6. 7. 9 tion of wheel bearings, brakes, transmission seals and electrical devices. Many expensive repair bills have reduced stopping ability, increasing the chance of the exhaust pipe to do the job. When finished cleaning, start the engine and let it idle for hard-to the wheel axles. 3. Make sure the spark plug and all surfaces with clean water and dry all filler caps...
... brakes may cause water seepage and deteriora9-1 4. 5. 6. 7. 9 tion of wheel bearings, brakes, transmission seals and electrical devices. Many expensive repair bills have reduced stopping ability, increasing the chance of the exhaust pipe to do the job. When finished cleaning, start the engine and let it idle for hard-to the wheel axles. 3. Make sure the spark plug and all surfaces with clean water and dry all filler caps...
Owners Manual
Page 127
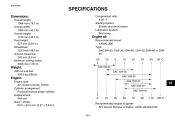
EBU25960 SPECIFICATIONS Dimensions: Overall length: 1984 mm (78.1 in) Overall width: 1085 mm (42.7 in) Overall height: 1120 mm (44.1 in) Seat height: 827 mm (32.6 in) Wheelbase: 1233 mm (48.5 in) Ground clearance: 245 mm (9.6 in) Minimum turning radius: 3000 mm (118 in) Compression ratio: 9.20 :1 Starting system: Electric and recoil starter Lubrication system: Wet sump Engine oil: Recommended brand: YAMALUBE Type...
EBU25960 SPECIFICATIONS Dimensions: Overall length: 1984 mm (78.1 in) Overall width: 1085 mm (42.7 in) Overall height: 1120 mm (44.1 in) Seat height: 827 mm (32.6 in) Wheelbase: 1233 mm (48.5 in) Ground clearance: 245 mm (9.6 in) Minimum turning radius: 3000 mm (118 in) Compression ratio: 9.20 :1 Starting system: Electric and recoil starter Lubrication system: Wet sump Engine oil: Recommended brand: YAMALUBE Type...
Owners Manual
Page 130
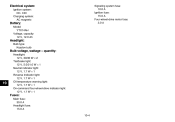
Electrical system: Ignition system: DC. CDI Charging system: AC magneto Battery: Model: YTX14AH Voltage, capacity: 12 V, 12.0 Ah Signaling system fuse: 10.0 A Ignition fuse: 15.0 A Four-wheel-drive motor fuse: 3.0 A Headlight: Bulb type: Krypton bulb Bulb voltage, wattage × quantity: Headlight: 12 V, 30/30 W × 2 Tail/brake light: 12 V, 5.0/21.0 W × 1 Neutral indicator light: 12 V, 1.7 W × 1 Reverse indicator light: 12 V, 1.7 W × 1 Oil temperature warning light: 12 V, 1.7 W × 1 On-command four-wheel-drive indicator light: 12 V, 1.7 W × 1 10 Fuses: Main...
Electrical system: Ignition system: DC. CDI Charging system: AC magneto Battery: Model: YTX14AH Voltage, capacity: 12 V, 12.0 Ah Signaling system fuse: 10.0 A Ignition fuse: 15.0 A Four-wheel-drive motor fuse: 3.0 A Headlight: Bulb type: Krypton bulb Bulb voltage, wattage × quantity: Headlight: 12 V, 30/30 W × 2 Tail/brake light: 12 V, 5.0/21.0 W × 1 Neutral indicator light: 12 V, 1.7 W × 1 Reverse indicator light: 12 V, 1.7 W × 1 Oil temperature warning light: 12 V, 1.7 W × 1 On-command four-wheel-drive indicator light: 12 V, 1.7 W × 1 10 Fuses: Main...
Owners Manual
Page 136
...'s place of sale with all apparent defects within ten (10) days after transfer. emissions standards applicable at the time of manufacture and that the vehicle is free from defects in effect, this warranty that it is designed, built, and equipped so as spark plugs, oil, oil filter, air filter, and brake shoes. AND EXCLUDED FROM THIS WARRANTY. Lack of proper maintenance are not qualitatively...
...'s place of sale with all apparent defects within ten (10) days after transfer. emissions standards applicable at the time of manufacture and that the vehicle is free from defects in effect, this warranty that it is designed, built, and equipped so as spark plugs, oil, oil filter, air filter, and brake shoes. AND EXCLUDED FROM THIS WARRANTY. Lack of proper maintenance are not qualitatively...
Owners Manual
Page 137
... fail, damage or failure due to be covered under this person is limited to Yamaha Motor Corporation, U.S.A. Q. Yes. The unit has to improper or careless transportation and or tie-down. If a question or problem arises regarding warranty, first contact the owner of normal maintenance services, non-warranty repairs, accident and collision damages, and oil, oil filters, air filters, spark plugs, and brake shoes. Box 6555 Cypress, California 90630...
... fail, damage or failure due to be covered under this person is limited to Yamaha Motor Corporation, U.S.A. Q. Yes. The unit has to improper or careless transportation and or tie-down. If a question or problem arises regarding warranty, first contact the owner of normal maintenance services, non-warranty repairs, accident and collision damages, and oil, oil filters, air filters, spark plugs, and brake shoes. Box 6555 Cypress, California 90630...

Owners Manual
Page 141
...E Engine break-in ...6-4 Engine, cold start ...6-1 Engine idling speed ...8-25 Engine oil ...5-3 Engine oil and oil filter cartridge ...8-12 Engine, starting a warm ...6-3 Engine stop switch ...4-3 F Final gear oil ...5-3, 8-16 Four-wheel-drive indicator light ...4-3 Fuel ...4-10, 5-3 Fuel cock ...4-12 Fuel tank cap ...4-9 Fuses, replacing ...8-40 C Cables, checking and lubricating ...8-35 Carburetor, adjusting ...8-25 Carrier, front ...4-15 Carrier, rear ...4-15 Chassis fasteners ...5-6 Cleaning ...9-1 H Handlebar switches ...4-3 Headlight beam, adjusting ...8-43 Headlight bulb, replacing...
...E Engine break-in ...6-4 Engine, cold start ...6-1 Engine idling speed ...8-25 Engine oil ...5-3 Engine oil and oil filter cartridge ...8-12 Engine, starting a warm ...6-3 Engine stop switch ...4-3 F Final gear oil ...5-3, 8-16 Four-wheel-drive indicator light ...4-3 Fuel ...4-10, 5-3 Fuel cock ...4-12 Fuel tank cap ...4-9 Fuses, replacing ...8-40 C Cables, checking and lubricating ...8-35 Carburetor, adjusting ...8-25 Carrier, front ...4-15 Carrier, rear ...4-15 Chassis fasteners ...5-6 Cleaning ...9-1 H Handlebar switches ...4-3 Headlight beam, adjusting ...8-43 Headlight bulb, replacing...
Owners Manual
Page 142
... indicator light ...4-2 Noise regulation ...11-4 T Tail/brake light bulb, replacing ...8-44 Throttle cable free play, adjusting ...8-27 Throttle lever ...4-5, 5-4 Tires ...5-4 Troubleshooting ...8-46 Troubleshooting chart ...8-47 O Oil temperature warning light ...4-2 On-Command four-wheel-drive switch ...4-4 Owner's manual and tool kit ...8-1 P Panel, removing and installing ...8-9 Parking ...6-5 Parking brake ...4-8 Parking on a slope ...6-6 Part locations ...3-1 V Valve clearance ...8-27 V-belt case drain plug ...8-25 V-belt cooling duct check hose ...8-24 Vehicle Emission Control...
... indicator light ...4-2 Noise regulation ...11-4 T Tail/brake light bulb, replacing ...8-44 Throttle cable free play, adjusting ...8-27 Throttle lever ...4-5, 5-4 Tires ...5-4 Troubleshooting ...8-46 Troubleshooting chart ...8-47 O Oil temperature warning light ...4-2 On-Command four-wheel-drive switch ...4-4 Owner's manual and tool kit ...8-1 P Panel, removing and installing ...8-9 Parking ...6-5 Parking brake ...4-8 Parking on a slope ...6-6 Part locations ...3-1 V Valve clearance ...8-27 V-belt case drain plug ...8-25 V-belt cooling duct check hose ...8-24 Vehicle Emission Control...