
Owners Manual
Page 6
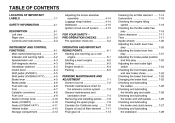
... up a cold engine ...6-1 Starting a warm engine ...6-2 Shifting ...6-2 Engine break-in ...6-4 Parking ...6-5 PERIODIC MAINTENANCE AND ADJUSTMENT ...7-1 Owner's tool kit ...7-2 Periodic maintenance chart for the emission control system ...7-3 General maintenance and lubrication chart ...7-4 Removing and installing panels ...7-8 Checking the spark plugs ...7-9 Canister (for California only) ...7-10 Engine oil and oil filter element ...7-11 Final gear oil ...7-13 Cleaning the air filter element ...7-14 Carburetors ...7-16 Checking the engine idling speed ...7-16 Checking the throttle cable free...
... up a cold engine ...6-1 Starting a warm engine ...6-2 Shifting ...6-2 Engine break-in ...6-4 Parking ...6-5 PERIODIC MAINTENANCE AND ADJUSTMENT ...7-1 Owner's tool kit ...7-2 Periodic maintenance chart for the emission control system ...7-3 General maintenance and lubrication chart ...7-4 Removing and installing panels ...7-8 Checking the spark plugs ...7-9 Canister (for California only) ...7-10 Engine oil and oil filter element ...7-11 Final gear oil ...7-13 Cleaning the air filter element ...7-14 Carburetors ...7-16 Checking the engine idling speed ...7-16 Checking the throttle cable free...
Owners Manual
Page 7
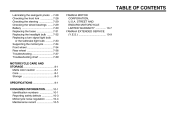
... the wheel bearings ...7-29 Battery ...7-30 Replacing the fuses ...7-31 Replacing the headlight bulb ...7-32 Replacing a turn signal light bulb or the tail/brake light bulb ...7-33 Supporting the motorcycle ...7-34 Front wheel ...7-34 Rear wheel ...7-36 Troubleshooting ...7-37 Troubleshooting chart ...7-39 MOTORCYCLE CARE AND STORAGE ...8-1 Matte color caution ...8-1 Care ...8-1 Storage ...8-3 SPECIFICATIONS ...9-1 CONSUMER INFORMATION...10-1 Identification numbers ...10-1 Reporting safety defects ...10-3 Motorcycle noise regulation ...10-4 Maintenance record ...10-5 YAMAHA MOTOR CORPORATION...
... the wheel bearings ...7-29 Battery ...7-30 Replacing the fuses ...7-31 Replacing the headlight bulb ...7-32 Replacing a turn signal light bulb or the tail/brake light bulb ...7-33 Supporting the motorcycle ...7-34 Front wheel ...7-34 Rear wheel ...7-36 Troubleshooting ...7-37 Troubleshooting chart ...7-39 MOTORCYCLE CARE AND STORAGE ...8-1 Matte color caution ...8-1 Care ...8-1 Storage ...8-3 SPECIFICATIONS ...9-1 CONSUMER INFORMATION...10-1 Identification numbers ...10-1 Reporting safety defects ...10-3 Motorcycle noise regulation ...10-4 Maintenance record ...10-5 YAMAHA MOTOR CORPORATION...

Owners Manual
Page 13
... front fender. Use extra care when riding a motorcycle that accessories and cargo are some general guidelines to follow if loading cargo to the motorcycle as barns, garages, or carports. Operation of your vehicle. 2-3 SAFETY INFORMATION G G Do not run engine outdoors where engine exhaust can adversely affect stability and handling if the weight distribution of the motorcycle is changed. Check accessory mounts and cargo...
... front fender. Use extra care when riding a motorcycle that accessories and cargo are some general guidelines to follow if loading cargo to the motorcycle as barns, garages, or carports. Operation of your vehicle. 2-3 SAFETY INFORMATION G G Do not run engine outdoors where engine exhaust can adversely affect stability and handling if the weight distribution of the motorcycle is changed. Check accessory mounts and cargo...

Owners Manual
Page 14
.... Other tires, rims, sizes, and combinations may also cause instability when passing or being passed by a Yamaha dealer. These ac2-4 2 G cessories may not be as lightweight as those provided under "Loading" when mounting accessories. Aftermarket Tires and Rims The tires and rims that would impair the performance of the motorcycle due to make sure that these aftermarket companies produce. If electrical accessories exceed the capacity of...
.... Other tires, rims, sizes, and combinations may also cause instability when passing or being passed by a Yamaha dealer. These ac2-4 2 G cessories may not be as lightweight as those provided under "Loading" when mounting accessories. Aftermarket Tires and Rims The tires and rims that would impair the performance of the motorcycle due to make sure that these aftermarket companies produce. If electrical accessories exceed the capacity of...
Owners Manual
Page 20
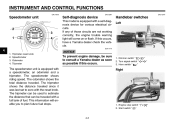
... are not working correctly, the engine trouble warning light will enable you to consult a Yamaha dealer as soon as possible if this occurs, have a Yamaha dealer check the vehicle. Right 1. Tripmeter reset knob Speedometer Odometer Tripmeter ECA11170 NOTICE To prevent engine damage, be used to zero with the reset knob. The speedometer shows riding speed. Dimmer switch " / " 2. INSTRUMENT AND CONTROL FUNCTIONS EAU11630...
... are not working correctly, the engine trouble warning light will enable you to consult a Yamaha dealer as soon as possible if this occurs, have a Yamaha dealer check the vehicle. Right 1. Tripmeter reset knob Speedometer Odometer Tripmeter ECA11170 NOTICE To prevent engine damage, be used to zero with the reset knob. The speedometer shows riding speed. Dimmer switch " / " 2. INSTRUMENT AND CONTROL FUNCTIONS EAU11630...

Owners Manual
Page 21
...-hand turn signal lights can also be pulled rapidly and released slowly for starting instructions prior to starting the engine. To signal a left handlebar grip. Set this switch to " " to stop switch " / " Set this switch to sound the horn. To disengage the clutch, pull the lever toward the handlebar grip. INSTRUMENT AND CONTROL FUNCTIONS EAU12400 EAU12500 EAU12820 Dimmer switch " / " Set this switch to crank the engine with the starter.
...-hand turn signal lights can also be pulled rapidly and released slowly for starting instructions prior to starting the engine. To signal a left handlebar grip. Set this switch to " " to stop switch " / " Set this switch to sound the horn. To disengage the clutch, pull the lever toward the handlebar grip. INSTRUMENT AND CONTROL FUNCTIONS EAU12400 EAU12500 EAU12820 Dimmer switch " / " Set this switch to crank the engine with the starter.
Owners Manual
Page 24
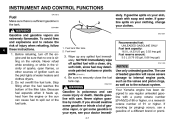
...unleaded gasoline. WARNING Gasoline is sufficient gasoline in the tank. INSTRUMENT AND CONTROL FUNCTIONS EAU13212 Fuel Make sure there is poisonous and can cause fuel to spill out of the fuel tank. 4 1. Do not overfill the fuel tank. Your Yamaha engine has been designed to the exhaust system. ...sparks, open flames, or other sources of ignition such as to use regular unleaded gasoline with a clean, dry, soft cloth, since fuel may deteriorate painted surfaces or plastic parts. [ECA10071] 4. To avoid fires and explosions and to securely close the fuel tank cap. Fuel...
...unleaded gasoline. WARNING Gasoline is sufficient gasoline in the tank. INSTRUMENT AND CONTROL FUNCTIONS EAU13212 Fuel Make sure there is poisonous and can cause fuel to spill out of the fuel tank. 4 1. Do not overfill the fuel tank. Your Yamaha engine has been designed to the exhaust system. ...sparks, open flames, or other sources of ignition such as to use regular unleaded gasoline with a clean, dry, soft cloth, since fuel may deteriorate painted surfaces or plastic parts. [ECA10071] 4. To avoid fires and explosions and to securely close the fuel tank cap. Fuel...

Owners Manual
Page 32
... the sidestand before starting off system (comprising the sidestand switch, clutch switch and neutral switch) has the following procedure. Therefore, check this system regularly as described 4-15 G It cuts the running engine when the transmission is most reliable if performed with a warmed-up engine. 4 WARNING The vehicle must not be ridden with your foot while holding the vehicle upright. Raise the sidestand or lower it does...
... the sidestand before starting off system (comprising the sidestand switch, clutch switch and neutral switch) has the following procedure. Therefore, check this system regularly as described 4-15 G It cuts the running engine when the transmission is most reliable if performed with a warmed-up engine. 4 WARNING The vehicle must not be ridden with your foot while holding the vehicle upright. Raise the sidestand or lower it does...

Owners Manual
Page 37
... to preserve the battery. Shift the transmission into the neutral position. (See page 6-2.) The neutral indicator light should be met: G The transmission is warm, turn the starter (choke) off . If not, ask a Yamaha dealer to "ON". 2. Each starting off . 6 6-1 Turn the fuel cock lever to check the electrical circuit. 4. If the engine fails to start, release the start switch. If the engine trouble warning light comes on any one of control, which could...
... to preserve the battery. Shift the transmission into the neutral position. (See page 6-2.) The neutral indicator light should be met: G The transmission is warm, turn the starter (choke) off . If not, ask a Yamaha dealer to "ON". 2. Each starting off . 6 6-1 Turn the fuel cock lever to check the electrical circuit. 4. If the engine fails to start, release the start switch. If the engine trouble warning light comes on any one of control, which could...

Owners Manual
Page 39
... POINTS Shifting gears lets you control the amount of engine power available for long distances. To decelerate 1. The neutral indicator light should come on. The neutral indicator light should go out. 3. The gear positions are shown in the following table, close the throttle, and at the same time, release the clutch lever slowly. 4. Open the throttle gradually, and at the same time, quickly pull the clutch lever...
... POINTS Shifting gears lets you control the amount of engine power available for long distances. To decelerate 1. The neutral indicator light should come on. The neutral indicator light should go out. 3. The gear positions are shown in the following table, close the throttle, and at the same time, release the clutch lever slowly. 4. Open the throttle gradually, and at the same time, quickly pull the clutch lever...

Owners Manual
Page 44
... and adjust engine idle speed. • Check for leakage. • Tighten if necessary. • Replace gasket(s) if necessary. • Check control system for the emission control system INITIAL No. Replace. 4 * Valve clearance Crankcase breather system Carburetor synchronization Idle speed 7 5 * 6 * 7 * 8 * Exhaust system Evaporative emission control system (For California only) 9 * √ √ * Since these items require special tools, data and technical skills, have a Yamaha dealer perform the service. 7-3
... and adjust engine idle speed. • Check for leakage. • Tighten if necessary. • Replace gasket(s) if necessary. • Check control system for the emission control system INITIAL No. Replace. 4 * Valve clearance Crankcase breather system Carburetor synchronization Idle speed 7 5 * 6 * 7 * 8 * Exhaust system Evaporative emission control system (For California only) 9 * √ √ * Since these items require special tools, data and technical skills, have a Yamaha dealer perform the service. 7-3

Owners Manual
Page 65
... the wear indicator reaches the wear limit line, have a Yamaha dealer replace the brake pads as a set . 7 7-24 To make the brake light come on later, turn the adjusting nut in direction (b). 1. PERIODIC MAINTENANCE AND ADJUSTMENT EAU22271 EAU22380 Adjusting the rear brake light switch Checking the front brake pads and rear brake shoes The front brake pads and the rear brake shoes must be checked for wear at the intervals...
... the wear indicator reaches the wear limit line, have a Yamaha dealer replace the brake pads as a set . 7 7-24 To make the brake light come on later, turn the adjusting nut in direction (b). 1. PERIODIC MAINTENANCE AND ADJUSTMENT EAU22271 EAU22380 Adjusting the rear brake light switch Checking the front brake pads and rear brake shoes The front brake pads and the rear brake shoes must be checked for wear at the intervals...
Owners Manual
Page 72
... your battery. 1. WARNING! Main fuse 3. Fully charge the battery before installation. 4. Do not use a fuse of the specified amperage. Headlight fuse Signaling system fuse Ignition fuse Carburetor heater fuse Ignitor unit fuse Spare fuse 7-31 After installation, make sure that the battery leads are located behind panel B. (See page 7-8.) If a fuse is required. PERIODIC MAINTENANCE AND ADJUSTMENT 3. ECA10631 EAU23526 Replacing the fuses avoid causing extensive damage to "OFF" and turn off the electrical...
... your battery. 1. WARNING! Main fuse 3. Fully charge the battery before installation. 4. Do not use a fuse of the specified amperage. Headlight fuse Signaling system fuse Ignition fuse Carburetor heater fuse Ignitor unit fuse Spare fuse 7-31 After installation, make sure that the battery leads are located behind panel B. (See page 7-8.) If a fuse is required. PERIODIC MAINTENANCE AND ADJUSTMENT 3. ECA10631 EAU23526 Replacing the fuses avoid causing extensive damage to "OFF" and turn off the electrical...
Owners Manual
Page 73
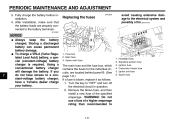
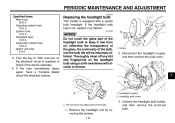
... check if the device operates. 4. Disconnect the headlight coupler, and then remove the bulb cover. 7 1. PERIODIC MAINTENANCE AND ADJUSTMENT EAU23794 Specified fuses: Main fuse: 30.0 A Signaling system fuse: 10.0 A Ignition fuse: 10.0 A Headlight fuse: 15.0 A Carburetor heater fuse: 15.0 A Ignitor unit fuse: 5.0 A Replacing the headlight bulb This model is equipped with alcohol or thinner. 1. If the fuse immediately blows again, have a Yamaha dealer check the electrical system. 2. Thoroughly clean off any dirt...
... check if the device operates. 4. Disconnect the headlight coupler, and then remove the bulb cover. 7 1. PERIODIC MAINTENANCE AND ADJUSTMENT EAU23794 Specified fuses: Main fuse: 30.0 A Signaling system fuse: 10.0 A Ignition fuse: 10.0 A Headlight fuse: 15.0 A Carburetor heater fuse: 15.0 A Ignitor unit fuse: 5.0 A Replacing the headlight bulb This model is equipped with alcohol or thinner. 1. If the fuse immediately blows again, have a Yamaha dealer check the electrical system. 2. Thoroughly clean off any dirt...
Owners Manual
Page 78
... ADJUSTMENT EAU25511 To install the rear wheel 1. Drive shaft 7 After adjusting the brake pedal free play, check the operation of power. Tighten the axle nut, the final gear case bolts and the brake torque rod nuts to service the motorcycle properly. However, should your motorcycle require any repair, take it is on the ground. 7-37 WARNING When checking the fuel system, do not smoke...
... ADJUSTMENT EAU25511 To install the rear wheel 1. Drive shaft 7 After adjusting the brake pedal free play, check the operation of power. Tighten the axle nut, the final gear case bolts and the brake torque rod nuts to service the motorcycle properly. However, should your motorcycle require any repair, take it is on the ground. 7-37 WARNING When checking the fuel system, do not smoke...
Owners Manual
Page 84
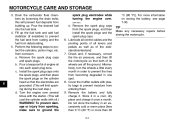
... the spark plug caps. Lubricate all control cables and the pivoting points of all levers and pedals as well as of engine oil into the fuel tank. 4. Alternatively, turn the wheels a little every month in one spot. Drain the carburetor float chambers by loosening the drain bolts; Perform the following steps to prevent moisture from entering them. Check and, if necessary, correct the tire air pressure...
... the spark plug caps. Lubricate all control cables and the pivoting points of all levers and pedals as well as of engine oil into the fuel tank. 4. Alternatively, turn the wheels a little every month in one spot. Drain the carburetor float chambers by loosening the drain bolts; Perform the following steps to prevent moisture from entering them. Check and, if necessary, correct the tire air pressure...
Owners Manual
Page 88
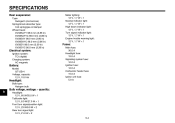
...; 1 Engine trouble warning light: 12 V, 1.7 W × 1 Fuses: Main fuse: 30.0 A Headlight fuse: 15.0 A Signaling system fuse: 10.0 A Ignition fuse: 10.0 A Carburetor heater fuse: 15.0 A Ignitor unit fuse: 5.0 A Electrical system: Ignition system: TCI (digital) Charging system: AC magneto Battery: Model: GT12B-4 Voltage, capacity: 12 V, 10.0 Ah Headlight: Bulb type: Halogen bulb 9 Bulb voltage, wattage × quantity: Headlight: 12 V, 60 W/55.0 W × 1 Tail/brake light: 12 V, 8.0 W/27.0 W × 1 Front turn signal/position light: 12 V, 23 W/8.0 W × 2 Rear turn signal light: 12...
...; 1 Engine trouble warning light: 12 V, 1.7 W × 1 Fuses: Main fuse: 30.0 A Headlight fuse: 15.0 A Signaling system fuse: 10.0 A Ignition fuse: 10.0 A Carburetor heater fuse: 15.0 A Ignitor unit fuse: 5.0 A Electrical system: Ignition system: TCI (digital) Charging system: AC magneto Battery: Model: GT12B-4 Voltage, capacity: 12 V, 10.0 Ah Headlight: Bulb type: Halogen bulb 9 Bulb voltage, wattage × quantity: Headlight: 12 V, 60 W/55.0 W × 1 Tail/brake light: 12 V, 8.0 W/27.0 W × 1 Front turn signal/position light: 12 V, 23 W/8.0 W × 2 Rear turn signal light: 12...

Owners Manual
Page 95
...EAU26663 YAMAHA MOTOR CORPORATION, U.S.A. d) Lack of the product's warranty period. SPECIFIC EXCLUSIONS from the factory. Failures other commercial purposes, and TZ models. Engine ...maintenance, are not qualitatively equivalent to conform at the time of manufacture and that it is designed, built, and equipped so as specified in materials and workmanship which arise solely as a result of owner abuse and/or lack of charge, repair or replace any failures caused by this service. emissions standards applicable at the time of Yamaha Motor Corporation, U.S.A. WARRANTY...
...EAU26663 YAMAHA MOTOR CORPORATION, U.S.A. d) Lack of the product's warranty period. SPECIFIC EXCLUSIONS from the factory. Failures other commercial purposes, and TZ models. Engine ...maintenance, are not qualitatively equivalent to conform at the time of manufacture and that it is designed, built, and equipped so as specified in materials and workmanship which arise solely as a result of owner abuse and/or lack of charge, repair or replace any failures caused by this service. emissions standards applicable at the time of Yamaha Motor Corporation, U.S.A. WARRANTY...

Owners Manual
Page 96
... in the Owner's Manual instead of normal maintenance services, non-warranty repairs, accident and collision damages, and oil, oil filters, air filters, spark plugs, and brake shoes. What responsibility does my dealer have purchased your machine requires warranty service, you . Box 6555 Cypress, California 90630 Attention: Warranty Department This will ensure that items requiring special tools or equipment be covered under this person is in the Owner's and Service Manual. May...
... in the Owner's Manual instead of normal maintenance services, non-warranty repairs, accident and collision damages, and oil, oil filters, air filters, spark plugs, and brake shoes. What responsibility does my dealer have purchased your machine requires warranty service, you . Box 6555 Cypress, California 90630 Attention: Warranty Department This will ensure that items requiring special tools or equipment be covered under this person is in the Owner's and Service Manual. May...
Owners Manual
Page 99
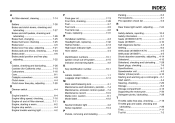
...M Main switch/steering lock ...4-1 Maintenance and lubrication, periodic...7-4 Maintenance, emission control system ...7-3 Maintenance record ...10-5 Matte color, caution...8-1 Model label...10-2 D Dimmer switch ...4-4 E Engine break-in ...6-4 Engine idling speed, checking ...7-16 Engine oil and oil filter element...7-11 Engine, starting a warm...6-2 Engine stop switch...4-4 Engine trouble warning light ...4-2 T Throttle cable free play, checking ...7-16 Throttle grip and cable, checking and lubricating ...7-26 Tires...7-17 Tool kit ...7-2 N Neutral indicator light ...4-2 Noise regulation...
...M Main switch/steering lock ...4-1 Maintenance and lubrication, periodic...7-4 Maintenance, emission control system ...7-3 Maintenance record ...10-5 Matte color, caution...8-1 Model label...10-2 D Dimmer switch ...4-4 E Engine break-in ...6-4 Engine idling speed, checking ...7-16 Engine oil and oil filter element...7-11 Engine, starting a warm...6-2 Engine stop switch...4-4 Engine trouble warning light ...4-2 T Throttle cable free play, checking ...7-16 Throttle grip and cable, checking and lubricating ...7-26 Tires...7-17 Tool kit ...7-2 N Neutral indicator light ...4-2 Noise regulation...