

Owners Manual
Page 6
... up a cold engine ...6-1 Starting a warm engine ...6-2 Shifting ...6-2 Engine break-in ...6-4 Parking ...6-5 PERIODIC MAINTENANCE AND ADJUSTMENT ...7-1 Owner's tool kit ...7-2 Periodic maintenance chart for the emission control system ...7-3 General maintenance and lubrication chart ...7-4 Removing and installing panels ...7-8 Checking the spark plugs ...7-9 Canister (for California only) ...7-10 Engine oil and oil filter element ...7-11 Final gear oil ...7-13 Cleaning the air filter element ...7-14 Carburetors ...7-16 Checking the engine idling speed ...7-16 Checking the throttle cable free...
... up a cold engine ...6-1 Starting a warm engine ...6-2 Shifting ...6-2 Engine break-in ...6-4 Parking ...6-5 PERIODIC MAINTENANCE AND ADJUSTMENT ...7-1 Owner's tool kit ...7-2 Periodic maintenance chart for the emission control system ...7-3 General maintenance and lubrication chart ...7-4 Removing and installing panels ...7-8 Checking the spark plugs ...7-9 Canister (for California only) ...7-10 Engine oil and oil filter element ...7-11 Final gear oil ...7-13 Cleaning the air filter element ...7-14 Carburetors ...7-16 Checking the engine idling speed ...7-16 Checking the throttle cable free...

Owners Manual
Page 7
... WARRANTY ...10-7 YAMAHA EXTENDED SERVICE (Y.E.S.) ...10-9 TABLE OF CONTENTS Lubricating the swingarm pivots ...7-28 Checking the front fork ...7-28 Checking the steering ...7-29 Checking the wheel bearings ...7-29 Battery ...7-30 Replacing the fuses ...7-31 Replacing the headlight bulb ...7-32 Replacing a turn signal light bulb or the tail/brake light bulb ...7-33 Supporting the motorcycle ...7-34 Front wheel ...7-34 Rear wheel ...7-36 Troubleshooting ...7-37 Troubleshooting chart ...7-39 MOTORCYCLE CARE AND STORAGE ...8-1 Matte color caution ...8-1 Care ...8-1 Storage ...8-3 SPECIFICATIONS...
... WARRANTY ...10-7 YAMAHA EXTENDED SERVICE (Y.E.S.) ...10-9 TABLE OF CONTENTS Lubricating the swingarm pivots ...7-28 Checking the front fork ...7-28 Checking the steering ...7-29 Checking the wheel bearings ...7-29 Battery ...7-30 Replacing the fuses ...7-31 Replacing the headlight bulb ...7-32 Replacing a turn signal light bulb or the tail/brake light bulb ...7-33 Supporting the motorcycle ...7-34 Front wheel ...7-34 Rear wheel ...7-36 Troubleshooting ...7-37 Troubleshooting chart ...7-39 MOTORCYCLE CARE AND STORAGE ...8-1 Matte color caution ...8-1 Care ...8-1 Storage ...8-3 SPECIFICATIONS...
Owners Manual
Page 13
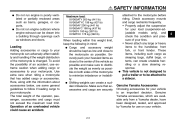
... Yamaha Accessories Choosing accessories for your vehicle. 2-3 When loading within this weight limit, keep the following in poorly ventilated or partially enclosed areas such as barns, garages, or carports. G Shifting weights can be drawn into a building through openings such as low and close to be kept as windows and doors. This vehicle is not designed to pull a trailer or to the center...
... Yamaha Accessories Choosing accessories for your vehicle. 2-3 When loading within this weight limit, keep the following in poorly ventilated or partially enclosed areas such as barns, garages, or carports. G Shifting weights can be drawn into a building through openings such as low and close to be kept as windows and doors. This vehicle is not designed to pull a trailer or to the center...
Owners Manual
Page 14
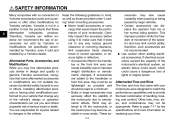
... genuine Yamaha accessories, recognize that change any way reduce ground clearance or cornering clearance, limit suspension travel, steering travel or control operation, or obscure lights or reflectors. • Accessories fitted to the handlebar or the front fork area can neither endorse nor recommend the use of your tires. Installing aftermarket products or having other modifications for tire specifications and more information on replacing your...
... genuine Yamaha accessories, recognize that change any way reduce ground clearance or cornering clearance, limit suspension travel, steering travel or control operation, or obscure lights or reflectors. • Accessories fitted to the handlebar or the front fork area can neither endorse nor recommend the use of your tires. Installing aftermarket products or having other modifications for tire specifications and more information on replacing your...
Owners Manual
Page 19
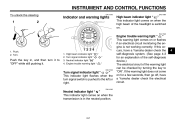
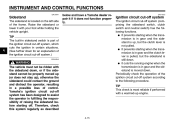
INSTRUMENT AND CONTROL FUNCTIONS To unlock the steering EAU11003 EAU11080 Indicator and warning lights High beam indicator light " " This indicator light comes on when the high beam of the warning light can be checked by turning the key to "ON". Turn. EAU11502 1. Push the key in, and then turn signal switch is in the neutral position. 4-2 If this occurs, have a Yamaha dealer check the electrical circuit. 4 Neutral indicator light " " This indicator light comes...
INSTRUMENT AND CONTROL FUNCTIONS To unlock the steering EAU11003 EAU11080 Indicator and warning lights High beam indicator light " " This indicator light comes on when the high beam of the warning light can be checked by turning the key to "ON". Turn. EAU11502 1. Push the key in, and then turn signal switch is in the neutral position. 4-2 If this occurs, have a Yamaha dealer check the electrical circuit. 4 Neutral indicator light " " This indicator light comes...

Owners Manual
Page 20
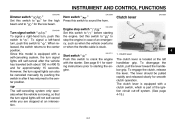
... shows the total distance traveled. Engine stop switch " 2. INSTRUMENT AND CONTROL FUNCTIONS EAU11630 EAU12091 EAU12347 Speedometer unit Self-diagnosis device This model is equipped with a speedometer, an odometer and a tripmeter. If any of those circuits are not working correctly, the engine trouble warning light will enable you to zero with a full tank of fuel. Handlebar switches Left 4 1. 2. 3. 4. Dimmer switch " / " 2. The speedometer shows riding speed. Start switch " " / " 4-3
... shows the total distance traveled. Engine stop switch " 2. INSTRUMENT AND CONTROL FUNCTIONS EAU11630 EAU12091 EAU12347 Speedometer unit Self-diagnosis device This model is equipped with a speedometer, an odometer and a tripmeter. If any of those circuits are not working correctly, the engine trouble warning light will enable you to zero with a full tank of fuel. Handlebar switches Left 4 1. 2. 3. 4. Dimmer switch " / " 2. The speedometer shows riding speed. Start switch " " / " 4-3
Owners Manual
Page 21
... ignition circuit cut-off system. (See page 4-15.) 4-4 EAU12430 Horn switch " " Press this switch to " ". Clutch lever The clutch lever is part of an emergency, such as when the vehicle overturns or when the throttle cable is equipped with the starter. See page 6-1 for starting instructions prior to " " for the low beam. INSTRUMENT AND CONTROL FUNCTIONS EAU12400 EAU12500 EAU12820 Dimmer switch " / " Set this switch...
... ignition circuit cut-off system. (See page 4-15.) 4-4 EAU12430 Horn switch " " Press this switch to " ". Clutch lever The clutch lever is part of an emergency, such as when the vehicle overturns or when the throttle cable is equipped with the starter. See page 6-1 for starting instructions prior to " " for the low beam. INSTRUMENT AND CONTROL FUNCTIONS EAU12400 EAU12500 EAU12820 Dimmer switch " / " Set this switch...

Owners Manual
Page 24
... exhaust system. NOTICE: Immediately wipe off the engine and be sure that no one is sitting on your clothes. The use of water heaters and clothes dryers. 2. If knocking (or pinging) occurs, use regular unleaded gasoline with soap and water. WARNING Gasoline is poisonous and can cause fuel to reduce the risk of a different brand or premi- INSTRUMENT AND CONTROL...
... exhaust system. NOTICE: Immediately wipe off the engine and be sure that no one is sitting on your clothes. The use of water heaters and clothes dryers. 2. If knocking (or pinging) occurs, use regular unleaded gasoline with soap and water. WARNING Gasoline is poisonous and can cause fuel to reduce the risk of a different brand or premi- INSTRUMENT AND CONTROL...
Owners Manual
Page 32
... the sidestand switch, clutch switch and neutral switch) has the following procedure. TIP The built-in gear and the sidestand is part of the ignition circuit cut -off system has been designed to the following functions. G It cuts the running engine when the transmission is in sidestand switch is moved down. G It prevents starting off system.) EWA10240 below and have a Yamaha dealer repair it...
... the sidestand switch, clutch switch and neutral switch) has the following procedure. TIP The built-in gear and the sidestand is part of the ignition circuit cut -off system has been designed to the following functions. G It cuts the running engine when the transmission is in sidestand switch is moved down. G It prevents starting off system.) EWA10240 below and have a Yamaha dealer repair it...
Owners Manual
Page 37
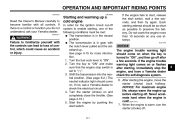
... the ignition circuit cut-off . 6 6-1 Shift the transmission into the neutral position. (See page 6-2.) The neutral indicator light should be met: G The transmission is warm, turn the starter (choke) off system to "ON". 2. ECA11370 NOTICE The engine trouble warning light should come on. After starting , immediately stop switch is set to preserve the battery. Turn the key to "ON", and then go off . Start the engine by pushing the start switch...
... the ignition circuit cut-off . 6 6-1 Shift the transmission into the neutral position. (See page 6-2.) The neutral indicator light should be met: G The transmission is warm, turn the starter (choke) off system to "ON". 2. ECA11370 NOTICE The engine trouble warning light should come on. After starting , immediately stop switch is set to preserve the battery. Turn the key to "ON", and then go off . Start the engine by pushing the start switch...
Owners Manual
Page 39
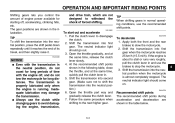
... shift the transmission into the neutral position.) 6. Follow the same procedure when shifting to shift the transmission into the neutral position, press the shift pedal down repeatedly until it reaches the end of time with the transmission in the following table, close the throttle, and at the same time, release the clutch lever slowly. 4. OPERATION AND IMPORTANT RIDING POINTS Shifting gears lets you control the amount of engine power...
... shift the transmission into the neutral position.) 6. Follow the same procedure when shifting to shift the transmission into the neutral position, press the shift pedal down repeatedly until it reaches the end of time with the transmission in the following table, close the throttle, and at the same time, release the clutch lever slowly. 4. OPERATION AND IMPORTANT RIDING POINTS Shifting gears lets you control the amount of engine power...

Owners Manual
Page 65
... disappeared, have a Yamaha dealer replace the brake shoes as a set . To make the brake light come on just before braking takes effect. EAU22540 Rear brake shoes Front brake pads 1. Turn the rear brake light switch adjusting nut while holding the rear brake light switch in the periodic maintenance and lubrication chart. PERIODIC MAINTENANCE AND ADJUSTMENT EAU22271 EAU22380 Adjusting the rear brake light switch Checking the front brake pads and rear brake shoes The front brake pads and the rear brake shoes must be...
... disappeared, have a Yamaha dealer replace the brake shoes as a set . To make the brake light come on just before braking takes effect. EAU22540 Rear brake shoes Front brake pads 1. Turn the rear brake light switch adjusting nut while holding the rear brake light switch in the periodic maintenance and lubrication chart. PERIODIC MAINTENANCE AND ADJUSTMENT EAU22271 EAU22380 Adjusting the rear brake light switch Checking the front brake pads and rear brake shoes The front brake pads and the rear brake shoes must be...

Owners Manual
Page 72
... that the battery leads are located behind panel B. (See page 7-8.) If a fuse is required. Using a conventional battery charger will damage the battery. WARNING! Headlight fuse Signaling system fuse Ignition fuse Carburetor heater fuse Ignitor unit fuse Spare fuse 7-31 PERIODIC MAINTENANCE AND ADJUSTMENT 3. Main fuse 3. Spare main fuse The main fuse and the fuse box, which contains the fuses for the individual circuits, are properly connected to "OFF" and turn off the electrical circuit...
... that the battery leads are located behind panel B. (See page 7-8.) If a fuse is required. Using a conventional battery charger will damage the battery. WARNING! Headlight fuse Signaling system fuse Ignition fuse Carburetor heater fuse Ignitor unit fuse Spare fuse 7-31 PERIODIC MAINTENANCE AND ADJUSTMENT 3. Main fuse 3. Spare main fuse The main fuse and the fuse box, which contains the fuses for the individual circuits, are properly connected to "OFF" and turn off the electrical circuit...

Owners Manual
Page 73
... touch the glass part of the headlight bulb to check if the device operates. 4. Remove the headlight unit by removing the screws. 7-32 3. Headlight bulb cover 1. Disconnect the headlight coupler, and then remove the bulb cover. 7 1. Screw 3. PERIODIC MAINTENANCE AND ADJUSTMENT EAU23794 Specified fuses: Main fuse: 30.0 A Signaling system fuse: 10.0 A Ignition fuse: 10.0 A Headlight fuse: 15.0 A Carburetor heater fuse: 15.0 A Ignitor unit fuse: 5.0 A Replacing the headlight bulb This model is equipped with alcohol or...
... touch the glass part of the headlight bulb to check if the device operates. 4. Remove the headlight unit by removing the screws. 7-32 3. Headlight bulb cover 1. Disconnect the headlight coupler, and then remove the bulb cover. 7 1. Screw 3. PERIODIC MAINTENANCE AND ADJUSTMENT EAU23794 Specified fuses: Main fuse: 30.0 A Signaling system fuse: 10.0 A Ignition fuse: 10.0 A Headlight fuse: 15.0 A Carburetor heater fuse: 15.0 A Ignitor unit fuse: 5.0 A Replacing the headlight bulb This model is equipped with alcohol or...

Owners Manual
Page 78
... wheel forward and guiding the drive shaft into the middle gear universal joint. 7. Imitation parts may occur during operation. Install the panel. 6. Tighten the axle nut, the final gear case bolts and the brake torque rod nuts to service the motorcycle properly. Install the final gear case bolts. 3. However, should your motorcycle require any repair, take it is on the ground. 7-37 WARNING When checking the fuel...
... wheel forward and guiding the drive shaft into the middle gear universal joint. 7. Imitation parts may occur during operation. Install the panel. 6. Tighten the axle nut, the final gear case bolts and the brake torque rod nuts to service the motorcycle properly. Install the final gear case bolts. 3. However, should your motorcycle require any repair, take it is on the ground. 7-37 WARNING When checking the fuel...

Owners Manual
Page 84
..., etc. Cover the muffler outlets with oil.) WARNING! Drain the carburetor float chambers by loosening the drain bolts; Fill up . Check and, if necessary, correct the tire air pressure, and then lift the motorcycle so that the electrodes are off the ground. from the spark plugs, and then install the spark plugs and the spark plug caps. Pour a teaspoonful of engine oil into the fuel tank. 4. Do not store the battery in...
..., etc. Cover the muffler outlets with oil.) WARNING! Drain the carburetor float chambers by loosening the drain bolts; Fill up . Check and, if necessary, correct the tire air pressure, and then lift the motorcycle so that the electrodes are off the ground. from the spark plugs, and then install the spark plugs and the spark plug caps. Pour a teaspoonful of engine oil into the fuel tank. 4. Do not store the battery in...

Owners Manual
Page 88
...; 1 Engine trouble warning light: 12 V, 1.7 W × 1 Fuses: Main fuse: 30.0 A Headlight fuse: 15.0 A Signaling system fuse: 10.0 A Ignition fuse: 10.0 A Carburetor heater fuse: 15.0 A Ignitor unit fuse: 5.0 A Electrical system: Ignition system: TCI (digital) Charging system: AC magneto Battery: Model: GT12B-4 Voltage, capacity: 12 V, 10.0 Ah Headlight: Bulb type: Halogen bulb 9 Bulb voltage, wattage × quantity: Headlight: 12 V, 60 W/55.0 W × 1 Tail/brake light: 12 V, 8.0 W/27.0 W × 1 Front turn signal/position light: 12 V, 23 W/8.0 W × 2 Rear turn signal light: 12...
...; 1 Engine trouble warning light: 12 V, 1.7 W × 1 Fuses: Main fuse: 30.0 A Headlight fuse: 15.0 A Signaling system fuse: 10.0 A Ignition fuse: 10.0 A Carburetor heater fuse: 15.0 A Ignitor unit fuse: 5.0 A Electrical system: Ignition system: TCI (digital) Charging system: AC magneto Battery: Model: GT12B-4 Voltage, capacity: 12 V, 10.0 Ah Headlight: Bulb type: Halogen bulb 9 Bulb voltage, wattage × quantity: Headlight: 12 V, 60 W/55.0 W × 1 Tail/brake light: 12 V, 8.0 W/27.0 W × 1 Front turn signal/position light: 12 V, 23 W/8.0 W × 2 Rear turn signal light: 12...
Owners Manual
Page 95
... of proper maintenance, are not qualitatively equivalent to : 1. c) Abnormal strain, neglect, or abuse. An inspection and registration fee will be to genuine Yamaha parts. hereby warrants that the machine be one (1) year from defects in warranty repairs will be free from this warranty. THE PERIOD OF WARRANTY for Yamaha motorcycles originally equipped with headlight, stoplight, and turn signals shall be...
... of proper maintenance, are not qualitatively equivalent to : 1. c) Abnormal strain, neglect, or abuse. An inspection and registration fee will be to genuine Yamaha parts. hereby warrants that the machine be one (1) year from defects in warranty repairs will be free from this warranty. THE PERIOD OF WARRANTY for Yamaha motorcycles originally equipped with headlight, stoplight, and turn signals shall be...
Owners Manual
Page 96
... the warranty cover incidental costs such as it to help you have under warranty. Will the warranty be "voided" or "cancelled." What costs are some examples of normal maintenance services, non-warranty repairs, accident and collision damages, and oil, oil filters, air filters, spark plugs, and brake shoes. A. Is the warranty transferable to a failure? CUSTOMER RELATIONS DEPARTMENT P.O. Specific examples include: Running the machine out of oil, sustained high rpm, full-throttle, operating...
... the warranty cover incidental costs such as it to help you have under warranty. Will the warranty be "voided" or "cancelled." What costs are some examples of normal maintenance services, non-warranty repairs, accident and collision damages, and oil, oil filters, air filters, spark plugs, and brake shoes. A. Is the warranty transferable to a failure? CUSTOMER RELATIONS DEPARTMENT P.O. Specific examples include: Running the machine out of oil, sustained high rpm, full-throttle, operating...

Owners Manual
Page 99
...M Main switch/steering lock ...4-1 Maintenance and lubrication, periodic...7-4 Maintenance, emission control system ...7-3 Maintenance record ...10-5 Matte color, caution...8-1 Model label...10-2 D Dimmer switch ...4-4 E Engine break-in ...6-4 Engine idling speed, checking ...7-16 Engine oil and oil filter element...7-11 Engine, starting a warm...6-2 Engine stop switch...4-4 Engine trouble warning light ...4-2 T Throttle cable free play, checking ...7-16 Throttle grip and cable, checking and lubricating ...7-26 Tires...7-17 Tool kit ...7-2 N Neutral indicator light ...4-2 Noise regulation...
...M Main switch/steering lock ...4-1 Maintenance and lubrication, periodic...7-4 Maintenance, emission control system ...7-3 Maintenance record ...10-5 Matte color, caution...8-1 Model label...10-2 D Dimmer switch ...4-4 E Engine break-in ...6-4 Engine idling speed, checking ...7-16 Engine oil and oil filter element...7-11 Engine, starting a warm...6-2 Engine stop switch...4-4 Engine trouble warning light ...4-2 T Throttle cable free play, checking ...7-16 Throttle grip and cable, checking and lubricating ...7-26 Tires...7-17 Tool kit ...7-2 N Neutral indicator light ...4-2 Noise regulation...