
Owners Manual
Page 6
... up a cold engine ...6-1 Starting a warm engine ...6-2 Shifting ...6-2 Engine break-in ...6-4 Parking ...6-5 PERIODIC MAINTENANCE AND ADJUSTMENT ...7-1 Owner's tool kit ...7-2 Periodic maintenance chart for the emission control system ...7-3 General maintenance and lubrication chart ...7-4 Removing and installing panels ...7-8 Checking the spark plugs ...7-9 Canister (for California only) ...7-10 Engine oil and oil filter element ...7-11 Final gear oil ...7-13 Cleaning the air filter element ...7-14 Carburetors ...7-16 Checking the engine idling speed ...7-16 Checking the throttle cable free...
... up a cold engine ...6-1 Starting a warm engine ...6-2 Shifting ...6-2 Engine break-in ...6-4 Parking ...6-5 PERIODIC MAINTENANCE AND ADJUSTMENT ...7-1 Owner's tool kit ...7-2 Periodic maintenance chart for the emission control system ...7-3 General maintenance and lubrication chart ...7-4 Removing and installing panels ...7-8 Checking the spark plugs ...7-9 Canister (for California only) ...7-10 Engine oil and oil filter element ...7-11 Final gear oil ...7-13 Cleaning the air filter element ...7-14 Carburetors ...7-16 Checking the engine idling speed ...7-16 Checking the throttle cable free...
Owners Manual
Page 7
... WARRANTY ...10-7 YAMAHA EXTENDED SERVICE (Y.E.S.) ...10-9 TABLE OF CONTENTS Lubricating the swingarm pivots ...7-28 Checking the front fork ...7-28 Checking the steering ...7-29 Checking the wheel bearings ...7-29 Battery ...7-30 Replacing the fuses ...7-31 Replacing the headlight bulb ...7-32 Replacing a turn signal light bulb or the tail/brake light bulb ...7-33 Supporting the motorcycle ...7-34 Front wheel ...7-34 Rear wheel ...7-36 Troubleshooting ...7-37 Troubleshooting chart ...7-39 MOTORCYCLE CARE AND STORAGE ...8-1 Matte color caution ...8-1 Care ...8-1 Storage ...8-3 SPECIFICATIONS...
... WARRANTY ...10-7 YAMAHA EXTENDED SERVICE (Y.E.S.) ...10-9 TABLE OF CONTENTS Lubricating the swingarm pivots ...7-28 Checking the front fork ...7-28 Checking the steering ...7-29 Checking the wheel bearings ...7-29 Battery ...7-30 Replacing the fuses ...7-31 Replacing the headlight bulb ...7-32 Replacing a turn signal light bulb or the tail/brake light bulb ...7-33 Supporting the motorcycle ...7-34 Front wheel ...7-34 Rear wheel ...7-36 Troubleshooting ...7-37 Troubleshooting chart ...7-39 MOTORCYCLE CARE AND STORAGE ...8-1 Matte color caution ...8-1 Care ...8-1 Storage ...8-3 SPECIFICATIONS...
Owners Manual
Page 13
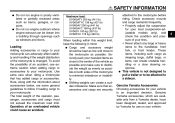
SAFETY INFORMATION G G Do not run engine outdoors where engine exhaust can create a sudden imbalance. Here, along with the information about accessories below, are some general guidelines to follow if loading cargo to your motorcycle: The total weight of your load (suspension-adjustable models only), and check the condition and pressure of the operator, passenger, accessories and cargo must not exceed the maximum load limit...
SAFETY INFORMATION G G Do not run engine outdoors where engine exhaust can create a sudden imbalance. Here, along with the information about accessories below, are some general guidelines to follow if loading cargo to your motorcycle: The total weight of your load (suspension-adjustable models only), and check the condition and pressure of the operator, passenger, accessories and cargo must not exceed the maximum load limit...
Owners Manual
Page 14
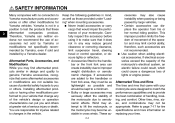
... performance of lights or engine power. These ac2-4 2 G cessories may limit control ability, therefore, such accessories are not suitable because of potential safety hazards to provide the best combination of serious injury or death. If electrical accessories exceed the capacity of the motorcycle's electrical system, an electric failure could result, which could cause a dangerous loss of your motorcycle. Aftermarket Tires and Rims The tires and rims that change...
... performance of lights or engine power. These ac2-4 2 G cessories may limit control ability, therefore, such accessories are not suitable because of potential safety hazards to provide the best combination of serious injury or death. If electrical accessories exceed the capacity of the motorcycle's electrical system, an electric failure could result, which could cause a dangerous loss of your motorcycle. Aftermarket Tires and Rims The tires and rims that change...

Owners Manual
Page 20
.... Handlebar switches Left 4 1. 2. 3. 4. Turn signal switch " / " 3. Horn switch " " The speedometer unit is equipped with a self-diagnosis device for various electrical circuits. Tripmeter reset knob Speedometer Odometer Tripmeter ECA11170 NOTICE To prevent engine damage, be traveled with a full tank of those circuits are not working correctly, the engine trouble warning light will enable you to zero with the reset knob. Right 1. Start switch " " / " 4-3 INSTRUMENT AND CONTROL FUNCTIONS EAU11630...
.... Handlebar switches Left 4 1. 2. 3. 4. Turn signal switch " / " 3. Horn switch " " The speedometer unit is equipped with a self-diagnosis device for various electrical circuits. Tripmeter reset knob Speedometer Odometer Tripmeter ECA11170 NOTICE To prevent engine damage, be traveled with a full tank of those circuits are not working correctly, the engine trouble warning light will enable you to zero with the reset knob. Right 1. Start switch " " / " 4-3 INSTRUMENT AND CONTROL FUNCTIONS EAU11630...
Owners Manual
Page 21
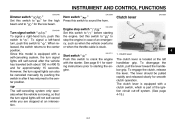
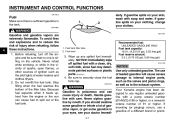
... with the starter. INSTRUMENT AND CONTROL FUNCTIONS EAU12400 EAU12500 EAU12820 Dimmer switch " / " Set this switch to sound the horn. EAU12660 Clutch lever Turn signal switch " / " To signal a right-hand turn , push this switch to crank the engine with a self-canceling system, the turn signal lights can also be pulled rapidly and released slowly for approximately 15 seconds. Since this model is stuck. 4 EAU12711 Start switch " " Push this switch to the center position. TIP...
... with the starter. INSTRUMENT AND CONTROL FUNCTIONS EAU12400 EAU12500 EAU12820 Dimmer switch " / " Set this switch to sound the horn. EAU12660 Clutch lever Turn signal switch " / " To signal a right-hand turn , push this switch to crank the engine with a self-canceling system, the turn signal lights can also be pulled rapidly and released slowly for approximately 15 seconds. Since this model is stuck. 4 EAU12711 Start switch " " Push this switch to the center position. TIP...
Owners Manual
Page 24
...INSTRUMENT AND CONTROL FUNCTIONS EAU13212 Fuel Make sure there is sitting on the vehicle. Fuel level 3. Never siphon gasoline by mouth. Before refueling, turn off spilled fuel with a pump octane number [(R+M)/2] of 86 or higher, or a research octane number of ignition such as to use regular unleaded gasoline with a clean, dry, soft cloth, since fuel may deteriorate painted... in the tank. WARNING Gasoline is poisonous and can cause fuel to internal engine parts, such as the valves and piston rings, as well as the pilot lights of the filler tube. If knocking (or pinging...
...INSTRUMENT AND CONTROL FUNCTIONS EAU13212 Fuel Make sure there is sitting on the vehicle. Fuel level 3. Never siphon gasoline by mouth. Before refueling, turn off spilled fuel with a pump octane number [(R+M)/2] of 86 or higher, or a research octane number of ignition such as to use regular unleaded gasoline with a clean, dry, soft cloth, since fuel may deteriorate painted... in the tank. WARNING Gasoline is poisonous and can cause fuel to internal engine parts, such as the valves and piston rings, as well as the pilot lights of the filler tube. If knocking (or pinging...
Owners Manual
Page 32
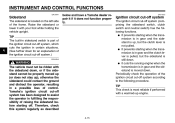
... while holding the vehicle upright. Yamaha's ignition circuit cut -off system, which cuts the ignition in a possible loss of the frame. INSTRUMENT AND CONTROL FUNCTIONS EAU15301 Sidestand The sidestand is still down. Raise the sidestand or lower it does not function properly. TIP The built-in sidestand switch is most reliable if performed with a warmed-up engine. 4 WARNING The vehicle must not be...
... while holding the vehicle upright. Yamaha's ignition circuit cut -off system, which cuts the ignition in a possible loss of the frame. INSTRUMENT AND CONTROL FUNCTIONS EAU15301 Sidestand The sidestand is still down. Raise the sidestand or lower it does not function properly. TIP The built-in sidestand switch is most reliable if performed with a warmed-up engine. 4 WARNING The vehicle must not be...
Owners Manual
Page 37
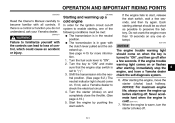
... the battery. Start the engine by pushing the start switch, wait a few seconds. If not, ask a Yamaha dealer to "ON". 2. After starting , immediately stop switch is in gear with the clutch lever pulled and the sidestand up. Turn the fuel cock lever to check the electrical circuit. 4. Shift the transmission into the neutral position. (See page 6-2.) The neutral indicator light should come on when the key is turned to enable starting...
... the battery. Start the engine by pushing the start switch, wait a few seconds. If not, ask a Yamaha dealer to "ON". 2. After starting , immediately stop switch is in gear with the clutch lever pulled and the sidestand up. Turn the fuel cock lever to check the electrical circuit. 4. Shift the transmission into the neutral position. (See page 6-2.) The neutral indicator light should come on when the key is turned to enable starting...

Owners Manual
Page 39
... To shift the transmission into first gear. Always use the clutch while changing gears to slow the motorcycle. 2. Open the throttle part way and gradually release the clutch lever. 7. Apply both the front and the rear brakes to avoid damaging the engine, transmission, To start out and accelerate 1. The neutral indicator light should go out. 3. ECA10260 and drive train, which are not designed to the next higher gear...
... To shift the transmission into first gear. Always use the clutch while changing gears to slow the motorcycle. 2. Open the throttle part way and gradually release the clutch lever. 7. Apply both the front and the rear brakes to avoid damaging the engine, transmission, To start out and accelerate 1. The neutral indicator light should go out. 3. ECA10260 and drive train, which are not designed to the next higher gear...
Owners Manual
Page 44
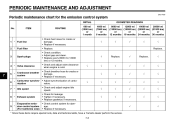
.... • Check control system for the emission control system INITIAL No. Replace. 4 * Valve clearance Crankcase breather system Carburetor synchronization Idle speed 7 5 * 6 * 7 * 8 * Exhaust system Evaporative emission control system (For California only) 9 * √ √ * Since these items require special tools, data and technical skills, have a Yamaha dealer perform the service. 7-3 PERIODIC MAINTENANCE AND ADJUSTMENT EAU17600 Periodic maintenance chart for damage. • Replace if necessary. √ √ 3 Spark plugs Replace.
.... • Check control system for the emission control system INITIAL No. Replace. 4 * Valve clearance Crankcase breather system Carburetor synchronization Idle speed 7 5 * 6 * 7 * 8 * Exhaust system Evaporative emission control system (For California only) 9 * √ √ * Since these items require special tools, data and technical skills, have a Yamaha dealer perform the service. 7-3 PERIODIC MAINTENANCE AND ADJUSTMENT EAU17600 Periodic maintenance chart for damage. • Replace if necessary. √ √ 3 Spark plugs Replace.
Owners Manual
Page 65
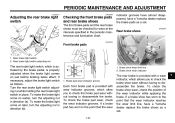
... disassemble the brake. PERIODIC MAINTENANCE AND ADJUSTMENT EAU22271 EAU22380 Adjusting the rear brake light switch Checking the front brake pads and rear brake shoes The front brake pads and the rear brake shoes must be checked for wear at the intervals specified in place. EAU22430 indicator grooves have almost disappeared, have a Yamaha dealer replace the brake shoes as a set . To make the brake light come on later, turn the adjusting...
... disassemble the brake. PERIODIC MAINTENANCE AND ADJUSTMENT EAU22271 EAU22380 Adjusting the rear brake light switch Checking the front brake pads and rear brake shoes The front brake pads and the rear brake shoes must be checked for wear at the intervals specified in place. EAU22430 indicator grooves have almost disappeared, have a Yamaha dealer replace the brake shoes as a set . To make the brake light come on later, turn the adjusting...

Owners Manual
Page 72
... then install a new fuse of a higher amperage rating than recommended to a constant-voltage battery charger, have access to 1. 2. 3. 4. 5. 6. PERIODIC MAINTENANCE AND ADJUSTMENT 3. Headlight fuse Signaling system fuse Ignition fuse Carburetor heater fuse Ignitor unit fuse Spare fuse 7-31 Fuse box 2. Turn the key to the electrical system and possibly a fire. [EWA15131] NOTICE G G 7 Always keep the battery charged. If you do not have a Yamaha dealer charge your battery. 1. WARNING! Fully charge the battery before installation. 4.
... then install a new fuse of a higher amperage rating than recommended to a constant-voltage battery charger, have access to 1. 2. 3. 4. 5. 6. PERIODIC MAINTENANCE AND ADJUSTMENT 3. Headlight fuse Signaling system fuse Ignition fuse Carburetor heater fuse Ignitor unit fuse Spare fuse 7-31 Fuse box 2. Turn the key to the electrical system and possibly a fire. [EWA15131] NOTICE G G 7 Always keep the battery charged. If you do not have a Yamaha dealer charge your battery. 1. WARNING! Fully charge the battery before installation. 4.
Owners Manual
Page 73
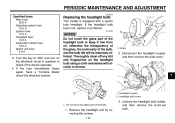
..." and turn on the headlight bulb using a cloth moistened with a quartz bulb headlight. Headlight coupler 2. PERIODIC MAINTENANCE AND ADJUSTMENT EAU23794 Specified fuses: Main fuse: 30.0 A Signaling system fuse: 10.0 A Ignition fuse: 10.0 A Headlight fuse: 15.0 A Carburetor heater fuse: 15.0 A Ignitor unit fuse: 5.0 A Replacing the headlight bulb This model is equipped with alcohol or thinner. 1. If the fuse immediately blows again, have a Yamaha dealer check the electrical system. 2. If the headlight bulb burns out, replace it free from oil, otherwise...
..." and turn on the headlight bulb using a cloth moistened with a quartz bulb headlight. Headlight coupler 2. PERIODIC MAINTENANCE AND ADJUSTMENT EAU23794 Specified fuses: Main fuse: 30.0 A Signaling system fuse: 10.0 A Ignition fuse: 10.0 A Headlight fuse: 15.0 A Carburetor heater fuse: 15.0 A Ignitor unit fuse: 5.0 A Replacing the headlight bulb This model is equipped with alcohol or thinner. 1. If the fuse immediately blows again, have a Yamaha dealer check the electrical system. 2. If the headlight bulb burns out, replace it free from oil, otherwise...
Owners Manual
Page 78
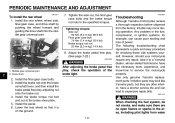
..., 14 ft·lbf) EAU25851 Troubleshooting Although Yamaha motorcycles receive a thorough inspection before shipment from water Install the rear wheel, wheel axle, final gear case, and drive shaft by pushing the wheel forward and guiding the drive shaft into the middle gear universal joint. 7. However, should your motorcycle require any repair, take it is on the ground. 7-37 WARNING When checking the fuel system, do not smoke, and...
..., 14 ft·lbf) EAU25851 Troubleshooting Although Yamaha motorcycles receive a thorough inspection before shipment from water Install the rear wheel, wheel axle, final gear case, and drive shaft by pushing the wheel forward and guiding the drive shaft into the middle gear universal joint. 7. However, should your motorcycle require any repair, take it is on the ground. 7-37 WARNING When checking the fuel system, do not smoke, and...
Owners Manual
Page 84
... tire air pressure, and then lift the motorcycle so that the electrodes are off the ground. Store it in an excessively cold or warm place [less than 30 8-4 MOTORCYCLE CARE AND STORAGE 3. Perform the following steps to prevent moisture from corrosion. b. Install the spark plug caps onto the spark plugs, and then place the spark plugs on storing the battery, see page 7-30. Lubricate all control...
... tire air pressure, and then lift the motorcycle so that the electrodes are off the ground. Store it in an excessively cold or warm place [less than 30 8-4 MOTORCYCLE CARE AND STORAGE 3. Perform the following steps to prevent moisture from corrosion. b. Install the spark plug caps onto the spark plugs, and then place the spark plugs on storing the battery, see page 7-30. Lubricate all control...
Owners Manual
Page 88
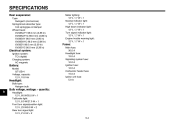
...; 1 Engine trouble warning light: 12 V, 1.7 W × 1 Fuses: Main fuse: 30.0 A Headlight fuse: 15.0 A Signaling system fuse: 10.0 A Ignition fuse: 10.0 A Carburetor heater fuse: 15.0 A Ignitor unit fuse: 5.0 A Electrical system: Ignition system: TCI (digital) Charging system: AC magneto Battery: Model: GT12B-4 Voltage, capacity: 12 V, 10.0 Ah Headlight: Bulb type: Halogen bulb 9 Bulb voltage, wattage × quantity: Headlight: 12 V, 60 W/55.0 W × 1 Tail/brake light: 12 V, 8.0 W/27.0 W × 1 Front turn signal/position light: 12 V, 23 W/8.0 W × 2 Rear turn signal light: 12...
...; 1 Engine trouble warning light: 12 V, 1.7 W × 1 Fuses: Main fuse: 30.0 A Headlight fuse: 15.0 A Signaling system fuse: 10.0 A Ignition fuse: 10.0 A Carburetor heater fuse: 15.0 A Ignitor unit fuse: 5.0 A Electrical system: Ignition system: TCI (digital) Charging system: AC magneto Battery: Model: GT12B-4 Voltage, capacity: 12 V, 10.0 Ah Headlight: Bulb type: Halogen bulb 9 Bulb voltage, wattage × quantity: Headlight: 12 V, 60 W/55.0 W × 1 Tail/brake light: 12 V, 8.0 W/27.0 W × 1 Front turn signal/position light: 12 V, 23 W/8.0 W × 2 Rear turn signal light: 12...
Owners Manual
Page 95
... from this service. SPECIFIC EXCLUSIONS from the date of time stated herein, subject to faulty workmanship or material from defects in the appropriate Owner's Manual, and 2. Operate and maintain the motorcycle as to remain in warranty repairs will be charged for this warranty shall include parts replaced due to 279cc 280cc and over Period 6,000 km (3,750 miles) or five...
... from this service. SPECIFIC EXCLUSIONS from the date of time stated herein, subject to faulty workmanship or material from defects in the appropriate Owner's Manual, and 2. Operate and maintain the motorcycle as to remain in warranty repairs will be charged for this warranty shall include parts replaced due to 279cc 280cc and over Period 6,000 km (3,750 miles) or five...
Owners Manual
Page 96
... compiled from the purchase registrations sent to Yamaha Motor Corporation, U.S.A. The remainder of your new address by sending a postcard listing your motorcycle model name, V.I .N. (frame number), dates, and receipts. If a question or problem arises regarding the warranty, first contact the owner of normal maintenance services, non-warranty repairs, accident and collision damages, and oil, oil filters, air filters, spark plugs, and brake shoes. If you should move after...
... compiled from the purchase registrations sent to Yamaha Motor Corporation, U.S.A. The remainder of your new address by sending a postcard listing your motorcycle model name, V.I .N. (frame number), dates, and receipts. If a question or problem arises regarding the warranty, first contact the owner of normal maintenance services, non-warranty repairs, accident and collision damages, and oil, oil filters, air filters, spark plugs, and brake shoes. If you should move after...
Owners Manual
Page 99
...M Main switch/steering lock ...4-1 Maintenance and lubrication, periodic...7-4 Maintenance, emission control system ...7-3 Maintenance record ...10-5 Matte color, caution...8-1 Model label...10-2 D Dimmer switch ...4-4 E Engine break-in ...6-4 Engine idling speed, checking ...7-16 Engine oil and oil filter element...7-11 Engine, starting a warm...6-2 Engine stop switch...4-4 Engine trouble warning light ...4-2 T Throttle cable free play, checking ...7-16 Throttle grip and cable, checking and lubricating ...7-26 Tires...7-17 Tool kit ...7-2 N Neutral indicator light ...4-2 Noise regulation...
...M Main switch/steering lock ...4-1 Maintenance and lubrication, periodic...7-4 Maintenance, emission control system ...7-3 Maintenance record ...10-5 Matte color, caution...8-1 Model label...10-2 D Dimmer switch ...4-4 E Engine break-in ...6-4 Engine idling speed, checking ...7-16 Engine oil and oil filter element...7-11 Engine, starting a warm...6-2 Engine stop switch...4-4 Engine trouble warning light ...4-2 T Throttle cable free play, checking ...7-16 Throttle grip and cable, checking and lubricating ...7-26 Tires...7-17 Tool kit ...7-2 N Neutral indicator light ...4-2 Noise regulation...