
Owners Manual
Page 6
... up a cold engine ...6-1 Starting a warm engine ...6-2 Shifting ...6-2 Engine break-in ...6-4 Parking ...6-5 PERIODIC MAINTENANCE AND ADJUSTMENT ...7-1 Owner's tool kit ...7-2 Periodic maintenance chart for the emission control system ...7-3 General maintenance and lubrication chart ...7-4 Removing and installing panels ...7-8 Checking the spark plugs ...7-9 Canister (for California only) ...7-10 Engine oil and oil filter element ...7-11 Final gear oil ...7-13 Cleaning the air filter element ...7-14 Carburetors ...7-16 Checking the engine idling speed ...7-16 Checking the throttle cable free...
... up a cold engine ...6-1 Starting a warm engine ...6-2 Shifting ...6-2 Engine break-in ...6-4 Parking ...6-5 PERIODIC MAINTENANCE AND ADJUSTMENT ...7-1 Owner's tool kit ...7-2 Periodic maintenance chart for the emission control system ...7-3 General maintenance and lubrication chart ...7-4 Removing and installing panels ...7-8 Checking the spark plugs ...7-9 Canister (for California only) ...7-10 Engine oil and oil filter element ...7-11 Final gear oil ...7-13 Cleaning the air filter element ...7-14 Carburetors ...7-16 Checking the engine idling speed ...7-16 Checking the throttle cable free...
Owners Manual
Page 7
... the steering ...7-29 Checking the wheel bearings ...7-29 Battery ...7-30 Replacing the fuses ...7-31 Replacing the headlight bulb ...7-32 Replacing a turn signal light bulb or the tail/brake light bulb ...7-33 Supporting the motorcycle ...7-34 Front wheel ...7-34 Rear wheel ...7-36 Troubleshooting ...7-37 Troubleshooting chart ...7-39 MOTORCYCLE CARE AND STORAGE ...8-1 Matte color caution ...8-1 Care ...8-1 Storage ...8-3 SPECIFICATIONS ...9-1 CONSUMER INFORMATION...10-1 Identification numbers ...10-1 Reporting safety defects ...10-3 Motorcycle noise regulation ...10-4 Maintenance record...
... the steering ...7-29 Checking the wheel bearings ...7-29 Battery ...7-30 Replacing the fuses ...7-31 Replacing the headlight bulb ...7-32 Replacing a turn signal light bulb or the tail/brake light bulb ...7-33 Supporting the motorcycle ...7-34 Front wheel ...7-34 Rear wheel ...7-36 Troubleshooting ...7-37 Troubleshooting chart ...7-39 MOTORCYCLE CARE AND STORAGE ...8-1 Matte color caution ...8-1 Care ...8-1 Storage ...8-3 SPECIFICATIONS ...9-1 CONSUMER INFORMATION...10-1 Identification numbers ...10-1 Reporting safety defects ...10-3 Motorcycle noise regulation ...10-4 Maintenance record...
Owners Manual
Page 13
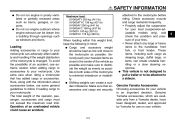
... the center of an overloaded vehicle could cause an accident. Check accessory mounts and cargo restraints frequently. • Properly adjust the suspension for your load (suspension-adjustable models only), and check the condition and pressure of an accident, use on both sides of the motorcycle to a sidecar. 2 Genuine Yamaha Accessories Choosing accessories for use extreme caution when adding cargo or accessories to your tires...
... the center of an overloaded vehicle could cause an accident. Check accessory mounts and cargo restraints frequently. • Properly adjust the suspension for your load (suspension-adjustable models only), and check the condition and pressure of an accident, use on both sides of the motorcycle to a sidecar. 2 Genuine Yamaha Accessories Choosing accessories for use extreme caution when adding cargo or accessories to your tires...
Owners Manual
Page 14
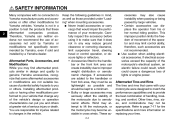
.... Aftermarket Tires and Rims The tires and rims that change any way reduce ground clearance or cornering clearance, limit suspension travel, steering travel or control operation, or obscure lights or reflectors. • Accessories fitted to the handlebar or the front fork area can neither endorse nor recommend the use of lights or engine power. Other tires, rims, sizes, and combinations may limit control ability, therefore, such accessories are responsible for Yamaha vehicles...
.... Aftermarket Tires and Rims The tires and rims that change any way reduce ground clearance or cornering clearance, limit suspension travel, steering travel or control operation, or obscure lights or reflectors. • Accessories fitted to the handlebar or the front fork area can neither endorse nor recommend the use of lights or engine power. Other tires, rims, sizes, and combinations may limit control ability, therefore, such accessories are responsible for Yamaha vehicles...
Owners Manual
Page 19
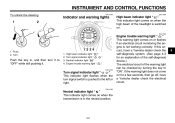
... indicator light " " Turn signal indicator light " Neutral indicator light " " Engine trouble warning light " " " EAU11020 Turn signal indicator light " " This indicator light flashes when the turn signal switch is switched on or flashes if an electrical circuit monitoring the engine is in , and then turn it . 1. 2. 3. 4. If the warning light does not come on when the transmission is not working correctly. Push. 2. EAU11502 1. Push the key in the neutral position. 4-2 If this occurs, have a Yamaha dealer...
... indicator light " " Turn signal indicator light " Neutral indicator light " " Engine trouble warning light " " " EAU11020 Turn signal indicator light " " This indicator light flashes when the turn signal switch is switched on or flashes if an electrical circuit monitoring the engine is in , and then turn it . 1. 2. 3. 4. If the warning light does not come on when the transmission is not working correctly. Push. 2. EAU11502 1. Push the key in the neutral position. 4-2 If this occurs, have a Yamaha dealer...
Owners Manual
Page 20
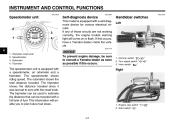
... speed. The tripmeter can be used to zero with the reset knob. Right 1. If this occurs. 1. Horn switch " " The speedometer unit is equipped with a full tank of those circuits are not working correctly, the engine trouble warning light will enable you to consult a Yamaha dealer as soon as possible if this occurs, have a Yamaha dealer check the vehicle. If any of fuel. Turn signal switch...
... speed. The tripmeter can be used to zero with the reset knob. Right 1. If this occurs. 1. Horn switch " " The speedometer unit is equipped with a full tank of those circuits are not working correctly, the engine trouble warning light will enable you to consult a Yamaha dealer as soon as possible if this occurs, have a Yamaha dealer check the vehicle. If any of fuel. Turn signal switch...

Owners Manual
Page 21
... the starter. EAU12660 Clutch lever Turn signal switch " / " To signal a right-hand turn signal lights can also be pulled rapidly and released slowly for approximately 15 seconds. The lever should be canceled manually by pushing the switch in case of the ignition circuit cut-off system. (See page 4-15.) 4-4 When released, the switch returns to " ". Since this model is stuck. 4 EAU12711 Start switch " " Push this switch to the center position. Engine...
... the starter. EAU12660 Clutch lever Turn signal switch " / " To signal a right-hand turn signal lights can also be pulled rapidly and released slowly for approximately 15 seconds. The lever should be canceled manually by pushing the switch in case of the ignition circuit cut-off system. (See page 4-15.) 4-4 When released, the switch returns to " ". Since this model is stuck. 4 EAU12711 Start switch " " Push this switch to the center position. Engine...
Owners Manual
Page 24
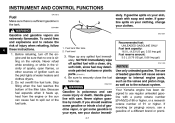
... some gasoline in the vicinity of sparks, open flames, or other sources of ignition such as to securely close the fuel tank cap. Your Yamaha engine has been designed to use regular unleaded gasoline with care. Handle gasoline with a pump octane number [(R+M)/2] of 86 or ...change your skin, wash with a clean, dry, soft cloth, since fuel may deteriorate painted surfaces or plastic parts. [ECA10071] 4. Because fuel expands when it heats up any spilled fuel immediately. INSTRUMENT AND CONTROL FUNCTIONS EAU13212 Fuel Make sure there is sitting on the vehicle. To avoid fires...
... some gasoline in the vicinity of sparks, open flames, or other sources of ignition such as to securely close the fuel tank cap. Your Yamaha engine has been designed to use regular unleaded gasoline with care. Handle gasoline with a pump octane number [(R+M)/2] of 86 or ...change your skin, wash with a clean, dry, soft cloth, since fuel may deteriorate painted surfaces or plastic parts. [ECA10071] 4. Because fuel expands when it heats up any spilled fuel immediately. INSTRUMENT AND CONTROL FUNCTIONS EAU13212 Fuel Make sure there is sitting on the vehicle. To avoid fires...

Owners Manual
Page 32
... running engine when the transmission is in gear and the sidestand is part of the ignition circuit cut -off system, which cuts the ignition in certain situations. (See further down , or if the sidestand cannot be ridden with your foot while holding the vehicle upright. INSTRUMENT AND CONTROL FUNCTIONS EAU15301 Sidestand The sidestand is most reliable if performed with a warmed-up engine. 4 WARNING...
... running engine when the transmission is in gear and the sidestand is part of the ignition circuit cut -off system, which cuts the ignition in certain situations. (See further down , or if the sidestand cannot be ridden with your foot while holding the vehicle upright. INSTRUMENT AND CONTROL FUNCTIONS EAU15301 Sidestand The sidestand is most reliable if performed with a warmed-up engine. 4 WARNING...

Owners Manual
Page 37
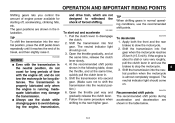
... Read the Owner's Manual carefully to preserve the battery. Shift the transmission into the neutral position. (See page 6-2.) The neutral indicator light should come on when the key is set to start, release the start switch. Turn the starter (choke) on . After starting , one attempt. When the engine is a control or function you do not understand, ask your Yamaha dealer. If there is warm, turn the starter (choke) off...
... Read the Owner's Manual carefully to preserve the battery. Shift the transmission into the neutral position. (See page 6-2.) The neutral indicator light should come on when the key is set to start, release the start switch. Turn the starter (choke) on . After starting , one attempt. When the engine is a control or function you do not understand, ask your Yamaha dealer. If there is warm, turn the starter (choke) off...
Owners Manual
Page 39
... gear. To decelerate 1. Shift the transmission into first gear. Open the throttle gradually, and at the same time, quickly pull the clutch lever in and use the clutch while changing gears to withstand the shock of forced shifting. OPERATION AND IMPORTANT RIDING POINTS Shifting gears lets you control the amount of engine power available for long distances. The gear positions are not designed to avoid damaging the engine, transmission, To start...
... gear. To decelerate 1. Shift the transmission into first gear. Open the throttle gradually, and at the same time, quickly pull the clutch lever in and use the clutch while changing gears to withstand the shock of forced shifting. OPERATION AND IMPORTANT RIDING POINTS Shifting gears lets you control the amount of engine power available for long distances. The gear positions are not designed to avoid damaging the engine, transmission, To start...
Owners Manual
Page 65
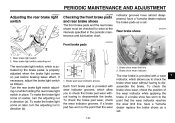
... wear indicator reaches the wear limit line, have a Yamaha dealer replace the brake pads as follows. PERIODIC MAINTENANCE AND ADJUSTMENT EAU22271 EAU22380 Adjusting the rear brake light switch Checking the front brake pads and rear brake shoes The front brake pads and the rear brake shoes must be checked for wear at the intervals specified in place. EAU22540 Rear brake shoes Front brake pads 1. To make the brake light come on just before...
... wear indicator reaches the wear limit line, have a Yamaha dealer replace the brake pads as follows. PERIODIC MAINTENANCE AND ADJUSTMENT EAU22271 EAU22380 Adjusting the rear brake light switch Checking the front brake pads and rear brake shoes The front brake pads and the rear brake shoes must be checked for wear at the intervals specified in place. EAU22540 Rear brake shoes Front brake pads 1. To make the brake light come on just before...
Owners Manual
Page 72
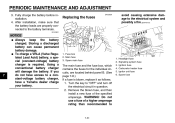
... a new fuse of a higher amperage rating than recommended to 1. 2. 3. 4. 5. 6. Headlight fuse Signaling system fuse Ignition fuse Carburetor heater fuse Ignitor unit fuse Spare fuse 7-31 After installation, make sure that the battery leads are located behind panel B. (See page 7-8.) If a fuse is required. If you do not have access to the electrical system and possibly a fire. [EWA15131] NOTICE G G 7 Always keep the battery charged. Main fuse 3. ECA10631 EAU23526 Replacing the fuses avoid...
... a new fuse of a higher amperage rating than recommended to 1. 2. 3. 4. 5. 6. Headlight fuse Signaling system fuse Ignition fuse Carburetor heater fuse Ignitor unit fuse Spare fuse 7-31 After installation, make sure that the battery leads are located behind panel B. (See page 7-8.) If a fuse is required. If you do not have access to the electrical system and possibly a fire. [EWA15131] NOTICE G G 7 Always keep the battery charged. Main fuse 3. ECA10631 EAU23526 Replacing the fuses avoid...

Owners Manual
Page 73
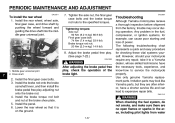
... the fuse immediately blows again, have a Yamaha dealer check the electrical system. 2. Headlight bulb cover 1. PERIODIC MAINTENANCE AND ADJUSTMENT EAU23794 Specified fuses: Main fuse: 30.0 A Signaling system fuse: 10.0 A Ignition fuse: 10.0 A Headlight fuse: 15.0 A Carburetor heater fuse: 15.0 A Ignitor unit fuse: 5.0 A Replacing the headlight bulb This model is equipped with alcohol or thinner. 1. Do not touch the glass part of the headlight bulb to "ON" and turn on the headlight bulb using a cloth moistened with a quartz bulb headlight.
... the fuse immediately blows again, have a Yamaha dealer check the electrical system. 2. Headlight bulb cover 1. PERIODIC MAINTENANCE AND ADJUSTMENT EAU23794 Specified fuses: Main fuse: 30.0 A Signaling system fuse: 10.0 A Ignition fuse: 10.0 A Headlight fuse: 15.0 A Carburetor heater fuse: 15.0 A Ignitor unit fuse: 5.0 A Replacing the headlight bulb This model is equipped with alcohol or thinner. 1. Do not touch the glass part of the headlight bulb to "ON" and turn on the headlight bulb using a cloth moistened with a quartz bulb headlight.
Owners Manual
Page 78
... final gear case bolts. 3. Install the panel. 6. Any problem in the area, including pilot lights from the factory, trouble may look like Yamaha parts, but they are no open flames or sparks in the fuel, compression, or ignition systems, for checking these vital systems yourself. Adjust the brake pedal free play , check the operation of power. Tighten the axle nut, the final gear case bolts...
... final gear case bolts. 3. Install the panel. 6. Any problem in the area, including pilot lights from the factory, trouble may look like Yamaha parts, but they are no open flames or sparks in the fuel, compression, or ignition systems, for checking these vital systems yourself. Adjust the brake pedal free play , check the operation of power. Tighten the axle nut, the final gear case bolts...
Owners Manual
Page 84
... the spark plug caps. Alternatively, turn the wheels a little every month in one spot. e. MOTORCYCLE CARE AND STORAGE 3. Perform the following steps to ground the spark plug electrodes while turning the engine over several times with the starter. (This will prevent fuel deposits from deteriorating. 5. a. Check and, if necessary, correct the tire air pressure, and then lift the motorcycle so that the electrodes are off the ground. Cover the muffler outlets with oil.) WARNING...
... the spark plug caps. Alternatively, turn the wheels a little every month in one spot. e. MOTORCYCLE CARE AND STORAGE 3. Perform the following steps to ground the spark plug electrodes while turning the engine over several times with the starter. (This will prevent fuel deposits from deteriorating. 5. a. Check and, if necessary, correct the tire air pressure, and then lift the motorcycle so that the electrodes are off the ground. Cover the muffler outlets with oil.) WARNING...

Owners Manual
Page 88
...; 1 Engine trouble warning light: 12 V, 1.7 W × 1 Fuses: Main fuse: 30.0 A Headlight fuse: 15.0 A Signaling system fuse: 10.0 A Ignition fuse: 10.0 A Carburetor heater fuse: 15.0 A Ignitor unit fuse: 5.0 A Electrical system: Ignition system: TCI (digital) Charging system: AC magneto Battery: Model: GT12B-4 Voltage, capacity: 12 V, 10.0 Ah Headlight: Bulb type: Halogen bulb 9 Bulb voltage, wattage × quantity: Headlight: 12 V, 60 W/55.0 W × 1 Tail/brake light: 12 V, 8.0 W/27.0 W × 1 Front turn signal/position light: 12 V, 23 W/8.0 W × 2 Rear turn signal light: 12...
...; 1 Engine trouble warning light: 12 V, 1.7 W × 1 Fuses: Main fuse: 30.0 A Headlight fuse: 15.0 A Signaling system fuse: 10.0 A Ignition fuse: 10.0 A Carburetor heater fuse: 15.0 A Ignitor unit fuse: 5.0 A Electrical system: Ignition system: TCI (digital) Charging system: AC magneto Battery: Model: GT12B-4 Voltage, capacity: 12 V, 10.0 Ah Headlight: Bulb type: Halogen bulb 9 Bulb voltage, wattage × quantity: Headlight: 12 V, 60 W/55.0 W × 1 Tail/brake light: 12 V, 8.0 W/27.0 W × 1 Front turn signal/position light: 12 V, 23 W/8.0 W × 2 Rear turn signal light: 12...
Owners Manual
Page 95
... or routine maintenance. SPECIFIC EXCLUSIONS from this service. EMISSION CONTROL SYSTEM WARRANTY: Yamaha Motor Corporation, U.S.A. Engine Displacement Under 50cc 50cc to 169cc 170cc to remain in material and workmanship for Yamaha motorcycles originally equipped with headlight, stoplight, and turn signals shall be free from the date of Yamaha Motor Corporation, U.S.A. MAKES NO OTHER WARRANTY OF ANY KIND, EXPRESSED OR IMPLIED. THE CUSTOMER'S RESPONSIBILITY under warranty become property...
... or routine maintenance. SPECIFIC EXCLUSIONS from this service. EMISSION CONTROL SYSTEM WARRANTY: Yamaha Motor Corporation, U.S.A. Engine Displacement Under 50cc 50cc to 169cc 170cc to remain in material and workmanship for Yamaha motorcycles originally equipped with headlight, stoplight, and turn signals shall be free from the date of Yamaha Motor Corporation, U.S.A. MAKES NO OTHER WARRANTY OF ANY KIND, EXPRESSED OR IMPLIED. THE CUSTOMER'S RESPONSIBILITY under warranty become property...
Owners Manual
Page 96
.... Does the warranty cover incidental costs such as it to bring your purchase. The warranty is in the Owner's and Service Manual. What responsibility does my dealer have under warranty. If a question or problem arises regarding the warranty, first contact the owner of normal maintenance services, non-warranty repairs, accident and collision damages, and oil, oil filters, air filters, spark plugs, and brake shoes. has an up every new machine before sale. 2. A. What...
.... Does the warranty cover incidental costs such as it to bring your purchase. The warranty is in the Owner's and Service Manual. What responsibility does my dealer have under warranty. If a question or problem arises regarding the warranty, first contact the owner of normal maintenance services, non-warranty repairs, accident and collision damages, and oil, oil filters, air filters, spark plugs, and brake shoes. has an up every new machine before sale. 2. A. What...
Owners Manual
Page 99
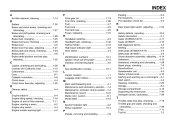
...M Main switch/steering lock ...4-1 Maintenance and lubrication, periodic...7-4 Maintenance, emission control system ...7-3 Maintenance record ...10-5 Matte color, caution...8-1 Model label...10-2 D Dimmer switch ...4-4 E Engine break-in ...6-4 Engine idling speed, checking ...7-16 Engine oil and oil filter element...7-11 Engine, starting a warm...6-2 Engine stop switch...4-4 Engine trouble warning light ...4-2 T Throttle cable free play, checking ...7-16 Throttle grip and cable, checking and lubricating ...7-26 Tires...7-17 Tool kit ...7-2 N Neutral indicator light ...4-2 Noise regulation...
...M Main switch/steering lock ...4-1 Maintenance and lubrication, periodic...7-4 Maintenance, emission control system ...7-3 Maintenance record ...10-5 Matte color, caution...8-1 Model label...10-2 D Dimmer switch ...4-4 E Engine break-in ...6-4 Engine idling speed, checking ...7-16 Engine oil and oil filter element...7-11 Engine, starting a warm...6-2 Engine stop switch...4-4 Engine trouble warning light ...4-2 T Throttle cable free play, checking ...7-16 Throttle grip and cable, checking and lubricating ...7-26 Tires...7-17 Tool kit ...7-2 N Neutral indicator light ...4-2 Noise regulation...