

Owners Manual
Page 3
... date of the Yamaha Royal Star™ VENTURE®. Regular inspections and careful maintenance, along with the emissions standards for clean air applicable at the time of printing, there may be minor discrepancies between your purchase of manufacture. If you have attained adequate knowledge of craftsmanship and reliability that have any question concerning this manual, please consult a Yamaha dealer. It...
... date of the Yamaha Royal Star™ VENTURE®. Regular inspections and careful maintenance, along with the emissions standards for clean air applicable at the time of printing, there may be minor discrepancies between your purchase of manufacture. If you have attained adequate knowledge of craftsmanship and reliability that have any question concerning this manual, please consult a Yamaha dealer. It...

Owners Manual
Page 6
... gear oil ...8-15 Coolant ...8-17 Cleaning the air filter elements ...8-18 Carburetors ...8-20 Checking the engine idling speed ...8-20 Checking the throttle cable free play ...8-20 Valve clearance ...8-21 Tires ...8-21 Cast wheels ...8-23 Clutch lever ...8-23 Adjusting the brake lever free play ...8-24 Adjusting the rear brake light switch ...8-24 TABLE OF CONTENTS LOCATION OF IMPORTANT LABELS ...1-1 SAFETY INFORMATION ...2-1 DESCRIPTION ...3-1 Left view ...3-1 Right view ...3-2 Controls and instruments...3-3 INSTRUMENT AND CONTROL FUNCTIONS ...4-1 Main switch/steering lock...
... gear oil ...8-15 Coolant ...8-17 Cleaning the air filter elements ...8-18 Carburetors ...8-20 Checking the engine idling speed ...8-20 Checking the throttle cable free play ...8-20 Valve clearance ...8-21 Tires ...8-21 Cast wheels ...8-23 Clutch lever ...8-23 Adjusting the brake lever free play ...8-24 Adjusting the rear brake light switch ...8-24 TABLE OF CONTENTS LOCATION OF IMPORTANT LABELS ...1-1 SAFETY INFORMATION ...2-1 DESCRIPTION ...3-1 Left view ...3-1 Right view ...3-2 Controls and instruments...3-3 INSTRUMENT AND CONTROL FUNCTIONS ...4-1 Main switch/steering lock...

Owners Manual
Page 7
...rear suspension ...8-29 Checking the front fork ...8-30 Checking the steering ...8-30 Checking the wheel bearings ...8-31 Battery ...8-31 Replacing the fuses ...8-32 Replacing the headlight bulb ...8-34 Replacing a turn signal light bulb or the tail/brake light bulb ...8-35 Supporting the motorcycle ...8-35 Troubleshooting ...8-36 Troubleshooting charts ...8-37 MOTORCYCLE CARE AND STORAGE ...9-1 Matte color caution ...9-1 Cleaning ...9-1 Storage ...9-2 SPECIFICATIONS ...10-1 CONSUMER INFORMATION ...11-1 Identification numbers ...11-1 Reporting safety defects ...11-3 Motorcycle noise regulation...
...rear suspension ...8-29 Checking the front fork ...8-30 Checking the steering ...8-30 Checking the wheel bearings ...8-31 Battery ...8-31 Replacing the fuses ...8-32 Replacing the headlight bulb ...8-34 Replacing a turn signal light bulb or the tail/brake light bulb ...8-35 Supporting the motorcycle ...8-35 Troubleshooting ...8-36 Troubleshooting charts ...8-37 MOTORCYCLE CARE AND STORAGE ...9-1 Matte color caution ...9-1 Cleaning ...9-1 Storage ...9-2 SPECIFICATIONS ...10-1 CONSUMER INFORMATION ...11-1 Identification numbers ...11-1 Reporting safety defects ...11-3 Motorcycle noise regulation...
Owners Manual
Page 12
... Yamaha for your load (suspension-adjustable models only), and check the condition and pressure of your motorcycle: The total weight of the operator, passenger, accessories and cargo must not exceed the maximum load limit. Here, along with no connection to Yamaha manufacture parts and accessories or offer other modifications for your motorcycle. Genuine Yamaha Accessories Choosing accessories for Yamaha vehicles. SAFETY INFORMATION G G 2 Do not run engine outdoors where engine exhaust...
... Yamaha for your load (suspension-adjustable models only), and check the condition and pressure of your motorcycle: The total weight of the operator, passenger, accessories and cargo must not exceed the maximum load limit. Here, along with no connection to Yamaha manufacture parts and accessories or offer other modifications for your motorcycle. Genuine Yamaha Accessories Choosing accessories for Yamaha vehicles. SAFETY INFORMATION G G 2 Do not run engine outdoors where engine exhaust...
Owners Manual
Page 13
.... Refer to improper weight distribution or aerodynamic changes. G Never install accessories or carry cargo that came with your motorcycle. G 2 Aftermarket Tires and Rims The tires and rims that would impair the performance of lights or engine power. You are not suitable because of serious injury or death. This improper position limits the freedom of movement of handling, braking, and comfort. Other tires, rims, sizes, and combinations may...
.... Refer to improper weight distribution or aerodynamic changes. G Never install accessories or carry cargo that came with your motorcycle. G 2 Aftermarket Tires and Rims The tires and rims that would impair the performance of lights or engine power. You are not suitable because of serious injury or death. This improper position limits the freedom of movement of handling, braking, and comfort. Other tires, rims, sizes, and combinations may...

Owners Manual
Page 17
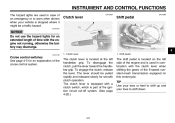
... vehicle is locked, and all the way to the left or right. 4-1 ACC (Accessory) The audio system and the auxiliary DC jack and connector can be used to lock the steering. Turn. 4 ON All electrical systems are described below. The various positions are supplied with power, and the headlight, meter lighting, taillight and position lights come on, and the engine can be removed. INSTRUMENT AND CONTROL...
... vehicle is locked, and all the way to the left or right. 4-1 ACC (Accessory) The audio system and the auxiliary DC jack and connector can be used to lock the steering. Turn. 4 ON All electrical systems are described below. The various positions are supplied with power, and the headlight, meter lighting, taillight and position lights come on, and the engine can be removed. INSTRUMENT AND CONTROL...
Owners Manual
Page 19
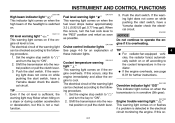
... radiator fan(s) automatically switch on or off according to the following procedure. 1. Shift the transmission into the neutral position or pull the clutch lever. 3. If the engine overheats, see page 8-37 for an explanation of these indicator lights. The electrical circuit of the warning light can be checked according to the coolant temperature in the radiator. TIP Even if the oil level is overheating. Fuel level warning light " " This warning light...
... radiator fan(s) automatically switch on or off according to the following procedure. 1. Shift the transmission into the neutral position or pull the clutch lever. 3. If the engine overheats, see page 8-37 for an explanation of these indicator lights. The electrical circuit of the warning light can be checked according to the coolant temperature in the radiator. TIP Even if the oil level is overheating. Fuel level warning light " " This warning light...
Owners Manual
Page 24
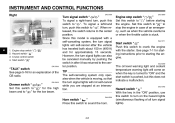
... system, the turn signal lights will self-cancel after it has returned to " ". EAU12711 Start switch " " Push this switch to the center position. EAU42390 The oil level warning light and coolant temperature warning light will come on the hazard lights (simultaneous flashing of the CB radio. When released, the switch returns to " " for the high beam and to the center position. Engine stop the engine in after the vehicle has traveled...
... system, the turn signal lights will self-cancel after it has returned to " ". EAU12711 Start switch " " Push this switch to the center position. EAU42390 The oil level warning light and coolant temperature warning light will come on the hazard lights (simultaneous flashing of the CB radio. When released, the switch returns to " " for the high beam and to the center position. Engine stop the engine in after the vehicle has traveled...
Owners Manual
Page 25
... an extended length of time with the clutch lever when shifting the gears of the 5-speed constant-mesh transmission equipped on the left handlebar grip. The clutch lever is located at the left side of the engine and is used in combination with the engine not running, otherwise the battery may discharge. 4 EAU12780 1. The clutch lever is equipped with a clutch switch, which is part of the ignition...
... an extended length of time with the clutch lever when shifting the gears of the 5-speed constant-mesh transmission equipped on the left handlebar grip. The clutch lever is located at the left side of the engine and is used in combination with the engine not running, otherwise the battery may discharge. 4 EAU12780 1. The clutch lever is equipped with a clutch switch, which is part of the ignition...

Owners Manual
Page 64
If the coolant temperature warning light remains on after starting with sufficient engine oil, have a Yamaha dealer check the electrical circuit. 6. Never accelerate hard when the engine is released. EAU16640 Starting a warm engine Follow the same procedure as for starter (choke) use and temperatures below 10 °C (50 °F) require about 35 seconds with the starter (choke) turned on, then about 7 seconds of excessive exhaust emissions, never...
If the coolant temperature warning light remains on after starting with sufficient engine oil, have a Yamaha dealer check the electrical circuit. 6. Never accelerate hard when the engine is released. EAU16640 Starting a warm engine Follow the same procedure as for starter (choke) use and temperatures below 10 °C (50 °F) require about 35 seconds with the starter (choke) turned on, then about 7 seconds of excessive exhaust emissions, never...
Owners Manual
Page 65
... avoid damaging the engine, transmission, and drive train, which are shown in the neutral position, do not tow the motorcycle for starting off , and do not coast for long periods of forced shifting. Inadequate lubrication may damage the transmission. At the recommended shift points shown in the following table, close the throttle, and at the same time, release the clutch lever slowly...
... avoid damaging the engine, transmission, and drive train, which are shown in the neutral position, do not tow the motorcycle for starting off , and do not coast for long periods of forced shifting. Inadequate lubrication may damage the transmission. At the recommended shift points shown in the following table, close the throttle, and at the same time, release the clutch lever slowly...

Owners Manual
Page 74
... air filter needs more frequent service if you are riding in unusually wet or dusty areas. Hydraulic brake and clutch systems • After disassembling the brake or clutch master cylinders, caliper cylinders or clutch release cylinder, always change the fluid. Regularly check the brake and clutch fluid levels and fill the reservoirs as required. • Replace the oil seals on the inner parts of the brake or clutch master cylinders, caliper cylinders and clutch release cylinder...
... air filter needs more frequent service if you are riding in unusually wet or dusty areas. Hydraulic brake and clutch systems • After disassembling the brake or clutch master cylinders, caliper cylinders or clutch release cylinder, always change the fluid. Regularly check the brake and clutch fluid levels and fill the reservoirs as required. • Replace the oil seals on the inner parts of the brake or clutch master cylinders, caliper cylinders and clutch release cylinder...

Owners Manual
Page 91
... the hydraulic system. EWA10630 EAU22280 WARNING G Adjusting the rear brake light switch The rear brake light switch, which may result in the hydraulic system, have a Yamaha dealer bleed the system before braking takes effect. A soft or spongy feeling in the brake lever can indicate the presence of air in ) as follows. 1. Since the brake light switch is air in loss of the cruise control system, it as shown...
... the hydraulic system. EWA10630 EAU22280 WARNING G Adjusting the rear brake light switch The rear brake light switch, which may result in the hydraulic system, have a Yamaha dealer bleed the system before braking takes effect. A soft or spongy feeling in the brake lever can indicate the presence of air in ) as follows. 1. Since the brake light switch is air in loss of the cruise control system, it as shown...

Owners Manual
Page 100
... turn on the electrical circuit in question. 2. Turn the key to check if the device operates. 4. PERIODIC MAINTENANCE AND ADJUSTMENT Fuse box 1 is located behind panel B. (See page 8-8.) Specified fuses: Main fuse: 30.0 A Cruise control fuse: 10.0 A Carburetor heater fuse: 10.0 A Auxiliary DC connector fuse: 5.0 A Auxiliary DC jack fuse: 5.0 A Audio system fuse: 10.0 A Ignition fuse: 10.0 A Signaling system fuse: 15.0 A Headlight fuse: 15.0 A Radiator fan fuse: 10.0 A Backup fuse: 10.0 A 1. 2. 3. 4. 5. 6. Backup fuse (for odometer and clock) Radiator fan fuse Headlight fuse Signaling...
... turn on the electrical circuit in question. 2. Turn the key to check if the device operates. 4. PERIODIC MAINTENANCE AND ADJUSTMENT Fuse box 1 is located behind panel B. (See page 8-8.) Specified fuses: Main fuse: 30.0 A Cruise control fuse: 10.0 A Carburetor heater fuse: 10.0 A Auxiliary DC connector fuse: 5.0 A Auxiliary DC jack fuse: 5.0 A Audio system fuse: 10.0 A Ignition fuse: 10.0 A Signaling system fuse: 15.0 A Headlight fuse: 15.0 A Radiator fan fuse: 10.0 A Backup fuse: 10.0 A 1. 2. 3. 4. 5. 6. Backup fuse (for odometer and clock) Radiator fan fuse Headlight fuse Signaling...

Owners Manual
Page 108
... from corrosion. from building up the fuel tank and add fuel stabilizer (if available) to prevent the fuel tank from rusting and the fuel from the spark plugs, and then install the spark plugs and the spark plug caps. Remove the spark plug caps from deteriorating. 5. Alternatively, turn the wheels a little every month in one spot. Cover the muffler outlets with oil.) WARNING! Do not store the battery in a cool, dry place and charge it...
... from corrosion. from building up the fuel tank and add fuel stabilizer (if available) to prevent the fuel tank from rusting and the fuel from the spark plugs, and then install the spark plugs and the spark plug caps. Remove the spark plug caps from deteriorating. 5. Alternatively, turn the wheels a little every month in one spot. Cover the muffler outlets with oil.) WARNING! Do not store the battery in a cool, dry place and charge it...

Owners Manual
Page 109
...: 10.00 :1 Starting system: Electric starter Lubrication system: Wet sump Recommended engine oil grade: API service SG type or higher, JASO standard MA Engine oil quantity: Without oil filter cartridge replacement: 3.50 L (3.70 US qt, 3.08 Imp.qt) With oil filter cartridge replacement: 3.70 L (3.91 US qt, 3.26 Imp.qt) Spark plug (s): Manufacturer/model: NGK/DPR8EA-9 Manufacturer/model: DENSO/X24EPR-U9 Spark plug gap: 0.8-0.9 mm (0.031-0.035 in) Clutch: Clutch type: Wet...
...: 10.00 :1 Starting system: Electric starter Lubrication system: Wet sump Recommended engine oil grade: API service SG type or higher, JASO standard MA Engine oil quantity: Without oil filter cartridge replacement: 3.50 L (3.70 US qt, 3.08 Imp.qt) With oil filter cartridge replacement: 3.70 L (3.91 US qt, 3.26 Imp.qt) Spark plug (s): Manufacturer/model: NGK/DPR8EA-9 Manufacturer/model: DENSO/X24EPR-U9 Spark plug gap: 0.8-0.9 mm (0.031-0.035 in) Clutch: Clutch type: Wet...

Owners Manual
Page 111
... 23 W/8.0 W × 2 Rear turn signal light: 12 V, 21.0 W × 2 Neutral indicator light: 12 V, 1.7 W × 1 High beam indicator light: 12 V, 1.7 W × 1 Oil level warning light: 12 V, 1.7 W × 1 Turn signal indicator light: 12 V, 1.7 W × 2 Fuel level warning light: 14 V, 3.0 W × 1 Coolant temperature warning light: 12 V, 1.7 W × 1 Engine trouble warning light: 12 V, 1.7 W × 1 Fuses: Main fuse: 30.0 A Headlight fuse: 15.0 A Signaling system fuse: 15.0 A Ignition fuse: 10.0 A Radiator fan fuse: 10.0 A Carburetor heater fuse: 10.0 A Cruise control fuse: 10.0 A 10...
... 23 W/8.0 W × 2 Rear turn signal light: 12 V, 21.0 W × 2 Neutral indicator light: 12 V, 1.7 W × 1 High beam indicator light: 12 V, 1.7 W × 1 Oil level warning light: 12 V, 1.7 W × 1 Turn signal indicator light: 12 V, 1.7 W × 2 Fuel level warning light: 14 V, 3.0 W × 1 Coolant temperature warning light: 12 V, 1.7 W × 1 Engine trouble warning light: 12 V, 1.7 W × 1 Fuses: Main fuse: 30.0 A Headlight fuse: 15.0 A Signaling system fuse: 15.0 A Ignition fuse: 10.0 A Radiator fan fuse: 10.0 A Carburetor heater fuse: 10.0 A Cruise control fuse: 10.0 A 10...

Owners Manual
Page 118
ROYAL STAR™ VENTURE® LIMITED WARRANTY 11 EAU26703 11-7 CONSUMER INFORMATION YAMAHA MOTOR CORPORATION, U.S.A.
ROYAL STAR™ VENTURE® LIMITED WARRANTY 11 EAU26703 11-7 CONSUMER INFORMATION YAMAHA MOTOR CORPORATION, U.S.A.

Owners Manual
Page 121
...Dimmer switch...4-8 M Main switch/steering lock...4-1 Maintenance and lubrication, periodic ...8-4 Maintenance, emission control system ...8-3 Maintenance record ...11-5 Matte color, caution ...9-1 Model label ...11-2 E Engine break-in ...7-4 Engine idling speed, checking...8-20 Engine oil and oil filter cartridge ...8-12 Engine, starting a warm ...7-2 Engine stop switch ...4-8 Engine trouble warning light ...4-3 B Battery ...8-31 Brake and clutch fluid levels, checking ...8-25 Brake and clutch fluids, changing...8-27 Brake and clutch levers, checking and lubricating ...8-28 Brake and shift...
...Dimmer switch...4-8 M Main switch/steering lock...4-1 Maintenance and lubrication, periodic ...8-4 Maintenance, emission control system ...8-3 Maintenance record ...11-5 Matte color, caution ...9-1 Model label ...11-2 E Engine break-in ...7-4 Engine idling speed, checking...8-20 Engine oil and oil filter cartridge ...8-12 Engine, starting a warm ...7-2 Engine stop switch ...4-8 Engine trouble warning light ...4-3 B Battery ...8-31 Brake and clutch fluid levels, checking ...8-25 Brake and clutch fluids, changing...8-27 Brake and clutch levers, checking and lubricating ...8-28 Brake and shift...

Owners Manual
Page 122
... engine...7-1 Start switch ...4-8 Steering, checking ...8-30 Steering, locking with a padlock...4-14 Storage ...9-2 Supporting the motorcycle ...8-35 Swingarm pivots, lubricating ...8-29 T TALK switch ...4-8 Throttle cable free play, checking ...8-20 Throttle grip and cable, checking and lubricating ...8-27 Tires ...8-21 Tool kit ...8-2 Troubleshooting ...8-36 Troubleshooting charts ...8-37 Turn signal indicator lights ...4-2 Turn signal light bulb or tail/brake light bulb, replacing ...8-35 Turn signal switch ...4-8 V Valve clearance ...8-21 Vehicle identification number ...11-1 W Warranty...
... engine...7-1 Start switch ...4-8 Steering, checking ...8-30 Steering, locking with a padlock...4-14 Storage ...9-2 Supporting the motorcycle ...8-35 Swingarm pivots, lubricating ...8-29 T TALK switch ...4-8 Throttle cable free play, checking ...8-20 Throttle grip and cable, checking and lubricating ...8-27 Tires ...8-21 Tool kit ...8-2 Troubleshooting ...8-36 Troubleshooting charts ...8-37 Turn signal indicator lights ...4-2 Turn signal light bulb or tail/brake light bulb, replacing ...8-35 Turn signal switch ...4-8 V Valve clearance ...8-21 Vehicle identification number ...11-1 W Warranty...