
Owners Manual
Page 3
...air applicable at the time of this manual, please consult a Yamaha dealer. Do not attempt to the recommended maintenance schedules and operating instructions contained within this motorcycle. It represents the high degree of craftsmanship and reliability that you and your purchase of fine sporting, touring, and pacesetting racing machines. The design and manufacture of its controls and operating features. Yamaha... of this manual. This model is the result of Yamaha's vast experience in the production of the Yamaha Road Star™. EWA10011 WARNING Please read this manual and the...
...air applicable at the time of this manual, please consult a Yamaha dealer. Do not attempt to the recommended maintenance schedules and operating instructions contained within this motorcycle. It represents the high degree of craftsmanship and reliability that you and your purchase of fine sporting, touring, and pacesetting racing machines. The design and manufacture of its controls and operating features. Yamaha... of this manual. This model is the result of Yamaha's vast experience in the production of the Yamaha Road Star™. EWA10011 WARNING Please read this manual and the...
Owners Manual
Page 6
... and instruments...3-5 INSTRUMENT AND CONTROL FUNCTIONS ...4-1 Main switch/steering lock ...4-1 Indicator and warning lights ...4-2 Multi-function meter unit ...4-3 Handlebar switches ...4-6 Clutch lever ...4-8 Shift pedal ...4-8 Brake lever ...4-8 Brake pedal ...4-9 Fuel tank cap ...4-9 Fuel ...4-10 Catalytic converters ...4-11 Locking the steering with a padlock ...4-12 Rider seat ...4-12 Helmet holder ...4-13 Windshield [XV17ATY(C)/XV17ATSY(C)] ...4-13 Saddlebags [XV17ATY(C)]...4-14 Sidecases [XV17ATSY(C)]...4-15 Adjusting the shock absorber assembly ...4-16 Sidestand ...4-17 Ignition...
... and instruments...3-5 INSTRUMENT AND CONTROL FUNCTIONS ...4-1 Main switch/steering lock ...4-1 Indicator and warning lights ...4-2 Multi-function meter unit ...4-3 Handlebar switches ...4-6 Clutch lever ...4-8 Shift pedal ...4-8 Brake lever ...4-8 Brake pedal ...4-9 Fuel tank cap ...4-9 Fuel ...4-10 Catalytic converters ...4-11 Locking the steering with a padlock ...4-12 Rider seat ...4-12 Helmet holder ...4-13 Windshield [XV17ATY(C)/XV17ATSY(C)] ...4-13 Saddlebags [XV17ATY(C)]...4-14 Sidecases [XV17ATSY(C)]...4-15 Adjusting the shock absorber assembly ...4-16 Sidestand ...4-17 Ignition...
Owners Manual
Page 7
...10-7 YAMAHA EXTENDED SERVICE (Y.E.S.) ...10-9 TABLE OF CONTENTS Battery ...7-31 Replacing the fuses ...7-33 Replacing the headlight bulb ...7-34 Tail/brake light ...7-35 Replacing a turn signal light bulb ...7-35 Replacing a license plate light bulb ...7-36 Supporting the motorcycle ...7-36 Troubleshooting ...7-37 Troubleshooting chart ...7-38 MOTORCYCLE CARE AND STORAGE ...8-1 Matte color caution ...8-1 Care ...8-1 Storage ...8-4 SPECIFICATIONS ...9-1 CONSUMER INFORMATION...10-1 Identification numbers ...10-1 Reporting safety defects ...10-3 Motorcycle noise regulation ...10-4 Maintenance...
...10-7 YAMAHA EXTENDED SERVICE (Y.E.S.) ...10-9 TABLE OF CONTENTS Battery ...7-31 Replacing the fuses ...7-33 Replacing the headlight bulb ...7-34 Tail/brake light ...7-35 Replacing a turn signal light bulb ...7-35 Replacing a license plate light bulb ...7-36 Supporting the motorcycle ...7-36 Troubleshooting ...7-37 Troubleshooting chart ...7-38 MOTORCYCLE CARE AND STORAGE ...8-1 Matte color caution ...8-1 Care ...8-1 Storage ...8-4 SPECIFICATIONS ...9-1 CONSUMER INFORMATION...10-1 Identification numbers ...10-1 Reporting safety defects ...10-3 Motorcycle noise regulation ...10-4 Maintenance...

Owners Manual
Page 12
.... Do not run engine in mind: G Cargo and accessory weight should be attached to distribute the weight as evenly as barns, garages, or carports. This vehicle is changed. Genuine Yamaha Accessories Choosing accessories for use extreme caution when adding cargo or accessories to your load (suspension-adjustable models only), and check the condition and pressure of the motorcycle is not designed to pull a trailer or to...
.... Do not run engine in mind: G Cargo and accessory weight should be attached to distribute the weight as evenly as barns, garages, or carports. This vehicle is changed. Genuine Yamaha Accessories Choosing accessories for use extreme caution when adding cargo or accessories to your load (suspension-adjustable models only), and check the condition and pressure of the motorcycle is not designed to pull a trailer or to...

Owners Manual
Page 13
..." when mounting accessories. If electrical accessories exceed the capacity of the motorcycle's electrical system, an electric failure could result, which could cause a dangerous loss of lights or engine power. 2 Aftermarket Tires and Rims The tires and rims that came with no connection to Yamaha manufacture parts and accessories or offer other modifications performed to your vehicle that change any way reduce ground clearance or cornering clearance, limit suspension travel, steering travel or control operation...
..." when mounting accessories. If electrical accessories exceed the capacity of the motorcycle's electrical system, an electric failure could result, which could cause a dangerous loss of lights or engine power. 2 Aftermarket Tires and Rims The tires and rims that came with no connection to Yamaha manufacture parts and accessories or offer other modifications performed to your vehicle that change any way reduce ground clearance or cornering clearance, limit suspension travel, steering travel or control operation...
Owners Manual
Page 16
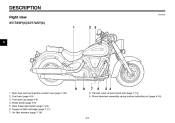
Shock absorber assembly spring preload adjusting nut (page 4-16) 3-3 Transfer case oil level check bolt (page 7-14) 9. Main fuse and fuel injection system fuse (page 7-33) Fuel tank (page 4-9) Fuel tank cap (page 4-9) Brake pedal (page 4-9) Rear brake light switch (page 7-24) Engine oil filter cartridge (page 7-11) Air filter element (page 7-16) 8 7 6 5 4 8. DESCRIPTION EAU32230 Right view XV17AWY(C)/XV17ASY(C) 1 2 3 3 9 1. 2. 3. 4. 5. 6. 7.
Shock absorber assembly spring preload adjusting nut (page 4-16) 3-3 Transfer case oil level check bolt (page 7-14) 9. Main fuse and fuel injection system fuse (page 7-33) Fuel tank (page 4-9) Fuel tank cap (page 4-9) Brake pedal (page 4-9) Rear brake light switch (page 7-24) Engine oil filter cartridge (page 7-11) Air filter element (page 7-16) 8 7 6 5 4 8. DESCRIPTION EAU32230 Right view XV17AWY(C)/XV17ASY(C) 1 2 3 3 9 1. 2. 3. 4. 5. 6. 7.
Owners Manual
Page 17
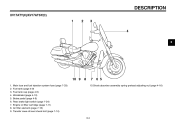
DESCRIPTION XV17ATY(C)/XV17ATSY(C) 1 2 3 4 3 10 9 1. 2. 3. 4. 5. 6. 7. 8. 9. Main fuse and fuel injection system fuse (page 7-33) Fuel tank (page 4-9) Fuel tank cap (page 4-9) Windshield (page 4-13) Brake pedal (page 4-9) Rear brake light switch (page 7-24) Engine oil filter cartridge (page 7-11) Air filter element (page 7-16) Transfer case oil level check bolt (page 7-14) 8 7 6 5 10.Shock absorber assembly spring preload adjusting nut (page 4-16) 3-4
DESCRIPTION XV17ATY(C)/XV17ATSY(C) 1 2 3 4 3 10 9 1. 2. 3. 4. 5. 6. 7. 8. 9. Main fuse and fuel injection system fuse (page 7-33) Fuel tank (page 4-9) Fuel tank cap (page 4-9) Windshield (page 4-13) Brake pedal (page 4-9) Rear brake light switch (page 7-24) Engine oil filter cartridge (page 7-11) Air filter element (page 7-16) Transfer case oil level check bolt (page 7-14) 8 7 6 5 10.Shock absorber assembly spring preload adjusting nut (page 4-16) 3-4

Owners Manual
Page 21
...: The fuel level warning light will flash eight times, and 4 Turn signal indicator lights " " and " " The corresponding indicator light flashes when the turn signal switch is switched on for the fuel level detection circuit. EAU11363 3 2 1 1. Turn. 1. 2. 3. 4. 5. 6. If a problem is detected in , and then turn signal indicator light " " Engine trouble warning light " " Fuel level warning light " " 4 5 6 Push the key in the fuel level detection circuit, the following cycle will be checked by turning the key to "ON". The electrical circuit...
...: The fuel level warning light will flash eight times, and 4 Turn signal indicator lights " " and " " The corresponding indicator light flashes when the turn signal switch is switched on for the fuel level detection circuit. EAU11363 3 2 1 1. Turn. 1. 2. 3. 4. 5. 6. If a problem is detected in , and then turn signal indicator light " " Engine trouble warning light " " Fuel level warning light " " 4 5 6 Push the key in the fuel level detection circuit, the following cycle will be checked by turning the key to "ON". The electrical circuit...

Owners Manual
Page 26
.... Engine stop switch " / "SELECT" switch " / "RESET" switch Start switch " " " " Start switch " " Push this switch to starting the engine. EAU41700 The engine trouble warning light will self-cancel after it has returned to " ". INSTRUMENT AND CONTROL FUNCTIONS Right has traveled both about 150 m (490 ft) and for detailed information. 4-7 However, the turn , push this does not indicate a malfunction. When released, the switch returns to "ON" and the start switch is turned to the center...
.... Engine stop switch " / "SELECT" switch " / "RESET" switch Start switch " " " " Start switch " " Push this switch to starting the engine. EAU41700 The engine trouble warning light will self-cancel after it has returned to " ". INSTRUMENT AND CONTROL FUNCTIONS Right has traveled both about 150 m (490 ft) and for detailed information. 4-7 However, the turn , push this does not indicate a malfunction. When released, the switch returns to "ON" and the start switch is turned to the center...
Owners Manual
Page 36
... the locknut to an open the cylinder assembly. Raise the sidestand or lower it with or attempt to open flame or other high heat source. G Do not dispose of raising the sidestand before handling the shock absorber assembly. Therefore, check this system regularly as described 3. Take the shock absorber assembly to excessive gas pressure. INSTRUMENT AND CONTROL FUNCTIONS EAU15301 Tightening torque: Locknut: 35...
... the locknut to an open the cylinder assembly. Raise the sidestand or lower it with or attempt to open flame or other high heat source. G Do not dispose of raising the sidestand before handling the shock absorber assembly. Therefore, check this system regularly as described 3. Take the shock absorber assembly to excessive gas pressure. INSTRUMENT AND CONTROL FUNCTIONS EAU15301 Tightening torque: Locknut: 35...

Owners Manual
Page 44
... distances. EAU16681 To start switch. Each starting off . Even with the engine off, and do not tow the motorcycle for starting attempt should be as short as possible to disengage the clutch. 2. Never accelerate hard when the engine is running. Neutral position G 6 Shifting gears lets you control the amount of time with the transmission in the illustration. If not, ask a Yamaha dealer to start, release the start switch, wait a few...
... distances. EAU16681 To start switch. Each starting off . Even with the engine off, and do not tow the motorcycle for starting attempt should be as short as possible to disengage the clutch. 2. Never accelerate hard when the engine is running. Neutral position G 6 Shifting gears lets you control the amount of time with the transmission in the illustration. If not, ask a Yamaha dealer to start, release the start switch, wait a few...

Owners Manual
Page 60
... that the vehicle is positioned straight up when checking the oil level. Turn the engine off and check for several minutes while checking it in the periodic maintenance and lubrication chart. To check the transfer case oil level 1. Remove the oil check bolt, and then check the oil level in a false reading. 2. Start the engine, and then let it idle for the...
... that the vehicle is positioned straight up when checking the oil level. Turn the engine off and check for several minutes while checking it in the periodic maintenance and lubrication chart. To check the transfer case oil level 1. Remove the oil check bolt, and then check the oil level in a false reading. 2. Start the engine, and then let it idle for the...

Owners Manual
Page 61
... and tighten the oil filler cap. 7-15 Transfer case oil drain bolt 4. Start the engine and let it to the correct level, and then install the oil filler cap. Tightening torque: Transfer case oil check bolt: 7.5 Nm (0.75 m·kgf, 5.4 ft·lbf) 3. Remove the oil filler cap, refill with the specified amount of the recommended type to raise it idle for several...
... and tighten the oil filler cap. 7-15 Transfer case oil drain bolt 4. Start the engine and let it to the correct level, and then install the oil filler cap. Tightening torque: Transfer case oil check bolt: 7.5 Nm (0.75 m·kgf, 5.4 ft·lbf) 3. Remove the oil filler cap, refill with the specified amount of the recommended type to raise it idle for several...

Owners Manual
Page 66
... a Yamaha dealer immediately and have the tire replaced. 7-20 Operation of cargo, rider, passenger, and accessories (windshield, saddlebags, etc. Tire inflation pressure should be adjusted according to total weight of an overloaded vehicle could cause an accident. PERIODIC MAINTENANCE AND ADJUSTMENT EAU21423 EWA10511 Tires (For cast wheel models) To ensure maximum performance, long service, and safe operation, note the following: Tire air pressure Always check and adjust the tire pressure before...
... a Yamaha dealer immediately and have the tire replaced. 7-20 Operation of cargo, rider, passenger, and accessories (windshield, saddlebags, etc. Tire inflation pressure should be adjusted according to total weight of an overloaded vehicle could cause an accident. PERIODIC MAINTENANCE AND ADJUSTMENT EAU21423 EWA10511 Tires (For cast wheel models) To ensure maximum performance, long service, and safe operation, note the following: Tire air pressure Always check and adjust the tire pressure before...

Owners Manual
Page 79
... rating than recommended to avoid causing extensive damage to the electrical system and possibly a fire. [EWA15131] 7 7-33 Main fuse 2. Turn the key to unhook it as follows. 1. PERIODIC MAINTENANCE AND ADJUSTMENT EAU45661 Replacing the fuses The main fuse and fuel injection system fuse are located in question. 2. Slot 1. Fuel injection system fuse 1. 2. 3. 4. 5. 6. 7. 7 6 54 3 2 Spare fuse Signaling system fuse Ignition fuse Auxiliary DC connector fuse Headlight fuse Backup fuse (for odometer and clock) Auto-decompression fuse...
... rating than recommended to avoid causing extensive damage to the electrical system and possibly a fire. [EWA15131] 7 7-33 Main fuse 2. Turn the key to unhook it as follows. 1. PERIODIC MAINTENANCE AND ADJUSTMENT EAU45661 Replacing the fuses The main fuse and fuel injection system fuse are located in question. 2. Slot 1. Fuel injection system fuse 1. 2. 3. 4. 5. 6. 7. 7 6 54 3 2 Spare fuse Signaling system fuse Ignition fuse Auxiliary DC connector fuse Headlight fuse Backup fuse (for odometer and clock) Auto-decompression fuse...
Owners Manual
Page 80
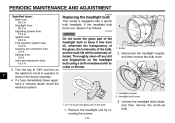
... the electrical system. 1. Remove the headlight unit by removing the screws. 7-34 3. Headlight coupler 2. If the headlight bulb burns out, replace it free from oil, otherwise the transparency of the glass, the luminosity of the bulb. 1. PERIODIC MAINTENANCE AND ADJUSTMENT EAU23794 Specified fuses: Main fuse: 50.0 A Headlight fuse: 20.0 A Signaling system fuse: 15.0 A Ignition fuse: 20.0 A Fuel injection system fuse: 15.0 A Auxiliary DC connector fuse: 3.0 A Backup fuse: 3.0 A Auto-decompression fuse: 15.0 A Replacing the headlight bulb This model...
... the electrical system. 1. Remove the headlight unit by removing the screws. 7-34 3. Headlight coupler 2. If the headlight bulb burns out, replace it free from oil, otherwise the transparency of the glass, the luminosity of the bulb. 1. PERIODIC MAINTENANCE AND ADJUSTMENT EAU23794 Specified fuses: Main fuse: 50.0 A Headlight fuse: 20.0 A Signaling system fuse: 15.0 A Ignition fuse: 20.0 A Fuel injection system fuse: 15.0 A Auxiliary DC connector fuse: 3.0 A Backup fuse: 3.0 A Auto-decompression fuse: 15.0 A Replacing the headlight bulb This model...
Owners Manual
Page 90
...: 1688 mm (66.5 in) Ground clearance: 145 mm (5.71 in) Minimum turning radius: 3200 mm (126.0 in) Engine: Engine type: Air cooled 4-stroke, OHV Cylinder arrangement: V-type 2-cylinder Displacement: 1670.0 cm³ Bore × stroke: 97.0 × 113.0 mm (3.82 × 4.45 in) Compression ratio: 8.36 :1 Starting system: Electric starter Lubrication system: Dry sump Engine oil quantity: Without oil filter cartridge replacement: 3.70 L (3.91 US qt...
...: 1688 mm (66.5 in) Ground clearance: 145 mm (5.71 in) Minimum turning radius: 3200 mm (126.0 in) Engine: Engine type: Air cooled 4-stroke, OHV Cylinder arrangement: V-type 2-cylinder Displacement: 1670.0 cm³ Bore × stroke: 97.0 × 113.0 mm (3.82 × 4.45 in) Compression ratio: 8.36 :1 Starting system: Electric starter Lubrication system: Dry sump Engine oil quantity: Without oil filter cartridge replacement: 3.70 L (3.91 US qt...

Owners Manual
Page 100
... (18,641 miles) or five years, whichever occurs first YAMAHA MOTOR CORPORATION, U.S.A. Failures other commercial purposes, and TZ models. P.O. MODELS EXCLUDED FROM WARRANTY include those used in the appropriate Owner's Manual, and 2. emissions standards applicable at the time of manufacture and that it not to remain in material and workmanship for Yamaha motorcycles originally equipped with headlight, stoplight, and turn signals shall be...
... (18,641 miles) or five years, whichever occurs first YAMAHA MOTOR CORPORATION, U.S.A. Failures other commercial purposes, and TZ models. P.O. MODELS EXCLUDED FROM WARRANTY include those used in the appropriate Owner's Manual, and 2. emissions standards applicable at the time of manufacture and that it not to remain in material and workmanship for Yamaha motorcycles originally equipped with headlight, stoplight, and turn signals shall be...

Owners Manual
Page 101
... recommended maintenance shown in the Owner's Manual? Completely set up -to remain effective. The customer's responsibility includes all first purchasers against the possibility of normal maintenance services, non-warranty repairs, accident and collision damages, and oil, oil filters, air filters, spark plugs, and brake shoes. CONSUMER INFORMATION WARRANTY QUESTIONS AND ANSWERS Q. These terms are a qualified mechanic and follow the procedures specified in areas. Specific examples include: Running the...
... recommended maintenance shown in the Owner's Manual? Completely set up -to remain effective. The customer's responsibility includes all first purchasers against the possibility of normal maintenance services, non-warranty repairs, accident and collision damages, and oil, oil filters, air filters, spark plugs, and brake shoes. CONSUMER INFORMATION WARRANTY QUESTIONS AND ANSWERS Q. These terms are a qualified mechanic and follow the procedures specified in areas. Specific examples include: Running the...
Owners Manual
Page 104
... ...4-3 D Dimmer switch ...4-7 Drive belt slack...7-26 T Tail/brake light...7-35 Throttle cable free play, checking ...7-17 Throttle grip and cable, checking and lubricating ...7-27 Tires (For cast wheel models)...7-20 Tires (For spoke wheel model)...7-18 Tool kit...7-2 Transfer case oil...7-14 Troubleshooting ...7-37 Troubleshooting chart ...7-38 E Engine break-in...6-3 Engine oil and oil filter cartridge...7-11 Engine stop switch ...4-7 Engine trouble warning light...4-3 N Neutral indicator light...4-2 Noise regulation...10-4 P Panels, removing and installing...7-8 Parking ...6-4 Part...
... ...4-3 D Dimmer switch ...4-7 Drive belt slack...7-26 T Tail/brake light...7-35 Throttle cable free play, checking ...7-17 Throttle grip and cable, checking and lubricating ...7-27 Tires (For cast wheel models)...7-20 Tires (For spoke wheel model)...7-18 Tool kit...7-2 Transfer case oil...7-14 Troubleshooting ...7-37 Troubleshooting chart ...7-38 E Engine break-in...6-3 Engine oil and oil filter cartridge...7-11 Engine stop switch ...4-7 Engine trouble warning light...4-3 N Neutral indicator light...4-2 Noise regulation...10-4 P Panels, removing and installing...7-8 Parking ...6-4 Part...