
Owners Manual
Page 6
... ...4-5 Handlebar switches ...4-7 Throttle lever ...4-13 Speed limiter ...4-14 Front brake lever ...4-15 Brake pedal and rear brake lever ...4-15 Drive select lever ...4-16 Fuel tank cap ...4-16 Fuel ...4-17 Seat ...4-19 Storage compartments ...4-19 Front carrier ...4-22 Rear carrier ...4-22 Adjusting the front and rear shock absorber assemblies ...4-22 Auxiliary DC jack ...4-23 PRE-OPERATION CHECKS ...5-1 Pre-operation check list ...5-1 Fuel ...5-4 Engine oil ...5-4 Final gear oil ...5-4 Differential gear oil ...5-4 Coolant ...5-4 Front and rear brakes ...5-5 Throttle lever ...5-6 Tires...
... ...4-5 Handlebar switches ...4-7 Throttle lever ...4-13 Speed limiter ...4-14 Front brake lever ...4-15 Brake pedal and rear brake lever ...4-15 Drive select lever ...4-16 Fuel tank cap ...4-16 Fuel ...4-17 Seat ...4-19 Storage compartments ...4-19 Front carrier ...4-22 Rear carrier ...4-22 Adjusting the front and rear shock absorber assemblies ...4-22 Auxiliary DC jack ...4-23 PRE-OPERATION CHECKS ...5-1 Pre-operation check list ...5-1 Fuel ...5-4 Engine oil ...5-4 Final gear oil ...5-4 Differential gear oil ...5-4 Coolant ...5-4 Front and rear brakes ...5-5 Throttle lever ...5-6 Tires...
Owners Manual
Page 7
... the radiator grills ...8-20 Checking the spark plug ...8-20 Engine oil and oil filter cartridge ...8-22 Final gear oil ...8-27 Differential gear oil ...8-29 Coolant ...8-31 Cleaning the air filter element ...8-37 Cleaning the spark arrester ...8-41 V-belt case drain plug ...8-43 Adjusting the throttle cable free play ...8-44 Valve clearance ...8-45 Adjusting the drive select lever safety system cable ...8-45 Checking the front and rear brake pads ...8-45 Checking the rear brake hose protectors ...8-46 Checking the brake fluid...
... the radiator grills ...8-20 Checking the spark plug ...8-20 Engine oil and oil filter cartridge ...8-22 Final gear oil ...8-27 Differential gear oil ...8-29 Coolant ...8-31 Cleaning the air filter element ...8-37 Cleaning the spark arrester ...8-41 V-belt case drain plug ...8-43 Adjusting the throttle cable free play ...8-44 Valve clearance ...8-45 Adjusting the drive select lever safety system cable ...8-45 Checking the front and rear brake pads ...8-45 Checking the rear brake hose protectors ...8-46 Checking the brake fluid...
Owners Manual
Page 8
...54 Lubricating the steering shaft ...8-55 Battery ...8-55 Replacing a fuse ...8-58 Replacing a headlight bulb ...8-60 Adjusting a headlight beam ...8-62 Replacing the tail/brake light bulb ...8-63 Removing a wheel ...8-64 Installing a wheel ...8-64 Troubleshooting ...8-65 Troubleshooting charts ...8-67 CLEANING AND STORAGE...9-1 Cleaning ...9-1 Storage ...9-2 SPECIFICATIONS ...10-1 CONSUMER INFORMATION...11-1 Identification numbers ...11-1 Noise regulation ...11-3 Maintenance record ...11-4 YAMAHA MOTOR CORPORATION, U.S.A. ATV LIMITED WARRANTY ...11-5 YAMAHA EXTENDED SERVICE (Y.E.S.) ...11...
...54 Lubricating the steering shaft ...8-55 Battery ...8-55 Replacing a fuse ...8-58 Replacing a headlight bulb ...8-60 Adjusting a headlight beam ...8-62 Replacing the tail/brake light bulb ...8-63 Removing a wheel ...8-64 Installing a wheel ...8-64 Troubleshooting ...8-65 Troubleshooting charts ...8-67 CLEANING AND STORAGE...9-1 Cleaning ...9-1 Storage ...9-2 SPECIFICATIONS ...10-1 CONSUMER INFORMATION...11-1 Identification numbers ...11-1 Noise regulation ...11-3 Maintenance record ...11-4 YAMAHA MOTOR CORPORATION, U.S.A. ATV LIMITED WARRANTY ...11-5 YAMAHA EXTENDED SERVICE (Y.E.S.) ...11...
Owners Manual
Page 10
... hills as described in this manual. Never operate on excessively rough, slippery or loose terrain until you stall or roll backwards when climbing a hill. Always be alert to turn at high speed. G G G G Always follow proper procedures for going down a hill at excessive speeds. Shift your weight forward. Never attempt to changing terrain conditions when operating the ATV...
... hills as described in this manual. Never operate on excessively rough, slippery or loose terrain until you stall or roll backwards when climbing a hill. Always be alert to turn at high speed. G G G G Always follow proper procedures for going down a hill at excessive speeds. Shift your weight forward. Never attempt to changing terrain conditions when operating the ATV...
Owners Manual
Page 20
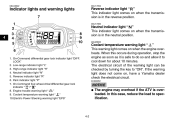
... engine overheats. EBU28662 1. On-Command four-wheel-drive/differential gear lock indicator " "/" " 8. The electrical circuit of the warning light can be checked by turning the key to cool down for about 10 minutes. LOCK" 2. When this case, reduce the load to specification. 4-2 EBU26692 EBU17830 Indicator lights and warning lights Reverse indicator light " " This indicator light comes on when the transmission is in the neutral position. Low-range indicator light "L" 3. Coolant temperature warning light " " 10.Electric Power Steering warning light "EPS" Coolant...
... engine overheats. EBU28662 1. On-Command four-wheel-drive/differential gear lock indicator " "/" " 8. The electrical circuit of the warning light can be checked by turning the key to cool down for about 10 minutes. LOCK" 2. When this case, reduce the load to specification. 4-2 EBU26692 EBU17830 Indicator lights and warning lights Reverse indicator light " " This indicator light comes on when the transmission is in the neutral position. Low-range indicator light "L" 3. Coolant temperature warning light " " 10.Electric Power Steering warning light "EPS" Coolant...
Owners Manual
Page 21
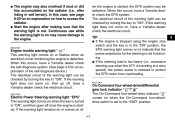
... radiator (i.e., after making sure that the power assistance for the steering is started . Start the engine after riding in the "ON" position, the EPS warning light comes on to indicate that the warning light is started , the EPS system may cause damage to the "4WD" position. EBU27542 Electric Power Steering warning light "EPS" This warning light comes on when the key is turned to "ON". ter the engine is not functioning. The electrical circuit of the warning light...
... radiator (i.e., after making sure that the power assistance for the steering is started . Start the engine after riding in the "ON" position, the EPS warning light comes on to indicate that the warning light is started , the EPS system may cause damage to the "4WD" position. EBU27542 Electric Power Steering warning light "EPS" This warning light comes on when the key is turned to "ON". ter the engine is not functioning. The electrical circuit of the warning light...
Owners Manual
Page 26
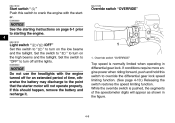
ECB00050 Override switch "OVERRIDE" NOTICE See the starting instructions on page 6-1 prior to starting the engine. 4 EBU18151 Light switch " / /OFF" Set this switch to " " to the point that the starter motor will appear as shown in differential gear lock. Override switch "OVERRIDE" NOTICE Do not use the headlights with the starter. Top speed is pushed, the segments of time, otherwise the battery may discharge to turn on the high beams...
ECB00050 Override switch "OVERRIDE" NOTICE See the starting instructions on page 6-1 prior to starting the engine. 4 EBU18151 Light switch " / /OFF" Set this switch to " " to the point that the starter motor will appear as shown in differential gear lock. Override switch "OVERRIDE" NOTICE Do not use the headlights with the starter. Top speed is pushed, the segments of time, otherwise the battery may discharge to turn on the high beams...
Owners Manual
Page 37
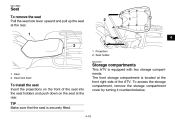
...access the storage compartment, remove the storage compartment cover by turning it counterclockwise. Seat lock lever To install the seat Insert the projections on the front of the seat into the seat holders and push down on the seat at the front right side of the ATV. ...The front storage compartment is equipped with two storage compartments. TIP Make sure that the seat is securely fitted. 4-19 This ATV is located at the rear. Seat 2. Seat holder EBU27361 Storage compartments 1. EBU18880 Seat To remove the seat Pull the seat lock...
...access the storage compartment, remove the storage compartment cover by turning it counterclockwise. Seat lock lever To install the seat Insert the projections on the front of the seat into the seat holders and push down on the seat at the front right side of the ATV. ...The front storage compartment is equipped with two storage compartments. TIP Make sure that the seat is securely fitted. 4-19 This ATV is located at the rear. Seat 2. Seat holder EBU27361 Storage compartments 1. EBU18880 Seat To remove the seat Pull the seat lock...
Owners Manual
Page 48
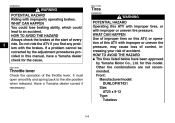
Front: Manufacturer/model: DUNLOP/KT421 Size: AT25 x 8-12 Type: Tubeless 5 Throttle lever Check the operation of every ride. If a problem cannot be corrected by Yamaha Motor Co., Ltd. It must open smoothly and spring back to an accident. WHAT CAN HAPPEN You could lose braking ability, which could lead to the idle position when released. HOW TO AVOID THE HAZARD...
Front: Manufacturer/model: DUNLOP/KT421 Size: AT25 x 8-12 Type: Tubeless 5 Throttle lever Check the operation of every ride. If a problem cannot be corrected by Yamaha Motor Co., Ltd. It must open smoothly and spring back to an accident. WHAT CAN HAPPEN You could lose braking ability, which could lead to the idle position when released. HOW TO AVOID THE HAZARD...

Owners Manual
Page 53
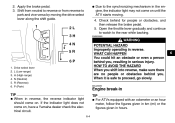
... coolant temperature warning light and engine trouble warning light should come on, then go off, see page 4-2 for the corresponding warning light circuit check. 2. The EPS warning light should come on , have a Yamaha dealer check the electrical circuit. The engine can be as short as possible to preserve battery energy. Apply the rear brake lever or brake pedal. 4. Completely close the throttle lever and start the engine by pushing the start switch...
... coolant temperature warning light and engine trouble warning light should come on, then go off, see page 4-2 for the corresponding warning light circuit check. 2. The EPS warning light should come on , have a Yamaha dealer check the electrical circuit. The engine can be as short as possible to preserve battery energy. Apply the rear brake lever or brake pedal. 4. Completely close the throttle lever and start the engine by pushing the start switch...
Owners Manual
Page 55
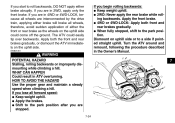
...km (mi) or the figures given in hours. 6-4 TIP G When in the engine, the indicator light may not come on. Apply the brake pedal. 3. When it is safe to the rear while backing. G Due to park and vice versa by moving . 4. WHAT CAN HAPPEN You could hit an obstacle... release the brake pedal. 5. If the indicator light does not come on until the ATV starts moving the drive select lever along the shift guide. Shift from neutral to reverse or from reverse to the synchronizing mechanism in reverse, the reverse indicator light should come on , have a Yamaha dealer check the electrical ...
...km (mi) or the figures given in hours. 6-4 TIP G When in the engine, the indicator light may not come on. Apply the brake pedal. 3. When it is safe to the rear while backing. G Due to park and vice versa by moving . 4. WHAT CAN HAPPEN You could hit an obstacle... release the brake pedal. 5. If the indicator light does not come on until the ATV starts moving the drive select lever along the shift guide. Shift from neutral to reverse or from reverse to the synchronizing mechanism in reverse, the reverse indicator light should come on , have a Yamaha dealer check the electrical ...
Owners Manual
Page 83
... and rear brakes gradually. If you start to a side if pointed straight uphill. If you lose all forward speed: G Keep weight uphill. EWB01351 If you are in 4WD or 4WD-LOCK, because all wheels, therefore, avoid sudden application of either brake abruptly. If you begin rolling backwards: G Keep weight uphill. G Shift to the park position. If you are interconnected by the drive train...
... and rear brakes gradually. If you start to a side if pointed straight uphill. If you lose all forward speed: G Keep weight uphill. EWB01351 If you are in 4WD or 4WD-LOCK, because all wheels, therefore, avoid sudden application of either brake abruptly. If you begin rolling backwards: G Keep weight uphill. G Shift to the park position. If you are interconnected by the drive train...
Owners Manual
Page 151
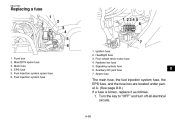
Fuse box Main/EPS spare fuse Main fuse EPS fuse Fuel injection system spare fuse Fuel injection system fuse 1. 2. 3. 4. 5. 6. 7. Ignition fuse Headlight fuse Four-wheel-drive motor fuse Radiator fan fuse Signaling system fuse Auxiliary DC jack fuse Spare fuse 8 The main fuse, the fuel injection system fuse, the EPS fuse, and the fuse box are located under panel A. (See page 8-8.) If a fuse is blown, replace it as follows. 1. Turn the key to "OFF" and turn off all electrical circuits. 8-58 EBU27580 Replacing a fuse 1. 2. 3. 4. 5. 6.
Fuse box Main/EPS spare fuse Main fuse EPS fuse Fuel injection system spare fuse Fuel injection system fuse 1. 2. 3. 4. 5. 6. 7. Ignition fuse Headlight fuse Four-wheel-drive motor fuse Radiator fan fuse Signaling system fuse Auxiliary DC jack fuse Spare fuse 8 The main fuse, the fuel injection system fuse, the EPS fuse, and the fuse box are located under panel A. (See page 8-8.) If a fuse is blown, replace it as follows. 1. Turn the key to "OFF" and turn off all electrical circuits. 8-58 EBU27580 Replacing a fuse 1. 2. 3. 4. 5. 6.

Owners Manual
Page 152
ECB00640 NOTICE To prevent accidental short-circuiting, turn off the main switch when checking or replacing a fuse. 2. Remove the blown fuse, and then install a new fuse of the specified amperage. 8 Specified fuses: Main fuse: 40.0 A Headlight fuse: 15.0 A Ignition fuse: 15.0 A Four-wheel-drive motor fuse: 15.0 A Signaling system fuse: 5.0 A Auxiliary DC jack fuse: 15.0 A Radiator fan fuse: 20.0 A Fuel injection system fuse: 15.0 A EPS fuse: 40.0 A EWB02151 WARNING POTENTIAL HAZARD Using an improper fuse. 8-59
ECB00640 NOTICE To prevent accidental short-circuiting, turn off the main switch when checking or replacing a fuse. 2. Remove the blown fuse, and then install a new fuse of the specified amperage. 8 Specified fuses: Main fuse: 40.0 A Headlight fuse: 15.0 A Ignition fuse: 15.0 A Four-wheel-drive motor fuse: 15.0 A Signaling system fuse: 5.0 A Auxiliary DC jack fuse: 15.0 A Radiator fan fuse: 20.0 A Fuel injection system fuse: 15.0 A EPS fuse: 40.0 A EWB02151 WARNING POTENTIAL HAZARD Using an improper fuse. 8-59
Owners Manual
Page 162
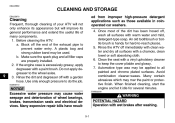
..., start the engine and let it idle for hard-to all painted and chrome plated surfaces. Avoid combination cleaner-waxes. EWB02300 9 NOTICE Excessive water pressure may be used. Block off the end of wheel bearings, brakes, transmission seals and electrical devices. Rinse the dirt and degreaser off immediately with clean water and dry all filler caps are properly installed. 2. Use only enough pressure to the wheel axles...
..., start the engine and let it idle for hard-to all painted and chrome plated surfaces. Avoid combination cleaner-waxes. EWB02300 9 NOTICE Excessive water pressure may be used. Block off the end of wheel bearings, brakes, transmission seals and electrical devices. Rinse the dirt and degreaser off immediately with clean water and dry all filler caps are properly installed. 2. Use only enough pressure to the wheel axles...
Owners Manual
Page 165
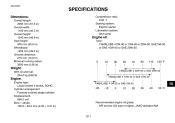
EBU25960 SPECIFICATIONS Dimensions: Overall length: 2065 mm (81.3 in) Overall width: 1180 mm (46.5 in) Overall height: 1240 mm (48.8 in) Seat height: 905 mm (35.6 in) Wheelbase: 1250 mm (49.2 in) Ground clearance: 275 mm (10.8 in) Minimum turning radius: 3200 mm (126 in) Compression ratio: 9.20 :1 Starting system: Electric starter Lubrication system: Wet sump Engine oil: Type: YAMALUBE 4 5W-30 or...
EBU25960 SPECIFICATIONS Dimensions: Overall length: 2065 mm (81.3 in) Overall width: 1180 mm (46.5 in) Overall height: 1240 mm (48.8 in) Seat height: 905 mm (35.6 in) Wheelbase: 1250 mm (49.2 in) Ground clearance: 275 mm (10.8 in) Minimum turning radius: 3200 mm (126 in) Compression ratio: 9.20 :1 Starting system: Electric starter Lubrication system: Wet sump Engine oil: Type: YAMALUBE 4 5W-30 or...

Owners Manual
Page 169
Headlight fuse: 15.0 A Signaling system fuse: 5.0 A Ignition fuse: 15.0 A Auxiliary DC jack fuse: 15.0 A Four-wheel-drive motor fuse: 15.0 A Radiator fan fuse: 20.0 A 10 10-5
Headlight fuse: 15.0 A Signaling system fuse: 5.0 A Ignition fuse: 15.0 A Auxiliary DC jack fuse: 15.0 A Four-wheel-drive motor fuse: 15.0 A Radiator fan fuse: 20.0 A 10 10-5
Owners Manual
Page 174
... inspection and repairs at the time of each 2006 and later model Yamaha ATV covered by this warranty that time for warranty by this service. EMISSION CONTROL SYSTEM WARRANTY Yamaha Motor Corporation, USA also warrants to meet these standards within ten (10) days after discovery, and make the machine available at that the vehicle is designed, built, and equipped so as a result of owner abuse...
... inspection and repairs at the time of each 2006 and later model Yamaha ATV covered by this warranty that time for warranty by this service. EMISSION CONTROL SYSTEM WARRANTY Yamaha Motor Corporation, USA also warrants to meet these standards within ten (10) days after discovery, and make the machine available at that the vehicle is designed, built, and equipped so as a result of owner abuse...

Owners Manual
Page 175
... my responsibility during the warranty period? A. Since all of the recommended maintenance shown in the Owner's Manual? Q. The unit has to maintain a complete, up every new machine before sale. 2. What are handled at the time of normal maintenance services, non-warranty repairs, accident and collision damages, and oil, oil filters, air filters, spark plugs, and brake shoes. What costs are general and overlap each manufacturer of a motor vehicle to be transferred...
... my responsibility during the warranty period? A. Since all of the recommended maintenance shown in the Owner's Manual? Q. The unit has to maintain a complete, up every new machine before sale. 2. What are handled at the time of normal maintenance services, non-warranty repairs, accident and collision damages, and oil, oil filters, air filters, spark plugs, and brake shoes. What costs are general and overlap each manufacturer of a motor vehicle to be transferred...
Owners Manual
Page 180
... ...8-3 Maintenance record ...11-4 Model label ...11-2 Multifunction display ...4-5 N Neutral indicator light ...4-2 Noise regulation ...11-3 O On-Command differential gear lock switch ...4-10 On-Command four-wheel-drive switch ...4-9 Override switch ...4-8 Owner's manual and tool kit ...8-1 T Tail/brake light bulb, replacing ...8-63 Throttle cable free play, adjusting ...8-44 Throttle lever ...4-13, 5-6 Tire pressure, measuring ...5-7 Tires ...5-6 Tire wear limit ...5-8 Troubleshooting ...8-65 Troubleshooting charts ...8-67 P Panels, removing and installing ...8-8 Park indicator light...
... ...8-3 Maintenance record ...11-4 Model label ...11-2 Multifunction display ...4-5 N Neutral indicator light ...4-2 Noise regulation ...11-3 O On-Command differential gear lock switch ...4-10 On-Command four-wheel-drive switch ...4-9 Override switch ...4-8 Owner's manual and tool kit ...8-1 T Tail/brake light bulb, replacing ...8-63 Throttle cable free play, adjusting ...8-44 Throttle lever ...4-13, 5-6 Tire pressure, measuring ...5-7 Tires ...5-6 Tire wear limit ...5-8 Troubleshooting ...8-65 Troubleshooting charts ...8-67 P Panels, removing and installing ...8-8 Park indicator light...