
Owners Manual
Page 7
... PERIODIC MAINTENANCE AND MINOR REPAIR ...6-1 PERIODIC MAINTENANCE ...6-1 Owner's tool kit ...6-1 Periodic maintenance chart for the emission control system ...6-3 General maintenance and lubrication chart ...6-4 Removing and installing the panel ...6-8 Checking the spark plugs ...6-8 Canister (for California only) ...6-10 Engine oil and oil filter element ...6-10 Cleaning the air filter element ...6-13 Carburetor ...6-15 Checking the engine idling speed ...6-15 Checking the throttle cable free play ...6-15 Valve clearance ...6-16 Tires ...6-16 Spoke wheels ...6-18 Accessories and replacement...
... PERIODIC MAINTENANCE AND MINOR REPAIR ...6-1 PERIODIC MAINTENANCE ...6-1 Owner's tool kit ...6-1 Periodic maintenance chart for the emission control system ...6-3 General maintenance and lubrication chart ...6-4 Removing and installing the panel ...6-8 Checking the spark plugs ...6-8 Canister (for California only) ...6-10 Engine oil and oil filter element ...6-10 Cleaning the air filter element ...6-13 Carburetor ...6-15 Checking the engine idling speed ...6-15 Checking the throttle cable free play ...6-15 Valve clearance ...6-16 Tires ...6-16 Spoke wheels ...6-18 Accessories and replacement...

Owners Manual
Page 8
... LIMITED WARRANTY ...9-7 YAMAHA EXTENDED SERVICE (Y.E.S.) ...9-9 TABLE OF CONTENTS Checking the front fork ...6-28 Checking the steering ...6-29 Checking the wheel bearings ...6-30 Battery ...6-30 Replacing the fuses ...6-32 Replacing the headlight bulb ...6-32 Replacing the tail/brake light bulb ...6-34 Replacing a turn signal light bulb ...6-34 Supporting the motorcycle ...6-35 Front wheel ...6-36 Rear wheel ...6-37 Troubleshooting ...6-39 Troubleshooting chart ...6-40 MOTORCYCLE CARE AND STORAGE ...7-1 Matte color caution ...7-1 Care ...7-1 Storage ...7-3 SPECIFICATIONS ...8-1 CONSUMER...
... LIMITED WARRANTY ...9-7 YAMAHA EXTENDED SERVICE (Y.E.S.) ...9-9 TABLE OF CONTENTS Checking the front fork ...6-28 Checking the steering ...6-29 Checking the wheel bearings ...6-30 Battery ...6-30 Replacing the fuses ...6-32 Replacing the headlight bulb ...6-32 Replacing the tail/brake light bulb ...6-34 Replacing a turn signal light bulb ...6-34 Supporting the motorcycle ...6-35 Front wheel ...6-36 Rear wheel ...6-37 Troubleshooting ...6-39 Troubleshooting chart ...6-40 MOTORCYCLE CARE AND STORAGE ...7-1 Matte color caution ...7-1 Care ...7-1 Storage ...7-3 SPECIFICATIONS ...8-1 CONSUMER...
Owners Manual
Page 11
... does not in cross winds. Carefully inspect the accessory before riding. These accessories may become unstable in any way reduce ground clearance or cornering clearance, limit suspension travel, steering travel or control operation, or obscure lights or reflectors. • Accessories fitted to distribute the weight as evenly as possible on this weight limit, keep the following guidelines in mind: G Cargo...
... does not in cross winds. Carefully inspect the accessory before riding. These accessories may become unstable in any way reduce ground clearance or cornering clearance, limit suspension travel, steering travel or control operation, or obscure lights or reflectors. • Accessories fitted to distribute the weight as evenly as possible on this weight limit, keep the following guidelines in mind: G Cargo...
Owners Manual
Page 12
G Never start the engine or let it run for manual type). G 1 G Gasoline and exhaust gas G GASOLINE IS HIGHLY FLAMMABLE: • Always turn the engine off when refueling. • Take care not to spill any length of lights or engine power. G G Always turn the engine off before leaving the motorcycle unattended and remove the key from the main switch. If you should lean over . • Do not park the...
G Never start the engine or let it run for manual type). G 1 G Gasoline and exhaust gas G GASOLINE IS HIGHLY FLAMMABLE: • Always turn the engine off when refueling. • Take care not to spill any length of lights or engine power. G G Always turn the engine off before leaving the motorcycle unattended and remove the key from the main switch. If you should lean over . • Do not park the...

Owners Manual
Page 16
DESCRIPTION EAU10420 Right view 2 1. 2. 3. 4. 5. 6. 7. 8. Owner's tool kit (page 6-1) 10.Shock absorber assembly spring preload adjusting ring (page 3-9) Tail/brake light (page 6-34) Rear turn signal lights (page 6-34) Rider seat (page 3-8) Air filter element (page 6-13) Front turn signal/position lights (page 6-34) Brake pedal (page 3-4) Footrest Rear brake light switch (page 6-22) 2-2 9.
DESCRIPTION EAU10420 Right view 2 1. 2. 3. 4. 5. 6. 7. 8. Owner's tool kit (page 6-1) 10.Shock absorber assembly spring preload adjusting ring (page 3-9) Tail/brake light (page 6-34) Rear turn signal lights (page 6-34) Rider seat (page 3-8) Air filter element (page 6-13) Front turn signal/position lights (page 6-34) Brake pedal (page 3-4) Footrest Rear brake light switch (page 6-22) 2-2 9.

Owners Manual
Page 18
... parking position for an extended length of time, otherwise the battery may discharge. The key can be started. The main switch controls the ignition and lighting systems. The various main switch positions are supplied with power, and the headlight, meter lighting, taillight and position lights come on, and the engine can be removed. Turn signal indicator light "TURN" EAU11040 ON All electrical systems are described below. The key cannot be removed. EAU10660 Turn signal indicator light "TURN...
... parking position for an extended length of time, otherwise the battery may discharge. The key can be started. The main switch controls the ignition and lighting systems. The various main switch positions are supplied with power, and the headlight, meter lighting, taillight and position lights come on, and the engine can be removed. Turn signal indicator light "TURN" EAU11040 ON All electrical systems are described below. The key cannot be removed. EAU10660 Turn signal indicator light "TURN...

Owners Manual
Page 19
... knob Speedometer 1. Turn signal switch "TURN" 3. Horn switch "HORN" The speedometer unit is equipped with a full tank of the headlight is switched on. Speedometer unit Handlebar switches Left 3 1. 2. 3. 4. The speedometer shows riding speed. Engine stop switch "ENGINE STOP" 2. Dimmer switch "LIGHTS" 2. The tripmeter shows the distance traveled since it was last set to estimate the distance that can be traveled with a speedometer, an odometer and a tripmeter. Start switch "START" 3-2 The...
... knob Speedometer 1. Turn signal switch "TURN" 3. Horn switch "HORN" The speedometer unit is equipped with a full tank of the headlight is switched on. Speedometer unit Handlebar switches Left 3 1. 2. 3. 4. The speedometer shows riding speed. Engine stop switch "ENGINE STOP" 2. Dimmer switch "LIGHTS" 2. The tripmeter shows the distance traveled since it was last set to estimate the distance that can be traveled with a speedometer, an odometer and a tripmeter. Start switch "START" 3-2 The...

Owners Manual
Page 20
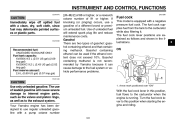
... vehicle overturns or when the throttle cable is part of the ignition circuit cut-off system. (See page 3-11.) Start switch "START" Push this switch to crank the engine with a clutch switch, which is stuck. EAU12440 CAUTION: See page 5-1 for starting instructions prior to "LO" for the low beam. Clutch lever Horn switch "HORN" Press this switch to sound the horn. To engage the clutch, release the lever. INSTRUMENT AND CONTROL...
... vehicle overturns or when the throttle cable is part of the ignition circuit cut-off system. (See page 3-11.) Start switch "START" Push this switch to crank the engine with a clutch switch, which is stuck. EAU12440 CAUTION: See page 5-1 for starting instructions prior to "LO" for the low beam. Clutch lever Horn switch "HORN" Press this switch to sound the horn. To engage the clutch, release the lever. INSTRUMENT AND CONTROL...
Owners Manual
Page 23
... engine is equipped with a pump octane number 3-6 1. INSTRUMENT AND CONTROL FUNCTIONS ECA10070 CAUTION: Immediately wipe off spilled fuel with a clean, dry, soft cloth, since fuel may deteriorate painted surfaces or plastic parts. The fuel cock lever positions are two types of leaded gasoline will extend spark plug life and reduce maintenance costs. Use of 91 or higher. EAU13300 Recommended fuel: UNLEADED GASOLINE ONLY Fuel tank capacity...
... engine is equipped with a pump octane number 3-6 1. INSTRUMENT AND CONTROL FUNCTIONS ECA10070 CAUTION: Immediately wipe off spilled fuel with a clean, dry, soft cloth, since fuel may deteriorate painted surfaces or plastic parts. The fuel cock lever positions are two types of leaded gasoline will extend spark plug life and reduce maintenance costs. Use of 91 or higher. EAU13300 Recommended fuel: UNLEADED GASOLINE ONLY Fuel tank capacity...

Owners Manual
Page 32
Check chain condition. Lubricate if necessary. Check air pressure. PRE-OPERATION CHECKS ITEM Check chain slack. Correct if necessary. Check tire condition and tread depth. CHECKS PAGE Drive chain 6-24, 6-26 Wheels and tires 6-16, 6-18 Brake and shift pedals &#...ignition circuit cut-off system. • If system is defective, have Yamaha dealer check vehicle. • Check fluid level. • Fill with distilled water if necessary. 6-27 6-27 6-28 - - 3-10 6-30 4 Brake and clutch levers Sidestand Chassis fasteners Instruments, lights, signals and switches Sidestand switch Battery...
Check chain condition. Lubricate if necessary. Check air pressure. PRE-OPERATION CHECKS ITEM Check chain slack. Correct if necessary. Check tire condition and tread depth. CHECKS PAGE Drive chain 6-24, 6-26 Wheels and tires 6-16, 6-18 Brake and shift pedals &#...ignition circuit cut-off system. • If system is defective, have Yamaha dealer check vehicle. • Check fluid level. • Fill with distilled water if necessary. 6-27 6-27 6-28 - - 3-10 6-30 4 Brake and clutch levers Sidestand Chassis fasteners Instruments, lights, signals and switches Sidestand switch Battery...
Owners Manual
Page 33
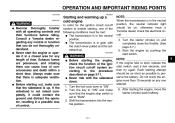
... starting, one attempt. 6. Shift the transmission into the neutral position. 5-1 Never start the engine or operate it could contact the ground and distract the operator, resulting in a possible loss of control. Always make sure that the engine stop switch is set to start, release the start switch. Turn the starter (choke) on , otherwise have a Yamaha dealer check the electrical circuit. 4. OPERATION AND IMPORTANT RIDING POINTS EAU15950 EAU32620 EWA10270 WARNING G Starting...
... starting, one attempt. 6. Shift the transmission into the neutral position. 5-1 Never start the engine or operate it could contact the ground and distract the operator, resulting in a possible loss of control. Always make sure that the engine stop switch is set to start, release the start switch. Turn the starter (choke) on , otherwise have a Yamaha dealer check the electrical circuit. 4. OPERATION AND IMPORTANT RIDING POINTS EAU15950 EAU32620 EWA10270 WARNING G Starting...
Owners Manual
Page 35
... may damage the transmission. Shift the transmission into second gear. (Make sure not to disengage the clutch. 2. The neutral indicator light should come on. Open the throttle gradually, and at the recommended shift points. If the engine is about to stall or runs very roughly, pull the clutch lever in and use the clutch while changing gears to avoid damaging the engine, transmission, and drive train, which are...
... may damage the transmission. Shift the transmission into second gear. (Make sure not to disengage the clutch. 2. The neutral indicator light should come on. Open the throttle gradually, and at the recommended shift points. If the engine is about to stall or runs very roughly, pull the clutch lever in and use the clutch while changing gears to avoid damaging the engine, transmission, and drive train, which are...
Owners Manual
Page 39
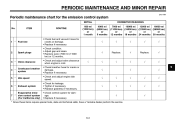
... maintenance chart for damage. • Replace if necessary. √ 2 Spark plugs √ Replace. √ Replace. √ 3 * Valve clearance Crankcase breather system Idle speed √ √ √ √ √ √ 6 4 * 5 * √ √ √ √ √ √ √ √ 6 * Exhaust system Evaporative emission control system (For California only) 7 * √ √ * Since these items require special tools, data and technical skills, have a Yamaha dealer perform the service...
... maintenance chart for damage. • Replace if necessary. √ 2 Spark plugs √ Replace. √ Replace. √ 3 * Valve clearance Crankcase breather system Idle speed √ √ √ √ √ √ 6 4 * 5 * √ √ √ √ √ √ √ √ 6 * Exhaust system Evaporative emission control system (For California only) 7 * √ √ * Since these items require special tools, data and technical skills, have a Yamaha dealer perform the service...

Owners Manual
Page 41
...) lightly. 10 * Swingarm pivot bushes √ √ √ √ 11 Drive chain Every 300 mi (500 km) and after washing the motorcycle or riding in the rain 6 √ √ √ Repack. √ √ 12 * Steering bearings 13 * Chassis fasteners Brake lever pivot shaft Brake pedal pivot shaft Clutch lever pivot shaft 14 15 16 6-5 PERIODIC MAINTENANCE AND MINOR REPAIR INITIAL...
...) lightly. 10 * Swingarm pivot bushes √ √ √ √ 11 Drive chain Every 300 mi (500 km) and after washing the motorcycle or riding in the rain 6 √ √ √ Repack. √ √ 12 * Steering bearings 13 * Chassis fasteners Brake lever pivot shaft Brake pedal pivot shaft Clutch lever pivot shaft 14 15 16 6-5 PERIODIC MAINTENANCE AND MINOR REPAIR INITIAL...
Owners Manual
Page 52
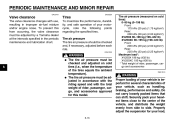
... (430 lb) * Total weight of rider, passenger, cargo and accessories EWA10510 WARNING Proper loading of your vehicle is important for your vehicle, such as handling, braking, performance and safety. Do not carry loosely packed items that can shift. To prevent this model. Tire air pressure (measured on cold tires (i.e., when the temperature of your load, 6-16 Properly adjust the suspension for several characteristics of the tires equals the ambient...
... (430 lb) * Total weight of rider, passenger, cargo and accessories EWA10510 WARNING Proper loading of your vehicle is important for your vehicle, such as handling, braking, performance and safety. Do not carry loosely packed items that can shift. To prevent this model. Tire air pressure (measured on cold tires (i.e., when the temperature of your load, 6-16 Properly adjust the suspension for several characteristics of the tires equals the ambient...

Owners Manual
Page 60
... the rear wheel forward. NOTE: When checking and adjusting the drive chain slack, there should be no weight on the motorcycle. 6 2. NOTE: Using the alignment marks on each ride and adjusted if necessary. Brake pedal free play adjusting nut. 1. Drive chain slack 4. Remove the cotter pin from the axle nut, and then loosen the axle nut. 3. Shift the transmission into the neutral position...
... the rear wheel forward. NOTE: When checking and adjusting the drive chain slack, there should be no weight on the motorcycle. 6 2. NOTE: Using the alignment marks on each ride and adjusted if necessary. Brake pedal free play adjusting nut. 1. Drive chain slack 4. Remove the cotter pin from the axle nut, and then loosen the axle nut. 3. Shift the transmission into the neutral position...
Owners Manual
Page 81
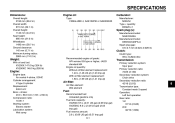
... 148.0 kg (326 lb) Engine: Engine type: Air cooled 4-stroke, SOHC Cylinder arrangement: V-type 2-cylinder Displacement: 249.0 cm³ Bore × stroke: 49.0 × 66.0 mm (1.93 × 2.60 in) Compression ratio: 10.00 :1 Starting system: Electric starter Lubrication system: Wet sump Recommended engine oil grade: API service SG type or higher, JASO standard MA Engine oil quantity: Without oil filter element replacement: 1.40 L (1.48 US qt...
... 148.0 kg (326 lb) Engine: Engine type: Air cooled 4-stroke, SOHC Cylinder arrangement: V-type 2-cylinder Displacement: 249.0 cm³ Bore × stroke: 49.0 × 66.0 mm (1.93 × 2.60 in) Compression ratio: 10.00 :1 Starting system: Electric starter Lubrication system: Wet sump Recommended engine oil grade: API service SG type or higher, JASO standard MA Engine oil quantity: Without oil filter element replacement: 1.40 L (1.48 US qt...
Owners Manual
Page 90
... as specified in warranty repairs will be charged for Yamaha motorcycles originally equipped with headlight, stoplight, and turn signals shall be warranted for the balance of 50cc or greater, that the machine be free from this service. b) Installation of proper maintenance, are not qualitatively equivalent to original parts. Operate and maintain the motorcycle as a result of owner abuse and...
... as specified in warranty repairs will be charged for Yamaha motorcycles originally equipped with headlight, stoplight, and turn signals shall be warranted for the balance of 50cc or greater, that the machine be free from this service. b) Installation of proper maintenance, are not qualitatively equivalent to original parts. Operate and maintain the motorcycle as a result of owner abuse and...
Owners Manual
Page 91
..., and oil, oil filters, air filters, spark plugs, and brake shoes. No. Q. Explain the operation, maintenance, and warranty requirements to : YAMAHA MOTOR CORPORATION, U.S.A. Q. A. The unit has to repair of sale, and upon request. CUSTOMER SERVICE If your motorcycle model name, V.I perform any important information such as towing or transportation due to -date list of all costs of purchase. If a question or problem arises regarding the warranty, first contact the owner of...
..., and oil, oil filters, air filters, spark plugs, and brake shoes. No. Q. Explain the operation, maintenance, and warranty requirements to : YAMAHA MOTOR CORPORATION, U.S.A. Q. A. The unit has to repair of sale, and upon request. CUSTOMER SERVICE If your motorcycle model name, V.I perform any important information such as towing or transportation due to -date list of all costs of purchase. If a question or problem arises regarding the warranty, first contact the owner of...

Owners Manual
Page 94
... Maintenance record...9-5 Matte color, caution ...7-1 Model label ...9-2 D Dimmer switch ...3-3 Drive chain, cleaning and lubricating ...6-26 Drive chain slack...6-24 T Tail/brake light bulb, replacing ...6-34 Throttle cable free play, checking ...6-15 Throttle grip and cable, checking and lubricating ...6-27 Tires ...6-16 Tool kit...6-1 Troubleshooting ...6-39 Troubleshooting chart ...6-40 E Engine break-in...5-4 Engine idling speed, checking ...6-15 Engine oil and oil filter element ...6-10 Engine, starting a warm ...5-2 Engine stop switch ...3-3 N Neutral indicator light...3-1 Noise...
... Maintenance record...9-5 Matte color, caution ...7-1 Model label ...9-2 D Dimmer switch ...3-3 Drive chain, cleaning and lubricating ...6-26 Drive chain slack...6-24 T Tail/brake light bulb, replacing ...6-34 Throttle cable free play, checking ...6-15 Throttle grip and cable, checking and lubricating ...6-27 Tires ...6-16 Tool kit...6-1 Troubleshooting ...6-39 Troubleshooting chart ...6-40 E Engine break-in...5-4 Engine idling speed, checking ...6-15 Engine oil and oil filter element ...6-10 Engine, starting a warm ...5-2 Engine stop switch ...3-3 N Neutral indicator light...3-1 Noise...