
Owners Manual
Page 7
... control system ...6-3 General maintenance and lubrication chart ...6-4 Checking the spark plugs ...6-8 Canister (for California only) ...6-9 Engine oil and oil filter cartridge ...6-9 Transfer case oil ...6-12 Air filter element ...6-13 Checking the throttle cable free play ...6-13 Valve clearance ...6-13 Tires ...6-14 Cast wheels ...6-15 Accessories and replacement parts ...6-16 Clutch lever ...6-16 Adjusting the rear brake light switch ...6-17 Checking the front and rear brake pads ...6-17 Checking the brake and clutch fluid levels ...6-18 Changing the brake and clutch fluids ...6-19 Drive...
... control system ...6-3 General maintenance and lubrication chart ...6-4 Checking the spark plugs ...6-8 Canister (for California only) ...6-9 Engine oil and oil filter cartridge ...6-9 Transfer case oil ...6-12 Air filter element ...6-13 Checking the throttle cable free play ...6-13 Valve clearance ...6-13 Tires ...6-14 Cast wheels ...6-15 Accessories and replacement parts ...6-16 Clutch lever ...6-16 Adjusting the rear brake light switch ...6-17 Checking the front and rear brake pads ...6-17 Checking the brake and clutch fluid levels ...6-18 Changing the brake and clutch fluids ...6-19 Drive...
Owners Manual
Page 11
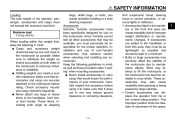
.... Keep the following in any way reduce ground clearance or cornering clearance, limit suspension travel, steering travel or control operation, or obscure lights or reflectors. • Accessories fitted to the handlebar, front fork, or front fender. G Never install accessories or carry cargo that it to make sure that would impair the performance of the opera- 1 1-3 This improper position limits...
.... Keep the following in any way reduce ground clearance or cornering clearance, limit suspension travel, steering travel or control operation, or obscure lights or reflectors. • Accessories fitted to the handlebar, front fork, or front fender. G Never install accessories or carry cargo that it to make sure that would impair the performance of the opera- 1 1-3 This improper position limits...
Owners Manual
Page 12
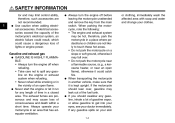
... in a closed area. If electrical accessories exceed the capacity of the motorcycle's electrical system, an electric failure could result, which could catch fire. G G Always turn the engine off before leaving the motorcycle unattended and remove the key from the main switch. Use caution when adding electrical accessories. G Never start the engine or let it could cause a dangerous loss of time in the vicinity of gasoline...
... in a closed area. If electrical accessories exceed the capacity of the motorcycle's electrical system, an electric failure could result, which could catch fire. G G Always turn the engine off before leaving the motorcycle unattended and remove the key from the main switch. Use caution when adding electrical accessories. G Never start the engine or let it could cause a dangerous loss of time in the vicinity of gasoline...
Owners Manual
Page 19
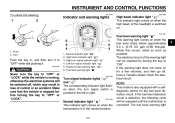
...) (0.66 Imp.gal). Neutral indicator light " " High beam indicator light " " Right turn signal indicator light " " Left turn signal indicator light " " Engine trouble warning light " " Fuel level warning light " " EAU11030 Turn signal indicator lights " " and " " The corresponding indicator light flashes when the turn it to "ON". If the warning light does not come on . NOTE: This model is switched on for the fuel level detection circuit. Push the key in loss of the headlight is also equipped with...
...) (0.66 Imp.gal). Neutral indicator light " " High beam indicator light " " Right turn signal indicator light " " Left turn signal indicator light " " Engine trouble warning light " " Fuel level warning light " " EAU11030 Turn signal indicator lights " " and " " The corresponding indicator light flashes when the turn it to "ON". If the warning light does not come on . NOTE: This model is switched on for the fuel level detection circuit. Push the key in loss of the headlight is also equipped with...
Owners Manual
Page 23
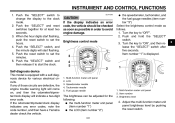
... code, the vehicle should be adjusted for various electrical circuits. Adjust the multi-function meter unit panel brightness level by pushing the reset switch. If any error codes, note the code number, and then have a Yamaha dealer check the vehicle. Item number 3. INSTRUMENT AND CONTROL FUNCTIONS 1. If the odometer/tripmeter/clock display indicates any of those circuits are defective, the engine trouble warning light...
... code, the vehicle should be adjusted for various electrical circuits. Adjust the multi-function meter unit panel brightness level by pushing the reset switch. If any error codes, note the code number, and then have a Yamaha dealer check the vehicle. Item number 3. INSTRUMENT AND CONTROL FUNCTIONS 1. If the odometer/tripmeter/clock display indicates any of those circuits are defective, the engine trouble warning light...
Owners Manual
Page 25
... turn them off. Since this switch to starting the engine. EAU12660 Start switch " " Push this model is pushed, but this switch to the center position. Set this switch to the center position. ECA10050 Turn signal switch " / " To signal a right-hand turn signal lights can be canceled manually by pushing the switch in either light, otherwise the headlight fuse may blow or the battery may discharge. 3-8 When released, the switch returns to sound the horn. ECA15321 The engine trouble warning light...
... turn them off. Since this switch to starting the engine. EAU12660 Start switch " " Push this model is pushed, but this switch to the center position. Set this switch to the center position. ECA10050 Turn signal switch " / " To signal a right-hand turn signal lights can be canceled manually by pushing the switch in either light, otherwise the headlight fuse may blow or the battery may discharge. 3-8 When released, the switch returns to sound the horn. ECA15321 The engine trouble warning light...
Owners Manual
Page 29
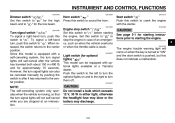
... allow the engine to prevent a fire hazard or other materials that the exhaust system has cooled down to the catalytic converter. While holding the key in that the seat is properly secured before doing any maintenance work. Push the front of the seat up, and then pull the seat off. Unlock. 2. WARNING The exhaust system is equipped with a catalytic converter in place. 3. Seat lock 2. EWA10860 Rider seat To remove...
... allow the engine to prevent a fire hazard or other materials that the exhaust system has cooled down to the catalytic converter. While holding the key in that the seat is properly secured before doing any maintenance work. Push the front of the seat up, and then pull the seat off. Unlock. 2. WARNING The exhaust system is equipped with a catalytic converter in place. 3. Seat lock 2. EWA10860 Rider seat To remove...
Owners Manual
Page 32
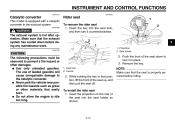
... in accordance with Yamaha's EXUP (EXhaust Ultimate Power valve) system. This system boosts engine power by a computer-controlled servomotor. G Do not deform or damage the gas cylinder in any way, as this will result in poor performance of the exhaust pipe. For proper handling, read and understand the following information before handling the shock absorber. ECA10191 WARNING 3 This shock absorber contains highly pressurized nitrogen gas. If the EXUP...
... in accordance with Yamaha's EXUP (EXhaust Ultimate Power valve) system. This system boosts engine power by a computer-controlled servomotor. G Do not deform or damage the gas cylinder in any way, as this will result in poor performance of the exhaust pipe. For proper handling, read and understand the following information before handling the shock absorber. ECA10191 WARNING 3 This shock absorber contains highly pressurized nitrogen gas. If the EXUP...
Owners Manual
Page 39
.... Turn the key to " ". Consult a Yamaha dealer regarding any one attempt. 5 WARNING G G Before starting , one of control. If a warning light does not go 5-1 NOTE: If the engine fails to start, release the start switch, wait a few seconds, then go off, see page 3-2 for the ignition circuit cut -off system according to preserve the battery. Exhaust fumes are poisonous, and inhaling them can cause loss of time. If...
.... Turn the key to " ". Consult a Yamaha dealer regarding any one attempt. 5 WARNING G G Before starting , one of control. If a warning light does not go 5-1 NOTE: If the engine fails to start, release the start switch, wait a few seconds, then go off, see page 3-2 for the ignition circuit cut -off system according to preserve the battery. Exhaust fumes are poisonous, and inhaling them can cause loss of time. If...
Owners Manual
Page 40
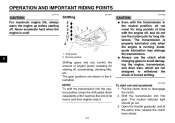
... clutch while changing gears to avoid damaging the engine, transmission, and drive train, which are shown in the neutral position, do not tow the motorcycle for starting off , accelerating, climbing hills, etc. Open the throttle gradually, and at the same time, release the clutch lever slowly. 5-2 OPERATION AND IMPORTANT RIDING POINTS ECA11130 EAU16671 ECA10260 CAUTION: For maximum engine life, always warm the engine up before starting...
... clutch while changing gears to avoid damaging the engine, transmission, and drive train, which are shown in the neutral position, do not tow the motorcycle for starting off , accelerating, climbing hills, etc. Open the throttle gradually, and at the same time, release the clutch lever slowly. 5-2 OPERATION AND IMPORTANT RIDING POINTS ECA11130 EAU16671 ECA10260 CAUTION: For maximum engine life, always warm the engine up before starting...
Owners Manual
Page 49
... starting from 8000 mi (13000 km) or 12 months. Regularly check the brake and clutch fluid levels and fill the reservoirs as required. • Replace the oil seals on the inner parts of the brake or clutch master cylinders, caliper cylinders and clutch release cylinder every two years. • Replace the brake and clutch hoses every four years or if cracked or damaged. 6 6-7 EAU38440 NOTE: G Air filter • This model's air filter...
... starting from 8000 mi (13000 km) or 12 months. Regularly check the brake and clutch fluid levels and fill the reservoirs as required. • Replace the oil seals on the inner parts of the brake or clutch master cylinders, caliper cylinders and clutch release cylinder every two years. • Replace the brake and clutch hoses every four years or if cracked or damaged. 6 6-7 EAU38440 NOTE: G Air filter • This model's air filter...
Owners Manual
Page 54
... sure that no foreign material enters the oil tank. 6 NOTE: Be sure to prevent clutch slippage (since the engine oil also lubricates the clutch), do not use oils with the remaining oil quantity while regularly checking the oil level on any parts after the engine and exhaust system have a Yamaha dealer check and repair the vehicle. Install the engine oil filler cap. 15. Install the rider seat. 6-12
... sure that no foreign material enters the oil tank. 6 NOTE: Be sure to prevent clutch slippage (since the engine oil also lubricates the clutch), do not use oils with the remaining oil quantity while regularly checking the oil level on any parts after the engine and exhaust system have a Yamaha dealer check and repair the vehicle. Install the engine oil filler cap. 15. Install the rider seat. 6-12
Owners Manual
Page 59
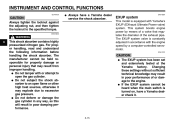
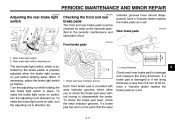
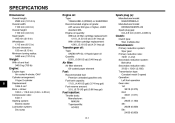
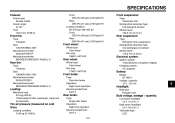
... before braking takes effect. EAU22500 Rear brake pads Front brake pads 1. Lining thickness 6 1. Rear brake light switch 2. To check the brake pad wear, check the wear indicator grooves. PERIODIC MAINTENANCE AND MINOR REPAIR EAU22270 EAU22390 Adjusting the rear brake light switch Checking the front and rear brake pads The front and rear brake pads must be checked for damage and measure the lining thickness. EAU22430 indicator grooves have almost disappeared, have a Yamaha dealer replace the brake pads as...
... before braking takes effect. EAU22500 Rear brake pads Front brake pads 1. Lining thickness 6 1. Rear brake light switch 2. To check the brake pad wear, check the wear indicator grooves. PERIODIC MAINTENANCE AND MINOR REPAIR EAU22270 EAU22390 Adjusting the rear brake light switch Checking the front and rear brake pads The front and rear brake pads must be checked for damage and measure the lining thickness. EAU22430 indicator grooves have almost disappeared, have a Yamaha dealer replace the brake pads as...
Owners Manual
Page 68
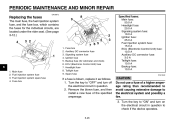
... the rider seat. (See page 3-12.) 6 1. 2. 3. 4. Turn the key to the electrical system and possibly a fire. 3. PERIODIC MAINTENANCE AND MINOR REPAIR EAU38372 Replacing the fuses The main fuse, the fuel injection system fuse, and the fuse box, which contains the fuses for odometer and clock) ECU (Electronic Control Unit) fuse Headlight fuse Taillight fuse Spare fuse Specified fuses: Main fuse: 50.0 A Headlight fuse: 20.0 A Signaling system fuse: 10.0 A Ignition fuse: 25.0 A Fuel injection system fuse: 15.0 A ECU (Electronic Control Unit) fuse: 10...
... the rider seat. (See page 3-12.) 6 1. 2. 3. 4. Turn the key to the electrical system and possibly a fire. 3. PERIODIC MAINTENANCE AND MINOR REPAIR EAU38372 Replacing the fuses The main fuse, the fuel injection system fuse, and the fuse box, which contains the fuses for odometer and clock) ECU (Electronic Control Unit) fuse Headlight fuse Taillight fuse Spare fuse Specified fuses: Main fuse: 50.0 A Headlight fuse: 20.0 A Signaling system fuse: 10.0 A Ignition fuse: 25.0 A Fuel injection system fuse: 15.0 A ECU (Electronic Control Unit) fuse: 10...
Owners Manual
Page 80
... Recommended engine oil grade: API service SG type or higher, JASO standard MA Engine oil quantity: Without oil filter cartridge replacement: 4.10 L (4.33 US qt) (3.61 Imp.qt) With oil filter cartridge replacement: 4.90 L (5.18 US qt) (4.31 Imp.qt) Spark plug (s): Manufacturer/model: NGK/DPR8EA-9 Manufacturer/model: DENSO/X24EPR-U9 Spark plug gap: 0.8-0.9 mm (0.031-0.035 in) Clutch: Clutch type: Wet, multiple-disc Transmission: Primary reduction system: Spur gear Primary...
... Recommended engine oil grade: API service SG type or higher, JASO standard MA Engine oil quantity: Without oil filter cartridge replacement: 4.10 L (4.33 US qt) (3.61 Imp.qt) With oil filter cartridge replacement: 4.90 L (5.18 US qt) (4.31 Imp.qt) Spark plug (s): Manufacturer/model: NGK/DPR8EA-9 Manufacturer/model: DENSO/X24EPR-U9 Spark plug gap: 0.8-0.9 mm (0.031-0.035 in) Clutch: Clutch type: Wet, multiple-disc Transmission: Primary reduction system: Spur gear Primary...
Owners Manual
Page 81
... RADIAL G Rear suspension: Type: Swingarm (link suspension) Spring/shock absorber type: Coil spring/gas-oil damper Wheel travel: 110.0 mm (4.33 in) Front wheel: Wheel type: Cast wheel Rim size: 18M/C x MT4.00 Electrical system: Ignition system: Transistorized coil ignition (digital) Charging system: AC magneto Rear wheel: Wheel type: Cast wheel Rim size: 17M/C x MT5.50 Rear tire: Type: Tubeless Size: 190/60R17M/C 78H Manufacturer/model: DUNLOP/D251 Manufacturer/model: BRIDGESTONE/G850 RADIAL G Battery: Model: GT14B-4 Voltage, capacity: 12 V, 12.0 Ah Front brake: Type...
... RADIAL G Rear suspension: Type: Swingarm (link suspension) Spring/shock absorber type: Coil spring/gas-oil damper Wheel travel: 110.0 mm (4.33 in) Front wheel: Wheel type: Cast wheel Rim size: 18M/C x MT4.00 Electrical system: Ignition system: Transistorized coil ignition (digital) Charging system: AC magneto Rear wheel: Wheel type: Cast wheel Rim size: 17M/C x MT5.50 Rear tire: Type: Tubeless Size: 190/60R17M/C 78H Manufacturer/model: DUNLOP/D251 Manufacturer/model: BRIDGESTONE/G850 RADIAL G Battery: Model: GT14B-4 Voltage, capacity: 12 V, 12.0 Ah Front brake: Type...
Owners Manual
Page 82
SPECIFICATIONS Front turn signal/position light: 12 V, 23 W/8.0 W × 2 Rear turn signal light: 12 V, 21.0 W × 2 License plate light: 12 V, 5.0 W Meter lighting: LED Neutral indicator light: LED High beam indicator light: LED Turn signal indicator light: LED Fuel level warning light: LED Engine trouble warning light: LED Auxiliary DC connector fuse: 3.0 A Backup fuse: 10.0 A Fuses: Main fuse: 50.0 A Headlight fuse: 20.0 A Taillight fuse: 10.0 A Signaling system fuse: 10.0 A Ignition fuse: 25.0 A ECU (Electronic Control Unit) fuse: 10.0 A Fuel injection system fuse: 15.0 A 8 8-3
SPECIFICATIONS Front turn signal/position light: 12 V, 23 W/8.0 W × 2 Rear turn signal light: 12 V, 21.0 W × 2 License plate light: 12 V, 5.0 W Meter lighting: LED Neutral indicator light: LED High beam indicator light: LED Turn signal indicator light: LED Fuel level warning light: LED Engine trouble warning light: LED Auxiliary DC connector fuse: 3.0 A Backup fuse: 10.0 A Fuses: Main fuse: 50.0 A Headlight fuse: 20.0 A Taillight fuse: 10.0 A Signaling system fuse: 10.0 A Ignition fuse: 25.0 A ECU (Electronic Control Unit) fuse: 10.0 A Fuel injection system fuse: 15.0 A 8 8-3
Owners Manual
Page 89
...,000 km (18,641 miles) or five years, whichever occurs first YAMAHA MOTOR CORPORATION, U.S.A. In order for Yamaha motorcycles originally equipped with headlight, stoplight, and turn signals shall be free from this warranty with all apparent defects within the period listed immediately below. b) Installation of parts or accessories that time for the period of each Yamaha motorcycle covered by : a) Competition or racing...
...,000 km (18,641 miles) or five years, whichever occurs first YAMAHA MOTOR CORPORATION, U.S.A. In order for Yamaha motorcycles originally equipped with headlight, stoplight, and turn signals shall be free from this warranty with all apparent defects within the period listed immediately below. b) Installation of parts or accessories that time for the period of each Yamaha motorcycle covered by : a) Competition or racing...
Owners Manual
Page 90
... as towing or transportation due to second owners? IF you have under warranty. Will the warranty be void or cancelled if I .N. (frame number), dealer number (or dealer's name) as described in the Owner's Manual? Specific examples include: Running the machine out of normal maintenance services, non-warranty repairs, accident and collision damages, and oil, oil filters, air filters, spark plugs, and brake shoes. If a question or problem arises regarding the warranty, first...
... as towing or transportation due to second owners? IF you have under warranty. Will the warranty be void or cancelled if I .N. (frame number), dealer number (or dealer's name) as described in the Owner's Manual? Specific examples include: Running the machine out of normal maintenance services, non-warranty repairs, accident and collision damages, and oil, oil filters, air filters, spark plugs, and brake shoes. If a question or problem arises regarding the warranty, first...
Owners Manual
Page 93
... ...6-16 Air filter element...6-13 Auxiliary DC connector ...3-18 Fuel level warning light...3-2 Fuel tank cap...3-10 Fuses, replacing...6-26 Pre-operation check list ...4-2 R Rear brake light switch, adjusting ...6-17 Rear suspension, lubricating ...6-22 Rider seat ...3-12 H Handlebar switches ...3-7 Headlight bulb, replacing...6-27 Helmet holder...3-13 High beam indicator light...3-2 Horn switch ...3-8 B Battery ...6-24 Brake and clutch fluid levels, checking ...6-18 Brake and clutch fluids, changing...6-19 Brake and clutch levers, checking and lubricating ...6-21 Brake and shift pedals...
... ...6-16 Air filter element...6-13 Auxiliary DC connector ...3-18 Fuel level warning light...3-2 Fuel tank cap...3-10 Fuses, replacing...6-26 Pre-operation check list ...4-2 R Rear brake light switch, adjusting ...6-17 Rear suspension, lubricating ...6-22 Rider seat ...3-12 H Handlebar switches ...3-7 Headlight bulb, replacing...6-27 Helmet holder...3-13 High beam indicator light...3-2 Horn switch ...3-8 B Battery ...6-24 Brake and clutch fluid levels, checking ...6-18 Brake and clutch fluids, changing...6-19 Brake and clutch levers, checking and lubricating ...6-21 Brake and shift pedals...