
Owners Manual
Page 7
......5-4 Parking ...5-5 PERIODIC MAINTENANCE AND MINOR REPAIR ...6-1 PERIODIC MAINTENANCE ...6-1 Owner's tool kit ...6-1 Periodic maintenance chart for the emission control system ...6-3 General maintenance and lubrication chart ...6-4 Removing and installing panels ...6-8 Checking the spark plugs ...6-9 Canister (for California only) ...6-10 Engine oil and oil filter element ...6-11 Final gear oil ...6-13 Cleaning the air filter element ...6-14 Carburetors ...6-16 Checking the throttle cable free play ...6-16 Valve clearance ...6-16 Tires ...6-17 Spoke wheels ...6-20 Accessories and replacement...
......5-4 Parking ...5-5 PERIODIC MAINTENANCE AND MINOR REPAIR ...6-1 PERIODIC MAINTENANCE ...6-1 Owner's tool kit ...6-1 Periodic maintenance chart for the emission control system ...6-3 General maintenance and lubrication chart ...6-4 Removing and installing panels ...6-8 Checking the spark plugs ...6-9 Canister (for California only) ...6-10 Engine oil and oil filter element ...6-11 Final gear oil ...6-13 Cleaning the air filter element ...6-14 Carburetors ...6-16 Checking the throttle cable free play ...6-16 Valve clearance ...6-16 Tires ...6-17 Spoke wheels ...6-20 Accessories and replacement...
Owners Manual
Page 8
...Replacing the fuses ...6-31 Replacing the headlight bulb ...6-32 Replacing a turn signal light bulb or the tail/brake light bulb ...6-33 Supporting the motorcycle ...6-34 Front wheel ...6-35 Rear wheel ...6-36 Troubleshooting ...6-38 Troubleshooting chart ...6-39 MOTORCYCLE CARE AND STORAGE ...7-1 Care ...7-1 Storage ...7-3 SPECIFICATIONS ...8-1 CONSUMER INFORMATION ...9-1 Identification numbers ...9-1 Reporting safety defects ...9-3 Motorcycle noise regulation ...9-4 Maintenance record ...9-5 YAMAHA MOTOR CORPORATION, U.S.A. STREET AND ENDURO MOTORCYCLE LIMITED WARRANTY ...9-7 YAMAHA EXTENDED...
...Replacing the fuses ...6-31 Replacing the headlight bulb ...6-32 Replacing a turn signal light bulb or the tail/brake light bulb ...6-33 Supporting the motorcycle ...6-34 Front wheel ...6-35 Rear wheel ...6-36 Troubleshooting ...6-38 Troubleshooting chart ...6-39 MOTORCYCLE CARE AND STORAGE ...7-1 Care ...7-1 Storage ...7-3 SPECIFICATIONS ...8-1 CONSUMER INFORMATION ...9-1 Identification numbers ...9-1 Reporting safety defects ...9-3 Motorcycle noise regulation ...9-4 Maintenance record ...9-5 YAMAHA MOTOR CORPORATION, U.S.A. STREET AND ENDURO MOTORCYCLE LIMITED WARRANTY ...9-7 YAMAHA EXTENDED...
Owners Manual
Page 10
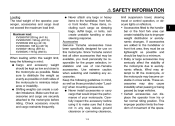
... an accident, use extreme caution when adding cargo or accessories to your motorcycle illegal to this motorcycle not approved by road and traffic conditions. • Always signal before turning or changing lanes. G Never wear loose-fitting clothes, otherwise they could delay seeing a hazard. G Never touch the engine or exhaust system during operation to an impairment of head injuries...
... an accident, use extreme caution when adding cargo or accessories to your motorcycle illegal to this motorcycle not approved by road and traffic conditions. • Always signal before turning or changing lanes. G Never wear loose-fitting clothes, otherwise they could delay seeing a hazard. G Never touch the engine or exhaust system during operation to an impairment of head injuries...
Owners Manual
Page 11
... reduce ground clearance or cornering clearance, 1-3 G limit suspension travel, steering travel or control operation, or obscure lights or reflectors. • Accessories fitted to make sure that would impair the performance of non-Yamaha accessories. Accessories Genuine Yamaha accessories have been specifically designed for the proper selection, installation and use on both sides of the motorcycle due to the handlebar, front fork, or front fender. G Shifting weights...
... reduce ground clearance or cornering clearance, 1-3 G limit suspension travel, steering travel or control operation, or obscure lights or reflectors. • Accessories fitted to make sure that would impair the performance of non-Yamaha accessories. Accessories Genuine Yamaha accessories have been specifically designed for the proper selection, installation and use on both sides of the motorcycle due to the handlebar, front fork, or front fender. G Shifting weights...
Owners Manual
Page 12
... , gasoline may leak out of an open flame), otherwise it could cause a dangerous loss of lights or engine power. Use caution when adding electrical accessories. The exhaust fumes are poisonous and may cause loss of time in another vehicle, make sure that it is kept upright and that has adequate ventilation. G Never start the engine or let it run for manual type). If...
... , gasoline may leak out of an open flame), otherwise it could cause a dangerous loss of lights or engine power. Use caution when adding electrical accessories. The exhaust fumes are poisonous and may cause loss of time in another vehicle, make sure that it is kept upright and that has adequate ventilation. G Never start the engine or let it run for manual type). If...
Owners Manual
Page 21
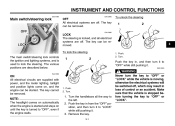
... "LOCK". 1. INSTRUMENT AND CONTROL FUNCTIONS EAU10460 EAU10660 Main switch/steering lock OFF All electrical systems are described below. EAU10580 3 1. Turn. Make sure that the vehicle is moving, otherwise the electrical systems will be switched off, which may result in loss of control or an accident. NOTE: The headlight comes on automatically when the engine is started and stays on , and the engine can be started. Push the key in...
... "LOCK". 1. INSTRUMENT AND CONTROL FUNCTIONS EAU10460 EAU10660 Main switch/steering lock OFF All electrical systems are described below. EAU10580 3 1. Turn. Make sure that the vehicle is moving, otherwise the electrical systems will be switched off, which may result in loss of control or an accident. NOTE: The headlight comes on automatically when the engine is started and stays on , and the engine can be started. Push the key in...
Owners Manual
Page 22
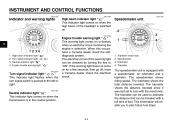
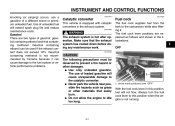
... fuel stops. 3-2 When this occurs, have a Yamaha dealer check the electrical circuit. 1. 2. 3. 4. INSTRUMENT AND CONTROL FUNCTIONS EAU11003 EAU11080 EAU11630 Indicator and warning lights High beam indicator light " " This indicator light comes on when the high beam of the headlight is pushed to the left or right. EAU11500 Speedometer unit 3 1. 2. 3. 4. High beam indicator light " " Turn signal indicator light " Neutral indicator light " " Engine trouble warning light " " " EAU11020 Turn signal indicator light " " This indicator light...
... fuel stops. 3-2 When this occurs, have a Yamaha dealer check the electrical circuit. 1. 2. 3. 4. INSTRUMENT AND CONTROL FUNCTIONS EAU11003 EAU11080 EAU11630 Indicator and warning lights High beam indicator light " " This indicator light comes on when the high beam of the headlight is pushed to the left or right. EAU11500 Speedometer unit 3 1. 2. 3. 4. High beam indicator light " " Turn signal indicator light " Neutral indicator light " " Engine trouble warning light " " " EAU11020 Turn signal indicator light " " This indicator light...
Owners Manual
Page 23
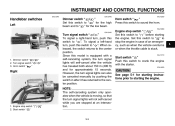
... released, the switch returns to starting the engine. EAU12430 Horn switch " " Press this switch to " " for the high beam and to " " for starting instructions prior to the center position. EAU12660 1. However, the turn signal lights can also be canceled manually by pushing the switch in case of an emergency, such as when the vehicle overturns or when the throttle cable is equipped with the starter. INSTRUMENT AND CONTROL FUNCTIONS...
... released, the switch returns to starting the engine. EAU12430 Horn switch " " Press this switch to " " for the high beam and to " " for starting instructions prior to the center position. EAU12660 1. However, the turn signal lights can also be canceled manually by pushing the switch in case of an emergency, such as when the vehicle overturns or when the throttle cable is equipped with the starter. INSTRUMENT AND CONTROL FUNCTIONS...
Owners Manual
Page 27
... when the engine is equipped with catalytic converters in the illustrations. 3 OFF WARNING The exhaust system is not recommended by Yamaha because it . INSTRUMENT AND CONTROL FUNCTIONS knocking (or pinging) occurs, use of unleaded fuel will not flow. ECA10700 CAUTION: The following precautions must be used if the ethanol content does not exceed 10%. Always turn the fuel cock lever to idle too...
... when the engine is equipped with catalytic converters in the illustrations. 3 OFF WARNING The exhaust system is not recommended by Yamaha because it . INSTRUMENT AND CONTROL FUNCTIONS knocking (or pinging) occurs, use of unleaded fuel will not flow. ECA10700 CAUTION: The following precautions must be used if the ethanol content does not exceed 10%. Always turn the fuel cock lever to idle too...
Owners Manual
Page 33
... the gas cylinder. WARNING The vehicle must not be held responsible for an explanation of the frame. Raise the sidestand or lower it may result from improper handling. For proper handling, read and understand the following information before starting off system.) EWA10240 3 1. INSTRUMENT AND CONTROL FUNCTIONS EWA10220 EAU15150 EAU15301 WARNING This shock absorber contains highly pressurized nitrogen gas. NOTE: The built-in poor damping performance.
... the gas cylinder. WARNING The vehicle must not be held responsible for an explanation of the frame. Raise the sidestand or lower it may result from improper handling. For proper handling, read and understand the following information before starting off system.) EWA10240 3 1. INSTRUMENT AND CONTROL FUNCTIONS EWA10220 EAU15150 EAU15301 WARNING This shock absorber contains highly pressurized nitrogen gas. NOTE: The built-in poor damping performance.
Owners Manual
Page 39
... of control. Always make sure that the engine stop switch is set to preserve the battery. ECA11370 WARNING G G Before starting , one attempt. Turn the key to enable starting the engine, check the function of the following conditions must be as short as possible to " ". 3. Never start the engine or operate it could contact the ground and distract the operator, resulting in gear with the clutch lever...
... of control. Always make sure that the engine stop switch is set to preserve the battery. ECA11370 WARNING G G Before starting , one attempt. Turn the key to enable starting the engine, check the function of the following conditions must be as short as possible to " ". 3. Never start the engine or operate it could contact the ground and distract the operator, resulting in gear with the clutch lever...
Owners Manual
Page 41
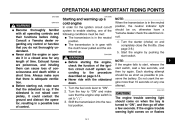
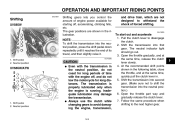
... of time with the engine off , accelerating, climbing hills, etc. Always use the clutch while changing gears to the next higher gear. 5 5-3 The neutral indicator light should go out. 3. Follow the same procedure when shifting to avoid damaging the engine, transmission, To start out and accelerate 1. OPERATION AND IMPORTANT RIDING POINTS EAU16671 Shifting XVS65W Shifting gears lets you control the amount of engine power available for starting off...
... of time with the engine off , accelerating, climbing hills, etc. Always use the clutch while changing gears to the next higher gear. 5 5-3 The neutral indicator light should go out. 3. Follow the same procedure when shifting to avoid damaging the engine, transmission, To start out and accelerate 1. OPERATION AND IMPORTANT RIDING POINTS EAU16671 Shifting XVS65W Shifting gears lets you control the amount of engine power available for starting off...
Owners Manual
Page 46
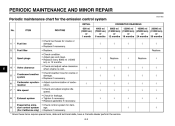
... breather hose for cracks or damage. • Replace if necessary. • Adjust synchronization of carburetors. • Check and adjust engine idle speed. • Check for leakage. • Tighten if necessary. • Replace gasket(s) if necessary. • Check control system for the emission control system INITIAL No. PERIODIC MAINTENANCE AND MINOR REPAIR EAU17600 Periodic maintenance chart for damage. • Replace if necessary. √ √ 3 Spark plugs Replace.
... breather hose for cracks or damage. • Replace if necessary. • Adjust synchronization of carburetors. • Check and adjust engine idle speed. • Check for leakage. • Tighten if necessary. • Replace gasket(s) if necessary. • Check control system for the emission control system INITIAL No. PERIODIC MAINTENANCE AND MINOR REPAIR EAU17600 Periodic maintenance chart for damage. • Replace if necessary. √ √ 3 Spark plugs Replace.
Owners Manual
Page 61
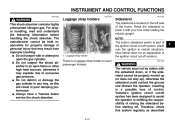
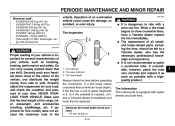
... VEHICLE. Tire sidewall 2. Tire wear indicator 3. Properly adjust the suspension for this model) does not exceed the maximum load of your tires. if approved for your heaviest items close to the center of all wheeland brake-related parts, including the tires, should be left to side. Minimum tire tread depth (front and rear): 1.0 mm (0.04 in it as soon as handling, braking, performance and safety...
... VEHICLE. Tire sidewall 2. Tire wear indicator 3. Properly adjust the suspension for this model) does not exceed the maximum load of your tires. if approved for your heaviest items close to the center of all wheeland brake-related parts, including the tires, should be left to side. Minimum tire tread depth (front and rear): 1.0 mm (0.04 in it as soon as handling, braking, performance and safety...
Owners Manual
Page 67
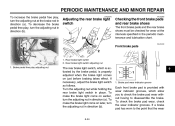
... brake pads 1. To make the brake light come on earlier, turn the adjusting nut in direction (a). PERIODIC MAINTENANCE AND MINOR REPAIR To increase the brake pedal free play, turn the adjusting nut at the intervals specified in the periodic maintenance and lubrication chart. To decrease the brake pedal free play, turn the adjusting nut in place. Rear brake light switch adjusting nut 1. If necessary, adjust the brake light switch...
... brake pads 1. To make the brake light come on earlier, turn the adjusting nut in direction (a). PERIODIC MAINTENANCE AND MINOR REPAIR To increase the brake pedal free play, turn the adjusting nut at the intervals specified in the periodic maintenance and lubrication chart. To decrease the brake pedal free play, turn the adjusting nut in place. Rear brake light switch adjusting nut 1. If necessary, adjust the brake light switch...
Owners Manual
Page 74
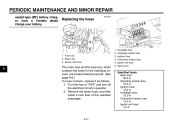
Main fuse 3. Headlight fuse Signaling system fuse Ignition fuse Carburetor heater fuse Ignitor unit fuse Spare fuse Specified fuses: Main fuse: 30.0 A Signaling system fuse: 10.0 A Ignition fuse: 10.0 A Headlight fuse: 15.0 A Carburetor heater fuse: 15.0 A Ignitor unit fuse: 5.0 A 6-31 Turn the key to "OFF" and turn off the electrical circuit in question. 2. PERIODIC MAINTENANCE AND MINOR REPAIR sealed-type (MF) battery charger, have a Yamaha dealer charge your battery. Spare main fuse 6 The main fuse and the fuse box, which contains the fuses for the individual...
Main fuse 3. Headlight fuse Signaling system fuse Ignition fuse Carburetor heater fuse Ignitor unit fuse Spare fuse Specified fuses: Main fuse: 30.0 A Signaling system fuse: 10.0 A Ignition fuse: 10.0 A Headlight fuse: 15.0 A Carburetor heater fuse: 15.0 A Ignitor unit fuse: 5.0 A 6-31 Turn the key to "OFF" and turn off the electrical circuit in question. 2. PERIODIC MAINTENANCE AND MINOR REPAIR sealed-type (MF) battery charger, have a Yamaha dealer charge your battery. Spare main fuse 6 The main fuse and the fuse box, which contains the fuses for the individual...

Owners Manual
Page 80
... brake light. 2. While supporting the drive shaft, pull the rear wheel back to the procedure on the ground. 6-37 Drive shaft After adjusting the brake pedal free play adjusting nut onto the brake rod. 4. PERIODIC MAINTENANCE AND MINOR REPAIR EAU25511 To install the rear wheel 1. Tighten the axle nut, the final gear case bolts and the brake torque rod nuts to support the drive shaft as an assembly: wheel, wheel axle, final gear...
... brake light. 2. While supporting the drive shaft, pull the rear wheel back to the procedure on the ground. 6-37 Drive shaft After adjusting the brake pedal free play adjusting nut onto the brake rod. 4. PERIODIC MAINTENANCE AND MINOR REPAIR EAU25511 To install the rear wheel 1. Tighten the axle nut, the final gear case bolts and the brake torque rod nuts to support the drive shaft as an assembly: wheel, wheel axle, final gear...
Owners Manual
Page 83
... terms of wheel and swingarm bearings, fork and brakes), electric components (couplers, connectors, instruments, switches and lights), breather hoses and vents. Frequent and proper care does not only comply with strong or abrasive cleaning products, solvent or 7-1 G thinner, fuel (gasoline), rust removers or inhibitors, brake fluid, antifreeze or electrolyte. Remove extremely stubborn dirt, like oil burnt onto the crankcase, with a windshield: Do not...
... terms of wheel and swingarm bearings, fork and brakes), electric components (couplers, connectors, instruments, switches and lights), breather hoses and vents. Frequent and proper care does not only comply with strong or abrasive cleaning products, solvent or 7-1 G thinner, fuel (gasoline), rust removers or inhibitors, brake fluid, antifreeze or electrolyte. Remove extremely stubborn dirt, like oil burnt onto the crankcase, with a windshield: Do not...
Owners Manual
Page 90
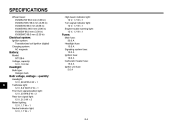
...1 Engine trouble warning light: 12 V, 1.7 W × 1 Fuses: Main fuse: 30.0 A Headlight fuse: 15.0 A Signaling system fuse: 10.0 A Ignition fuse: 10.0 A Carburetor heater fuse: 15.0 A Ignitor unit fuse: 5.0 A Electrical system: Ignition system: Transistorized coil ignition (digital) Charging system: AC magneto Battery: Model: GT12B-4 Voltage, capacity: 12 V, 10.0 Ah Headlight: Bulb type: Halogen bulb Bulb voltage, wattage × quantity: 8 Headlight: 12 V, 60 W/55.0 W × 1 Tail/brake light: 12 V, 8.0 W/27.0 W × 1 Front turn signal/position light: 12 V, 23 W/8.0 W × 2 Rear...
...1 Engine trouble warning light: 12 V, 1.7 W × 1 Fuses: Main fuse: 30.0 A Headlight fuse: 15.0 A Signaling system fuse: 10.0 A Ignition fuse: 10.0 A Carburetor heater fuse: 15.0 A Ignitor unit fuse: 5.0 A Electrical system: Ignition system: Transistorized coil ignition (digital) Charging system: AC magneto Battery: Model: GT12B-4 Voltage, capacity: 12 V, 10.0 Ah Headlight: Bulb type: Halogen bulb Bulb voltage, wattage × quantity: 8 Headlight: 12 V, 60 W/55.0 W × 1 Tail/brake light: 12 V, 8.0 W/27.0 W × 1 Front turn signal/position light: 12 V, 23 W/8.0 W × 2 Rear...
Owners Manual
Page 101
...Main switch/steering lock ...3-1 Maintenance and lubrication, periodic...6-4 Maintenance, emission control system ...6-3 Maintenance, periodic ...6-1 Maintenance record ...9-5 Model label...9-2 D Dimmer switch ...3-3 E Engine break-in ...5-4 Engine oil and oil filter element...6-11 Engine, starting a warm...5-2 Engine stop switch...3-3 Engine trouble warning light ...3-2 T Throttle cable free play, checking ...6-16 Throttle grip and cable, checking and lubricating ...6-27 Tires...6-17 Tool kit ...6-1 Troubleshooting ...6-38 N Neutral indicator light ...3-2 Noise regulation ...9-4 P Panels...
...Main switch/steering lock ...3-1 Maintenance and lubrication, periodic...6-4 Maintenance, emission control system ...6-3 Maintenance, periodic ...6-1 Maintenance record ...9-5 Model label...9-2 D Dimmer switch ...3-3 E Engine break-in ...5-4 Engine oil and oil filter element...6-11 Engine, starting a warm...5-2 Engine stop switch...3-3 Engine trouble warning light ...3-2 T Throttle cable free play, checking ...6-16 Throttle grip and cable, checking and lubricating ...6-27 Tires...6-17 Tool kit ...6-1 Troubleshooting ...6-38 N Neutral indicator light ...3-2 Noise regulation ...9-4 P Panels...