

Owners Manual
Page 3
.... The design and manufacture of the Yamaha Road Star™. Yamaha has met these fields. This manual will give you an understanding of the operation, inspection, and basic maintenance of this Yamaha motorcycle fully comply with the emissions standards for clean air applicable at the date of craftsmanship and reliability that you have made Yamaha a leader in the production of...
.... The design and manufacture of the Yamaha Road Star™. Yamaha has met these fields. This manual will give you an understanding of the operation, inspection, and basic maintenance of this Yamaha motorcycle fully comply with the emissions standards for clean air applicable at the date of craftsmanship and reliability that you have made Yamaha a leader in the production of...
Owners Manual
Page 7
... oil ...6-13 Cleaning the air filter element ...6-15 Carburetor ...6-16 Checking the throttle cable free play ...6-17 Valve clearance ...6-17 Tires (For spoke wheel model) ...6-17 Tires (For cast wheel models) ...6-19 Spoke wheels ...6-21 Cast wheels ...6-21 Accessories and replacement parts ...6-22 Adjusting the clutch lever free play ...6-22 Adjusting the brake lever free play ...6-23 Adjusting the rear brake light switch ...6-24 Checking the front and rear brake pads ...6-24 Checking the brake fluid...
... oil ...6-13 Cleaning the air filter element ...6-15 Carburetor ...6-16 Checking the throttle cable free play ...6-17 Valve clearance ...6-17 Tires (For spoke wheel model) ...6-17 Tires (For cast wheel models) ...6-19 Spoke wheels ...6-21 Cast wheels ...6-21 Accessories and replacement parts ...6-22 Adjusting the clutch lever free play ...6-22 Adjusting the brake lever free play ...6-23 Adjusting the rear brake light switch ...6-24 Checking the front and rear brake pads ...6-24 Checking the brake fluid...

Owners Manual
Page 8
... the steering ...6-32 Checking the wheel bearings ...6-32 Battery ...6-33 Replacing the fuses ...6-34 Replacing the headlight bulb ...6-35 Tail/brake light ...6-37 Replacing a turn signal light bulb ...6-37 Replacing a license plate light bulb ...6-37 Supporting the motorcycle ...6-38 Troubleshooting ...6-39 Troubleshooting chart ...6-40 MOTORCYCLE CARE AND STORAGE ...7-1 Care ...7-1 Storage ...7-4 SPECIFICATIONS ...8-1 CONSUMER INFORMATION ...9-1 Identification numbers ...9-1 Reporting safety defects ...9-3 Motorcycle noise regulation ...9-4 Maintenance record ...9-5 YAMAHA MOTOR CORPORATION...
... the steering ...6-32 Checking the wheel bearings ...6-32 Battery ...6-33 Replacing the fuses ...6-34 Replacing the headlight bulb ...6-35 Tail/brake light ...6-37 Replacing a turn signal light bulb ...6-37 Replacing a license plate light bulb ...6-37 Supporting the motorcycle ...6-38 Troubleshooting ...6-39 Troubleshooting chart ...6-40 MOTORCYCLE CARE AND STORAGE ...7-1 Care ...7-1 Storage ...7-4 SPECIFICATIONS ...8-1 CONSUMER INFORMATION ...9-1 Identification numbers ...9-1 Reporting safety defects ...9-3 Motorcycle noise regulation ...9-4 Maintenance record ...9-5 YAMAHA MOTOR CORPORATION...

Owners Manual
Page 11
... this weight limit, keep the following guidelines in any way reduce ground clearance or cornering clearance, 1-3 G limit suspension travel, steering travel or control operation, or obscure lights or reflectors. • Accessories fitted to the handlebar or the front fork area can create unstable handling or slow steering response. This improper position limits the freedom of movement of the operator, passenger, accessories...
... this weight limit, keep the following guidelines in any way reduce ground clearance or cornering clearance, 1-3 G limit suspension travel, steering travel or control operation, or obscure lights or reflectors. • Accessories fitted to the handlebar or the front fork area can create unstable handling or slow steering response. This improper position limits the freedom of movement of the operator, passenger, accessories...
Owners Manual
Page 12
... limit control ability, therefore, such accessories are poisonous and may leak out of the carburetor or fuel tank. If electrical accessories exceed the capacity of the motorcycle's electrical system, an electric failure could result, which could catch fire. G 1 G Gasoline and exhaust gas G GASOLINE IS HIGHLY FLAMMABLE: • Always turn the engine off when refueling. • Take care not to spill any length of time in another vehicle, make...
... limit control ability, therefore, such accessories are poisonous and may leak out of the carburetor or fuel tank. If electrical accessories exceed the capacity of the motorcycle's electrical system, an electric failure could result, which could catch fire. G 1 G Gasoline and exhaust gas G GASOLINE IS HIGHLY FLAMMABLE: • Always turn the engine off when refueling. • Take care not to spill any length of time in another vehicle, make...
Owners Manual
Page 22
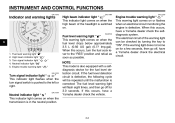
... Neutral indicator light " " This indicator light comes on for the fuel level detection circuit. When this occurs, turn signal switch is also equipped with a selfdiagnosis device for a few seconds, then go off , have a Yamaha dealer check the electrical circuit. If this occurs, have a Yamaha dealer check the vehicle. 3-2 The electrical circuit of the headlight is in the neutral position. NOTE: This model is...
... Neutral indicator light " " This indicator light comes on for the fuel level detection circuit. When this occurs, turn signal switch is also equipped with a selfdiagnosis device for a few seconds, then go off , have a Yamaha dealer check the electrical circuit. If this occurs, have a Yamaha dealer check the vehicle. 3-2 The electrical circuit of the headlight is in the neutral position. NOTE: This model is...

Owners Manual
Page 28
... 10%. EWA10880 Recommended fuel: UNLEADED GASOLINE ONLY Fuel tank capacity: 20.0 L (5.28 US gal) (4.40 Imp.gal) Fuel reserve amount (when the fuel level warning light comes on the hot engine. Use of unleaded fuel will cause severe damage to the fuel system or vehicle performance problems. WARNING G CAUTION: Use only unleaded gasoline. The use of leaded gasoline will extend spark plug life and reduce maintenance costs. Gasohol containing...
... 10%. EWA10880 Recommended fuel: UNLEADED GASOLINE ONLY Fuel tank capacity: 20.0 L (5.28 US gal) (4.40 Imp.gal) Fuel reserve amount (when the fuel level warning light comes on the hot engine. Use of unleaded fuel will cause severe damage to the fuel system or vehicle performance problems. WARNING G CAUTION: Use only unleaded gasoline. The use of leaded gasoline will extend spark plug life and reduce maintenance costs. Gasohol containing...
Owners Manual
Page 42
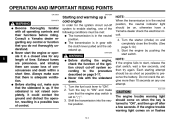
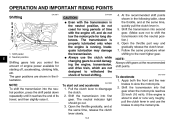
... to enable starting the engine, check the function of time. ECA11370 WARNING G G Before starting , one attempt. Shift the transmission into the neutral position. Never ride with all operating controls and their functions before riding. If the engine trouble warning light comes on , otherwise have a Yamaha dealer check the electrical circuit. 4. OPERATION AND IMPORTANT RIDING POINTS EAU15950 EAU16390 EWA10270 WARNING G Starting and warming up a cold engine In order...
... to enable starting the engine, check the function of time. ECA11370 WARNING G G Before starting , one attempt. Shift the transmission into the neutral position. Never ride with all operating controls and their functions before riding. If the engine trouble warning light comes on , otherwise have a Yamaha dealer check the electrical circuit. 4. OPERATION AND IMPORTANT RIDING POINTS EAU15950 EAU16390 EWA10270 WARNING G Starting and warming up a cold engine In order...
Owners Manual
Page 44
... the rear brakes to stop the motorcycle. If the engine is running. EAU16700 To start out and accelerate 1. Even with the transmission in the illustration. Open the throttle gradually, and at the same time, quickly pull the clutch lever in the following table, close the throttle, and at the same time, release the clutch lever slowly. 5-3 To decelerate 1. Shift pedal 2. At the recommended shift points...
... the rear brakes to stop the motorcycle. If the engine is running. EAU16700 To start out and accelerate 1. Even with the transmission in the illustration. Open the throttle gradually, and at the same time, quickly pull the clutch lever in the following table, close the throttle, and at the same time, release the clutch lever slowly. 5-3 To decelerate 1. Shift pedal 2. At the recommended shift points...

Owners Manual
Page 49
...; Adjust if necessary. • Check breather hose for cracks or damage. • Replace if necessary. • Check and adjust engine idle speed. • Check for leakage. • Tighten if necessary. • Replace gasket(s) if necessary. • Check control system for the emission control system INITIAL No. PERIODIC MAINTENANCE AND MINOR REPAIR EAU17600 Periodic maintenance chart for damage. • Replace if necessary. √ √ 3 Spark plugs Replace.
...; Adjust if necessary. • Check breather hose for cracks or damage. • Replace if necessary. • Check and adjust engine idle speed. • Check for leakage. • Tighten if necessary. • Replace gasket(s) if necessary. • Check control system for the emission control system INITIAL No. PERIODIC MAINTENANCE AND MINOR REPAIR EAU17600 Periodic maintenance chart for damage. • Replace if necessary. √ √ 3 Spark plugs Replace.

Owners Manual
Page 52
... free play if necessary. • Lubricate the throttle grip housing and cable. 6-6 √ √ 19 * Shock absorber assembly Rear suspension link pivots Engine oil Engine oil filter cartridge √ √ √ √ √ √ 20 * 21 √ √ √ √ √ √ √ 6 22 * 23 * Transfer case oil Change. √ Change. 24 * Front and rear brake switches Control cables √ √ √ √ √ √ √ √...
... free play if necessary. • Lubricate the throttle grip housing and cable. 6-6 √ √ 19 * Shock absorber assembly Rear suspension link pivots Engine oil Engine oil filter cartridge √ √ √ √ √ √ 20 * 21 √ √ √ √ √ √ √ 6 22 * 23 * Transfer case oil Change. √ Change. 24 * Front and rear brake switches Control cables √ √ √ √ √ √ √ √...

Owners Manual
Page 59
... vehicle is leaking, immediately turn it off , and then check the oil level and correct it idle for several times, and then turn the engine off and check for oil leakage before each ride. In addition, the transfer case oil level should be at the intervals specified in an upright position. Remove the engine oil filler cap, and then gradually fill the oil tank with a diesel specification...
... vehicle is leaking, immediately turn it off , and then check the oil level and correct it idle for several times, and then turn the engine off and check for oil leakage before each ride. In addition, the transfer case oil level should be at the intervals specified in an upright position. Remove the engine oil filler cap, and then gradually fill the oil tank with a diesel specification...
Owners Manual
Page 65
... accessories (windshield, saddlebags, etc. WARNING Tire inflation pressure should be of the same make and design, otherwise the handling characteristics of the vehicle cannot be checked and adjusted when the temperature of the tire equals the ambient air temperature. Tire inflation pressure must be adjusted according to total weight of rider, passenger, cargo and accessories 6 6-19 EWA10460 EAU21421 Tires (For cast wheel models) To ensure maximum performance, long service...
... accessories (windshield, saddlebags, etc. WARNING Tire inflation pressure should be of the same make and design, otherwise the handling characteristics of the vehicle cannot be checked and adjusted when the temperature of the tire equals the ambient air temperature. Tire inflation pressure must be adjusted according to total weight of rider, passenger, cargo and accessories 6 6-19 EWA10460 EAU21421 Tires (For cast wheel models) To ensure maximum performance, long service...

Owners Manual
Page 66
... the suspension and tire air pressure with regard to the center of control, or severe injury. G EWA10460 WARNING The front and rear tires should be of the same make and design, otherwise the handling characteristics of your motorcycle, you should keep the following precautions in tire damage, loss of the motorcycle and distribute the weight evenly on the handling, braking, performance and safety characteristics of the vehicle...
... the suspension and tire air pressure with regard to the center of control, or severe injury. G EWA10460 WARNING The front and rear tires should be of the same make and design, otherwise the handling characteristics of your motorcycle, you should keep the following precautions in tire damage, loss of the motorcycle and distribute the weight evenly on the handling, braking, performance and safety characteristics of the vehicle...

Owners Manual
Page 70
.... Turn the adjusting nut while holding the rear brake light switch in the periodic maintenance and lubrication chart. To check the brake pad wear, check the position of control and an accident. Adjusting the rear brake light switch Checking the front and rear brake pads The front and rear brake pads must be checked for wear at the intervals specified in place. Brake pad wear indicator Each front brake pad is working properly. If a brake pad...
.... Turn the adjusting nut while holding the rear brake light switch in the periodic maintenance and lubrication chart. To check the brake pad wear, check the position of control and an accident. Adjusting the rear brake light switch Checking the front and rear brake pads The front and rear brake pads must be checked for wear at the intervals specified in place. Brake pad wear indicator Each front brake pad is working properly. If a brake pad...

Owners Manual
Page 80
... fuse 2. Signaling system fuse Ignition fuse Headlight fuse Carburetor heater fuse Backup fuse (for the individual circuits, are located behind panel A. (See page 6-8.) If a fuse is required. Spare main fuse 1. 2. 3. 4. 5. 6. To charge a sealed-type (MF) battery, a special (constant-voltage) battery charger is blown, replace it as follows. 1. Remove the blown fuse, and then install a new fuse of the specified amperage. Using a conventional battery charger will damage the battery. PERIODIC MAINTENANCE AND...
... fuse 2. Signaling system fuse Ignition fuse Headlight fuse Carburetor heater fuse Backup fuse (for the individual circuits, are located behind panel A. (See page 6-8.) If a fuse is required. Spare main fuse 1. 2. 3. 4. 5. 6. To charge a sealed-type (MF) battery, a special (constant-voltage) battery charger is blown, replace it as follows. 1. Remove the blown fuse, and then install a new fuse of the specified amperage. Using a conventional battery charger will damage the battery. PERIODIC MAINTENANCE AND...

Owners Manual
Page 81
... a fuse of a higher amperage rating than recommended to avoid causing extensive damage to check if the device operates. 4. Replacing the headlight bulb This model is equipped with a quartz bulb headlight. Screw 2. Remove the headlight unit by removing the screws. 6 1. If the fuse immediately blows again, have a Yamaha dealer check the electrical system. Disconnect the headlight coupler, and then remove the bulb cover. 6-35 If the headlight bulb...
... a fuse of a higher amperage rating than recommended to avoid causing extensive damage to check if the device operates. 4. Replacing the headlight bulb This model is equipped with a quartz bulb headlight. Screw 2. Remove the headlight unit by removing the screws. 6 1. If the fuse immediately blows again, have a Yamaha dealer check the electrical system. Disconnect the headlight coupler, and then remove the bulb cover. 6-35 If the headlight bulb...
Owners Manual
Page 92
...: Electric starter Lubrication system: Dry sump Fuel: Recommended fuel: Unleaded gasoline only Fuel tank capacity: 20.0 L (5.28 US gal) (4.40 Imp.gal) Fuel reserve amount: 3.5 L (0.92 US gal) (0.77 Imp.gal) Carburetor: Manufacturer: MIKUNI Type × quantity: BSR40 x 1 Spark plug (s): Manufacturer/model: NGK/DPR7EA-9 Manufacturer/model: DENSO/X22EPR-U9 Spark plug gap: 0.8-0.9 mm (0.031-0.035 in) Engine oil: Type: YAMALUBE 4 (20W40) or SAE20W40 Recommended engine oil grade: API service...
...: Electric starter Lubrication system: Dry sump Fuel: Recommended fuel: Unleaded gasoline only Fuel tank capacity: 20.0 L (5.28 US gal) (4.40 Imp.gal) Fuel reserve amount: 3.5 L (0.92 US gal) (0.77 Imp.gal) Carburetor: Manufacturer: MIKUNI Type × quantity: BSR40 x 1 Spark plug (s): Manufacturer/model: NGK/DPR7EA-9 Manufacturer/model: DENSO/X22EPR-U9 Spark plug gap: 0.8-0.9 mm (0.031-0.035 in) Engine oil: Type: YAMALUBE 4 (20W40) or SAE20W40 Recommended engine oil grade: API service...

Owners Manual
Page 94
...: Headlight: 12 V, 60 W/55.0 W × 1 Tail/brake light: LED Front turn signal/position light: 12 V, 23 W/8.0 W × 2 Rear turn signal light: 12 V, 21.0 W × 2 License plate light: 12 V, 5.0 W × 1 Meter lighting: 14 V, 0.56 W x 4 Neutral indicator light: 14 V, 1.12 W High beam indicator light: 14 V, 1.12 W Turn signal indicator light: 14 V, 1.12 W 8-3 Front suspension: 8 Type: Telescopic fork Spring/shock absorber type: Coil spring/oil damper Wheel travel: 140.0 mm (5.51 in) Rear suspension: Type: Swingarm (link suspension) Spring/shock absorber type: Coil spring/gas-oil...
...: Headlight: 12 V, 60 W/55.0 W × 1 Tail/brake light: LED Front turn signal/position light: 12 V, 23 W/8.0 W × 2 Rear turn signal light: 12 V, 21.0 W × 2 License plate light: 12 V, 5.0 W × 1 Meter lighting: 14 V, 0.56 W x 4 Neutral indicator light: 14 V, 1.12 W High beam indicator light: 14 V, 1.12 W Turn signal indicator light: 14 V, 1.12 W 8-3 Front suspension: 8 Type: Telescopic fork Spring/shock absorber type: Coil spring/oil damper Wheel travel: 140.0 mm (5.51 in) Rear suspension: Type: Swingarm (link suspension) Spring/shock absorber type: Coil spring/gas-oil...

Owners Manual
Page 105
INDEX A Accessories and replacement parts ...6-22 Air filter element, cleaning ...6-15 Fuel ...3-8 Fuel cock...3-9 Fuel gauge ...3-4 Fuel level warning light...3-2 Fuel tank cap...3-7 Fuses, replacing...6-34 Part locations ...2-1 Pre-operation check list ...4-2 R Rear brake light switch, adjusting ...6-24 Rear suspension, lubricating ...6-31 Rider seat ...3-10 B Battery ...6-33 Brake and clutch levers, checking and lubricating ...6-29 Brake and shift pedals, checking and lubricating ...6-29 Brake fluid, changing ...6-26 Brake fluid level, checking ...6-25 Brake lever ...3-6 Brake lever free ...
INDEX A Accessories and replacement parts ...6-22 Air filter element, cleaning ...6-15 Fuel ...3-8 Fuel cock...3-9 Fuel gauge ...3-4 Fuel level warning light...3-2 Fuel tank cap...3-7 Fuses, replacing...6-34 Part locations ...2-1 Pre-operation check list ...4-2 R Rear brake light switch, adjusting ...6-24 Rear suspension, lubricating ...6-31 Rider seat ...3-10 B Battery ...6-33 Brake and clutch levers, checking and lubricating ...6-29 Brake and shift pedals, checking and lubricating ...6-29 Brake fluid, changing ...6-26 Brake fluid level, checking ...6-25 Brake lever ...3-6 Brake lever free ...