
Owners Manual
Page 6
... MAINTENANCE ...6-1 Owner's tool kit ...6-2 Periodic maintenance chart for the emission control system ...6-3 General maintenance and lubrication chart ...6-4 Removing and installing cowlings and panels ...6-8 Checking the spark plug ...6-12 Canister ...6-14 Engine oil and oil filter element ...6-14 Final transmission oil ...6-17 Coolant ...6-18 Air filter elements and check hoses and V-belt case air filter element ...6-20 Checking the throttle cable free play ...6-23 Valve clearance ...6-23 Tires ...6-23 Cast wheels ...6-25 Accessories and replacement parts ...6-26 Front and rear brake...
... MAINTENANCE ...6-1 Owner's tool kit ...6-2 Periodic maintenance chart for the emission control system ...6-3 General maintenance and lubrication chart ...6-4 Removing and installing cowlings and panels ...6-8 Checking the spark plug ...6-12 Canister ...6-14 Engine oil and oil filter element ...6-14 Final transmission oil ...6-17 Coolant ...6-18 Air filter elements and check hoses and V-belt case air filter element ...6-20 Checking the throttle cable free play ...6-23 Valve clearance ...6-23 Tires ...6-23 Cast wheels ...6-25 Accessories and replacement parts ...6-26 Front and rear brake...

Owners Manual
Page 10
... seriously affect the stability of non-Yamaha accessories. If accessories are not recommended. Accessories fitted to the handlebar or the front fork area can create unstable handling or a slow steering response. Make sure to improper weight distribution or aerodynamic changes. Since Yamaha cannot test all other accessories that would impair the performance of lights or engine power. G Never install accessories or carry cargo that may...
... seriously affect the stability of non-Yamaha accessories. If accessories are not recommended. Accessories fitted to the handlebar or the front fork area can create unstable handling or a slow steering response. Make sure to improper weight distribution or aerodynamic changes. Since Yamaha cannot test all other accessories that would impair the performance of lights or engine power. G Never install accessories or carry cargo that may...
Owners Manual
Page 11
... ground, otherwise it run for any length of consciousness and death within a short time. Avoid hard braking, because the scooter could get into your eyes, see you and open a door in your path. Slow down and cross them with soap and water and change your clothes. Slow down as you approach a corner or turn. The brake pads could slide. Do not park...
... ground, otherwise it run for any length of consciousness and death within a short time. Avoid hard braking, because the scooter could get into your eyes, see you and open a door in your path. Slow down and cross them with soap and water and change your clothes. Slow down as you approach a corner or turn. The brake pads could slide. Do not park...
Owners Manual
Page 19
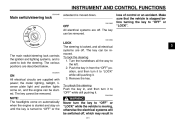
... main switch/steering lock controls the ignition and lighting systems, and is locked, and all the way to "OFF" or "LOCK" while the vehicle is moved down. To lock the steering 1. EAU36070 ON All electrical circuits are off. EAU10680 loss of control or an accident. Turn the handlebars all electrical systems are supplied with power; NOTE: The headlights come on automatically when the engine is started . INSTRUMENT AND CONTROL FUNCTIONS EAU10460 Main switch/steering lock...
... main switch/steering lock controls the ignition and lighting systems, and is locked, and all the way to "OFF" or "LOCK" while the vehicle is moved down. To lock the steering 1. EAU36070 ON All electrical circuits are off. EAU10680 loss of control or an accident. Turn the handlebars all electrical systems are supplied with power; NOTE: The headlights come on automatically when the engine is started . INSTRUMENT AND CONTROL FUNCTIONS EAU10460 Main switch/steering lock...
Owners Manual
Page 23
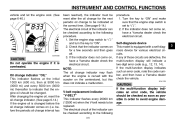
... on, have a Yamaha dealer check the electrical circuit. ECA11790 2 3 4 5 6 7 8 9 ECA10020 CAUTION: Do not operate the engine if it is set to "ON". 2. Turn the key to "ON" and make sure that the engine oil should be changed before the periodic oil change indicator may flash when the engine is equipped with the scooter on (i.e. INSTRUMENT AND CONTROL FUNCTIONS vehicle and let the engine cool. (See page...
... on, have a Yamaha dealer check the electrical circuit. ECA11790 2 3 4 5 6 7 8 9 ECA10020 CAUTION: Do not operate the engine if it is set to "ON". 2. Turn the key to "ON" and make sure that the engine oil should be changed before the periodic oil change indicator may flash when the engine is equipped with the scooter on (i.e. INSTRUMENT AND CONTROL FUNCTIONS vehicle and let the engine cool. (See page...
Owners Manual
Page 25
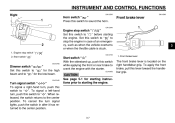
... rear brake to " " for the low beam. EAU12460 Start switch " " With the sidestand up, push this switch to " " for starting instructions prior to sound the horn. ECA10050 1. Turn signal switch " / " To signal a right-hand turn , push this switch to " ". To signal a left-hand turn , push this switch to " ". To cancel the turn signal lights, push the switch in case of an emergency, such as when the vehicle overturns or when the throttle...
... rear brake to " " for the low beam. EAU12460 Start switch " " With the sidestand up, push this switch to " " for starting instructions prior to sound the horn. ECA10050 1. Turn signal switch " / " To signal a right-hand turn , push this switch to " ". To signal a left-hand turn , push this switch to " ". To cancel the turn signal lights, push the switch in case of an emergency, such as when the vehicle overturns or when the throttle...

Owners Manual
Page 27
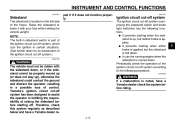
INSTRUMENT AND CONTROL FUNCTIONS EAU13161 Fuel tank cap To open the fuel tank cap 1. Opening lever 2. The lock will be released and the fuel tank cap can be removed. 1 1. Close the lid. 1 EWA11120 WARNING Be sure that the fuel tank cap is properly installed and locked before riding the scooter. 1 1. Open the lid by sliding the lever forward, and then pull the lever up. Fuel tank cap 2 3 2 To install the fuel tank cap 1. Match marks...
INSTRUMENT AND CONTROL FUNCTIONS EAU13161 Fuel tank cap To open the fuel tank cap 1. Opening lever 2. The lock will be released and the fuel tank cap can be removed. 1 1. Close the lid. 1 EWA11120 WARNING Be sure that the fuel tank cap is properly installed and locked before riding the scooter. 1 1. Open the lid by sliding the lever forward, and then pull the lever up. Fuel tank cap 2 3 2 To install the fuel tank cap 1. Match marks...
Owners Manual
Page 33
... running engine when the sidestand is still down , or if the sidestand cannot be ridden with your foot while holding the vehicle upright. Yamaha's ignition circuit cut -off system has been designed to the following functions. INSTRUMENT AND CONTROL FUNCTIONS EAU15301 Sidestand The sidestand is applied. Raise the sidestand or lower it does not function properly. EWA10250 2 3 4 5 6 7 8 9 WARNING The vehicle...
... running engine when the sidestand is still down , or if the sidestand cannot be ridden with your foot while holding the vehicle upright. Yamaha's ignition circuit cut -off system has been designed to the following functions. INSTRUMENT AND CONTROL FUNCTIONS EAU15301 Sidestand The sidestand is applied. Raise the sidestand or lower it does not function properly. EWA10250 2 3 4 5 6 7 8 9 WARNING The vehicle...
Owners Manual
Page 38
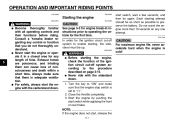
Never start , release the 5-1 CAUTION: See page 5-3 for engine break-in a closed area for any length of time. NOTE: If the engine does not start the engine or operate it in instructions prior to operating the vehicle for the ignition circuit cut -off system to " ". 2. For safety, always start switch while applying the front or rear brake. Turn the key to "ON" and make sure that there is...
Never start , release the 5-1 CAUTION: See page 5-3 for engine break-in a closed area for any length of time. NOTE: If the engine does not start the engine or operate it in instructions prior to operating the vehicle for the ignition circuit cut -off system to " ". 2. For safety, always start switch while applying the front or rear brake. Turn the key to "ON" and make sure that there is...
Owners Manual
Page 42
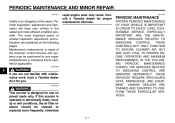
... a Yamaha dealer for use on the following pages. PERIODIC MAINTENANCE AND MINOR REPAIR EAU17271 1 2 3 4 5 6 7 8 9 Safety is certified (if applicable). Maintenance, replacement, or repair of the owner. THESE SERVICES REQUIRE SPECIALIZED DATA, KNOWLEDGE, AND EQUIPMENT. THESE CONTROLS NOT ONLY FUNCTION TO ENSURE CLEANER AIR, BUT ARE ALSO VITAL TO PROPER ENGINE OPERATION AND MAXIMUM PERFORMANCE. Periodic inspection, adjustment and lubrication will keep your vehicle in...
... a Yamaha dealer for use on the following pages. PERIODIC MAINTENANCE AND MINOR REPAIR EAU17271 1 2 3 4 5 6 7 8 9 Safety is certified (if applicable). Maintenance, replacement, or repair of the owner. THESE SERVICES REQUIRE SPECIALIZED DATA, KNOWLEDGE, AND EQUIPMENT. THESE CONTROLS NOT ONLY FUNCTION TO ENSURE CLEANER AIR, BUT ARE ALSO VITAL TO PROPER ENGINE OPERATION AND MAXIMUM PERFORMANCE. Periodic inspection, adjustment and lubrication will keep your vehicle in...

Owners Manual
Page 44
...) or 18 months. Replace if necessary. PERIODIC MAINTENANCE AND MINOR REPAIR EAU17600 Periodic maintenance chart for cracks or damage. Replace any damaged parts. √ √ Replace. √ √ Every 26600 mi (42000 km √ * Since these items require special tools, data and technical skills, have a Yamaha dealer perform the service. 6-3 Check the air cut-off valve, reed valve, and hose for damage. Check engine idle speed.
...) or 18 months. Replace if necessary. PERIODIC MAINTENANCE AND MINOR REPAIR EAU17600 Periodic maintenance chart for cracks or damage. Replace any damaged parts. √ √ Replace. √ √ Every 26600 mi (42000 km √ * Since these items require special tools, data and technical skills, have a Yamaha dealer perform the service. 6-3 Check the air cut-off valve, reed valve, and hose for damage. Check engine idle speed.

Owners Manual
Page 47
... Engine oil filter element G Replace. Check vehicle for coolant leakage. Check operation. Lights, signals and G Check operation 24 * switches G Adjust headlight beam. * Since these items require special tools, data and technical skills, have a Yamaha dealer perform the service. Change. Replace. Change. G Adjust the throttle cable free Throttle grip hous√ √ 23 * play . G 2 Every 3 years √ √ √ 19 * Cooling system G 3 4 5 Final transmission 20 oil 21 * V-belt Front and rear brake 22 * switches...
... Engine oil filter element G Replace. Check vehicle for coolant leakage. Check operation. Lights, signals and G Check operation 24 * switches G Adjust headlight beam. * Since these items require special tools, data and technical skills, have a Yamaha dealer perform the service. Change. Replace. Change. G Adjust the throttle cable free Throttle grip hous√ √ 23 * play . G 2 Every 3 years √ √ √ 19 * Cooling system G 3 4 5 Final transmission 20 oil 21 * V-belt Front and rear brake 22 * switches...
Owners Manual
Page 55
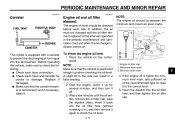
... the oil filter element replaced at the intervals specified in the periodic maintenance and lubrication chart and when the oil change indicator comes on the centerstand. G Check each hose connection. To check the engine oil level 1. Place the vehicle on . PERIODIC MAINTENANCE AND MINOR REPAIR EAU36110 EAU34181 Canister Engine oil and oil filter element The engine oil level should be between the minimum and maximum level marks. 1 2 1 3 This model...
... the oil filter element replaced at the intervals specified in the periodic maintenance and lubrication chart and when the oil change indicator comes on the centerstand. G Check each hose connection. To check the engine oil level 1. Place the vehicle on . PERIODIC MAINTENANCE AND MINOR REPAIR EAU36110 EAU34181 Canister Engine oil and oil filter element The engine oil level should be between the minimum and maximum level marks. 1 2 1 3 This model...
Owners Manual
Page 58
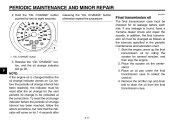
... the intervals specified in the periodic maintenance and lubrication chart. 1. Start the engine, warm up the final transmission oil by riding the scooter for the next periodic oil change interval has been reached), the indicator must be reset after 6-17 Remove the oil filler cap and drain bolt to collect the used oil. 4. "OIL CHANGE" button 1 5 6 7 8 9 3. releasing the "OIL CHANGE" button, otherwise repeat the procedure. Place...
... the intervals specified in the periodic maintenance and lubrication chart. 1. Start the engine, warm up the final transmission oil by riding the scooter for the next periodic oil change interval has been reached), the indicator must be reset after 6-17 Remove the oil filler cap and drain bolt to collect the used oil. 4. "OIL CHANGE" button 1 5 6 7 8 9 3. releasing the "OIL CHANGE" button, otherwise repeat the procedure. Place...
Owners Manual
Page 65
..., passenger, and accessories (cowling, saddlebags, etc. Always comply with excessively worn tires decrease riding stability and can shift. Tire tread depth 3. Tire wear indicator The tires must be left to side. Brakes, tires, and related wheel parts replacement should be checked before each ride. Do not carry loosely packed items that the 1 3 1. Have excessively worn tires replaced by a Yamaha dealer immediately. PERIODIC MAINTENANCE AND MINOR REPAIR Tire air pressure...
..., passenger, and accessories (cowling, saddlebags, etc. Always comply with excessively worn tires decrease riding stability and can shift. Tire tread depth 3. Tire wear indicator The tires must be left to side. Brakes, tires, and related wheel parts replacement should be checked before each ride. Do not carry loosely packed items that the 1 3 1. Have excessively worn tires replaced by a Yamaha dealer immediately. PERIODIC MAINTENANCE AND MINOR REPAIR Tire air pressure...
Owners Manual
Page 76
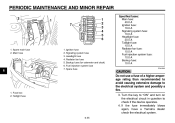
...fuse 1. Fuel injection system fuse 7. If the fuse immediately blows again, have a Yamaha dealer check the electrical system. 6-35 Headlight fuse 4. Backup fuse (for odometer and clock) 6. Spare main fuse 2. Signaling system fuse 3. Radiator fan fuse 5. Fuse box 2. Turn the key to "ON" and turn on the electrical circuit in question to the electrical system and possibly a fire. 3. PERIODIC MAINTENANCE AND MINOR REPAIR 2 1 2 3 4 5 6 7 8 9 1. Ignition fuse 2. Taillight fuse 1. Spare fuse 1 7 1 2 3 4 5 6 1 2 Specified fuses: Main fuse: 40.0 A Ignition fuse: 10.0 A Signaling...
...fuse 1. Fuel injection system fuse 7. If the fuse immediately blows again, have a Yamaha dealer check the electrical system. 6-35 Headlight fuse 4. Backup fuse (for odometer and clock) 6. Spare main fuse 2. Signaling system fuse 3. Radiator fan fuse 5. Fuse box 2. Turn the key to "ON" and turn on the electrical circuit in question to the electrical system and possibly a fire. 3. PERIODIC MAINTENANCE AND MINOR REPAIR 2 1 2 3 4 5 6 7 8 9 1. Ignition fuse 2. Taillight fuse 1. Spare fuse 1 7 1 2 3 4 5 6 1 2 Specified fuses: Main fuse: 40.0 A Ignition fuse: 10.0 A Signaling...
Owners Manual
Page 83
... looking good, extend its life and optimize its performance. Rust and corrosion can damage windshields, cowlings, panels and other plastic parts. ucts onto seals, gaskets and wheel axles. G Cleaning ECA10780 CAUTION: G Avoid using cloths or sponges which have been in the following areas: seals (of wheel and swingarm bearings, fork and brakes), electric components (couplers, connectors, instruments, switches and lights), breather hoses and vents. Use...
... looking good, extend its life and optimize its performance. Rust and corrosion can damage windshields, cowlings, panels and other plastic parts. ucts onto seals, gaskets and wheel axles. G Cleaning ECA10780 CAUTION: G Avoid using cloths or sponges which have been in the following areas: seals (of wheel and swingarm bearings, fork and brakes), electric components (couplers, connectors, instruments, switches and lights), breather hoses and vents. Use...
Owners Manual
Page 87
... oil filter element replacement: 1.70 L (1.80 US qt) (1.50 Imp.qt) Weight: With oil and fuel: 212.0 kg (467 lb) Clutch: Clutch type: Dry, centrifugal automatic Engine: Engine type: Liquid cooled 4-stroke, DOHC Cylinder arrangement: Forward-inclined single cylinder Displacement: 395.0 cm3 Bore × stroke: 83.0 × 73.0 mm (3.27 × 2.87 in) Compression ratio: 10.60 :1 Starting system: Electric starter Final transmission oil: Type: SAE10W30 type SE motor oil Quantity...
... oil filter element replacement: 1.70 L (1.80 US qt) (1.50 Imp.qt) Weight: With oil and fuel: 212.0 kg (467 lb) Clutch: Clutch type: Dry, centrifugal automatic Engine: Engine type: Liquid cooled 4-stroke, DOHC Cylinder arrangement: Forward-inclined single cylinder Displacement: 395.0 cm3 Bore × stroke: 83.0 × 73.0 mm (3.27 × 2.87 in) Compression ratio: 10.60 :1 Starting system: Electric starter Final transmission oil: Type: SAE10W30 type SE motor oil Quantity...

Owners Manual
Page 89
SPECIFICATIONS Headlight: Bulb type: Halogen bulb Radiator fan fuse: 10.0 A Fuel injection system fuse: 10.0 A Backup fuse: 10.0 A Bulb voltage, wattage × quantity: Headlight: 12 V, 60 W/55.0 W × 2 Tail/brake light: LED Front turn signal/position light: 12 V, 21 W/5.0 W × 2 Rear turn signal light: 12 V, 21.0 W × 2 License plate light: 12 V, 5.0 W × 1 Meter lighting: 12 V, 2.0 W × 3 High beam indicator light: 12 V, 1.4 W × 1 Turn signal indicator light: 12 V, 1.4 W × 2 Engine trouble warning light: 12 V, 1.4 W × 1 2 3 4 5 6 7 8 9 Fuses: Main fuse:...
SPECIFICATIONS Headlight: Bulb type: Halogen bulb Radiator fan fuse: 10.0 A Fuel injection system fuse: 10.0 A Backup fuse: 10.0 A Bulb voltage, wattage × quantity: Headlight: 12 V, 60 W/55.0 W × 2 Tail/brake light: LED Front turn signal/position light: 12 V, 21 W/5.0 W × 2 Rear turn signal light: 12 V, 21.0 W × 2 License plate light: 12 V, 5.0 W × 1 Meter lighting: 12 V, 2.0 W × 3 High beam indicator light: 12 V, 1.4 W × 1 Turn signal indicator light: 12 V, 1.4 W × 2 Engine trouble warning light: 12 V, 1.4 W × 1 2 3 4 5 6 7 8 9 Fuses: Main fuse:...
Owners Manual
Page 100
......5-2 Accessories and replacement parts...6-26 Air filter elements and check hoses and V-belt case air filter element ...6-20 Front fork, checking ...6-31 Fuel...3-10 Fuel tank cap ...3-9 Fuses, replacing ...6-34 R Rear brake lock lever ...3-8 Rear brake lock lever cable, adjusting ...6-27 Rider seat, adjusting...3-12 H Handlebar switches ...3-6 Headlight bulb, replacing ...6-36 High beam indicator light ...3-2 Horn switch ...3-7 S Safe-riding points ...1-4 Safety defects, reporting ...9-3 Safety information ...1-1 Seats ...3-11 Sidestand ...3-15 Spark plug, checking ...6-12 Specifications...
......5-2 Accessories and replacement parts...6-26 Air filter elements and check hoses and V-belt case air filter element ...6-20 Front fork, checking ...6-31 Fuel...3-10 Fuel tank cap ...3-9 Fuses, replacing ...6-34 R Rear brake lock lever ...3-8 Rear brake lock lever cable, adjusting ...6-27 Rider seat, adjusting...3-12 H Handlebar switches ...3-6 Headlight bulb, replacing ...6-36 High beam indicator light ...3-2 Horn switch ...3-7 S Safe-riding points ...1-4 Safety defects, reporting ...9-3 Safety information ...1-1 Seats ...3-11 Sidestand ...3-15 Spark plug, checking ...6-12 Specifications...