
Owners Manual
Page 7
... ...3-2 Clutch lever ...3-3 Shift pedal ...3-4 Brake lever ...3-4 Brake pedal ...3-4 Fuel tank cap ...3-5 Fuel ...3-5 Fuel cock ...3-6 Starter (choke) lever ...3-7 Steering lock ...3-8 Rider seat ...3-8 Helmet holder ...3-9 Adjusting the shock absorber assemblies ...3-9 Sidestand ...3-10 Ignition circuit cut-off system ...3-11 PRE-OPERATION CHECKS ...4-1 Pre-operation check list ...4-2 OPERATION AND IMPORTANT RIDING POINTS ...5-1 Starting and warming up a cold engine ...5-1 Starting a warm engine ...5-2 Shifting ...5-2 Engine break-in ...5-4 Parking ...5-4 PERIODIC MAINTENANCE AND MINOR REPAIR...
... ...3-2 Clutch lever ...3-3 Shift pedal ...3-4 Brake lever ...3-4 Brake pedal ...3-4 Fuel tank cap ...3-5 Fuel ...3-5 Fuel cock ...3-6 Starter (choke) lever ...3-7 Steering lock ...3-8 Rider seat ...3-8 Helmet holder ...3-9 Adjusting the shock absorber assemblies ...3-9 Sidestand ...3-10 Ignition circuit cut-off system ...3-11 PRE-OPERATION CHECKS ...4-1 Pre-operation check list ...4-2 OPERATION AND IMPORTANT RIDING POINTS ...5-1 Starting and warming up a cold engine ...5-1 Starting a warm engine ...5-2 Shifting ...5-2 Engine break-in ...5-4 Parking ...5-4 PERIODIC MAINTENANCE AND MINOR REPAIR...
Owners Manual
Page 8
... the steering ...6-29 Checking the wheel bearings ...6-29 Battery ...6-30 Replacing the fuses ...6-31 Replacing the headlight bulb ...6-32 Replacing the tail/brake light bulb ...6-33 Replacing a turn signal light bulb ...6-34 Supporting the motorcycle ...6-35 Front wheel ...6-35 Rear wheel ...6-37 Troubleshooting ...6-39 Troubleshooting chart ...6-40 MOTORCYCLE CARE AND STORAGE ...7-1 Care ...7-1 Storage ...7-3 SPECIFICATIONS ...8-1 CONSUMER INFORMATION ...9-1 Identification numbers ...9-1 Reporting safety defects ...9-3 Motorcycle noise regulation ...9-4 Maintenance record ...9-5 YAMAHA MOTOR...
... the steering ...6-29 Checking the wheel bearings ...6-29 Battery ...6-30 Replacing the fuses ...6-31 Replacing the headlight bulb ...6-32 Replacing the tail/brake light bulb ...6-33 Replacing a turn signal light bulb ...6-34 Supporting the motorcycle ...6-35 Front wheel ...6-35 Rear wheel ...6-37 Troubleshooting ...6-39 Troubleshooting chart ...6-40 MOTORCYCLE CARE AND STORAGE ...7-1 Care ...7-1 Storage ...7-3 SPECIFICATIONS ...8-1 CONSUMER INFORMATION ...9-1 Identification numbers ...9-1 Reporting safety defects ...9-3 Motorcycle noise regulation ...9-4 Maintenance record ...9-5 YAMAHA MOTOR...
Owners Manual
Page 11
...ground clearance or cornering clearance, limit suspension travel, steering travel or control operation, or obscure lights or reflectors. • Accessories fitted to the handlebar or the front fork area can create instability due to improper weight distribution or aerodynamic changes. Make sure that would impair the performance...instability when passing or being passed by large vehicles. • Certain accessories can displace the operator from his or her normal riding position. Accessories Genuine Yamaha accessories have been specifically designed for the proper selection, installation and...
...ground clearance or cornering clearance, limit suspension travel, steering travel or control operation, or obscure lights or reflectors. • Accessories fitted to the handlebar or the front fork area can create instability due to improper weight distribution or aerodynamic changes. Make sure that would impair the performance...instability when passing or being passed by large vehicles. • Certain accessories can displace the operator from his or her normal riding position. Accessories Genuine Yamaha accessories have been specifically designed for the proper selection, installation and...
Owners Manual
Page 12
... that the fuel cock is turned to spill any length of the carburetor or fuel tank. When transporting the motorcycle in another vehicle, make sure that has adequate ventilation. Use caution when adding electrical accessories. Always operate your clothes. a kerosene heater, or near a flammable source (e.g. If any gasoline, inhale a lot of lights or engine power. SAFETY INFORMATION tor and may limit control ability, therefore...
... that the fuel cock is turned to spill any length of the carburetor or fuel tank. When transporting the motorcycle in another vehicle, make sure that has adequate ventilation. Use caution when adding electrical accessories. Always operate your clothes. a kerosene heater, or near a flammable source (e.g. If any gasoline, inhale a lot of lights or engine power. SAFETY INFORMATION tor and may limit control ability, therefore...
Owners Manual
Page 18
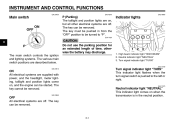
... the parking position for an extended length of time, otherwise the battery may discharge. Turn signal indicator light "TURN" EAU11040 ON All electrical systems are supplied with power, and the headlight, meter lighting, taillight and position lights come on, and the engine can be removed. The main switch controls the ignition and lighting systems. The various main switch positions are described below. Neutral indicator light "NEUTRAL" 3. EAU10660 Turn signal indicator light "TURN" This indicator light flashes when the turn signal switch...
... the parking position for an extended length of time, otherwise the battery may discharge. Turn signal indicator light "TURN" EAU11040 ON All electrical systems are supplied with power, and the headlight, meter lighting, taillight and position lights come on, and the engine can be removed. The main switch controls the ignition and lighting systems. The various main switch positions are described below. Neutral indicator light "NEUTRAL" 3. EAU10660 Turn signal indicator light "TURN" This indicator light flashes when the turn signal switch...
Owners Manual
Page 19
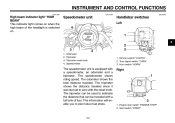
... 1. Speedometer unit Handlebar switches Left 3 1. 2. 3. 4. The speedometer shows riding speed. The odometer shows the total distance traveled. Start switch "START" 3-2 The tripmeter can be traveled with a full tank of the headlight is equipped with the reset knob. This information will enable you to estimate the distance that can be used to plan future fuel stops. Right 1. Engine stop switch "ENGINE STOP" 2. Turn signal switch "TURN" 3.
... 1. Speedometer unit Handlebar switches Left 3 1. 2. 3. 4. The speedometer shows riding speed. The odometer shows the total distance traveled. Start switch "START" 3-2 The tripmeter can be traveled with a full tank of the headlight is equipped with the reset knob. This information will enable you to estimate the distance that can be used to plan future fuel stops. Right 1. Engine stop switch "ENGINE STOP" 2. Turn signal switch "TURN" 3.
Owners Manual
Page 20
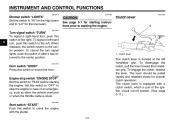
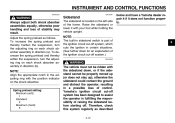
... the horn. INSTRUMENT AND CONTROL FUNCTIONS EAU12410 ECA10050 EAU12820 Dimmer switch "LIGHTS" Set the switch to "HI" for the high beam and to "LO" for smooth clutch operation. Clutch lever 3 Turn signal switch "TURN" To signal a right-hand turn signal lights, push the switch in case of the ignition circuit cut-off system. (See page 3-11.) Start switch "START" Push this switch to the center position. The lever should be pulled rapidly and released...
... the horn. INSTRUMENT AND CONTROL FUNCTIONS EAU12410 ECA10050 EAU12820 Dimmer switch "LIGHTS" Set the switch to "HI" for the high beam and to "LO" for smooth clutch operation. Clutch lever 3 Turn signal switch "TURN" To signal a right-hand turn signal lights, push the switch in case of the ignition circuit cut-off system. (See page 3-11.) Start switch "START" Push this switch to the center position. The lever should be pulled rapidly and released...
Owners Manual
Page 23
... tank to the fuel system or vehicle performance problems. EAU13580 Fuel cock This model is not recommended by Yamaha because it . The fuel cock lever positions are two types of 91 or higher. ON 3 CAUTION: Use only unleaded gasoline. If knocking (or pinging) occurs, use regular unleaded gasoline with a clean, dry, soft cloth, since fuel may deteriorate painted surfaces or plastic parts. Turn...
... tank to the fuel system or vehicle performance problems. EAU13580 Fuel cock This model is not recommended by Yamaha because it . The fuel cock lever positions are two types of 91 or higher. ON 3 CAUTION: Use only unleaded gasoline. If knocking (or pinging) occurs, use regular unleaded gasoline with a clean, dry, soft cloth, since fuel may deteriorate painted surfaces or plastic parts. Turn...
Owners Manual
Page 27
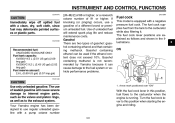
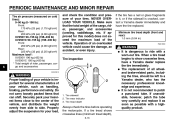
... harden the suspension, turn the adjusting ring on each shock absorber assembly in direction (a). To decrease the spring preload and thereby soften the suspension, turn the adjusting ring on each shock absorber assembly in direction (b). Therefore, check this system regularly as follows. INSTRUMENT AND CONTROL FUNCTIONS EWA10210 EAU15301 WARNING Always adjust both shock absorber assemblies equally, otherwise poor handling and loss of the frame. Yamaha's ignition circuit...
... harden the suspension, turn the adjusting ring on each shock absorber assembly in direction (a). To decrease the spring preload and thereby soften the suspension, turn the adjusting ring on each shock absorber assembly in direction (b). Therefore, check this system regularly as follows. INSTRUMENT AND CONTROL FUNCTIONS EWA10210 EAU15301 WARNING Always adjust both shock absorber assemblies equally, otherwise poor handling and loss of the frame. Yamaha's ignition circuit...
Owners Manual
Page 32
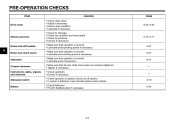
... air pressure. Correct if necessary. Check tire condition and tread depth. PRE-OPERATION CHECKS ITEM Check chain slack. CHECKS PAGE Drive chain 6-23, 6-25 Wheels and tires 6-15, 6-17 Brake and shift ...ignition circuit cut-off system. • If system is defective, have Yamaha dealer check vehicle. • Check fluid level. • Fill with distilled water if necessary. 6-27 6-27 6-27 - - 3-10 6-30 4 Brake and clutch levers Sidestand Chassis fasteners Instruments, lights, signals and switches Sidestand switch Battery 4-3 Check for damage. Adjust if necessary. Check chain condition...
... air pressure. Correct if necessary. Check tire condition and tread depth. PRE-OPERATION CHECKS ITEM Check chain slack. CHECKS PAGE Drive chain 6-23, 6-25 Wheels and tires 6-15, 6-17 Brake and shift ...ignition circuit cut-off system. • If system is defective, have Yamaha dealer check vehicle. • Check fluid level. • Fill with distilled water if necessary. 6-27 6-27 6-27 - - 3-10 6-30 4 Brake and clutch levers Sidestand Chassis fasteners Instruments, lights, signals and switches Sidestand switch Battery 4-3 Check for damage. Adjust if necessary. Check chain condition...
Owners Manual
Page 33
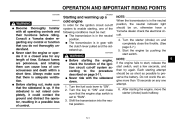
... the throttle. (See page 3-7.) 5. Turn the starter (choke) on , otherwise have a Yamaha dealer check the electrical circuit. 4. Shift the transmission into the neutral position. 5-1 G The transmission is adequate ventilation. NOTE: If the engine fails to enable starting, one attempt. 6. Never ride with the clutch lever pulled and the sidestand up. Turn the key to "RUN". 3. Exhaust fumes are poisonous, and inhaling them can cause loss of control...
... the throttle. (See page 3-7.) 5. Turn the starter (choke) on , otherwise have a Yamaha dealer check the electrical circuit. 4. Shift the transmission into the neutral position. 5-1 G The transmission is adequate ventilation. NOTE: If the engine fails to enable starting, one attempt. 6. Never ride with the clutch lever pulled and the sidestand up. Turn the key to "RUN". 3. Exhaust fumes are poisonous, and inhaling them can cause loss of control...
Owners Manual
Page 35
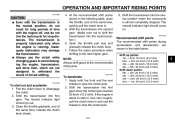
... rear brakes to the next higher gear. Pull the clutch lever to stop the motorcycle. 5-3 Open the throttle gradually, and at the recommended shift points. EAU16720 Recommended shift points The recommended shift points during acceleration and deceleration are shown in and use the clutch while changing gears to avoid damaging the engine, transmission, and drive train, which are not designed to shift the transmission into the neutral...
... rear brakes to the next higher gear. Pull the clutch lever to stop the motorcycle. 5-3 Open the throttle gradually, and at the recommended shift points. EAU16720 Recommended shift points The recommended shift points during acceleration and deceleration are shown in and use the clutch while changing gears to avoid damaging the engine, transmission, and drive train, which are not designed to shift the transmission into the neutral...
Owners Manual
Page 39
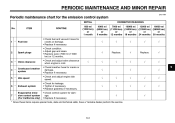
... engine is cold. • Check breather hose for cracks or damage. • Replace if necessary. • Check and adjust engine idle speed. • Check for leakage. • Tighten if necessary. • Replace gasket(s) if necessary. • Check control system for the emission control system INITIAL No. PERIODIC MAINTENANCE AND MINOR REPAIR EAU17580 Periodic maintenance chart for damage. • Replace if necessary. √ 2 Spark plugs √ Replace. √ Replace. √ 3 * Valve...
... engine is cold. • Check breather hose for cracks or damage. • Replace if necessary. • Check and adjust engine idle speed. • Check for leakage. • Tighten if necessary. • Replace gasket(s) if necessary. • Check control system for the emission control system INITIAL No. PERIODIC MAINTENANCE AND MINOR REPAIR EAU17580 Periodic maintenance chart for damage. • Replace if necessary. √ 2 Spark plugs √ Replace. √ Replace. √ 3 * Valve...
Owners Manual
Page 42
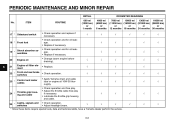
... engine before draining). • Replace. • Check operation. • Apply Yamaha chain and cable lube or engine oil 10W-30 thoroughly. • Check operation and free play. • Adjust the throttle cable free play if necessary. • Lubricate the throttle grip housing and cable. • Check operation. • Adjust headlight beam. 18 * Front fork 19 * Shock absorber assemblies Engine oil Engine oil filter element Front and rear brake switches Control...
... engine before draining). • Replace. • Check operation. • Apply Yamaha chain and cable lube or engine oil 10W-30 thoroughly. • Check operation and free play. • Adjust the throttle cable free play if necessary. • Lubricate the throttle grip housing and cable. • Check operation. • Adjust headlight beam. 18 * Front fork 19 * Shock absorber assemblies Engine oil Engine oil filter element Front and rear brake switches Control...
Owners Manual
Page 45
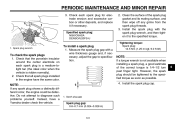
... insulator around the center electrode on each spark plug for electrode erosion and excessive carbon or other deposits, and replace it to specification. Spark plug gap Spark plug gap: 0.6-0.7 mm (0.024-0.028 in the engine have a Yamaha dealer check the vehicle. Spark plug wrench To check the spark plugs 1. Instead, have the same color. However, the spark plug should be defective. To install a spark plug 1. PERIODIC MAINTENANCE AND MINOR REPAIR 3. Specified spark plug: NGK/C6HSA...
... insulator around the center electrode on each spark plug for electrode erosion and excessive carbon or other deposits, and replace it to specification. Spark plug gap Spark plug gap: 0.6-0.7 mm (0.024-0.028 in the engine have a Yamaha dealer check the vehicle. Spark plug wrench To check the spark plugs 1. Instead, have the same color. However, the spark plug should be defective. To install a spark plug 1. PERIODIC MAINTENANCE AND MINOR REPAIR 3. Specified spark plug: NGK/C6HSA...
Owners Manual
Page 52
... the tire replaced. Tire inspection if the tire has a nail or glass fragments in ) EWA10560 WARNING G 6 G WARNING Proper loading of your vehicle is cracked, contact a Yamaha dealer immediately and have a Yamaha dealer replace the tire immediately. Do not carry loosely packed items that the total weight of your vehicle, such as possible with a worn-out tire. The replacement of your tires. PERIODIC MAINTENANCE AND MINOR REPAIR Tire air pressure (measured on cold tires...
... the tire replaced. Tire inspection if the tire has a nail or glass fragments in ) EWA10560 WARNING G 6 G WARNING Proper loading of your vehicle is cracked, contact a Yamaha dealer immediately and have a Yamaha dealer replace the tire immediately. Do not carry loosely packed items that the total weight of your vehicle, such as possible with a worn-out tire. The replacement of your tires. PERIODIC MAINTENANCE AND MINOR REPAIR Tire air pressure (measured on cold tires...
Owners Manual
Page 76
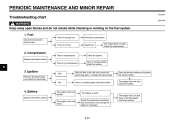
... fuel. There is enough fuel. Ignition Remove the spark plugs and check the electrodes. Have a Yamaha dealer check the vehicle. Check the compression. Open the throttle halfway and operate the electric starter. 4. The engine turns over slowly. Dry Have a Yamaha dealer check the vehicle. The battery is good. Check the fuel level in the fuel tank. Check the battery. Battery Operate the electric starter. The engine does not start . Check the ignition. 6 3. The engine does not start...
... fuel. There is enough fuel. Ignition Remove the spark plugs and check the electrodes. Have a Yamaha dealer check the vehicle. Check the compression. Open the throttle halfway and operate the electric starter. 4. The engine turns over slowly. Dry Have a Yamaha dealer check the vehicle. The battery is good. Check the fuel level in the fuel tank. Check the battery. Battery Operate the electric starter. The engine does not start . Check the ignition. 6 3. The engine does not start...
Owners Manual
Page 77
... wheel and swingarm bearings, fork and brakes), electric components (couplers, connectors, instruments, switches and lights), breather hoses and vents. Use only a soft, clean cloth or sponge with strong or abrasive 7-1 G cleaning products, solvent or thinner, fuel (gasoline), rust removers or inhibitors, brake fluid, antifreeze or electrolyte. Do not use strong cleaners or hard sponges as all electrical couplers and connectors, including the spark plug caps...
... wheel and swingarm bearings, fork and brakes), electric components (couplers, connectors, instruments, switches and lights), breather hoses and vents. Use only a soft, clean cloth or sponge with strong or abrasive 7-1 G cleaning products, solvent or thinner, fuel (gasoline), rust removers or inhibitors, brake fluid, antifreeze or electrolyte. Do not use strong cleaners or hard sponges as all electrical couplers and connectors, including the spark plug caps...
Owners Manual
Page 81
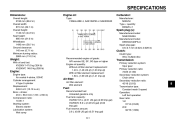
....0 kg (326 lb) Engine: Engine type: Air cooled 4-stroke, SOHC Cylinder arrangement: V-type 2-cylinder Displacement: 249.0 cm³ (15.19 cu.in) Bore × stroke: 49.0 × 66.0 mm (1.93 × 2.60 in) Compression ratio: 10.00 :1 Starting system: Electric starter Lubrication system: Wet sump Recommended engine oil grade: API service SE, SF, SG type or higher Engine oil quantity: Without oil filter element replacement: 1.40 L (1.48...
....0 kg (326 lb) Engine: Engine type: Air cooled 4-stroke, SOHC Cylinder arrangement: V-type 2-cylinder Displacement: 249.0 cm³ (15.19 cu.in) Bore × stroke: 49.0 × 66.0 mm (1.93 × 2.60 in) Compression ratio: 10.00 :1 Starting system: Electric starter Lubrication system: Wet sump Recommended engine oil grade: API service SE, SF, SG type or higher Engine oil quantity: Without oil filter element replacement: 1.40 L (1.48...
Owners Manual
Page 94
... Maintenance, emission control system...6-3 Maintenance, periodic ...6-1 Maintenance record...9-5 Model label ...9-2 D Dimmer switch ...3-3 Drive chain, cleaning and lubricating ...6-25 Drive chain slack...6-23 T Tail/brake light bulb, replacing ...6-33 Throttle cable free play, checking ...6-15 Throttle grip and cable, checking and lubricating ...6-26 Tires ...6-15 Tool kit...6-1 Troubleshooting ...6-39 E Engine break-in...5-4 Engine oil and oil filter element ...6-10 Engine, starting a warm ...5-2 Engine stop switch ...3-3 N Neutral indicator light...3-1 Noise regulation...9-4 P Panel...
... Maintenance, emission control system...6-3 Maintenance, periodic ...6-1 Maintenance record...9-5 Model label ...9-2 D Dimmer switch ...3-3 Drive chain, cleaning and lubricating ...6-25 Drive chain slack...6-23 T Tail/brake light bulb, replacing ...6-33 Throttle cable free play, checking ...6-15 Throttle grip and cable, checking and lubricating ...6-26 Tires ...6-15 Tool kit...6-1 Troubleshooting ...6-39 E Engine break-in...5-4 Engine oil and oil filter element ...6-10 Engine, starting a warm ...5-2 Engine stop switch ...3-3 N Neutral indicator light...3-1 Noise regulation...9-4 P Panel...