

Owners Manual
Page 6
...belt holders ...5-14 Spark plug holders...5-14 Carburetor coolant shut-off lever ...5-14 Backrest ...5-15 Storage compartment ...5-15 PRE-OPERATION CHECKS ...6-1 Fuel ...6-1 Engine oil...6-2 Coolant ...6-2 Throttle lever ...6-3 Recoil starter ...6-3 Throttle override system (T.O.R.S.) ...6-3 Brake ...6-4 Brake fluid leakage ...6-5 V-belt ...6-5 Drive guard ...6-5 Drive track ...6-6 Slide runners ...6-6 Skis and ski runners ...6-7 Steering system...6-7 Lights ...6-7 Battery ...6-7 Air filter ...6-8 Fittings and fasteners ...6-9 Tool kit and recommended equipment...6-9 OPERATION ...7-1 Starting...
...belt holders ...5-14 Spark plug holders...5-14 Carburetor coolant shut-off lever ...5-14 Backrest ...5-15 Storage compartment ...5-15 PRE-OPERATION CHECKS ...6-1 Fuel ...6-1 Engine oil...6-2 Coolant ...6-2 Throttle lever ...6-3 Recoil starter ...6-3 Throttle override system (T.O.R.S.) ...6-3 Brake ...6-4 Brake fluid leakage ...6-5 V-belt ...6-5 Drive guard ...6-5 Drive track ...6-6 Slide runners ...6-6 Skis and ski runners ...6-7 Steering system...6-7 Lights ...6-7 Battery ...6-7 Air filter ...6-8 Fittings and fasteners ...6-9 Tool kit and recommended equipment...6-9 OPERATION ...7-1 Starting...
Owners Manual
Page 7
... Replacing the V-belt ...8-13 Checking the drive chain housing oil level and the drive chain tension ...8-15 Checking the brake pads...8-17 Checking the parking brake pads...8-17 Checking the brake fluid level...8-18 Changing the brake fluid...8-18 Suspension...8-19 Adjusting the drive track ...8-23 Aligning the skis...8-25 Lubrication ...8-26 Replacing a headlight bulb ...8-27 Adjusting the headlight beam ...8-27 Battery ...8-28 Replacing a fuse...8-29 TROUBLESHOOTING ...9-1 STORAGE ...10-1 SPECIFICATIONS ...11-1 Dimensions...11-1 Engine ...11-1 Chassis...11-2 Electric...11-3 WIRING DIAGRAM...
... Replacing the V-belt ...8-13 Checking the drive chain housing oil level and the drive chain tension ...8-15 Checking the brake pads...8-17 Checking the parking brake pads...8-17 Checking the brake fluid level...8-18 Changing the brake fluid...8-18 Suspension...8-19 Adjusting the drive track ...8-23 Aligning the skis...8-25 Lubrication ...8-26 Replacing a headlight bulb ...8-27 Adjusting the headlight beam ...8-27 Battery ...8-28 Replacing a fuse...8-29 TROUBLESHOOTING ...9-1 STORAGE ...10-1 SPECIFICATIONS ...11-1 Dimensions...11-1 Engine ...11-1 Chassis...11-2 Electric...11-3 WIRING DIAGRAM...
Owners Manual
Page 14
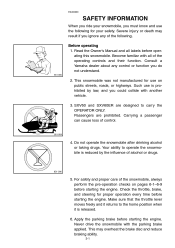
... engine. Passengers are designed to carry the OPERATOR ONLY. Apply the parking brake before starting the engine. For safety and proper care of the operating controls and their function. This may result if you could collide with another vehicle. 3. Your ability to the home position when it is prohibited by the influence of control. 4. Check the throttle, brake, and steering for use is released...
... engine. Passengers are designed to carry the OPERATOR ONLY. Apply the parking brake before starting the engine. For safety and proper care of the operating controls and their function. This may result if you could collide with another vehicle. 3. Your ability to the home position when it is prohibited by the influence of control. 4. Check the throttle, brake, and steering for use is released...
Owners Manual
Page 15
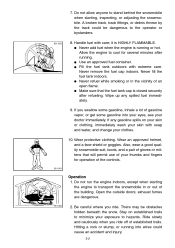
Do not allow anyone to cool for operation of gasoline vapor, or get some gasoline, inhale a lot of the controls. it is running into your eyes, see your clothes. 10. G Never add fuel when the engine is HIGHLY FLAMMABLE. Allow the engine to stand behind the snowmobile when starting the engine to transport the snowmobile in the vicinity of...
Do not allow anyone to cool for operation of gasoline vapor, or get some gasoline, inhale a lot of the controls. it is running into your eyes, see your clothes. 10. G Never add fuel when the engine is HIGHLY FLAMMABLE. Allow the engine to stand behind the snowmobile when starting the engine to transport the snowmobile in the vicinity of...
Owners Manual
Page 16
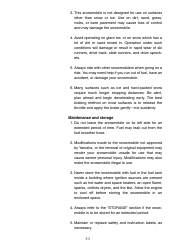
... Fuel may need help if you run out of control and may cause severe personal injury. Modifications may also make the snowmobile illegal to release the throttle and apply the brake gently-not suddenly. Maintain or replace safety ...fuel tank inside a building where ignition sources are present such as hot water and space heaters, an open flame, sparks, clothes dryers, and the like. Allow the engine to the snowmobile not approved by Yamaha, or the removal of dirt or sand mixed in an enclosed space. 4. Modifications made to cool off before storing the snowmobile in . Maintenance...
... Fuel may need help if you run out of control and may cause severe personal injury. Modifications may also make the snowmobile illegal to release the throttle and apply the brake gently-not suddenly. Maintain or replace safety ...fuel tank inside a building where ignition sources are present such as hot water and space heaters, an open flame, sparks, clothes dryers, and the like. Allow the engine to the snowmobile not approved by Yamaha, or the removal of dirt or sand mixed in an enclosed space. 4. Modifications made to cool off before storing the snowmobile in . Maintenance...
Owners Manual
Page 18
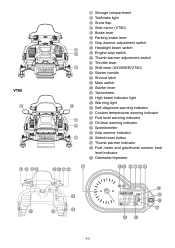
... compartment Tail/brake light Snow flap Side mirror (VT60) Brake lever Parking brake lever Grip warmer adjustment switch Headlight beam switch Engine stop switch Thumb warmer adjustment switch Throttle lever Shift lever (SXV60ER/VT60) Starter handle Shroud latch Main switch Starter lever Tachometer High beam indicator light Warning light Self-diagnosis warning indicator Coolant temperature warning indicator Fuel level warning indicator Oil level warning indicator Speedometer Grip warmer indicator Select/reset button Thumb warmer indicator Fuel meter and grip/thumb warmer heat...
... compartment Tail/brake light Snow flap Side mirror (VT60) Brake lever Parking brake lever Grip warmer adjustment switch Headlight beam switch Engine stop switch Thumb warmer adjustment switch Throttle lever Shift lever (SXV60ER/VT60) Starter handle Shroud latch Main switch Starter lever Tachometer High beam indicator light Warning light Self-diagnosis warning indicator Coolant temperature warning indicator Fuel level warning indicator Oil level warning indicator Speedometer Grip warmer indicator Select/reset button Thumb warmer indicator Fuel meter and grip/thumb warmer heat...
Owners Manual
Page 20
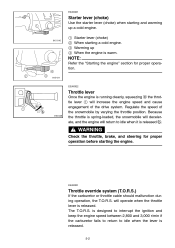
... interrupt the ignition and keep the engine speed between 2,800 and 3,000 r/min if the carburetor fails to return to idle when it is released. WARNING @ Check the throttle, brake, and steering for proper operation. @ ESU00022 Throttle lever Once the engine is released. 5-2 ESU00201 Starter lever (choke) Use the starter lever (choke) when starting and warming up When the engine is warm. Because the throttle is spring-loaded...
... interrupt the ignition and keep the engine speed between 2,800 and 3,000 r/min if the carburetor fails to return to idle when it is released. WARNING @ Check the throttle, brake, and steering for proper operation. @ ESU00022 Throttle lever Once the engine is released. 5-2 ESU00201 Starter lever (choke) Use the starter lever (choke) when starting and warming up When the engine is warm. Because the throttle is spring-loaded...
Owners Manual
Page 22
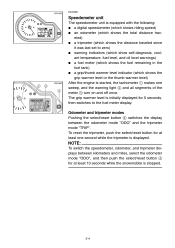
... displayed for 5 seconds, then switches to zero) G warning indicators (which show self-diagnosis, coolant temperature, fuel level, and oil level warnings) G a fuel meter (which shows the fuel remaining in the fuel tank) G a grip/thumb warmer ...speed) G an odometer (which shows the total distance traveled) G a tripmeter (which shows the grip warmer level or the thumb warmer level) After the engine is started, the tachometer 1 makes one second while the tripmeter is stopped. @ 5-4 Odometer and tripmeter modes Pushing the select/reset button 4 switches the display between kilometers and miles...
... displayed for 5 seconds, then switches to zero) G warning indicators (which show self-diagnosis, coolant temperature, fuel level, and oil level warnings) G a fuel meter (which shows the fuel remaining in the fuel tank) G a grip/thumb warmer ...speed) G an odometer (which shows the total distance traveled) G a tripmeter (which shows the grip warmer level or the thumb warmer level) After the engine is started, the tachometer 1 makes one second while the tripmeter is stopped. @ 5-4 Odometer and tripmeter modes Pushing the select/reset button 4 switches the display between kilometers and miles...
Owners Manual
Page 47
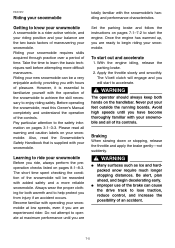
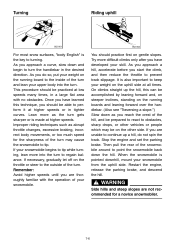
... the parking brake and follow the instructions on pages 8-1-8-3. Apply the throttle slowly and smoothly. Before operating the snowmobile, read the Snowmobiler's Safety Handbook that is essential to familiarize yourself with hours of an accident. @ 7-5 WARNING @ The operator should always keep both warmth and to start the engine. Riding your feet outside the running boards. Also, read this Owner's Manual...
... the parking brake and follow the instructions on pages 8-1-8-3. Apply the throttle slowly and smoothly. Before operating the snowmobile, read the Snowmobiler's Safety Handbook that is essential to familiarize yourself with hours of an accident. @ 7-5 WARNING @ The operator should always keep both warmth and to start the engine. Riding your feet outside the running boards. Also, read this Owner's Manual...
Owners Manual
Page 48
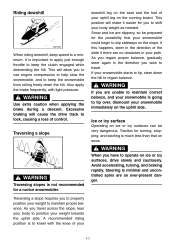
... to perform it at low speeds many times, in the desired direction. Stop the engine and set the parking brake. This procedure should be on the other side. When the snowmobile is made at all times. Try more as abrupt throttle changes, excessive braking, incorrect body movements, or too much speed for a novice snowmobiler. @ 7-6 Restart the engine, release the parking brake, and descend the hill. WARNING @ Side...
... to perform it at low speeds many times, in the desired direction. Stop the engine and set the parking brake. This procedure should be on the other side. When the snowmobile is made at all times. Try more as abrupt throttle changes, excessive braking, incorrect body movements, or too much speed for a novice snowmobiler. @ 7-6 Restart the engine, release the parking brake, and descend the hill. WARNING @ Side...
Owners Manual
Page 49
... across the slope, lean your body to tip over, dismount your weight towards the uphill side. WARNING @ WARNING @ Use extra caution when applying the brake during a descent. Steering is minimal and uncontrolled spins are unable to maintain correct balance, and your snowmobile starts to kneel with light pressure. A recommended riding position is important to apply just enough throttle to a minimum.
... across the slope, lean your body to tip over, dismount your weight towards the uphill side. WARNING @ WARNING @ Use extra caution when applying the brake during a descent. Steering is minimal and uncontrolled spins are unable to maintain correct balance, and your snowmobile starts to kneel with light pressure. A recommended riding position is important to apply just enough throttle to a minimum.
Owners Manual
Page 55
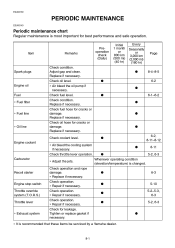
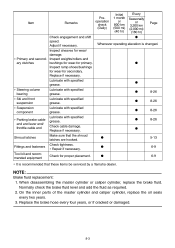
... 8-4-8-5 6-2 Engine oil Fuel ∗ Fuel filter ∗ Fuel line G 6-1-6-2 G G ∗ Oil line G 6-2, 8-11-8-12 G G Whenever operating condition (elevation/temperature) is recommended that these items be serviced by a Yamaha dealer. 8-1 Carburetor Recoil starter Engine stop switch Throttle override system (T.O.R.S.) Throttle lever ∗ Exhaust system ∗ It is changed. Replace if necessary. Check throttle lever operation. ∗ Adjust the jets. Check operation. ∗ Repair if necessary. ESU00139 8- PERIODIC MAINTENANCE ESU00140 Periodic maintenance chart...
... 8-4-8-5 6-2 Engine oil Fuel ∗ Fuel filter ∗ Fuel line G 6-1-6-2 G G ∗ Oil line G 6-2, 8-11-8-12 G G Whenever operating condition (elevation/temperature) is recommended that these items be serviced by a Yamaha dealer. 8-1 Carburetor Recoil starter Engine stop switch Throttle override system (T.O.R.S.) Throttle lever ∗ Exhaust system ∗ It is changed. Replace if necessary. Check throttle lever operation. ∗ Adjust the jets. Check operation. ∗ Repair if necessary. ESU00139 8- PERIODIC MAINTENANCE ESU00140 Periodic maintenance chart...
Owners Manual
Page 56
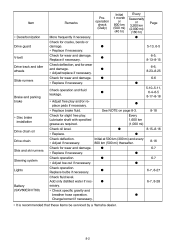
... mi) (160 hr) G Page ∗ Decarbonization Drive guard V-belt Drive track and idler wheels Slide runners More frequently if necessary. Check deflection, and for wear and damage. Check for wear and damage. ∗ Replace if necessary. Check for slight free play and/or replace pads if necessary. ∗ Replace brake fluid. Check oil level. ∗ Replace. Replace if necessary. Check operation. Lubricate shaft with...
... mi) (160 hr) G Page ∗ Decarbonization Drive guard V-belt Drive track and idler wheels Slide runners More frequently if necessary. Check deflection, and for wear and damage. Check for wear and damage. ∗ Replace if necessary. Check for slight free play and/or replace pads if necessary. ∗ Replace brake fluid. Check oil level. ∗ Replace. Replace if necessary. Check operation. Lubricate shaft with...
Owners Manual
Page 57
...; Primary and second- NOTE: @ Brake fluid replacement: 1. When disassembling the master cylinder or caliper cylinder, replace the brake fluid. Lubricate with specified grease. Check tightness. ∗ Repair if necessary. Lubricate with specified grease. ∗ Steering column bearing ∗ Ski and front suspension ∗ Suspension component ∗ Parking brake cable end and lever end/ throttle cable end Shroud latches Fittings and fasteners Tool kit and recommended equipment Lubricate with...
...; Primary and second- NOTE: @ Brake fluid replacement: 1. When disassembling the master cylinder or caliper cylinder, replace the brake fluid. Lubricate with specified grease. Check tightness. ∗ Repair if necessary. Lubricate with specified grease. ∗ Steering column bearing ∗ Ski and front suspension ∗ Suspension component ∗ Parking brake cable end and lever end/ throttle cable end Shroud latches Fittings and fasteners Tool kit and recommended equipment Lubricate with...
Owners Manual
Page 63
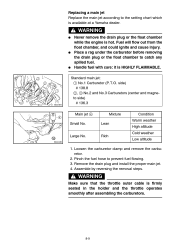
... the fuel hose to catch any spilled fuel. Standard main jet: 1 No.1 Carburetor (P.T.O. Assemble by reversing the removal steps. Replacing a main jet Replace the main jet according to the setting chart which is firmly seated in the holder and the throttle operates smoothly after assembling the carburetors. @ 8-9 Large No. 1. WARNING @ Make sure that the throttle outer cable is available at a Yamaha dealer...
... the fuel hose to catch any spilled fuel. Standard main jet: 1 No.1 Carburetor (P.T.O. Assemble by reversing the removal steps. Replacing a main jet Replace the main jet according to the setting chart which is firmly seated in the holder and the throttle operates smoothly after assembling the carburetors. @ 8-9 Large No. 1. WARNING @ Make sure that the throttle outer cable is available at a Yamaha dealer...
Owners Manual
Page 84
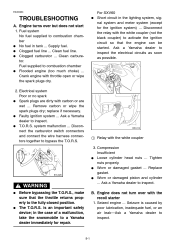
... fuel in the lighting system, signal system and meter system (except for repair. @ 9-1 TROUBLESHOOTING G A. Fuel system No fuel supplied to the fully-closed position. G Faulty ignition system ...Ask a Yamaha dealer to combustion chamber G Flooded engine (too much choke) ...Crank engine with carbon or are dirty with throttle open or wipe the spark plugs dry. 2. is caused by poor lubrication, inadequate fuel, or an air leak-Ask a Yamaha dealer...
... fuel in the lighting system, signal system and meter system (except for repair. @ 9-1 TROUBLESHOOTING G A. Fuel system No fuel supplied to the fully-closed position. G Faulty ignition system ...Ask a Yamaha dealer to combustion chamber G Flooded engine (too much choke) ...Crank engine with carbon or are dirty with throttle open or wipe the spark plugs dry. 2. is caused by poor lubrication, inadequate fuel, or an air leak-Ask a Yamaha dealer...
Owners Manual
Page 85
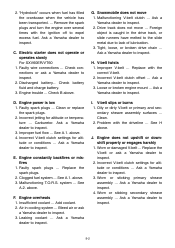
Electric starter does not operate or operates slowly For SXV60ER/VT60 1. Discharged battery...Check battery fluid and charge battery. 3. Engine power is caught in cooling system ...Bleed air or ask a Yamaha dealer to inspect. 2. Improper fuel flow ...See A.1. E. Malfunctioning T.O.R.S. F. Leaking coolant ...Ask a Yamaha dealer to inspect. G. Tight, loose, or broken drive chain ...Ask a Yamaha dealer to inspect. Incorrect V-belt clutch offset ...Ask a Yamaha dealer to inspect. 2. I. J. Faulty wire connections ...Check connections or ask...
Electric starter does not operate or operates slowly For SXV60ER/VT60 1. Discharged battery...Check battery fluid and charge battery. 3. Engine power is caught in cooling system ...Bleed air or ask a Yamaha dealer to inspect. 2. Improper fuel flow ...See A.1. E. Malfunctioning T.O.R.S. F. Leaking coolant ...Ask a Yamaha dealer to inspect. G. Tight, loose, or broken drive chain ...Ask a Yamaha dealer to inspect. Incorrect V-belt clutch offset ...Ask a Yamaha dealer to inspect. 2. I. J. Faulty wire connections ...Check connections or ask...
Owners Manual
Page 89
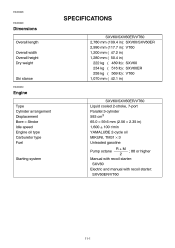
... length Overall width Overall height Dry weight Ski stance ESU00230 Engine CS-02E Type Cylinder arrangement Displacement Bore × Stroke Idle speed Engine oil type Carburetor type Fuel SXV60/SXV60ER/VT60 Liquid cooled 2-stroke, 7-port Parallel 3-cylinder 593 cm3 65.0 × 59.6 mm (2.56 × 2.35 in) 1,600 ± 100 r/min YAMALUBE 2-cycle oil MIKUNI, TM31 × 3 Unleaded gasoline R+M ; 88 or higher 2 Manual with recoil starter...
... length Overall width Overall height Dry weight Ski stance ESU00230 Engine CS-02E Type Cylinder arrangement Displacement Bore × Stroke Idle speed Engine oil type Carburetor type Fuel SXV60/SXV60ER/VT60 Liquid cooled 2-stroke, 7-port Parallel 3-cylinder 593 cm3 65.0 × 59.6 mm (2.56 × 2.35 in) 1,600 ± 100 r/min YAMALUBE 2-cycle oil MIKUNI, TM31 × 3 Unleaded gasoline R+M ; 88 or higher 2 Manual with recoil starter...
Owners Manual
Page 92
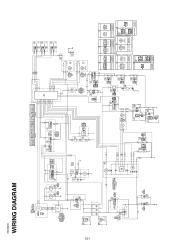
...Gy B O W (BLACK) R R/ W B (BLACK) R/ W R B (BLACK) a Z L/Y W É L/R G/Y B G Lg Y B U Y B Y [ Y Z R/ B B/G R/B G/B R/ B A R/ B G/R G/ R A G/ R G/ B G/ B A G/ B Ê O/B L/R B G/Y L/R O/B G/Y B O É L Y X B/G A B/G T B B G WIRE HARNESS SUB-WIRE HARNESS 3 Y R B B L (BLACK) (BLACK) B G B G É L/R G/Y B B Y G Gy B R/B Br B Y G W G B V G/B B/G (GREEN) (GREEN) B/G G G Y B Y B G/ Y L /R B O/B L/R B G/Y Ê Ê L G/ Y B L /R G/ Y B ` ` B B T B G B B F B L/R O/B G/Y B SUB-WIRE TAIL / BRAKE LIGHT SUB-WIRE HARNESS 3 HARNESS B A B ESU00233 1-
...Gy B O W (BLACK) R R/ W B (BLACK) R/ W R B (BLACK) a Z L/Y W É L/R G/Y B G Lg Y B U Y B Y [ Y Z R/ B B/G R/B G/B R/ B A R/ B G/R G/ R A G/ R G/ B G/ B A G/ B Ê O/B L/R B G/Y L/R O/B G/Y B O É L Y X B/G A B/G T B B G WIRE HARNESS SUB-WIRE HARNESS 3 Y R B B L (BLACK) (BLACK) B G B G É L/R G/Y B B Y G Gy B R/B Br B Y G W G B V G/B B/G (GREEN) (GREEN) B/G G G Y B Y B G/ Y L /R B O/B L/R B G/Y Ê Ê L G/ Y B L /R G/ Y B ` ` B B T B G B B F B L/R O/B G/Y B SUB-WIRE TAIL / BRAKE LIGHT SUB-WIRE HARNESS 3 HARNESS B A B ESU00233 1-
Owners Manual
Page 93
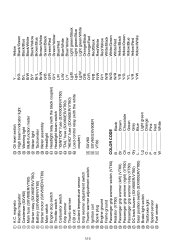
... Starter relay (SXV60ER/VT60) Battery (SXV60ER/VT60) Starter motor (SXV60ER/VT60) Main switch Engine stop switch Throttle switch Carburetor switch Grip warmer Thumb warmer CDI unit Coolant temperature sensor Grip warmer adjustment switch Thumb warmer adjustment switch Ignition coil Spark plug Engine ground Frame ground Passenger grip warmer switch (VT60) Resistor (VT60) Passenger grip warmer (left) (VT60) Passenger grip warmer (right) (VT60) Passenger grip warmer relay (VT60) DC back buzzer (SXV60ER/VT60) Gear position switch (SXV60ER/VT60) Brake light switch Tail/brake light Speed sensor Fuel...
... Starter relay (SXV60ER/VT60) Battery (SXV60ER/VT60) Starter motor (SXV60ER/VT60) Main switch Engine stop switch Throttle switch Carburetor switch Grip warmer Thumb warmer CDI unit Coolant temperature sensor Grip warmer adjustment switch Thumb warmer adjustment switch Ignition coil Spark plug Engine ground Frame ground Passenger grip warmer switch (VT60) Resistor (VT60) Passenger grip warmer (left) (VT60) Passenger grip warmer (right) (VT60) Passenger grip warmer relay (VT60) DC back buzzer (SXV60ER/VT60) Gear position switch (SXV60ER/VT60) Brake light switch Tail/brake light Speed sensor Fuel...