
Owners Manual
Page 6
... spark plugs ...6-9 Canister (for California only) ...6-10 Engine oil and oil filter cartridge ...6-11 Final gear oil ...6-14 Coolant ...6-15 Cleaning the air filter element ...6-18 Carburetors ...6-19 Checking the throttle cable free play ...6-19 Valve clearance ...6-20 Tires ...6-20 Cast wheels ...6-22 Accessories and replacement parts ...6-23 Clutch lever ...6-23 Adjusting the brake lever free play ...6-24 Adjusting the rear brake light switch ...6-24 Checking the front and rear brake pads ...6-25 Checking the brake and clutch fluid...
... spark plugs ...6-9 Canister (for California only) ...6-10 Engine oil and oil filter cartridge ...6-11 Final gear oil ...6-14 Coolant ...6-15 Cleaning the air filter element ...6-18 Carburetors ...6-19 Checking the throttle cable free play ...6-19 Valve clearance ...6-20 Tires ...6-20 Cast wheels ...6-22 Accessories and replacement parts ...6-23 Clutch lever ...6-23 Adjusting the brake lever free play ...6-24 Adjusting the rear brake light switch ...6-24 Checking the front and rear brake pads ...6-25 Checking the brake and clutch fluid...
Owners Manual
Page 7
... bearings ...6-30 Battery ...6-31 Replacing the fuses ...6-33 Replacing the headlight bulb ...6-34 Replacing a turn signal light bulb or the tail/brake light bulb ...6-35 Front wheel ...6-36 Rear wheel ...6-37 Troubleshooting ...6-39 Troubleshooting charts ...6-40 MOTORCYCLE CARE AND STORAGE ...7-1 Care ...7-1 Storage ...7-3 SPECIFICATIONS ...8-1 CONSUMER INFORMATION...9-1 Identification numbers ...9-1 Reporting safety defects ...9-3 Motorcycle noise regulation ...9-4 Maintenance record ...9-5 YAMAHA MOTOR CORPORATION, U.S.A. STREET AND ENDURO MOTORCYCLE LIMITED WARRANTY ...9-7 YAMAHA EXTENDED...
... bearings ...6-30 Battery ...6-31 Replacing the fuses ...6-33 Replacing the headlight bulb ...6-34 Replacing a turn signal light bulb or the tail/brake light bulb ...6-35 Front wheel ...6-36 Rear wheel ...6-37 Troubleshooting ...6-39 Troubleshooting charts ...6-40 MOTORCYCLE CARE AND STORAGE ...7-1 Care ...7-1 Storage ...7-3 SPECIFICATIONS ...8-1 CONSUMER INFORMATION...9-1 Identification numbers ...9-1 Reporting safety defects ...9-3 Motorcycle noise regulation ...9-4 Maintenance record ...9-5 YAMAHA MOTOR CORPORATION, U.S.A. STREET AND ENDURO MOTORCYCLE LIMITED WARRANTY ...9-7 YAMAHA EXTENDED...
Owners Manual
Page 10
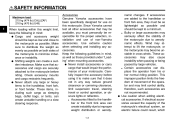
... that may become unstable in any way reduce ground clearance or cornering clearance, limit suspension travel, steering travel or control operation, or obscure lights or reflectors. Since Yamaha cannot test all other accessories that it to the motorcycle before using it does not in cross winds. Wind may attempt to lift the motorcycle, or the motorcycle may be...
... that may become unstable in any way reduce ground clearance or cornering clearance, limit suspension travel, steering travel or control operation, or obscure lights or reflectors. Since Yamaha cannot test all other accessories that it to the motorcycle before using it does not in cross winds. Wind may attempt to lift the motorcycle, or the motorcycle may be...
Owners Manual
Page 11
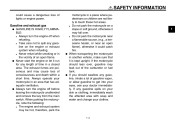
... leak out of the carburetor or fuel tank. SAFETY INFORMATION could catch fire. Never refuel while smoking or in a closed area. Always operate your doctor immediately. If you should lean over . If any length of time in the vicinity of consciousness and death within a short time. Gasoline and exhaust gas G GASOLINE IS HIGHLY FLAMMABLE: Always turn the engine off when refueling. G Never start...
... leak out of the carburetor or fuel tank. SAFETY INFORMATION could catch fire. Never refuel while smoking or in a closed area. Always operate your doctor immediately. If you should lean over . If any length of time in the vicinity of consciousness and death within a short time. Gasoline and exhaust gas G GASOLINE IS HIGHLY FLAMMABLE: Always turn the engine off when refueling. G Never start...
Owners Manual
Page 17
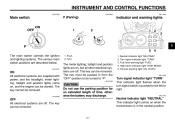
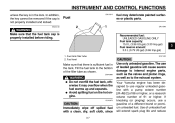
... removed. The key can be removed. Fuel level warning light "FUEL" 4. ON All electrical systems are supplied with power, and the headlight, meter lighting, taillight and position lights come on , but all other electrical systems are on , and the engine can be started. Turn signal indicator light "TURN" 3. Push. 2. INSTRUMENT AND CONTROL FUNCTIONS EAU10450 EAU10822 EAU11003 Main switch P (Parking) Indicator and warning lights 2 3 4 5 6 7 8 9 The main switch controls the ignition and lighting systems. The various main switch positions are...
... removed. The key can be removed. Fuel level warning light "FUEL" 4. ON All electrical systems are supplied with power, and the headlight, meter lighting, taillight and position lights come on , but all other electrical systems are on , and the engine can be started. Turn signal indicator light "TURN" 3. Push. 2. INSTRUMENT AND CONTROL FUNCTIONS EAU10450 EAU10822 EAU11003 Main switch P (Parking) Indicator and warning lights 2 3 4 5 6 7 8 9 The main switch controls the ignition and lighting systems. The various main switch positions are...
Owners Manual
Page 18
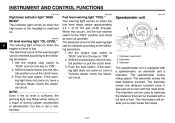
...". 2. Set the engine stop switch to "RUN" and turn the key to plan future fuel stops. 3-2 Shift the transmission into the neutral position or pull the clutch lever. 3. Push the start switch. Tripmeter reset knob 2. When this is not a malfunction. If the warning light does not come on , have a Yamaha dealer check the electrical circuit. Speedometer unit 1. Shift the transmission into the neutral position or pull the clutch lever. 3. Tripmeter...
...". 2. Set the engine stop switch to "RUN" and turn the key to plan future fuel stops. 3-2 Shift the transmission into the neutral position or pull the clutch lever. 3. Push the start switch. Tripmeter reset knob 2. When this is not a malfunction. If the warning light does not come on , have a Yamaha dealer check the electrical circuit. Speedometer unit 1. Shift the transmission into the neutral position or pull the clutch lever. 3. Tripmeter...
Owners Manual
Page 19
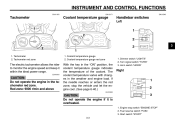
... the ideal power range. INSTRUMENT AND CONTROL FUNCTIONS EAU11851 EAU12171 EAU12343 Tachometer Coolant temperature gauge Handlebar switches Left 2 3 4 1. Coolant temperature gauge red zone The electric tachometer allows the rider to monitor the engine speed and keep it is overheated. 1. Start switch "START" 3-3 Tachometer 2. If the needle reaches or enters the red zone, stop switch "ENGINE STOP" 2. Turn signal switch "TURN" 3. The coolant temperature varies with changes in the weather and engine load. Dimmer switch "LIGHTS" 2. Coolant temperature gauge 2.
... the ideal power range. INSTRUMENT AND CONTROL FUNCTIONS EAU11851 EAU12171 EAU12343 Tachometer Coolant temperature gauge Handlebar switches Left 2 3 4 1. Coolant temperature gauge red zone The electric tachometer allows the rider to monitor the engine speed and keep it is overheated. 1. Start switch "START" 3-3 Tachometer 2. If the needle reaches or enters the red zone, stop switch "ENGINE STOP" 2. Turn signal switch "TURN" 3. The coolant temperature varies with changes in the weather and engine load. Dimmer switch "LIGHTS" 2. Coolant temperature gauge 2.
Owners Manual
Page 20
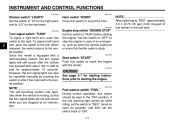
INSTRUMENT AND CONTROL FUNCTIONS EAU12410 EAU12510 Dimmer switch "LIGHTS" Set the switch to "HI" for the high beam and to "LO" for starting instructions prior to starting the engine. When released, the switch returns to "ON". 3-4 Engine stop the engine in case of fuel remain in the fuel tank. 2 3 4 5 6 7 8 9 Turn signal switch "TURN" To signal a right-hand turn signal lights can also be kept in after the vehicle has traveled both about 150 m (490 ft...
INSTRUMENT AND CONTROL FUNCTIONS EAU12410 EAU12510 Dimmer switch "LIGHTS" Set the switch to "HI" for the high beam and to "LO" for starting instructions prior to starting the engine. When released, the switch returns to "ON". 3-4 Engine stop the engine in case of fuel remain in the fuel tank. 2 3 4 5 6 7 8 9 Turn signal switch "TURN" To signal a right-hand turn signal lights can also be kept in after the vehicle has traveled both about 150 m (490 ft...
Owners Manual
Page 23
... fuel tank, otherwise it may deteriorate painted surfaces or plastic parts. Fuel tank filler tube 2. Use of 91 or higher. Fill the fuel tank to the exhaust system. Avoid spilling fuel on the hot engine. ECA10070 CAUTION: Use only unleaded gasoline. INSTRUMENT AND CONTROL FUNCTIONS unless the key is in the tank. EAU13300 WARNING Make sure that there is sufficient fuel in the lock. EWA10130 EAU13210 Fuel fuel...
... fuel tank, otherwise it may deteriorate painted surfaces or plastic parts. Fuel tank filler tube 2. Use of 91 or higher. Fill the fuel tank to the exhaust system. Avoid spilling fuel on the hot engine. ECA10070 CAUTION: Use only unleaded gasoline. INSTRUMENT AND CONTROL FUNCTIONS unless the key is in the tank. EAU13300 WARNING Make sure that there is sufficient fuel in the lock. EWA10130 EAU13210 Fuel fuel...
Owners Manual
Page 35
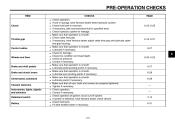
...if necessary. Check operation of ignition circuit cut-off system. PAGE Clutch G G G G 6-23, 6-25 Throttle grip G G 6-19, 6-27 2 3 Control cables G G G 6-27 4 6-20, 6-22 Wheels and tires G G G 5 6-27 6-28 6-28 - - 3-14 6-31 Brake and shift pedals Brake and clutch levers Centerstand, sidestand Chassis fasteners Instruments, lights, signals and switches Sidestand switch Battery G G G G G...have Yamaha dealer check vehicle. Fill with distilled water if necessary. Lubricate if necessary. PRE-OPERATION CHECKS ITEM G G CHECKS Check operation. Make sure that all nuts, bolts ...
...if necessary. Check operation of ignition circuit cut-off system. PAGE Clutch G G G G 6-23, 6-25 Throttle grip G G 6-19, 6-27 2 3 Control cables G G G 6-27 4 6-20, 6-22 Wheels and tires G G G 5 6-27 6-28 6-28 - - 3-14 6-31 Brake and shift pedals Brake and clutch levers Centerstand, sidestand Chassis fasteners Instruments, lights, signals and switches Sidestand switch Battery G G G G G...have Yamaha dealer check vehicle. Fill with distilled water if necessary. Lubricate if necessary. PRE-OPERATION CHECKS ITEM G G CHECKS Check operation. Make sure that all nuts, bolts ...
Owners Manual
Page 36
... any length of time. Consult a Yamaha dealer regarding any one of the ignition circuit cut -off system according to preserve the battery. Starting and warming up . NOTE: If the engine fails to "RUN". Each starting the engine, check the function of the following conditions must be as short as possible. 5-1 CAUTION: G The oil level warning light and fuel level warning light should be met: G The transmission is in gear...
... any length of time. Consult a Yamaha dealer regarding any one of the ignition circuit cut -off system according to preserve the battery. Starting and warming up . NOTE: If the engine fails to "RUN". Each starting the engine, check the function of the following conditions must be as short as possible. 5-1 CAUTION: G The oil level warning light and fuel level warning light should be met: G The transmission is in gear...
Owners Manual
Page 38
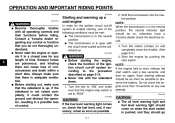
..., close the throttle, and at the same time, 5-3 To decelerate 1. At the recommended shift points shown in and use the clutch while changing gears to withstand the shock of engine power available for long distances. Inadequate lubrication may damage the transmission. The neutral indicator light should come on. Shift the transmission into the neutral position.) 6. Shift pedal Shifting gears lets you control the amount of forced shifting. The transmission is properly...
..., close the throttle, and at the same time, 5-3 To decelerate 1. At the recommended shift points shown in and use the clutch while changing gears to withstand the shock of engine power available for long distances. Inadequate lubrication may damage the transmission. The neutral indicator light should come on. Shift the transmission into the neutral position.) 6. Shift pedal Shifting gears lets you control the amount of forced shifting. The transmission is properly...
Owners Manual
Page 42
... in the performance of performance, excessive emissions, and render the vehicle unsafe for use. Consult a Yamaha dealer before attempting any changes. 6-2 EWA10340 1 2 3 4 5 6 7 8 9 WARNING Modifications not approved by Yamaha may be necessary to assist you . However, additional tools such as a torque wrench may cause loss of preventive maintenance and minor repairs. PERIODIC MAINTENANCE AND MINOR REPAIR owner's tool kit are intended to perform certain maintenance work correctly.
... in the performance of performance, excessive emissions, and render the vehicle unsafe for use. Consult a Yamaha dealer before attempting any changes. 6-2 EWA10340 1 2 3 4 5 6 7 8 9 WARNING Modifications not approved by Yamaha may be necessary to assist you . However, additional tools such as a torque wrench may cause loss of preventive maintenance and minor repairs. PERIODIC MAINTENANCE AND MINOR REPAIR owner's tool kit are intended to perform certain maintenance work correctly.
Owners Manual
Page 43
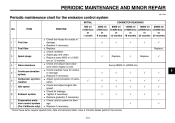
... engine idle speed. Replace every 8000 mi (13000 km) or 12 months. Check for damage. PERIODIC MAINTENANCE AND MINOR REPAIR EAU17600 Periodic maintenance chart for cracks or damage. Replace if necessary. Replace gasket(s) if necessary. Replace if necessary. 2 3 Replace. √ Replace. √ Replace. √ 4 5 Every 26600 mi (42000 km 6 7 8 9 √ √ * Since these items require special tools, data and technical skills, have a Yamaha dealer perform the service...
... engine idle speed. Replace every 8000 mi (13000 km) or 12 months. Check for damage. PERIODIC MAINTENANCE AND MINOR REPAIR EAU17600 Periodic maintenance chart for cracks or damage. Replace if necessary. Replace gasket(s) if necessary. Replace if necessary. 2 3 Replace. √ Replace. √ Replace. √ 4 5 Every 26600 mi (42000 km 6 7 8 9 √ √ * Since these items require special tools, data and technical skills, have a Yamaha dealer perform the service...
Owners Manual
Page 47
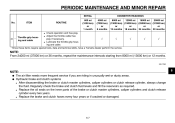
... clutch master cylinders, caliper cylinders or clutch release cylinder, always change the fluid. Replace the brake and clutch hoses every four years or if cracked or damaged. Replace the oil seals on the inner parts of the brake or clutch master cylinders, caliper cylinders and clutch release cylinder every two years. PERIODIC MAINTENANCE AND MINOR REPAIR INITIAL No. G G √ √ √ 2 3 4 5 6 7 8 9 NOTE: From 24000 mi (37000 km) or 36 months, repeat the maintenance intervals starting...
... clutch master cylinders, caliper cylinders or clutch release cylinder, always change the fluid. Replace the brake and clutch hoses every four years or if cracked or damaged. Replace the oil seals on the inner parts of the brake or clutch master cylinders, caliper cylinders and clutch release cylinder every two years. PERIODIC MAINTENANCE AND MINOR REPAIR INITIAL No. G G √ √ √ 2 3 4 5 6 7 8 9 NOTE: From 24000 mi (37000 km) or 36 months, repeat the maintenance intervals starting...
Owners Manual
Page 60
... riding speed and with use, resulting in the periodic maintenance and lubrication chart. Do not carry loosely packed items that can shift. Tire air pressure The tire air pressure should be adjusted by a Yamaha dealer at the intervals specified in improper air-fuel mixture and/or engine noise. To prevent this from side to the center of rider, passenger, cargo, and accessories approved for this model. EWA10500 G G 7 8 9 WARNING The tire air pressure...
... riding speed and with use, resulting in the periodic maintenance and lubrication chart. Do not carry loosely packed items that can shift. Tire air pressure The tire air pressure should be adjusted by a Yamaha dealer at the intervals specified in improper air-fuel mixture and/or engine noise. To prevent this from side to the center of rider, passenger, cargo, and accessories approved for this model. EWA10500 G G 7 8 9 WARNING The tire air pressure...
Owners Manual
Page 64
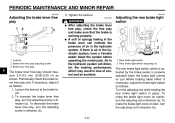
... a Yamaha dealer bleed the system before braking takes effect. To increase the brake lever free play and make the brake light come on just before operating the motorcycle. If necessary, adjust the brake light switch as shown. Rear brake light switch 2. Brake lever free play adjusting screw 3. Air in the hydraulic system will diminish the braking performance, which is activated by the brake pedal, is working properly. Turn the...
... a Yamaha dealer bleed the system before braking takes effect. To increase the brake lever free play and make the brake light come on just before operating the motorcycle. If necessary, adjust the brake light switch as shown. Rear brake light switch 2. Brake lever free play adjusting screw 3. Air in the hydraulic system will diminish the braking performance, which is activated by the brake pedal, is working properly. Turn the...
Owners Manual
Page 74
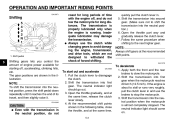
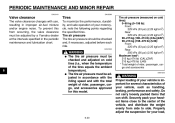
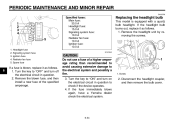
...PERIODIC MAINTENANCE AND MINOR REPAIR EAU23780 1 2 3 4 5 6 7 8 9 1. Headlight fuse 2. Remove the headlight unit by removing the screws. Screw 2. If a fuse is equipped with a quartz bulb headlight. If the fuse immediately blows again, have a Yamaha dealer check the electrical system. 1. Ignition fuse 4. If the headlight bulb burns out, replace it as follows. 1. Spare fuse Specified fuses: Main fuse: 30.0 A Headlight fuse: 15.0 A Signaling system fuse: 10.0 A Radiator fan fuse: 10.0 A Ignition fuse: 10.0 A ECA10640 Replacing the headlight bulb This model is blown, replace it...
...PERIODIC MAINTENANCE AND MINOR REPAIR EAU23780 1 2 3 4 5 6 7 8 9 1. Headlight fuse 2. Remove the headlight unit by removing the screws. Screw 2. If a fuse is equipped with a quartz bulb headlight. If the fuse immediately blows again, have a Yamaha dealer check the electrical system. 1. Ignition fuse 4. If the headlight bulb burns out, replace it as follows. 1. Spare fuse Specified fuses: Main fuse: 30.0 A Headlight fuse: 15.0 A Signaling system fuse: 10.0 A Radiator fan fuse: 10.0 A Ignition fuse: 10.0 A ECA10640 Replacing the headlight bulb This model is blown, replace it...
Owners Manual
Page 88
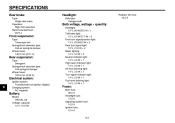
...; 1 Turn signal indicator light: 14 V, 3.0 W × 1 Fuel level warning light: 14 V, 3.0 W × 1 1 2 3 4 5 6 7 8 9 Front suspension: Type: Telescopic fork Spring/shock absorber type: Coil-air spring/oil damper Wheel travel: 140.0 mm (5.51 in) Rear suspension: Type: Swingarm Spring/shock absorber type: Coil spring/oil damper Wheel travel: 100.0 mm (3.94 in) Electrical system: Ignition system: Transistorized coil ignition (digital) Charging system: AC magneto Fuses: Main fuse: 30.0 A Headlight fuse: 15.0 A Signaling system fuse: 10.0 A Ignition fuse: 10.0 A 8-3 Battery: Model: YB16AL...
...; 1 Turn signal indicator light: 14 V, 3.0 W × 1 Fuel level warning light: 14 V, 3.0 W × 1 1 2 3 4 5 6 7 8 9 Front suspension: Type: Telescopic fork Spring/shock absorber type: Coil-air spring/oil damper Wheel travel: 140.0 mm (5.51 in) Rear suspension: Type: Swingarm Spring/shock absorber type: Coil spring/oil damper Wheel travel: 100.0 mm (3.94 in) Electrical system: Ignition system: Transistorized coil ignition (digital) Charging system: AC magneto Fuses: Main fuse: 30.0 A Headlight fuse: 15.0 A Signaling system fuse: 10.0 A Ignition fuse: 10.0 A 8-3 Battery: Model: YB16AL...
Owners Manual
Page 99
... R Rear brake light switch, adjusting ...6-24 Rear suspension, lubricating...6-29 Rider seat...3-9 H Handlebar switches ...3-3 Headlight bulb, replacing...6-34 Helmet holder ...3-10 High beam indicator light...3-2 Horn switch...3-4 S Safety defects, reporting ...9-3 Safety information ...1-1 Shifting ...5-3 Shift pedal ...3-5 Shock absorber assemblies, adjusting...3-12 Sidestand ...3-14 Spark plugs, checking ...6-9 Specifications ...8-1 Speedometer unit...3-2 Starter (choke) lever...3-8 Starting and warming up a cold engine...5-1 Start switch...3-4 Steering, checking...6-30 Steering lock...
... R Rear brake light switch, adjusting ...6-24 Rear suspension, lubricating...6-29 Rider seat...3-9 H Handlebar switches ...3-3 Headlight bulb, replacing...6-34 Helmet holder ...3-10 High beam indicator light...3-2 Horn switch...3-4 S Safety defects, reporting ...9-3 Safety information ...1-1 Shifting ...5-3 Shift pedal ...3-5 Shock absorber assemblies, adjusting...3-12 Sidestand ...3-14 Spark plugs, checking ...6-9 Specifications ...8-1 Speedometer unit...3-2 Starter (choke) lever...3-8 Starting and warming up a cold engine...5-1 Start switch...3-4 Steering, checking...6-30 Steering lock...