
Owners Manual
Page 7
......5-4 Parking ...5-5 PERIODIC MAINTENANCE AND MINOR REPAIR ...6-1 PERIODIC MAINTENANCE ...6-1 Owner's tool kit ...6-1 Periodic maintenance chart for the emission control system ...6-3 General maintenance and lubrication chart ...6-4 Removing and installing panels ...6-8 Checking the spark plugs ...6-9 Canister (for California only) ...6-10 Engine oil and oil filter element ...6-11 Final gear oil ...6-13 Cleaning the air filter element ...6-14 Carburetors ...6-16 Checking the throttle cable free play ...6-16 Valve clearance ...6-16 Tires ...6-17 Spoke wheels ...6-20 Accessories and replacement...
......5-4 Parking ...5-5 PERIODIC MAINTENANCE AND MINOR REPAIR ...6-1 PERIODIC MAINTENANCE ...6-1 Owner's tool kit ...6-1 Periodic maintenance chart for the emission control system ...6-3 General maintenance and lubrication chart ...6-4 Removing and installing panels ...6-8 Checking the spark plugs ...6-9 Canister (for California only) ...6-10 Engine oil and oil filter element ...6-11 Final gear oil ...6-13 Cleaning the air filter element ...6-14 Carburetors ...6-16 Checking the throttle cable free play ...6-16 Valve clearance ...6-16 Tires ...6-17 Spoke wheels ...6-20 Accessories and replacement...

Owners Manual
Page 8
...the fuses ...6-31 Replacing the headlight bulb ...6-32 Replacing a turn signal light bulb or the tail/brake light bulb ...6-33 Supporting the motorcycle ...6-34 Front wheel ...6-35 Rear wheel ...6-36 Troubleshooting ...6-38 Troubleshooting chart ...6-39 MOTORCYCLE CARE AND STORAGE ...7-1 Care ...7-1 Storage ...7-3 SPECIFICATIONS ...8-1 CONSUMER INFORMATION ...9-1 Identification numbers ...9-1 Reporting safety defects ...9-3 Motorcycle noise regulation ...9-4 Maintenance record ...9-5 YAMAHA MOTOR CORPORATION, U.S.A. STREET AND ENDURO MOTORCYCLE LIMITED WARRANTY ...9-7 YAMAHA EXTENDED SERVICE...
...the fuses ...6-31 Replacing the headlight bulb ...6-32 Replacing a turn signal light bulb or the tail/brake light bulb ...6-33 Supporting the motorcycle ...6-34 Front wheel ...6-35 Rear wheel ...6-36 Troubleshooting ...6-38 Troubleshooting chart ...6-39 MOTORCYCLE CARE AND STORAGE ...7-1 Care ...7-1 Storage ...7-3 SPECIFICATIONS ...8-1 CONSUMER INFORMATION ...9-1 Identification numbers ...9-1 Reporting safety defects ...9-3 Motorcycle noise regulation ...9-4 Maintenance record ...9-5 YAMAHA MOTOR CORPORATION, U.S.A. STREET AND ENDURO MOTORCYCLE LIMITED WARRANTY ...9-7 YAMAHA EXTENDED SERVICE...
Owners Manual
Page 10
...handling if the weight distribution of the motorcycle is changed. Modifications Modifications made to this motorcycle not approved by road and traffic conditions. • Always signal before turning or changing lanes. Use extra care when riding a motorcycle that other drugs. The posture of the operator and passenger is not suitable for off-road... added cargo or accessories. SAFETY INFORMATION wide on a turn due to EXCESSIVE SPEED or undercornering (insufficient lean angle for the speed). • Always obey the speed limit and never travel faster than warranted by Yamaha, or the removal...
...handling if the weight distribution of the motorcycle is changed. Modifications Modifications made to this motorcycle not approved by road and traffic conditions. • Always signal before turning or changing lanes. Use extra care when riding a motorcycle that other drugs. The posture of the operator and passenger is not suitable for off-road... added cargo or accessories. SAFETY INFORMATION wide on a turn due to EXCESSIVE SPEED or undercornering (insufficient lean angle for the speed). • Always obey the speed limit and never travel faster than warranted by Yamaha, or the removal...
Owners Manual
Page 11
... normal riding position. G Shifting weights can create unstable handling or slow steering response. Check accessory mounts and cargo restraints frequently. Use extreme caution when selecting and installing any large or heavy items to the handlebar, front fork, or front fender. Keep the following in cross winds. SAFETY INFORMATION Loading The total weight of the operator, passenger, accessories and cargo must be...
... normal riding position. G Shifting weights can create unstable handling or slow steering response. Check accessory mounts and cargo restraints frequently. Use extreme caution when selecting and installing any large or heavy items to the handlebar, front fork, or front fender. Keep the following in cross winds. SAFETY INFORMATION Loading The total weight of the operator, passenger, accessories and cargo must be...
Owners Manual
Page 12
... or fuel tank. If you should lean over . • Do not park the motorcycle near a flammable source (e.g. If it could cause a dangerous loss of lights or engine power. G 1 G Gasoline and exhaust gas G GASOLINE IS HIGHLY FLAMMABLE: • Always turn the engine off when refueling. • Take care not to get into your 1-4 eyes, see your clothes. If electrical accessories exceed the capacity of...
... or fuel tank. If you should lean over . • Do not park the motorcycle near a flammable source (e.g. If it could cause a dangerous loss of lights or engine power. G 1 G Gasoline and exhaust gas G GASOLINE IS HIGHLY FLAMMABLE: • Always turn the engine off when refueling. • Take care not to get into your 1-4 eyes, see your clothes. If electrical accessories exceed the capacity of...

Owners Manual
Page 21
... "LOCK" while the vehicle is used to "OFF", even if the engine stalls. Remove the key. 3-1 EAU10580 3 1. Push. 2. Push. 2. EWA10060 WARNING ON All electrical circuits are supplied with power, and the meter lighting, taillight and position lights come on until the key is started . NOTE: The headlight comes on automatically when the engine is turned to lock the steering. Turn. 1. EAU10680 To unlock the steering LOCK The steering is stopped before turning...
... "LOCK" while the vehicle is used to "OFF", even if the engine stalls. Remove the key. 3-1 EAU10580 3 1. Push. 2. Push. 2. EWA10060 WARNING ON All electrical circuits are supplied with power, and the meter lighting, taillight and position lights come on until the key is started . NOTE: The headlight comes on automatically when the engine is turned to lock the steering. Turn. 1. EAU10680 To unlock the steering LOCK The steering is stopped before turning...

Owners Manual
Page 22
... light " " Engine trouble warning light " " " EAU11020 Turn signal indicator light " " This indicator light flashes when the turn signal switch is equipped with a speedometer, an odometer and a tripmeter. When this occurs, have a Yamaha dealer check the electrical circuit. 1. 2. 3. 4. The electrical circuit of the warning light can be checked by turning the key to the left or right. The speedometer shows riding speed. If the warning light does not come on when the transmission...
... light " " Engine trouble warning light " " " EAU11020 Turn signal indicator light " " This indicator light flashes when the turn signal switch is equipped with a speedometer, an odometer and a tripmeter. When this occurs, have a Yamaha dealer check the electrical circuit. 1. 2. 3. 4. The electrical circuit of the warning light can be checked by turning the key to the left or right. The speedometer shows riding speed. If the warning light does not come on when the transmission...
Owners Manual
Page 23
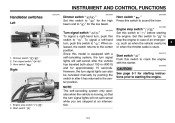
... at an intersection. Start switch " " / " 3-3 Dimmer switch " / " 2. EAU12710 3 Start switch " " Push this switch to starting the engine. NOTE: The self-canceling system only operates when the vehicle is moving, so that the turn signal lights can also be canceled manually by pushing the switch in case of an emergency, such as when the vehicle overturns or when the throttle cable is equipped with the starter. ECA10050 CAUTION...
... at an intersection. Start switch " " / " 3-3 Dimmer switch " / " 2. EAU12710 3 Start switch " " Push this switch to starting the engine. NOTE: The self-canceling system only operates when the vehicle is moving, so that the turn signal lights can also be canceled manually by pushing the switch in case of an emergency, such as when the vehicle overturns or when the throttle cable is equipped with the starter. ECA10050 CAUTION...
Owners Manual
Page 27
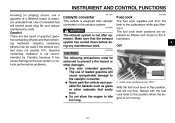
... when the engine is equipped with catalytic converters in the illustrations. 3 OFF WARNING The exhaust system is hot after operation. Gasohol containing ethanol can cause damage to the fuel system or vehicle performance problems. EAU13441 EAU13550 Catalytic converter This vehicle is not running. 3-7 EWA10860 Fuel cock The fuel cock supplies fuel from the tank to this position, fuel will extend spark plug life and reduce maintenance costs. G Never park the vehicle near possible fire hazards...
... when the engine is equipped with catalytic converters in the illustrations. 3 OFF WARNING The exhaust system is hot after operation. Gasohol containing ethanol can cause damage to the fuel system or vehicle performance problems. EAU13441 EAU13550 Catalytic converter This vehicle is not running. 3-7 EWA10860 Fuel cock The fuel cock supplies fuel from the tank to this position, fuel will extend spark plug life and reduce maintenance costs. G Never park the vehicle near possible fire hazards...

Owners Manual
Page 33
... 3 1. INSTRUMENT AND CONTROL FUNCTIONS EWA10220 EAU15150 EAU15301 WARNING This shock absorber contains highly pressurized nitrogen gas. The manufacturer cannot be held responsible for an explanation of control. G Do not deform or damage the gas cylinder in any way, as this system regularly as described 3-13 G Always have a Yamaha dealer service the shock absorber. Raise the sidestand or lower it may result from improper handling...
... 3 1. INSTRUMENT AND CONTROL FUNCTIONS EWA10220 EAU15150 EAU15301 WARNING This shock absorber contains highly pressurized nitrogen gas. The manufacturer cannot be held responsible for an explanation of control. G Do not deform or damage the gas cylinder in any way, as this system regularly as described 3-13 G Always have a Yamaha dealer service the shock absorber. Raise the sidestand or lower it may result from improper handling...

Owners Manual
Page 38
Check tire condition and tread depth. PAGE Wheels and tires 6-17, 6-20 Brake and shift pedals Brake and clutch levers Sidestand • Make sure that operation is smooth. • Lubricate pedal pivoting points if ...operation. • Correct if necessary. • Check operation of ignition circuit cut-off system. • If system is defective, have Yamaha dealer check vehicle. 6-27 6-27 6-28 - - 3-13 4 Chassis fasteners Instruments, lights, signals and switches Sidestand switch 4-3 PRE-OPERATION CHECKS ITEM CHECKS Check for damage. Correct if necessary. Check air pressure.
Check tire condition and tread depth. PAGE Wheels and tires 6-17, 6-20 Brake and shift pedals Brake and clutch levers Sidestand • Make sure that operation is smooth. • Lubricate pedal pivoting points if ...operation. • Correct if necessary. • Check operation of ignition circuit cut-off system. • If system is defective, have Yamaha dealer check vehicle. 6-27 6-27 6-28 - - 3-13 4 Chassis fasteners Instruments, lights, signals and switches Sidestand switch 4-3 PRE-OPERATION CHECKS ITEM CHECKS Check for damage. Correct if necessary. Check air pressure.
Owners Manual
Page 39
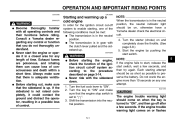
... area for the ignition circuit cut -off after a few seconds, and then try again. Turn the fuel cock lever to the procedure described on when the key is up. Shift the transmission into the neutral position. Exhaust fumes are poisonous, and inhaling them can cause loss of time. Each starting attempt should come on page 3-14. Never start the engine or operate...
... area for the ignition circuit cut -off after a few seconds, and then try again. Turn the fuel cock lever to the procedure described on when the key is up. Shift the transmission into the neutral position. Exhaust fumes are poisonous, and inhaling them can cause loss of time. Each starting attempt should come on page 3-14. Never start the engine or operate...
Owners Manual
Page 41
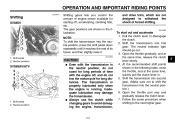
... higher gear. 5 5-3 and drive train, which are shown in . 5. Shift the transmission into the neutral position.) 6. Shift the transmission into second gear. (Make sure not to shift the transmission into first gear. OPERATION AND IMPORTANT RIDING POINTS EAU16671 Shifting XVS65V Shifting gears lets you control the amount of engine power available for long distances. Shift pedal 2. Inadequate lubrication may damage the transmission. Open the throttle part way and gradually release the clutch...
... higher gear. 5 5-3 and drive train, which are shown in . 5. Shift the transmission into the neutral position.) 6. Shift the transmission into second gear. (Make sure not to shift the transmission into first gear. OPERATION AND IMPORTANT RIDING POINTS EAU16671 Shifting XVS65V Shifting gears lets you control the amount of engine power available for long distances. Shift pedal 2. Inadequate lubrication may damage the transmission. Open the throttle part way and gradually release the clutch...
Owners Manual
Page 46
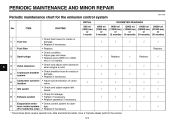
.... • Check control system for the emission control system INITIAL No. Replace. 6 4 * Valve clearance Crankcase breather system Carburetor synchronization Idle speed 5 * 6 * 7 * 8 * Exhaust system Evaporative emission control system (For California only) 9 * √ √ * Since these items require special tools, data and technical skills, have a Yamaha dealer perform the service. 6-3 PERIODIC MAINTENANCE AND MINOR REPAIR EAU17600 Periodic maintenance chart for damage. • Replace if necessary. √ √ 3 Spark plugs Replace.
.... • Check control system for the emission control system INITIAL No. Replace. 6 4 * Valve clearance Crankcase breather system Carburetor synchronization Idle speed 5 * 6 * 7 * 8 * Exhaust system Evaporative emission control system (For California only) 9 * √ √ * Since these items require special tools, data and technical skills, have a Yamaha dealer perform the service. 6-3 PERIODIC MAINTENANCE AND MINOR REPAIR EAU17600 Periodic maintenance chart for damage. • Replace if necessary. √ √ 3 Spark plugs Replace.

Owners Manual
Page 61
... wheels and tube tires. When a tire tread begins to side. Tire inspection EWA10560 WARNING G G WARNING Proper loading of all wheeland brake-related parts, including the tires, should be left to patch a punctured tube. Minimum tire tread depth (front and rear): 1.0 mm (0.04 in it as soon as handling, braking, performance and safety. The replacement of your vehicle is equipped with a worn-out tire. if approved for this model...
... wheels and tube tires. When a tire tread begins to side. Tire inspection EWA10560 WARNING G G WARNING Proper loading of all wheeland brake-related parts, including the tires, should be left to patch a punctured tube. Minimum tire tread depth (front and rear): 1.0 mm (0.04 in it as soon as handling, braking, performance and safety. The replacement of your vehicle is equipped with a worn-out tire. if approved for this model...

Owners Manual
Page 74
Headlight fuse Signaling system fuse Ignition fuse Carburetor heater fuse Ignitor unit fuse Spare fuse Specified fuses: Main fuse: 30.0 A Signaling system fuse: 10.0 A Ignition fuse: 10.0 A Headlight fuse: 15.0 A Carburetor heater fuse: 15.0 A Ignitor unit fuse: 5.0 A 6-31 Spare main fuse 6 The main fuse and the fuse box, which contains the fuses for the individual circuits, are located behind panel B. (See page 6-8.) If a fuse is blown, replace it as follows. 1. Turn the key to "OFF" and turn off the electrical circuit in question...
Headlight fuse Signaling system fuse Ignition fuse Carburetor heater fuse Ignitor unit fuse Spare fuse Specified fuses: Main fuse: 30.0 A Signaling system fuse: 10.0 A Ignition fuse: 10.0 A Headlight fuse: 15.0 A Carburetor heater fuse: 15.0 A Ignitor unit fuse: 5.0 A 6-31 Spare main fuse 6 The main fuse and the fuse box, which contains the fuses for the individual circuits, are located behind panel B. (See page 6-8.) If a fuse is blown, replace it as follows. 1. Turn the key to "OFF" and turn off the electrical circuit in question...

Owners Manual
Page 80
... joint 2. Lower the rear wheel so that it is on page 6-34. 8. Bolt 2. Install the brake rod onto the brake camshaft lever, and then install the brake pedal free play . (See page 6-23.) EWA10660 WARNING 1. NOTE: Make sure to the procedure on the ground. 6-37 Install the final gear case bolts. 3. Install the rear wheel, wheel axle, final gear case, and drive shaft by pushing the wheel forward and guiding...
... joint 2. Lower the rear wheel so that it is on page 6-34. 8. Bolt 2. Install the brake rod onto the brake camshaft lever, and then install the brake pedal free play . (See page 6-23.) EWA10660 WARNING 1. NOTE: Make sure to the procedure on the ground. 6-37 Install the final gear case bolts. 3. Install the rear wheel, wheel axle, final gear case, and drive shaft by pushing the wheel forward and guiding...

Owners Manual
Page 83
...the warranty, but never apply such prod- Do not use strong cleaners or hard sponges as all electrical couplers and connectors, including the spark plug caps, are used on plastic parts. Frequent and proper care does not only comply with water. ...engine has cooled down. 2. If the windshield is scratched, use any longer than instructed. ucts onto seals, gaskets and wheel axles. Remove extremely stubborn dirt, like oil burnt onto the crankcase, with strong or abrasive cleaning products, solvent or 7-1 G thinner, fuel (gasoline), rust removers or inhibitors, brake fluid...
...the warranty, but never apply such prod- Do not use strong cleaners or hard sponges as all electrical couplers and connectors, including the spark plug caps, are used on plastic parts. Frequent and proper care does not only comply with water. ...engine has cooled down. 2. If the windshield is scratched, use any longer than instructed. ucts onto seals, gaskets and wheel axles. Remove extremely stubborn dirt, like oil burnt onto the crankcase, with strong or abrasive cleaning products, solvent or 7-1 G thinner, fuel (gasoline), rust removers or inhibitors, brake fluid...

Owners Manual
Page 90
...mm (5.51 in) Bulb voltage, wattage × quantity: Headlight: 12 V, 60 W/55.0 W × 1 Tail/brake light: 12 V, 8.0 W/27.0 W × 1 Front turn signal/position light: 12 V, 23 W/8.0 W × 2 Rear turn signal light: 12 V, 21.0 W × 2 Meter lighting: 12 V, 1.7 W × 1 Neutral indicator light: 12 V, 1.7 W × 1 High beam indicator light: 12 V, 1.7 W × 1 Turn signal indicator light: 12 V, 1.7 W × 1 Engine trouble warning light: 12 V, 1.7 W × 1 Rear suspension: Type: Swingarm (monocross) Spring/shock absorber type: Coil spring/gas-oil damper Wheel travel: XVS65ATV 98...
...mm (5.51 in) Bulb voltage, wattage × quantity: Headlight: 12 V, 60 W/55.0 W × 1 Tail/brake light: 12 V, 8.0 W/27.0 W × 1 Front turn signal/position light: 12 V, 23 W/8.0 W × 2 Rear turn signal light: 12 V, 21.0 W × 2 Meter lighting: 12 V, 1.7 W × 1 Neutral indicator light: 12 V, 1.7 W × 1 High beam indicator light: 12 V, 1.7 W × 1 Turn signal indicator light: 12 V, 1.7 W × 1 Engine trouble warning light: 12 V, 1.7 W × 1 Rear suspension: Type: Swingarm (monocross) Spring/shock absorber type: Coil spring/gas-oil damper Wheel travel: XVS65ATV 98...
Owners Manual
Page 101
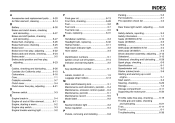
...Main switch/steering lock ...3-1 Maintenance and lubrication, periodic...6-4 Maintenance, emission control system ...6-3 Maintenance, periodic ...6-1 Maintenance record ...9-5 Model label...9-2 D Dimmer switch ...3-3 E Engine break-in ...5-4 Engine oil and oil filter element...6-11 Engine, starting a warm...5-2 Engine stop switch...3-3 Engine trouble warning light ...3-2 T Throttle cable free play, checking ...6-16 Throttle grip and cable, checking and lubricating ...6-27 Tires...6-17 Tool kit ...6-1 Troubleshooting ...6-38 N Neutral indicator light ...3-2 Noise regulation ...9-4 P Panels...
...Main switch/steering lock ...3-1 Maintenance and lubrication, periodic...6-4 Maintenance, emission control system ...6-3 Maintenance, periodic ...6-1 Maintenance record ...9-5 Model label...9-2 D Dimmer switch ...3-3 E Engine break-in ...5-4 Engine oil and oil filter element...6-11 Engine, starting a warm...5-2 Engine stop switch...3-3 Engine trouble warning light ...3-2 T Throttle cable free play, checking ...6-16 Throttle grip and cable, checking and lubricating ...6-27 Tires...6-17 Tool kit ...6-1 Troubleshooting ...6-38 N Neutral indicator light ...3-2 Noise regulation ...9-4 P Panels...