
Owners Manual
Page 7
... a cold engine ...5-1 Shifting ...5-2 Engine break-in ...5-3 Parking ...5-4 PERIODIC MAINTENANCE AND MINOR REPAIR ...6-1 PERIODIC MAINTENANCE ...6-1 Owner's tool kit ...6-1 Periodic maintenance chart for the emission control system ...6-3 General maintenance and lubrication chart ...6-4 Checking the spark plugs ...6-8 Canister (for California only) ...6-9 Engine oil and oil filter cartridge ...6-9 Transfer case oil ...6-12 Replacing the air filter elements ...6-13 Checking the throttle cable free play ...6-16 Valve clearance ...6-17 Tires ...6-17 Cast wheels ...6-19 Accessories and replacement...
... a cold engine ...5-1 Shifting ...5-2 Engine break-in ...5-3 Parking ...5-4 PERIODIC MAINTENANCE AND MINOR REPAIR ...6-1 PERIODIC MAINTENANCE ...6-1 Owner's tool kit ...6-1 Periodic maintenance chart for the emission control system ...6-3 General maintenance and lubrication chart ...6-4 Checking the spark plugs ...6-8 Canister (for California only) ...6-9 Engine oil and oil filter cartridge ...6-9 Transfer case oil ...6-12 Replacing the air filter elements ...6-13 Checking the throttle cable free play ...6-16 Valve clearance ...6-17 Tires ...6-17 Cast wheels ...6-19 Accessories and replacement...
Owners Manual
Page 11
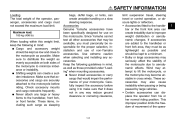
... any way reduce ground clearance or cornering clearance, limit suspension travel, steering travel or control operation, or obscure lights or reflectors. • Accessories fitted to the handlebar or the front fork area can create unstable handling or a slow steering response. These items, including such cargo as possible. Carefully inspect the accessory before riding. Accessories Genuine Yamaha accessories have been specifically designed for the...
... any way reduce ground clearance or cornering clearance, limit suspension travel, steering travel or control operation, or obscure lights or reflectors. • Accessories fitted to the handlebar or the front fork area can create unstable handling or a slow steering response. These items, including such cargo as possible. Carefully inspect the accessory before riding. Accessories Genuine Yamaha accessories have been specifically designed for the...
Owners Manual
Page 12
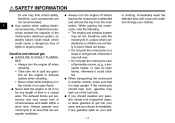
... your skin 1-4 or clothing, immediately wash the affected area with soap and water and change your clothes. SAFETY INFORMATION tor and may limit control ability, therefore, such accessories are poisonous and may leak out of the fuel tank. G 1 G Gasoline and exhaust gas G GASOLINE IS HIGHLY FLAMMABLE: • Always turn the engine off when refueling. • Take care not to spill any gasoline...
... your skin 1-4 or clothing, immediately wash the affected area with soap and water and change your clothes. SAFETY INFORMATION tor and may limit control ability, therefore, such accessories are poisonous and may leak out of the fuel tank. G 1 G Gasoline and exhaust gas G GASOLINE IS HIGHLY FLAMMABLE: • Always turn the engine off when refueling. • Take care not to spill any gasoline...

Owners Manual
Page 18
... loss of control or an accident. Turn. Make sure that the vehicle is turned to "OFF", even if the engine stalls. The key can be removed. The various positions are off. NOTE: The headlight comes on automatically when the engine is used to "LOCK" while still pushing it . Turn the handlebars all electrical systems are supplied with power, and the meter lighting, taillight, license...
... loss of control or an accident. Turn. Make sure that the vehicle is turned to "OFF", even if the engine stalls. The key can be removed. The various positions are off. NOTE: The headlight comes on automatically when the engine is used to "LOCK" while still pushing it . Turn the handlebars all electrical systems are supplied with power, and the meter lighting, taillight, license...
Owners Manual
Page 19
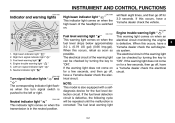
.... The electrical circuit of the headlight is in the neutral position. 3-2 High beam indicator light " " Right turn signal indicator light " " Fuel level warning light " " Engine trouble warning light " " Left turn signal indicator light " " Neutral indicator light " " EAU11030 Turn signal indicator lights " " and " " The corresponding indicator light flashes when the turn signal switch is also equipped with a selfdiagnosis device for a few seconds, and then go off , have a Yamaha dealer check the self-diagnosis system. NOTE: This model is...
.... The electrical circuit of the headlight is in the neutral position. 3-2 High beam indicator light " " Right turn signal indicator light " " Fuel level warning light " " Engine trouble warning light " " Left turn signal indicator light " " Neutral indicator light " " EAU11030 Turn signal indicator lights " " and " " The corresponding indicator light flashes when the turn signal switch is also equipped with a selfdiagnosis device for a few seconds, and then go off , have a Yamaha dealer check the self-diagnosis system. NOTE: This model is...

Owners Manual
Page 22
... engine trouble warning light will come on and the clock display will self-cancel after it has returned to " ". ECA11540 EAU12343 EAU12400 Handlebar switches Left Dimmer switch " / " Set this switch to the center position. If the clock display indicates such an error code, note the code number, and then have a Yamaha dealer check the vehicle. Horn switch " " Right Turn signal switch " / " To signal a right-hand turn, push this model...
... engine trouble warning light will come on and the clock display will self-cancel after it has returned to " ". ECA11540 EAU12343 EAU12400 Handlebar switches Left Dimmer switch " / " Set this switch to the center position. If the clock display indicates such an error code, note the code number, and then have a Yamaha dealer check the vehicle. Horn switch " " Right Turn signal switch " / " To signal a right-hand turn, push this model...
Owners Manual
Page 23
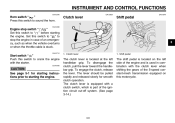
... should be pulled rapidly and released slowly for starting instructions prior to crank the engine with the clutch lever when shifting the gears of an emergency, such as when the vehicle overturns or when the throttle cable is located at the left side of the engine and is used in case of the 5-speed constant-mesh transmission equipped on this motorcycle...
... should be pulled rapidly and released slowly for starting instructions prior to crank the engine with the clutch lever when shifting the gears of an emergency, such as when the vehicle overturns or when the throttle cable is located at the left side of the engine and is used in case of the 5-speed constant-mesh transmission equipped on this motorcycle...

Owners Manual
Page 30
... vehicle upright. G Do not subject the shock absorber to open flame or other high heat sources, otherwise it may result from improper handling. G Always have a Yamaha dealer repair it if it with or attempt to an open the gas cylinder. NOTE: The built-in sidestand switch is located on the left side of raising the sidestand before starting off. INSTRUMENT AND CONTROL...
... vehicle upright. G Do not subject the shock absorber to open flame or other high heat sources, otherwise it may result from improper handling. G Always have a Yamaha dealer repair it if it with or attempt to an open the gas cylinder. NOTE: The built-in sidestand switch is located on the left side of raising the sidestand before starting off. INSTRUMENT AND CONTROL...
Owners Manual
Page 36
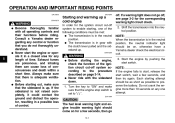
... the operator, resulting in a closed area for any length of time. ECA11560 CAUTION: The fuel level warning light and engine trouble warning light should be on any control or function that there is up . Each starting the engine, check the function of the following conditions must be met: G The transmission is in gear with the clutch lever pulled and the sidestand up . Always make sure...
... the operator, resulting in a closed area for any length of time. ECA11560 CAUTION: The fuel level warning light and engine trouble warning light should be on any control or function that there is up . Each starting the engine, check the function of the following conditions must be met: G The transmission is in gear with the clutch lever pulled and the sidestand up . Always make sure...
Owners Manual
Page 37
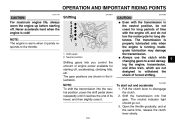
... the engine up before starting off . Never accelerate hard when the engine is running. NOTE: To shift the transmission into first gear. Always use the clutch while changing gears to withstand the shock of engine power available for long distances. Open the throttle gradually, and at the same time, release the clutch lever slowly. 5-2 Shift pedal 2. Even with the transmission in the illustration. Shift the transmission into the neutral position, press the shift...
... the engine up before starting off . Never accelerate hard when the engine is running. NOTE: To shift the transmission into first gear. Always use the clutch while changing gears to withstand the shock of engine power available for long distances. Open the throttle gradually, and at the same time, release the clutch lever slowly. 5-2 Shift pedal 2. Even with the transmission in the illustration. Shift the transmission into the neutral position, press the shift...
Owners Manual
Page 42
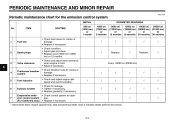
... and adjust engine idle speed and synchronization. • Check for leakage. • Tighten if necessary. • Replace gasket(s) if necessary. • Check control system for the emission control system INITIAL No. PERIODIC MAINTENANCE AND MINOR REPAIR EAU17600 Periodic maintenance chart for damage. • Replace if necessary. √ 2 * Spark plugs √ Replace. √ Replace. √ 3 * Valve clearance Every 16000 mi (25000 km) 6 4 * Crankcase breather system Fuel injection √...
... and adjust engine idle speed and synchronization. • Check for leakage. • Tighten if necessary. • Replace gasket(s) if necessary. • Check control system for the emission control system INITIAL No. PERIODIC MAINTENANCE AND MINOR REPAIR EAU17600 Periodic maintenance chart for damage. • Replace if necessary. √ 2 * Spark plugs √ Replace. √ Replace. √ 3 * Valve clearance Every 16000 mi (25000 km) 6 4 * Crankcase breather system Fuel injection √...

Owners Manual
Page 45
... case oil Change. √ Change. 6 23 * Front and rear brake switches Control cables √ √ √ √ √ √ √ √ √ √ √ √ 24 * 25 * Throttle grip housing and cable √ √ √ √ √ 26 * Lights, signals and switches √ √ √ √ √ * Since these items require special tools, data and technical skills, have a Yamaha dealer perform the service. 6-6 PERIODIC MAINTENANCE...
... case oil Change. √ Change. 6 23 * Front and rear brake switches Control cables √ √ √ √ √ √ √ √ √ √ √ √ 24 * 25 * Throttle grip housing and cable √ √ √ √ √ 26 * Lights, signals and switches √ √ √ √ √ * Since these items require special tools, data and technical skills, have a Yamaha dealer perform the service. 6-6 PERIODIC MAINTENANCE...
Owners Manual
Page 47
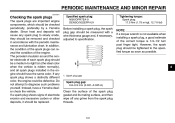
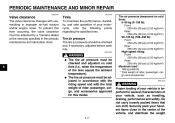
... diagnose such problems yourself. Do not attempt to the specified torque as soon as possible. 6 1. If a spark plug shows signs of each spark plug should be measured with the periodic maintenance and lubrication chart. PERIODIC MAINTENANCE AND MINOR REPAIR EAU19641 Checking the spark plugs The spark plugs are important engine components, which should be replaced. If any grime from the spark plug threads. 6-8 Since heat and deposits...
... diagnose such problems yourself. Do not attempt to the specified torque as soon as possible. 6 1. If a spark plug shows signs of each spark plug should be measured with the periodic maintenance and lubrication chart. PERIODIC MAINTENANCE AND MINOR REPAIR EAU19641 Checking the spark plugs The spark plugs are important engine components, which should be replaced. If any grime from the spark plug threads. 6-8 Since heat and deposits...

Owners Manual
Page 51
... idle for oil leakage before each ride. Install the engine oil filler cap. 15. Install the rider seat. 6 CAUTION: G In order to prevent clutch slippage (since the engine oil also lubricates the clutch), do not use oils with the remaining oil quantity while regularly checking the oil level on the dipstick. Recommended engine oil: See page 8-1. Remove the engine oil filler cap, and then gradually fill the oil tank with a diesel specification...
... idle for oil leakage before each ride. Install the engine oil filler cap. 15. Install the rider seat. 6 CAUTION: G In order to prevent clutch slippage (since the engine oil also lubricates the clutch), do not use oils with the remaining oil quantity while regularly checking the oil level on the dipstick. Recommended engine oil: See page 8-1. Remove the engine oil filler cap, and then gradually fill the oil tank with a diesel specification...
Owners Manual
Page 56
... before each ride. PERIODIC MAINTENANCE AND MINOR REPAIR EAU21401 EAU21750 Valve clearance The valve clearance changes with the total weight of the tires equals the ambient temperature). Tire air pressure (measured on cold tires (i.e., when the temperature of rider, passenger, cargo, and accessories approved for several characteristics of the vehicle, and distribute the weight 6-17 Do not carry loosely packed items that can shift. Securely pack your...
... before each ride. PERIODIC MAINTENANCE AND MINOR REPAIR EAU21401 EAU21750 Valve clearance The valve clearance changes with the total weight of the tires equals the ambient temperature). Tire air pressure (measured on cold tires (i.e., when the temperature of rider, passenger, cargo, and accessories approved for several characteristics of the vehicle, and distribute the weight 6-17 Do not carry loosely packed items that can shift. Securely pack your...

Owners Manual
Page 61
... MAINTENANCE AND MINOR REPAIR EWA10630 EAU22270 EAU22390 WARNING G G After adjusting the brake lever free play, check the free play and make sure that the brake is air in direction (b). 6 1. A soft or spongy feeling in the brake lever can indicate the presence of control and an accident. Turn the adjusting nut while holding the rear brake light switch in the periodic maintenance and lubrication chart. Brake pad...
... MAINTENANCE AND MINOR REPAIR EWA10630 EAU22270 EAU22390 WARNING G G After adjusting the brake lever free play, check the free play and make sure that the brake is air in direction (b). 6 1. A soft or spongy feeling in the brake lever can indicate the presence of control and an accident. Turn the adjusting nut while holding the rear brake light switch in the periodic maintenance and lubrication chart. Brake pad...

Owners Manual
Page 72
... turn on the electrical circuit in question to the electrical system and possibly a fire. 4. PERIODIC MAINTENANCE AND MINOR REPAIR Specified fuses: Main fuse: 30.0 A Headlight fuse: 15.0 A Signaling system fuse: 10.0 A Ignition fuse: 10.0 A Fuel injection system fuse: 15.0 A ECU fuse: 10.0 A Auto-decompression fuse: 15.0 A Backup fuse: 7.5 A ECA10640 6. Main fuse 2. Install the battery cover, and then hook the battery band onto the holder. 1. Spare main fuse 6 CAUTION: Do not use a fuse of a higher amperage rating than...
... turn on the electrical circuit in question to the electrical system and possibly a fire. 4. PERIODIC MAINTENANCE AND MINOR REPAIR Specified fuses: Main fuse: 30.0 A Headlight fuse: 15.0 A Signaling system fuse: 10.0 A Ignition fuse: 10.0 A Fuel injection system fuse: 15.0 A ECU fuse: 10.0 A Auto-decompression fuse: 15.0 A Backup fuse: 7.5 A ECA10640 6. Main fuse 2. Install the battery cover, and then hook the battery band onto the holder. 1. Spare main fuse 6 CAUTION: Do not use a fuse of a higher amperage rating than...
Owners Manual
Page 82
...) Engine oil: Type: YAMALUBE 4 (20W40) or SAE20W40 Recommended engine oil grade: API service SE, SF, SG type or higher Engine oil quantity: Without oil filter cartridge replacement: 3.70 L (3.91 US qt) (3.26 Imp.qt) With oil filter cartridge replacement: 4.10 L (4.33 US qt) (3.61 Imp.qt) Manufacturer/model: DENSO/X22EPR-U9 Spark plug gap: 0.8-0.9 mm (0.031-0.035 in) Clutch: Clutch type: Wet, multiple-disc Transmission: Primary reduction system: Spur gear...
...) Engine oil: Type: YAMALUBE 4 (20W40) or SAE20W40 Recommended engine oil grade: API service SE, SF, SG type or higher Engine oil quantity: Without oil filter cartridge replacement: 3.70 L (3.91 US qt) (3.26 Imp.qt) With oil filter cartridge replacement: 4.10 L (4.33 US qt) (3.61 Imp.qt) Manufacturer/model: DENSO/X22EPR-U9 Spark plug gap: 0.8-0.9 mm (0.031-0.035 in) Clutch: Clutch type: Wet, multiple-disc Transmission: Primary reduction system: Spur gear...

Owners Manual
Page 84
SPECIFICATIONS Tail/brake light: LED Front turn signal/position light: 12 V, 23 W/8.0 W × 2 Rear turn signal light: 12 V, 21.0 W × 2 License plate light: 12 V, 3.8 W × 2 Meter lighting: LED Neutral indicator light: LED High beam indicator light: LED Turn signal indicator light: LED Fuel level warning light: LED Engine trouble warning light: LED Backup fuse: 7.5 A Auto-decompression fuse: 15.0 A Fuses: Main fuse: 30.0 A Headlight fuse: 15.0 A Signaling system fuse: 10.0 A Ignition fuse: 10.0 A ECU fuse: 10.0 A Fuel injection system fuse: 15.0 A 8 8-3
SPECIFICATIONS Tail/brake light: LED Front turn signal/position light: 12 V, 23 W/8.0 W × 2 Rear turn signal light: 12 V, 21.0 W × 2 License plate light: 12 V, 3.8 W × 2 Meter lighting: LED Neutral indicator light: LED High beam indicator light: LED Turn signal indicator light: LED Fuel level warning light: LED Engine trouble warning light: LED Backup fuse: 7.5 A Auto-decompression fuse: 15.0 A Fuses: Main fuse: 30.0 A Headlight fuse: 15.0 A Signaling system fuse: 10.0 A Ignition fuse: 10.0 A ECU fuse: 10.0 A Fuel injection system fuse: 15.0 A 8 8-3

Owners Manual
Page 95
...20 Air filter elements, replacing ...6-13 Fuel tank cap...3-7 Fuses, replacing...6-32 Rear suspension, lubricating ...6-29 Rider seat ...3-9 H Handlebar switches ...3-5 Headlight bulb, replacing...6-34 Helmet holder...3-10 High beam indicator light...3-2 Horn switch ...3-6 S Safety defects, reporting...9-3 Safety information...1-1 Shifting...5-2 Shift pedal...3-6 Shock absorber assembly, adjusting ...3-11 Sidestand...3-13 Sidestand, checking and lubricating ...6-28 Spark plugs, checking...6-8 Specifications...8-1 Speedometer ...3-3 Starting and warming up a cold engine...5-1 Start switch...
...20 Air filter elements, replacing ...6-13 Fuel tank cap...3-7 Fuses, replacing...6-32 Rear suspension, lubricating ...6-29 Rider seat ...3-9 H Handlebar switches ...3-5 Headlight bulb, replacing...6-34 Helmet holder...3-10 High beam indicator light...3-2 Horn switch ...3-6 S Safety defects, reporting...9-3 Safety information...1-1 Shifting...5-2 Shift pedal...3-6 Shock absorber assembly, adjusting ...3-11 Sidestand...3-13 Sidestand, checking and lubricating ...6-28 Spark plugs, checking...6-8 Specifications...8-1 Speedometer ...3-3 Starting and warming up a cold engine...5-1 Start switch...