
Owners Manual
Page 6
... OF THE WARNING AND SPECIFICATION LABELS ...1-1 4 CONTROL FUNCTIONS ...4-1 Main switch ...4-1 Indicator lights ...4-2 Handlebar switches ...4-2 Throttle lever ...4-4 Speed limiter ...4-5 Front brake lever ...4-6 Rear brake lever ...4-6 Parking brake ...4-7 Drive select lever ...4-8 Fuel tank cap ...4-8 Fuel cock ...4-9 Starter (choke)...4-10 Seat ...4-10 Front carrier ...4-11 Rear carrier ...4-11 2 SAFETY INFORMATION ...2-1 3 DESCRIPTION AND MACHINE IDENTIFICATION...3-1 Identification number records ...3-2 Key identification number ...3-2 Vehicle identification number ...3-3 Model label...
... OF THE WARNING AND SPECIFICATION LABELS ...1-1 4 CONTROL FUNCTIONS ...4-1 Main switch ...4-1 Indicator lights ...4-2 Handlebar switches ...4-2 Throttle lever ...4-4 Speed limiter ...4-5 Front brake lever ...4-6 Rear brake lever ...4-6 Parking brake ...4-7 Drive select lever ...4-8 Fuel tank cap ...4-8 Fuel cock ...4-9 Starter (choke)...4-10 Seat ...4-10 Front carrier ...4-11 Rear carrier ...4-11 2 SAFETY INFORMATION ...2-1 3 DESCRIPTION AND MACHINE IDENTIFICATION...3-1 Identification number records ...3-2 Key identification number ...3-2 Vehicle identification number ...3-3 Model label...
Owners Manual
Page 7
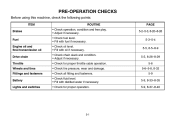
5 PRE-OPERATION CHECKS ...5-1 Front and rear brakes ...5-2 Fuel ...5-3 Engine and transmission oil ...5-5 Chain ...5-6 Throttle lever ...5-6 Tires ...5-6 How to measure tire pressure ...5-7 Tire wear limit ...5-8 Fittings and fasteners ...5-9 Battery ...5-9 Lights ...5-9 Switches ...5-9 Parking ...6-7 Parking on a slope...6-8 Accessories and loading ...6-9 7 6 OPERATION ...6-1 Starting a cold engine...6-1 Starting a warm engine ...6-3 Warming up ...6-3 Drive select lever operation and reverse driving ...6-4 Engine break-in ...6-6 Riding Your ATV...7-1 Getting to know your ATV ...7-3 Ride ...
5 PRE-OPERATION CHECKS ...5-1 Front and rear brakes ...5-2 Fuel ...5-3 Engine and transmission oil ...5-5 Chain ...5-6 Throttle lever ...5-6 Tires ...5-6 How to measure tire pressure ...5-7 Tire wear limit ...5-8 Fittings and fasteners ...5-9 Battery ...5-9 Lights ...5-9 Switches ...5-9 Parking ...6-7 Parking on a slope...6-8 Accessories and loading ...6-9 7 6 OPERATION ...6-1 Starting a cold engine...6-1 Starting a warm engine ...6-3 Warming up ...6-3 Drive select lever operation and reverse driving ...6-4 Engine break-in ...6-6 Riding Your ATV...7-1 Getting to know your ATV ...7-3 Ride ...
Owners Manual
Page 8
...21 Rear brake adjustment ...8-25 Drive chain slack check ...8-26 Drive chain slack adjustment...8-27 Lubricating the drive chain ...8-29 Draining the V-belt compartment...8-30 Cable inspection and lubrication ...8-30 Brake lever lubrication ...8-31 Knuckle shaft, lower arms and steering shaft lubrication ...8-31 Wheel removal ...8-32 Wheel installation ...8-32 Battery ...8-33 Replenishing the battery fluid ...8-35 Fuse replacement...8-36 Replacing the headlight bulb ...8-37 Tail/brake light bulb replacement ...8-39 Headlight beam adjustment...8-40 Troubleshooting...8-41 Troubleshooting chart...
...21 Rear brake adjustment ...8-25 Drive chain slack check ...8-26 Drive chain slack adjustment...8-27 Lubricating the drive chain ...8-29 Draining the V-belt compartment...8-30 Cable inspection and lubrication ...8-30 Brake lever lubrication ...8-31 Knuckle shaft, lower arms and steering shaft lubrication ...8-31 Wheel removal ...8-32 Wheel installation ...8-32 Battery ...8-33 Replenishing the battery fluid ...8-35 Fuse replacement...8-36 Replacing the headlight bulb ...8-37 Tail/brake light bulb replacement ...8-39 Headlight beam adjustment...8-40 Troubleshooting...8-41 Troubleshooting chart...
Owners Manual
Page 15
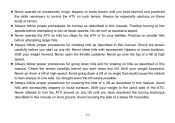
...vehicle to lean sharply to the uphill side of terrain. 8 Always follow proper procedures for braking on hills as described in this manual. Never attempt to turn the ATV around on any hill until you start down a hill at high speed. 8 Always follow proper procedures for your weight... until you start up any hill. Check the terrain carefully before attempting to control the ATV on level ground. Practice turning at faster speeds. Do not turn at low speeds before you have mastered the turning technique described in this manual. Shift your abilities....
...vehicle to lean sharply to the uphill side of terrain. 8 Always follow proper procedures for braking on hills as described in this manual. Never attempt to turn the ATV around on any hill until you start down a hill at high speed. 8 Always follow proper procedures for your weight... until you start up any hill. Check the terrain carefully before attempting to control the ATV on level ground. Practice turning at faster speeds. Do not turn at low speeds before you have mastered the turning technique described in this manual. Shift your abilities....
Owners Manual
Page 20
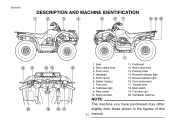
EBU00032 DESCRIPTION AND MACHINE IDENTIFICATION 1 2 3 4 5 6 7 890 q w e r t y 1. 2. 3. 4. 5. 6. 7. 8. 9. 10. Seat Drive select lever Front cover Headlight Front carrier Starter (choke) Fuel cock Tail/brake light Rear carrier Spark arrester 11. 12. 13. 14. 15. 16. 17. 18. 19. 20. Footboard Rear brake lever Parking brake Reverse indicator light Neutral indicator light Front brake lever Throttle lever Main switch Fuel tank cap Handlebar switches NOTE: p o i u 3-1 The machine you have purchased may differ slightly from those shown in the figures of this manual.
EBU00032 DESCRIPTION AND MACHINE IDENTIFICATION 1 2 3 4 5 6 7 890 q w e r t y 1. 2. 3. 4. 5. 6. 7. 8. 9. 10. Seat Drive select lever Front cover Headlight Front carrier Starter (choke) Fuel cock Tail/brake light Rear carrier Spark arrester 11. 12. 13. 14. 15. 16. 17. 18. 19. 20. Footboard Rear brake lever Parking brake Reverse indicator light Neutral indicator light Front brake lever Throttle lever Main switch Fuel tank cap Handlebar switches NOTE: p o i u 3-1 The machine you have purchased may differ slightly from those shown in the figures of this manual.
Owners Manual
Page 24
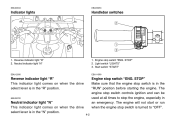
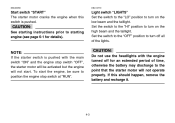
The engine will not start or run when the engine stop switch "ENG. Light switch "LIGHTS" 3. Engine stop switch is in the "RUN" position before starting the engine. Start switch "START" EBU11580 EBU12500 Reverse indicator light "R" This indicator light comes on when the drive select lever is in the "R" position. Reverse indicator light "R" 2. The engine stop switch controls ignition and can be used at all times to "OFF". 4-2 EBU00043 EBU00053 Indicator lights Handlebar switches 1 2 w q e 1. Engine stop the engine, especially in...
The engine will not start or run when the engine stop switch "ENG. Light switch "LIGHTS" 3. Engine stop switch is in the "RUN" position before starting the engine. Start switch "START" EBU11580 EBU12500 Reverse indicator light "R" This indicator light comes on when the drive select lever is in the "R" position. Reverse indicator light "R" 2. The engine stop switch controls ignition and can be used at all times to "OFF". 4-2 EBU00043 EBU00053 Indicator lights Handlebar switches 1 2 w q e 1. Engine stop the engine, especially in...
Owners Manual
Page 25
... use the headlights with the main switch "ON" and the engine stop switch at "RUN". Set the switch to the "OFF" position to turn on the high beam and the taillight. EBU00056 EBU14770 Start switch "START" The starter motor cranks the engine when this should happen, remove the battery and recharge it. 4-3 If this switch is pushed with the engine turned off all of time, otherwise the battery may...
... use the headlights with the main switch "ON" and the engine stop switch at "RUN". Set the switch to the "OFF" position to turn on the high beam and the taillight. EBU00056 EBU14770 Start switch "START" The starter motor cranks the engine when this should happen, remove the battery and recharge it. 4-3 If this switch is pushed with the engine turned off all of time, otherwise the battery may...
Owners Manual
Page 26
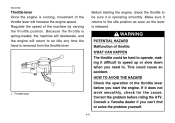
... not work smoothly, check for the cause. Correct the problem before you can't find or solve the problem yourself. 4-4 q 1. Regulate the speed of the throttle lever before riding the ATV. qWARNING POTENTIAL HAZARD Malfunction of throttle. Throttle lever EBU00062 Throttle lever Once the engine is running, movement of the throttle lever will return to the idle position as soon as the lever is released...
... not work smoothly, check for the cause. Correct the problem before you can't find or solve the problem yourself. 4-4 q 1. Regulate the speed of the throttle lever before riding the ATV. qWARNING POTENTIAL HAZARD Malfunction of throttle. Throttle lever EBU00062 Throttle lever Once the engine is running, movement of the throttle lever will return to the idle position as soon as the lever is released...
Owners Manual
Page 34
... Brakes Fuel Engine oil and final transmission oil Drive chain Throttle Wheels and tires Fittings and fasteners Battery Lights and switches ROUTINE • Check operation, condition and free play. • Adjust if necessary. • Check fuel level. • Fill with fuel if necessary. • Check oil level. • Fill with oil if necessary. • Check chain slack and condition. • Adjust if necessary. • Check for proper throttle cable operation. • Check tire pressure...
... Brakes Fuel Engine oil and final transmission oil Drive chain Throttle Wheels and tires Fittings and fasteners Battery Lights and switches ROUTINE • Check operation, condition and free play. • Adjust if necessary. • Check fuel level. • Fill with fuel if necessary. • Check oil level. • Fill with oil if necessary. • Check chain slack and condition. • Adjust if necessary. • Check for proper throttle cable operation. • Check tire pressure...
Owners Manual
Page 35
.... Front and rear brakes 8 Brake levers Check for wear. (See page 8-20.) 5 5-2 They should move smoothly and there should be a firm feeling when the brake is in safe operating condition. HOW TO AVOID THE HAZARD Always inspect your ATV each time you use it...Owner's Manual. If the brakes do not provide proper braking performance, inspect the brakes for correct free play is incorrect, adjust it to make sure the ATV is applied. If not, have the machine inspected by a Yamaha dealer. 8 Brake operation Test the brakes at slow speed after starting out to make sure they are working...
.... Front and rear brakes 8 Brake levers Check for wear. (See page 8-20.) 5 5-2 They should move smoothly and there should be a firm feeling when the brake is in safe operating condition. HOW TO AVOID THE HAZARD Always inspect your ATV each time you use it...Owner's Manual. If the brakes do not provide proper braking performance, inspect the brakes for correct free play is incorrect, adjust it to make sure the ATV is applied. If not, have the machine inspected by a Yamaha dealer. 8 Brake operation Test the brakes at slow speed after starting out to make sure they are working...
Owners Manual
Page 36
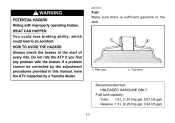
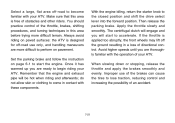
... operating brakes. If a problem cannot be corrected by the adjustment procedures provided in the tank. 1. HOW TO AVOID THE HAZARD Always check the brakes at the start of every ride. EBU13410 qWARNING POTENTIAL HAZARD Riding with the brakes. WHAT CAN HAPPEN You could lose braking ability, which could lead to an accident. Fuel level Recommended fuel: UNLEADED GASOLINE ONLY Fuel tank capacity...
... operating brakes. If a problem cannot be corrected by the adjustment procedures provided in the tank. 1. HOW TO AVOID THE HAZARD Always check the brakes at the start of every ride. EBU13410 qWARNING POTENTIAL HAZARD Riding with the brakes. WHAT CAN HAPPEN You could lose braking ability, which could lead to an accident. Fuel level Recommended fuel: UNLEADED GASOLINE ONLY Fuel tank capacity...
Owners Manual
Page 37
...%. If the fuel tank is still very hot. 5-4 Be careful not to the exhaust system. Your Yamaha engine has been designed to heat from the engine or the sun. Fuel expands when it may cause fuel system damage or vehicle performance problems. qWARNING POTENTIAL HAZARD Improper care when refueling. Wipe up . If knocking or pinging occurs, use regular unleaded gasoline with a pump octane number...
...%. If the fuel tank is still very hot. 5-4 Be careful not to the exhaust system. Your Yamaha engine has been designed to heat from the engine or the sun. Fuel expands when it may cause fuel system damage or vehicle performance problems. qWARNING POTENTIAL HAZARD Improper care when refueling. Wipe up . If knocking or pinging occurs, use regular unleaded gasoline with a pump octane number...

Owners Manual
Page 42
... for proper operation. Use only distilled water if refilling is necessary. (See pages 8-33-8-35.) EBU00803 Lights Check the headlight and tail/brake light to the Service Manual for proper operation. 5-9 Have a Yamaha dealer repair as necessary for correct tightening torque. EBU00499 Switches Check the operation of chassis fittings and fasteners before a ride. Battery Check fluid level and fill if necessary. EBU01162 EBU11700...
... for proper operation. Use only distilled water if refilling is necessary. (See pages 8-33-8-35.) EBU00803 Lights Check the headlight and tail/brake light to the Service Manual for proper operation. 5-9 Have a Yamaha dealer repair as necessary for correct tightening torque. EBU00499 Switches Check the operation of chassis fittings and fasteners before a ride. Battery Check fluid level and fill if necessary. EBU01162 EBU11700...
Owners Manual
Page 43
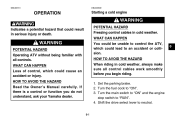
... control cables work smoothly before you do not understand, ask your Yamaha dealer. 6 6-1 If there is a control or function you begin riding. 1. Set the parking brake. 2. Shift the drive select lever to "ON". 3. HOW TO AVOID THE HAZARD Read the Owner ' s Manual carefully. Starting a cold engine qWARNING POTENTIAL HAZARD Freezing control cables in serious injury or death. Turn the main switch to "ON" and the engine stop switch...
... control cables work smoothly before you do not understand, ask your Yamaha dealer. 6 6-1 If there is a control or function you begin riding. 1. Set the parking brake. 2. Shift the drive select lever to "ON". 3. HOW TO AVOID THE HAZARD Read the Owner ' s Manual carefully. Starting a cold engine qWARNING POTENTIAL HAZARD Freezing control cables in serious injury or death. Turn the main switch to "ON" and the engine stop switch...

Owners Manual
Page 52
... sure the load does not interfere with controls or your ability to add accessories so that you can carry cargo or tow a trailer, you are going. 8 Ride more braking distance. MAXIMUM LOADING LIMIT 8 Vehicle loading limit (total weight of cargo, rider and accessories): 105 kg (231 lb) 8 Front carrier: 5 kg (11 lb) 8 Rear carrier: 10 kg (22 lb) 8 Load...
... sure the load does not interfere with controls or your ability to add accessories so that you can carry cargo or tow a trailer, you are going. 8 Ride more braking distance. MAXIMUM LOADING LIMIT 8 Vehicle loading limit (total weight of cargo, rider and accessories): 105 kg (231 lb) 8 Front carrier: 5 kg (11 lb) 8 Rear carrier: 10 kg (22 lb) 8 Load...
Owners Manual
Page 74
... difficult to perform on page 6-1 to start to become familiar with your ATV. When slowing down or stopping, release the throttle and apply the brakes smoothly and evenly. Set the parking brake and follow the instruction on pavement. If the throttle is designed for off-road use of the brakes can cause the tires to the closed position and shift the drive select...
... difficult to perform on page 6-1 to start to become familiar with your ATV. When slowing down or stopping, release the throttle and apply the brakes smoothly and evenly. Set the parking brake and follow the instruction on pavement. If the throttle is designed for off-road use of the brakes can cause the tires to the closed position and shift the drive select...

Owners Manual
Page 93
... HAZARD Turn off the engine when performing maintenance unless otherwise specified. 8-1 Owner's manual and tool kit You are not familiar with the owner's tool kit under the seat. 1 3 2 1. EBU12210 qWARNING POTENTIAL HAZARD Servicing an engine while it is an obligation of the body, causing injury. Electrical components can cause shocks or can catch clothing or parts of the machine owner. Owner's manual 3. The most efficient condition possible. Low-pressure tire gauge Safety is running...
... HAZARD Turn off the engine when performing maintenance unless otherwise specified. 8-1 Owner's manual and tool kit You are not familiar with the owner's tool kit under the seat. 1 3 2 1. EBU12210 qWARNING POTENTIAL HAZARD Servicing an engine while it is an obligation of the body, causing injury. Electrical components can cause shocks or can catch clothing or parts of the machine owner. Owner's manual 3. The most efficient condition possible. Low-pressure tire gauge Safety is running...
Owners Manual
Page 122
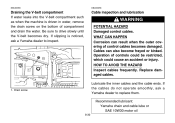
... frayed or kinked. Recommended lubricant: Yamaha chain and cable lube or SAE 10W30 motor oil 8-30 q 1. EBU00355 EBU00356 Draining the V-belt compartment If water leaks into the V-belt compartment such as when the machine is noticed, ask a Yamaha dealer to inspect. Replace damaged cables. Drain screw Cable inspection and lubrication qWARNING POTENTIAL HAZARD Damaged control cables. If slipping is driven in...
... frayed or kinked. Recommended lubricant: Yamaha chain and cable lube or SAE 10W30 motor oil 8-30 q 1. EBU00355 EBU00356 Draining the V-belt compartment If water leaks into the V-belt compartment such as when the machine is noticed, ask a Yamaha dealer to inspect. Replace damaged cables. Drain screw Cable inspection and lubrication qWARNING POTENTIAL HAZARD Damaged control cables. If slipping is driven in...
Owners Manual
Page 135
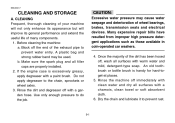
... expensive repair bills have resulted from improper high pressure detergent applications such as those available in coin-operated car washers. 4. CLEANING Frequent, thorough cleaning of your machine will not only enhance its appearance but will improve its general performance and extend the useful life of wheel bearings, brakes, transmission seals and electrical devices. Before cleaning the machine: a. cC Excessive water pressure may...
... expensive repair bills have resulted from improper high pressure detergent applications such as those available in coin-operated car washers. 4. CLEANING Frequent, thorough cleaning of your machine will not only enhance its appearance but will improve its general performance and extend the useful life of wheel bearings, brakes, transmission seals and electrical devices. Before cleaning the machine: a. cC Excessive water pressure may...
Owners Manual
Page 137
... charge it in the spark plug hole and reinstall the spark plug. Fill the fuel tank with oil. Clean the drive chain thoroughly and lubricate it once a month. Do not apply oil to drain the fuel system. Do not store the battery in a humid or salt-air atmosphere, coat all control cables. EBU00525 B. NOTE: Make any rubber parts or the seat cover. motor oil in a dry place and...
... charge it in the spark plug hole and reinstall the spark plug. Fill the fuel tank with oil. Clean the drive chain thoroughly and lubricate it once a month. Do not apply oil to drain the fuel system. Do not store the battery in a humid or salt-air atmosphere, coat all control cables. EBU00525 B. NOTE: Make any rubber parts or the seat cover. motor oil in a dry place and...