
Owners Manual
Page 7
... ...3-9 Front storage compartment ...3-10 Carrier ...3-11 4 PRE-OPERATION CHECKS ...4-1 Pre-operation check list ...4-1 OPERATION AND IMPORTANT RIDING POINTS ...5-1 Starting and warming up a cold engine ...5-1 Starting off ...5-2 Acceleration and deceleration ...5-3 Braking ...5-3 Engine break-in ...5-4 Parking ...5-5 PERIODIC MAINTENANCE AND MINOR REPAIR ...6-1 Owner's tool kit ...6-1 Periodic maintenance and lubrication chart ...6-2 Removing and installing the panel ...6-5 Checking the spark plug ...6-5 Final transmission oil ...6-7 Cleaning the air filter element ...6-8 1 2 5 3 6
... ...3-9 Front storage compartment ...3-10 Carrier ...3-11 4 PRE-OPERATION CHECKS ...4-1 Pre-operation check list ...4-1 OPERATION AND IMPORTANT RIDING POINTS ...5-1 Starting and warming up a cold engine ...5-1 Starting off ...5-2 Acceleration and deceleration ...5-3 Braking ...5-3 Engine break-in ...5-4 Parking ...5-5 PERIODIC MAINTENANCE AND MINOR REPAIR ...6-1 Owner's tool kit ...6-1 Periodic maintenance and lubrication chart ...6-2 Removing and installing the panel ...6-5 Checking the spark plug ...6-5 Final transmission oil ...6-7 Cleaning the air filter element ...6-8 1 2 5 3 6
Owners Manual
Page 8
... front and rear brake levers ...6-17 Checking and lubricating the centerstand ...6-18 Checking the front fork ...6-18 Checking the steering ...6-19 Checking the wheel bearings ...6-20 Battery ...6-20 Replacing the fuse ...6-22 Troubleshooting ...6-22 Troubleshooting chart ...6-23 7 SCOOTER CARE AND STORAGE ...7-1 Care ...7-1 Storage ...7-4 SPECIFICATIONS ...8-1 CONSUMER INFORMATION ...9-1 Identification numbers ...9-1 Key identification number ...9-1 Vehicle identification number ...9-1 Model label ...9-2 Reporting safety defects ...9-3 SCOOTER NOISE REGULATION ...9-4 YAMAHA MOTOR CORPORATION...
... front and rear brake levers ...6-17 Checking and lubricating the centerstand ...6-18 Checking the front fork ...6-18 Checking the steering ...6-19 Checking the wheel bearings ...6-20 Battery ...6-20 Replacing the fuse ...6-22 Troubleshooting ...6-22 Troubleshooting chart ...6-23 7 SCOOTER CARE AND STORAGE ...7-1 Care ...7-1 Storage ...7-4 SPECIFICATIONS ...8-1 CONSUMER INFORMATION ...9-1 Identification numbers ...9-1 Key identification number ...9-1 Vehicle identification number ...9-1 Model label ...9-2 Reporting safety defects ...9-3 SCOOTER NOISE REGULATION ...9-4 YAMAHA MOTOR CORPORATION...
Owners Manual
Page 12
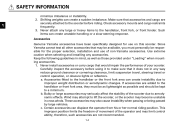
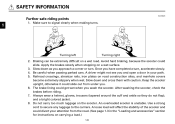
... way reduce ground clearance or cornering clearance, limit suspension travel, steering travel or control operation, or obscure lights or reflectors. c. Carefully inspect the accessory before riding. a. Since Yamaha cannot test all other accessories that accessories and cargo are added to the handlebar or front fork area, they must personally be kept to the handlebar, front fork, or front fender. Shifting weights can...
... way reduce ground clearance or cornering clearance, limit suspension travel, steering travel or control operation, or obscure lights or reflectors. c. Carefully inspect the accessory before riding. a. Since Yamaha cannot test all other accessories that accessories and cargo are added to the handlebar or front fork area, they must personally be kept to the handlebar, front fork, or front fender. Shifting weights can...
Owners Manual
Page 13
.... Always turn the engine off before leaving the scooter unattended and remove the key from the main switch. Do not park the scooter on a slope or soft ground, otherwise it could cause a dangerous loss of gasoline vapor, or allow gasoline to spill any length of time in the vicinity of consciousness and death within a short time. Never start the engine or...
.... Always turn the engine off before leaving the scooter unattended and remove the key from the main switch. Do not park the scooter on a slope or soft ground, otherwise it could cause a dangerous loss of gasoline vapor, or allow gasoline to spill any length of time in the vicinity of consciousness and death within a short time. Never start the engine or...
Owners Manual
Page 14
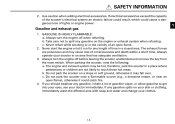
Apply the brakes slowly when stopping on road construction sites, and manhole covers become extremely slippery when wet. Be careful when passing parked cars. A driver might not see you approach a corner or turn , accelerate slowly. 4. After washing the scooter, check the brakes before riding. 7..... Braking can be extremely difficult on the scooter. Use a strong cord to secure any luggage to signal clearly when making turns. Do not carry too much luggage on a wet road. Keep the scooter upright, otherwise it could slide. Turning left Turning right 2. Q SAFETY INFORMATION...
Apply the brakes slowly when stopping on road construction sites, and manhole covers become extremely slippery when wet. Be careful when passing parked cars. A driver might not see you approach a corner or turn , accelerate slowly. 4. After washing the scooter, check the brakes before riding. 7..... Braking can be extremely difficult on the scooter. Use a strong cord to secure any luggage to signal clearly when making turns. Do not carry too much luggage on a wet road. Keep the scooter upright, otherwise it could slide. Turning left Turning right 2. Q SAFETY INFORMATION...
Owners Manual
Page 20
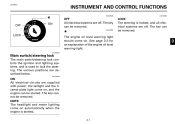
... power, the taillight and the license plate light come on automatically when the engine is started . The key can be removed. See page 3-3 for an explanation of the engine oil level warning light. EAU00029 3 Main switch/steering lock The main switch/steering lock controls the ignition and lighting systems, and is locked, and all electrical systems are off . NOTE: The headlight and meter lighting come on. The various positions are described below. EAU00027 INSTRUMENT...
... power, the taillight and the license plate light come on automatically when the engine is started . The key can be removed. See page 3-3 for an explanation of the engine oil level warning light. EAU00029 3 Main switch/steering lock The main switch/steering lock controls the ignition and lighting systems, and is locked, and all electrical systems are off . NOTE: The headlight and meter lighting come on. The various positions are described below. EAU00027 INSTRUMENT...
Owners Manual
Page 23
... switch to sound the horn. Turn signal switch "4/6" To signal a right-hand turn signal lights, push the switch in after it has returned to the center position. 3-4 Fuel gauge EAU00113 2 1. 2. 3. 4. 5. 3 5 Fuel gauge The fuel gauge indicates the amount of fuel in case of an emergency, such as when the scooter overturns or when the throttle cable is stuck. NOTE: Do not allow the fuel tank to the center position. Dimmer switch "&/%" Turn signal switch "4/6" Horn switch "*" Engine stop switch "$/#" Start switch "," EAU00118 Engine...
... switch to sound the horn. Turn signal switch "4/6" To signal a right-hand turn signal lights, push the switch in after it has returned to the center position. 3-4 Fuel gauge EAU00113 2 1. 2. 3. 4. 5. 3 5 Fuel gauge The fuel gauge indicates the amount of fuel in case of an emergency, such as when the scooter overturns or when the throttle cable is stuck. NOTE: Do not allow the fuel tank to the center position. Dimmer switch "&/%" Turn signal switch "4/6" Horn switch "*" Engine stop switch "$/#" Start switch "," EAU00118 Engine...
Owners Manual
Page 25
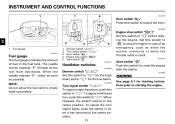
INSTRUMENT AND CONTROL FUNCTIONS 3 To install the fuel tank cap Insert the fuel tank cap into the tank opening and closing procedures.) Fuel tank cap To remove the fuel tank cap Lift the fuel tank cap lock lever and then turn it down. Oil tank cap 3. Fuel tank cap lock lever 1 w Make sure that the fuel tank cap is sufficient fuel in the tank. The fuel tank cap can then be removed. Fuel tank cap 2. Fuel tank filler tube 2. Fuel level EAU03753 Fuel Make sure that the fuel and 2-stroke engine oil tank caps are located under the seat. (See...
INSTRUMENT AND CONTROL FUNCTIONS 3 To install the fuel tank cap Insert the fuel tank cap into the tank opening and closing procedures.) Fuel tank cap To remove the fuel tank cap Lift the fuel tank cap lock lever and then turn it down. Oil tank cap 3. Fuel tank cap lock lever 1 w Make sure that the fuel tank cap is sufficient fuel in the tank. The fuel tank cap can then be removed. Fuel tank cap 2. Fuel tank filler tube 2. Fuel level EAU03753 Fuel Make sure that the fuel and 2-stroke engine oil tank caps are located under the seat. (See...
Owners Manual
Page 26
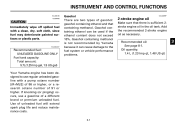
... engine oil as necessary. INSTRUMENT AND CONTROL FUNCTIONS EAU00185 EC000008 cC Immediately wipe off spilled fuel with a pump octane number [(R+M)/2] of 86 or higher, or a research octane number of gasohol: gasohol containing ethanol and that there is sufficient 2stroke engine oil in the oil tank. Gasohol containing ethanol can cause damage to use a gasoline of unleaded fuel will extend spark plug life and reduce maintenance...
... engine oil as necessary. INSTRUMENT AND CONTROL FUNCTIONS EAU00185 EC000008 cC Immediately wipe off spilled fuel with a pump octane number [(R+M)/2] of 86 or higher, or a research octane number of gasohol: gasohol containing ethanol and that there is sufficient 2stroke engine oil in the oil tank. Gasohol containing ethanol can cause damage to use a gasoline of unleaded fuel will extend spark plug life and reduce maintenance...
Owners Manual
Page 31
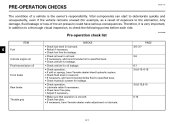
... addition to a thorough visual inspection, to specified level. 9 Check vehicle for leakage. 9 Check vehicle for example, as a result of a vehicle is smooth. 9 Check free play. 9 If necessary, have serious consequences. Any damage, fluid leakage or loss of tire air pressure could have Yamaha dealer make adjustment or lubricate. 3-6~3-7 PAGE 4 Fuel 3-6 2-stroke engine oil Final transmission oil 6-7 3-5,6-13~6-16 Front brake 3-5,6-13,6-15 Rear brake 6-10 Throttle grip 4-1
... addition to a thorough visual inspection, to specified level. 9 Check vehicle for leakage. 9 Check vehicle for example, as a result of a vehicle is smooth. 9 Check free play. 9 If necessary, have serious consequences. Any damage, fluid leakage or loss of tire air pressure could have Yamaha dealer make adjustment or lubricate. 3-6~3-7 PAGE 4 Fuel 3-6 2-stroke engine oil Final transmission oil 6-7 3-5,6-13~6-16 Front brake 3-5,6-13,6-15 Rear brake 6-10 Throttle grip 4-1
Owners Manual
Page 33
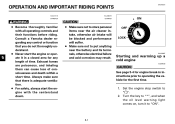
Set the engine stop switch to "ON". 5-1 Turn the key to "*", and when the oil level warning light comes on, turn it in instructions prior to put anything near the battery and its terminals, otherwise electrical failure and acid corrosion may result. cC 8 Make sure not to store personal items near the air cleaner intake, otherwise air intake will be blocked and performance will suffer. 8 Make...
Set the engine stop switch to "ON". 5-1 Turn the key to "*", and when the oil level warning light comes on, turn it in instructions prior to put anything near the battery and its terminals, otherwise electrical failure and acid corrosion may result. cC 8 Make sure not to store personal items near the air cleaner intake, otherwise air intake will be blocked and performance will suffer. 8 Make...
Owners Manual
Page 34
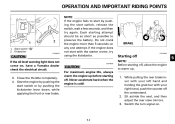
... the rear brake lever with your left hand and holding the grab bar with the starter motor, try again. Each starting off. Close the throttle completely. 4. Starting off NOTE: Before starting off the centerstand. 2. Never accelerate hard when the engine is cold! 5-2 Do not crank the engine more than 5 seconds on , have a Yamaha dealer check the electrical circuit. 3. Switch the turn signal on. 5 cC For maximum engine life...
... the rear brake lever with your left hand and holding the grab bar with the starter motor, try again. Each starting off. Close the throttle completely. 4. Starting off NOTE: Before starting off the centerstand. 2. Never accelerate hard when the engine is cold! 5-2 Do not crank the engine more than 5 seconds on , have a Yamaha dealer check the electrical circuit. 3. Switch the turn signal on. 5 cC For maximum engine life...
Owners Manual
Page 38
... paved roads only. If this manual and the tools provided in abnormally dusty, muddy or wet conditions, the air filter element should be necessary to assist you . EAU00466 EW000061 Owner's tool kit The service information included in this scooter is operated in the owner's tool kit are not familiar with scooter maintenance work correctly. Periodic inspection, adjustment and lubrication will keep your vehicle...
... paved roads only. If this manual and the tools provided in abnormally dusty, muddy or wet conditions, the air filter element should be necessary to assist you . EAU00466 EW000061 Owner's tool kit The service information included in this scooter is operated in the owner's tool kit are not familiar with scooter maintenance work correctly. Periodic inspection, adjustment and lubrication will keep your vehicle...
Owners Manual
Page 39
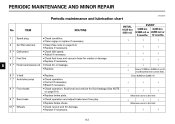
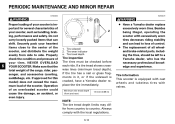
PERIODIC MAINTENANCE AND MINOR REPAIR EAU00473 Periodic maintenance and lubrication chart No. 1 2 3 * 4 * ITEM Spark plug Air filter element Carburetor Fuel line Final transmission oil ROUTINE 9 Check condition. 9 Clean regap or replace if necessary. 9 Clean.(See note on page 6-4.) 9 Replace brake pads. 9 Check operation and adjust brake lever free play. 9 Replace brake shoes. 9 Check runout and for oil leakage. 9 Replace. INITIAL 10,00 km (600 mi) √ EVERY 6,000 km 3,000 km...
PERIODIC MAINTENANCE AND MINOR REPAIR EAU00473 Periodic maintenance and lubrication chart No. 1 2 3 * 4 * ITEM Spark plug Air filter element Carburetor Fuel line Final transmission oil ROUTINE 9 Check condition. 9 Clean regap or replace if necessary. 9 Clean.(See note on page 6-4.) 9 Replace brake pads. 9 Check operation and adjust brake lever free play. 9 Replace brake shoes. 9 Check runout and for oil leakage. 9 Replace. INITIAL 10,00 km (600 mi) √ EVERY 6,000 km 3,000 km...
Owners Manual
Page 43
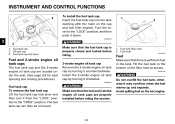
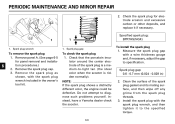
... spark plug 1. Spark plug gap: 0.6 - 0.7 mm (0.024 - 0.028 in the owner's tool kit. Remove the spark plug as shown, with the spark plug wrench included in ) 2. PERIODIC MAINTENANCE AND MINOR REPAIR 2. Specified spark plug: BPR7HS(NGK) To install the spark plug 1. Install the spark plug with a wire thickness gauge and, if necessary, adjust the gap to diagnose such problems yourself. Spark plug gap 6 To remove the spark plug 1. Check that the porcelain insulator around the center...
... spark plug 1. Spark plug gap: 0.6 - 0.7 mm (0.024 - 0.028 in the owner's tool kit. Remove the spark plug as shown, with the spark plug wrench included in ) 2. PERIODIC MAINTENANCE AND MINOR REPAIR 2. Specified spark plug: BPR7HS(NGK) To install the spark plug 1. Install the spark plug with a wire thickness gauge and, if necessary, adjust the gap to diagnose such problems yourself. Spark plug gap 6 To remove the spark plug 1. Check that the porcelain insulator around the center...
Owners Manual
Page 44
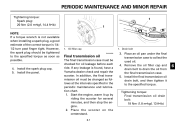
However, the spark plug should be changed as possible. 4. Oil filler cap EAU04228 1. In addition, the final transmission oil must be checked for several minutes, and then stop the engine. 2. Start the engine, warm it to the specified torque as soon as follows at the intervals specified in the periodic maintenance and lubrication chart. 1. Tightening torque: Final transmission oil drain bolt: 18 Nm (1.8 m•kgf...
However, the spark plug should be changed as possible. 4. Oil filler cap EAU04228 1. In addition, the final transmission oil must be checked for several minutes, and then stop the engine. 2. Start the engine, warm it to the specified torque as soon as follows at the intervals specified in the periodic maintenance and lubrication chart. 1. Tightening torque: Final transmission oil drain bolt: 18 Nm (1.8 m•kgf...
Owners Manual
Page 49
... for this model) does not exceed the maximum load of the cargo, rider, passenger, and accessories (cowling, saddlebags, etc. Tire sidewall 2. if approved for several characteristics of your scooter, such as handling, braking, performance and safety. Operation of an overloaded scooter could cause tire damage, an accident, or even injury. 1 2 w 8 Have a Yamaha dealer replace excessively worn tires. PERIODIC MAINTENANCE AND MINOR REPAIR EW000083 EW000079...
... for this model) does not exceed the maximum load of the cargo, rider, passenger, and accessories (cowling, saddlebags, etc. Tire sidewall 2. if approved for several characteristics of your scooter, such as handling, braking, performance and safety. Operation of an overloaded scooter could cause tire damage, an accident, or even injury. 1 2 w 8 Have a Yamaha dealer replace excessively worn tires. PERIODIC MAINTENANCE AND MINOR REPAIR EW000083 EW000079...
Owners Manual
Page 62
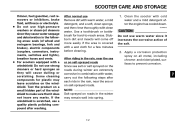
... of the salt. 2. Clean the scooter with clean water. Test the product on the roads during winter are extremely corrosive in combination with water, carry out the following areas: seals (of wheel and swingarm bearings, fork and brakes), electric components (couplers, connectors, instruments, switches and lights), breather hoses and vents. 8 For scooters equipped with a windshield: Do not use Remove dirt with warm...
... of the salt. 2. Clean the scooter with clean water. Test the product on the roads during winter are extremely corrosive in combination with water, carry out the following areas: seals (of wheel and swingarm bearings, fork and brakes), electric components (couplers, connectors, instruments, switches and lights), breather hoses and vents. 8 For scooters equipped with a windshield: Do not use Remove dirt with warm...
Owners Manual
Page 66
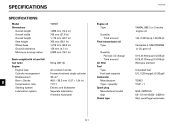
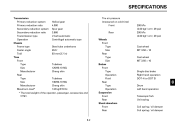
....2 in) 120 mm (4.7 in) 2,000 mm (78.7 in) Engine oil Type Quantity Total amount Final transmission oil Type Quantity Periodic oil change Total amount Air filter Fuel Type Fuel tank capacity Carburetor Manufacturer Type × quantity Spark plug Manufacturer/model Gap Clutch type EAU01038 YAMALUBE 2 or 2-stroke engine oil 1.4L (1.23 lmp qt, 1.48 US qt) Yamalube 4, SAE10W30SE or GL gear oil 0.11L (0.10 lmp qt, 0.12 US qt) 0.13L...
....2 in) 120 mm (4.7 in) 2,000 mm (78.7 in) Engine oil Type Quantity Total amount Final transmission oil Type Quantity Periodic oil change Total amount Air filter Fuel Type Fuel tank capacity Carburetor Manufacturer Type × quantity Spark plug Manufacturer/model Gap Clutch type EAU01038 YAMALUBE 2 or 2-stroke engine oil 1.4L (1.23 lmp qt, 1.48 US qt) Yamalube 4, SAE10W30SE or GL gear oil 0.11L (0.10 lmp qt, 0.12 US qt) 0.13L...
Owners Manual
Page 67
... system Secondary reduction ratio Transmission type Operation Chassis Frame type Caster angle Trail Tires Front Type Size Manufacturer Rear Type Size Manufacturer Maximum load* Helical gear 4.000 Spur gear 3.666 V-belt automatic Centrifugal automatic type Steel tube underbone 26.5° 93 mm(3.7 in) Tire air pressure (measured on cold tires) Front Rear Wheels Front Type Size Rear Type Size Brakes Front Type Operation Fluid Rear Type Operation Suspension Front Rear Shock absorbers Front Rear 200 kPa (2.00...
... system Secondary reduction ratio Transmission type Operation Chassis Frame type Caster angle Trail Tires Front Type Size Manufacturer Rear Type Size Manufacturer Maximum load* Helical gear 4.000 Spur gear 3.666 V-belt automatic Centrifugal automatic type Steel tube underbone 26.5° 93 mm(3.7 in) Tire air pressure (measured on cold tires) Front Rear Wheels Front Type Size Rear Type Size Brakes Front Type Operation Fluid Rear Type Operation Suspension Front Rear Shock absorbers Front Rear 200 kPa (2.00...