
Owners Manual
Page 7
... MAINTENANCE AND MINOR REPAIR ...6-1 PERIODIC MAINTENANCE ...6-1 Owner's tool kit ...6-1 Periodic maintenance chart for the emission control system ...6-3 General maintenance and lubrication chart ...6-4 Removing and installing the panel ...6-8 Checking the spark plugs ...6-8 Canister (for California only) ...6-10 Engine oil ...6-10 Final gear oil ...6-12 Cleaning the air filter element ...6-13 Adjusting the carburetors ...6-14 Adjusting the throttle cable free play ...6-15 Adjusting the valve clearance ...6-15 Tires ...6-15 Cast wheels ...6-17 Accessories and replacement...
... MAINTENANCE AND MINOR REPAIR ...6-1 PERIODIC MAINTENANCE ...6-1 Owner's tool kit ...6-1 Periodic maintenance chart for the emission control system ...6-3 General maintenance and lubrication chart ...6-4 Removing and installing the panel ...6-8 Checking the spark plugs ...6-8 Canister (for California only) ...6-10 Engine oil ...6-10 Final gear oil ...6-12 Cleaning the air filter element ...6-13 Adjusting the carburetors ...6-14 Adjusting the throttle cable free play ...6-15 Adjusting the valve clearance ...6-15 Tires ...6-15 Cast wheels ...6-17 Accessories and replacement...

Owners Manual
Page 8
... OF CONTENTS Battery ...6-27 Replacing the fuses ...6-28 Replacing the headlight bulb ...6-30 Replacing a turn signal light bulb or the tail/brake light bulb ...6-31 Supporting the motorcycle ...6-31 Troubleshooting ...6-32 Troubleshooting chart ...6-33 MOTORCYCLE CARE AND STORAGE ...7-1 Care ...7-1 Storage ...7-3 SPECIFICATIONS ...8-1 CONSUMER INFORMATION ...9-1 Identification numbers ...9-1 Reporting safety defects ...9-3 Motorcycle noise regulation ...9-4 Maintenance record ...9-5 YAMAHA MOTOR CORPORATION, U.S.A. STREET AND ENDURO MOTORCYCLE LIMITED WARRANTY ...9-7 YAMAHA EXTENDED SERVICE...
... OF CONTENTS Battery ...6-27 Replacing the fuses ...6-28 Replacing the headlight bulb ...6-30 Replacing a turn signal light bulb or the tail/brake light bulb ...6-31 Supporting the motorcycle ...6-31 Troubleshooting ...6-32 Troubleshooting chart ...6-33 MOTORCYCLE CARE AND STORAGE ...7-1 Care ...7-1 Storage ...7-3 SPECIFICATIONS ...8-1 CONSUMER INFORMATION ...9-1 Identification numbers ...9-1 Reporting safety defects ...9-3 Motorcycle noise regulation ...9-4 Maintenance record ...9-5 YAMAHA MOTOR CORPORATION, U.S.A. STREET AND ENDURO MOTORCYCLE LIMITED WARRANTY ...9-7 YAMAHA EXTENDED SERVICE...
Owners Manual
Page 11
... to improper weight distribution or aerodynamic changes. Accessories Genuine Yamaha accessories have been specifically designed for the proper selection, installation and use on both sides of the motorcycle to minimize imbalance or instability. Keep the following in any way reduce ground clearance or cornering clearance, limit suspension travel, steering travel or control operation, or obscure lights or reflectors. • Accessories fitted to...
... to improper weight distribution or aerodynamic changes. Accessories Genuine Yamaha accessories have been specifically designed for the proper selection, installation and use on both sides of the motorcycle to minimize imbalance or instability. Keep the following in any way reduce ground clearance or cornering clearance, limit suspension travel, steering travel or control operation, or obscure lights or reflectors. • Accessories fitted to...
Owners Manual
Page 12
.... • Do not park the motorcycle on your skin or clothing, immediately wash the affected area with soap and water and change your clothes. G Never start the engine or let it run for manual type). G G Always turn the engine off before leaving the motorcycle unattended and remove the key from the main switch. SAFETY INFORMATION tor and may limit control ability, therefore, such...
.... • Do not park the motorcycle on your skin or clothing, immediately wash the affected area with soap and water and change your clothes. G Never start the engine or let it run for manual type). G G Always turn the engine off before leaving the motorcycle unattended and remove the key from the main switch. SAFETY INFORMATION tor and may limit control ability, therefore, such...

Owners Manual
Page 19
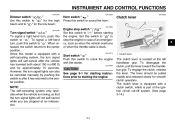
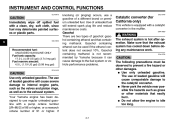
... a Yamaha dealer check the selfdiagnosis system. Oil level warning light " " Neutral indicator light " " Turn signal indicator light " Engine trouble warning light " High beam indicator light " " " " Oil level warning light " " This warning light comes on . INSTRUMENT AND CONTROL FUNCTIONS EAU11001 EAU11080 EAU11500 Indicator and warning lights High beam indicator light " " This indicator light comes on when the high beam of the headlight is switched on when the engine oil level is low. EAU11120 1. 2. 3. 4. 5. EAU11020 Engine trouble warning light " " This warning light comes...
... a Yamaha dealer check the selfdiagnosis system. Oil level warning light " " Neutral indicator light " " Turn signal indicator light " Engine trouble warning light " High beam indicator light " " " " Oil level warning light " " This warning light comes on . INSTRUMENT AND CONTROL FUNCTIONS EAU11001 EAU11080 EAU11500 Indicator and warning lights High beam indicator light " " This indicator light comes on when the high beam of the headlight is switched on when the engine oil level is low. EAU11120 1. 2. 3. 4. 5. EAU11020 Engine trouble warning light " " This warning light comes...
Owners Manual
Page 21
...: See page 5-1 for smooth clutch operation. EAU12660 Clutch lever Turn signal switch " / " To signal a right-hand turn signal lights can also be pulled rapidly and released slowly for starting instructions prior to crank the engine with a clutch switch, which is part of an emergency, such as when the vehicle overturns or when the throttle cable is equipped with the starter. To disengage the clutch, pull the lever toward...
...: See page 5-1 for smooth clutch operation. EAU12660 Clutch lever Turn signal switch " / " To signal a right-hand turn signal lights can also be pulled rapidly and released slowly for starting instructions prior to crank the engine with a clutch switch, which is part of an emergency, such as when the vehicle overturns or when the throttle cable is equipped with the starter. To disengage the clutch, pull the lever toward...
Owners Manual
Page 24
... other damages. Make sure that containing methanol. G Do not allow the engine to the fuel system or vehicle performance problems. EAU13440 Catalytic converter (for California only) This vehicle is hot after operation. Gasohol containing ethanol can cause damage to idle too long. EWA10860 WARNING The exhaust system is equipped with a pump octane number [(R+M)/2] of 86 or higher, or a research octane number of...
... other damages. Make sure that containing methanol. G Do not allow the engine to the fuel system or vehicle performance problems. EAU13440 Catalytic converter (for California only) This vehicle is hot after operation. Gasohol containing ethanol can cause damage to idle too long. EWA10860 WARNING The exhaust system is equipped with a pump octane number [(R+M)/2] of 86 or higher, or a research octane number of...

Owners Manual
Page 30
... built-in sidestand switch is part of control. Yamaha's ignition circuit cut-off system has been designed to an open the gas cylinder. G Do not subject the shock absorber to assist the operator in a possible loss of the ignition circuit cut -off system.) EWA10240 WARNING This shock absorber contains highly pressurized nitrogen gas. G Always have a Yamaha dealer service the shock absorber. 3 1. WARNING The vehicle must not be...
... built-in sidestand switch is part of control. Yamaha's ignition circuit cut-off system has been designed to an open the gas cylinder. G Do not subject the shock absorber to assist the operator in a possible loss of the ignition circuit cut -off system.) EWA10240 WARNING This shock absorber contains highly pressurized nitrogen gas. G Always have a Yamaha dealer service the shock absorber. 3 1. WARNING The vehicle must not be...

Owners Manual
Page 35
PAGE Throttle grip 6-15, 6-23 Control cables 6-23 Wheels and tires 6-15, 6-17 Brake and shift pedals Brake and clutch levers Sidestand Chassis fasteners Instruments, lights, signals and switches Sidestand switch • Make sure that operation is smooth. • ...bolts and screws are properly tightened. • Tighten if necessary. • Check operation. • Correct if necessary. • Check operation of ignition circuit cut-off system. • If system is defective, have Yamaha dealer adjust cable free play . • If necessary, have Yamaha dealer check vehicle...
PAGE Throttle grip 6-15, 6-23 Control cables 6-23 Wheels and tires 6-15, 6-17 Brake and shift pedals Brake and clutch levers Sidestand Chassis fasteners Instruments, lights, signals and switches Sidestand switch • Make sure that operation is smooth. • ...bolts and screws are properly tightened. • Tighten if necessary. • Check operation. • Correct if necessary. • Check operation of ignition circuit cut-off system. • If system is defective, have Yamaha dealer adjust cable free play . • If necessary, have Yamaha dealer check vehicle...
Owners Manual
Page 36
... the battery. Before starting , one attempt. NOTE: If the engine fails to three seconds. Turn the starter (choke) on after two to start, release the start switch, wait a few seconds, and then try again. If the oil level warning light flickers or remains on and completely close the throttle. (See page 3-9.) 5. Always make sure that there is in a closed area for the ignition circuit...
... the battery. Before starting , one attempt. NOTE: If the engine fails to three seconds. Turn the starter (choke) on after two to start, release the start switch, wait a few seconds, and then try again. If the oil level warning light flickers or remains on and completely close the throttle. (See page 3-9.) 5. Always make sure that there is in a closed area for the ignition circuit...
Owners Manual
Page 38
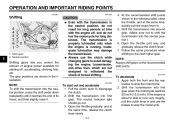
... the front and the rear brakes to disengage the clutch. 2. Shift pedal 2. Always use the brakes to withstand the shock of engine power available for long distances. The transmission is properly lubricated only when the engine is about to stall or runs very roughly, pull the clutch lever in and use the clutch while changing gears to avoid damaging the engine, transmission, and drive train, which are shown...
... the front and the rear brakes to disengage the clutch. 2. Shift pedal 2. Always use the brakes to withstand the shock of engine power available for long distances. The transmission is properly lubricated only when the engine is about to stall or runs very roughly, pull the clutch lever in and use the clutch while changing gears to avoid damaging the engine, transmission, and drive train, which are shown...
Owners Manual
Page 43
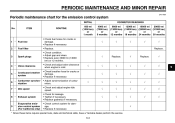
... breather hose for cracks or damage. • Replace if necessary. • Adjust synchronization of carburetors. • Check and adjust engine idle speed. • Check for leakage. • Tighten if necessary. • Replace gasket(s) if necessary. • Check control system for the emission control system INITIAL No. PERIODIC MAINTENANCE AND MINOR REPAIR EAU17600 Periodic maintenance chart for damage. • Replace if necessary. √ √ 3 Spark plugs Replace.
... breather hose for cracks or damage. • Replace if necessary. • Adjust synchronization of carburetors. • Check and adjust engine idle speed. • Check for leakage. • Tighten if necessary. • Replace gasket(s) if necessary. • Check control system for the emission control system INITIAL No. PERIODIC MAINTENANCE AND MINOR REPAIR EAU17600 Periodic maintenance chart for damage. • Replace if necessary. √ √ 3 Spark plugs Replace.

Owners Manual
Page 56
... the tire replaced. Tire inspection 1. If a tire tread shows crosswise lines (minimum tread depth), if the tire has a nail or glass fragments in ) WARNING Proper loading of your tires. Properly adjust the suspension for this model) does not exceed the maximum load of your vehicle, such as handling, braking, performance and safety. if approved for your heaviest items close to side. PERIODIC MAINTENANCE AND MINOR REPAIR Tire air pressure...
... the tire replaced. Tire inspection 1. If a tire tread shows crosswise lines (minimum tread depth), if the tire has a nail or glass fragments in ) WARNING Proper loading of your tires. Properly adjust the suspension for this model) does not exceed the maximum load of your vehicle, such as handling, braking, performance and safety. if approved for your heaviest items close to side. PERIODIC MAINTENANCE AND MINOR REPAIR Tire air pressure...

Owners Manual
Page 60
... hydraulic 6-20 The rear brake light switch, which may result in direction (b). 3. Rear brake light switch adjusting nut WARNING G G After adjusting the brake lever free play, check the free play adjusting screw EAU22270 Adjusting the rear brake light switch 6 1. PERIODIC MAINTENANCE AND MINOR REPAIR system. To make the brake light come on later, turn the adjusting screw in loss of control and an accident. 1. If there is air in direction (a). To...
... hydraulic 6-20 The rear brake light switch, which may result in direction (b). 3. Rear brake light switch adjusting nut WARNING G G After adjusting the brake lever free play, check the free play adjusting screw EAU22270 Adjusting the rear brake light switch 6 1. PERIODIC MAINTENANCE AND MINOR REPAIR system. To make the brake light come on later, turn the adjusting screw in loss of control and an accident. 1. If there is air in direction (a). To...

Owners Manual
Page 68
...) battery charger, have a Yamaha dealer charge your battery. To charge a sealed-type (MF) battery, a special (constant-voltage) battery charger is located under the ignitor unit panel. NOTE: Include steps 1-3 and 9-10 only for odometer) Spare fuse 1. PERIODIC MAINTENANCE AND MINOR REPAIR ECA10630 EAU27101 CAUTION: G Replacing the fuses The main fuse is required. Using a conventional battery charger will damage the battery. Fuse box Headlight fuse Signaling system fuse Ignition fuse Carburetor heater fuse Ignitor...
...) battery charger, have a Yamaha dealer charge your battery. To charge a sealed-type (MF) battery, a special (constant-voltage) battery charger is located under the ignitor unit panel. NOTE: Include steps 1-3 and 9-10 only for odometer) Spare fuse 1. PERIODIC MAINTENANCE AND MINOR REPAIR ECA10630 EAU27101 CAUTION: G Replacing the fuses The main fuse is required. Using a conventional battery charger will damage the battery. Fuse box Headlight fuse Signaling system fuse Ignition fuse Carburetor heater fuse Ignitor...

Owners Manual
Page 69
.... PERIODIC MAINTENANCE AND MINOR REPAIR Specified fuses: Main fuse: 30.0 A Backup fuse: 5.0 A Ignition fuse: 10.0 A Headlight fuse: 15.0 A Carburetor heater fuse: 15.0 A Signaling system fuse: 10.0 A Ignitor unit fuse: XVS1100AW 5.0 A (CAL) XVS1100AT 5.0 A (CAL) ECA10640 8. Main fuse 4. Remove the blown fuse, and then install a new fuse of a higher amperage rating than recommended to avoid causing extensive damage to the electrical system and possibly a fire. 6. Turn the key to "OFF" and turn on the electrical circuit...
.... PERIODIC MAINTENANCE AND MINOR REPAIR Specified fuses: Main fuse: 30.0 A Backup fuse: 5.0 A Ignition fuse: 10.0 A Headlight fuse: 15.0 A Carburetor heater fuse: 15.0 A Signaling system fuse: 10.0 A Ignitor unit fuse: XVS1100AW 5.0 A (CAL) XVS1100AT 5.0 A (CAL) ECA10640 8. Main fuse 4. Remove the blown fuse, and then install a new fuse of a higher amperage rating than recommended to avoid causing extensive damage to the electrical system and possibly a fire. 6. Turn the key to "OFF" and turn on the electrical circuit...

Owners Manual
Page 74
... a small hidden part of wheel and swingarm bearings, fork and brakes), electric components (couplers, connectors, instruments, switches and lights), breather hoses and vents. If the windshield is scratched, use strong cleaners or hard sponges as all electrical couplers and connectors, including the spark plug caps, are tightly installed. 3. Always rinse the dirt and degreaser off with the terms of the warranty, but never apply...
... a small hidden part of wheel and swingarm bearings, fork and brakes), electric components (couplers, connectors, instruments, switches and lights), breather hoses and vents. If the windshield is scratched, use strong cleaners or hard sponges as all electrical couplers and connectors, including the spark plug caps, are tightly installed. 3. Always rinse the dirt and degreaser off with the terms of the warranty, but never apply...

Owners Manual
Page 78
...: Without oil filter element replacement: 3.00 L (3.17 US qt) (2.64 Imp.qt) With oil filter element replacement: 3.10 L (3.28 US qt) (2.73 Imp.qt) Clutch: Clutch type: Wet, multiple-disc Engine: 8 Engine type: Air cooled 4-stroke, SOHC Cylinder arrangement: V-type 2-cylinder Displacement: 1063.0 cm³ (64.86 cu.in) Bore × stroke: 95.0 × 75.0 mm (3.74 × 2.95 in) Compression ratio: 8.30 :1 Starting system: Electric starter Transmission...
...: Without oil filter element replacement: 3.00 L (3.17 US qt) (2.64 Imp.qt) With oil filter element replacement: 3.10 L (3.28 US qt) (2.73 Imp.qt) Clutch: Clutch type: Wet, multiple-disc Engine: 8 Engine type: Air cooled 4-stroke, SOHC Cylinder arrangement: V-type 2-cylinder Displacement: 1063.0 cm³ (64.86 cu.in) Bore × stroke: 95.0 × 75.0 mm (3.74 × 2.95 in) Compression ratio: 8.30 :1 Starting system: Electric starter Transmission...

Owners Manual
Page 80
...) Backup fuse: 5.0 A Battery: Model: GT14B-4 Voltage, capacity: 12 V, 12.0 Ah Headlight: Bulb type: Halogen bulb Bulb voltage, wattage x quantity: Headlight: 12 V, 60 W/55.0 W × 1 Tail/brake light: 12 V, 8.0/27.0 W × 1 Front turn signal/position light: 12 V, 23 W/8.0 W × 2 Rear turn signal light: 12 V, 21.0 W × 2 Meter lighting: 14 V, 1.4 W × 2 Neutral indicator light: 12 V, 1.7 W × 1 High beam indicator light: 12 V, 1.7 W × 1 Oil level warning light: 12 V, 1.7 W × 1 Turn signal indicator light: 12 V, 1.7 W × 1 8 8-3 SPECIFICATIONS Wheel travel...
...) Backup fuse: 5.0 A Battery: Model: GT14B-4 Voltage, capacity: 12 V, 12.0 Ah Headlight: Bulb type: Halogen bulb Bulb voltage, wattage x quantity: Headlight: 12 V, 60 W/55.0 W × 1 Tail/brake light: 12 V, 8.0/27.0 W × 1 Front turn signal/position light: 12 V, 23 W/8.0 W × 2 Rear turn signal light: 12 V, 21.0 W × 2 Meter lighting: 14 V, 1.4 W × 2 Neutral indicator light: 12 V, 1.7 W × 1 High beam indicator light: 12 V, 1.7 W × 1 Oil level warning light: 12 V, 1.7 W × 1 Turn signal indicator light: 12 V, 1.7 W × 1 8 8-3 SPECIFICATIONS Wheel travel...

Owners Manual
Page 91
... ...6-3 Maintenance, periodic ...6-1 Maintenance record ...9-5 Model label...9-2 D Dimmer switch ...3-4 E Engine break-in ...5-4 Engine oil...6-10 Engine, starting a warm...5-2 Engine stop switch...3-4 Engine trouble warning light ...3-2 T Throttle cable free play, adjusting...6-15 Throttle grip and cable, checking and lubricating ...6-23 Tires...6-15 Tool kit ...6-1 Troubleshooting ...6-32 Troubleshooting chart ...6-33 N Neutral indicator light ...3-2 Noise regulation ...9-4 O Oil level warning light ...3-2 F Final gear oil ...6-12 Front and rear brake pads, checking...6-21 P Panel...
... ...6-3 Maintenance, periodic ...6-1 Maintenance record ...9-5 Model label...9-2 D Dimmer switch ...3-4 E Engine break-in ...5-4 Engine oil...6-10 Engine, starting a warm...5-2 Engine stop switch...3-4 Engine trouble warning light ...3-2 T Throttle cable free play, adjusting...6-15 Throttle grip and cable, checking and lubricating ...6-23 Tires...6-15 Tool kit ...6-1 Troubleshooting ...6-32 Troubleshooting chart ...6-33 N Neutral indicator light ...3-2 Noise regulation ...9-4 O Oil level warning light ...3-2 F Final gear oil ...6-12 Front and rear brake pads, checking...6-21 P Panel...