
Owners Manual
Page 6
...13 Storage compartment ...5-14 PRE-OPERATION CHECKS ...6-1 Fuel ...6-1 Engine oil...6-2 Engine oil level ...6-3 Coolant ...6-4 Throttle lever ...6-5 Throttle override system (T.O.R.S.) ...6-5 Brake ...6-6 Brake fluid leakage ...6-7 V-belt ...6-7 Drive guard ...6-7 Drive track ...6-8 51-mm (2.0-in) high-profile pattern drive track...6-8 Slide runners ...6-9 Skis and ski runners ...6-9 Steering system...6-10 Lights ...6-10 Air filter ...6-11 Fittings and fasteners ...6-11 Tool kit and recommended equipment...6-11 OPERATION ...7-1 Starting the engine ...7-1 Break-in ...7-2 Riding your snowmobile...
...13 Storage compartment ...5-14 PRE-OPERATION CHECKS ...6-1 Fuel ...6-1 Engine oil...6-2 Engine oil level ...6-3 Coolant ...6-4 Throttle lever ...6-5 Throttle override system (T.O.R.S.) ...6-5 Brake ...6-6 Brake fluid leakage ...6-7 V-belt ...6-7 Drive guard ...6-7 Drive track ...6-8 51-mm (2.0-in) high-profile pattern drive track...6-8 Slide runners ...6-9 Skis and ski runners ...6-9 Steering system...6-10 Lights ...6-10 Air filter ...6-11 Fittings and fasteners ...6-11 Tool kit and recommended equipment...6-11 OPERATION ...7-1 Starting the engine ...7-1 Break-in ...7-2 Riding your snowmobile...
Owners Manual
Page 7
... Changing the engine oil...8-11 Cooling system ...8-13 V-belt replacement ...8-15 Checking the drive chain housing oil level and the drive chain tension ...8-17 Checking the brake pads...8-19 Checking the parking brake pads...8-19 Checking the brake fluid level...8-20 Brake fluid replacement...8-20 Suspension...8-20 Drive track adjustment...8-29 Ski alignment ...8-31 Handlebar adjustment ...8-31 Lubrication ...8-34 Headlight bulb replacement...8-35 Headlight beam adjustment...8-35 Battery ...8-36 Fuse replacement...8-36 TROUBLESHOOTING ...9-1 STORAGE ...10-1 SPECIFICATIONS ...11-1 Dimensions...
... Changing the engine oil...8-11 Cooling system ...8-13 V-belt replacement ...8-15 Checking the drive chain housing oil level and the drive chain tension ...8-17 Checking the brake pads...8-19 Checking the parking brake pads...8-19 Checking the brake fluid level...8-20 Brake fluid replacement...8-20 Suspension...8-20 Drive track adjustment...8-29 Ski alignment ...8-31 Handlebar adjustment ...8-31 Lubrication ...8-34 Headlight bulb replacement...8-35 Headlight beam adjustment...8-35 Battery ...8-36 Fuse replacement...8-36 TROUBLESHOOTING ...9-1 STORAGE ...10-1 SPECIFICATIONS ...11-1 Dimensions...
Owners Manual
Page 15
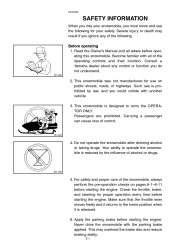
... for proper operation every time before starting the engine. Check the throttle, brake, and steering for use is released. 6. Passengers are prohibited. Make sure that the throttle lever moves freely and it returns to carry the OPERATOR ONLY. Never drive the snowmobile with all labels before starting the engine. Before operating 1. Consult a Yamaha dealer about any of the operating controls and their function. ESU00008...
... for proper operation every time before starting the engine. Check the throttle, brake, and steering for use is released. 6. Passengers are prohibited. Make sure that the throttle lever moves freely and it returns to carry the OPERATOR ONLY. Never drive the snowmobile with all labels before starting the engine. Before operating 1. Consult a Yamaha dealer about any of the operating controls and their function. ESU00008...
Owners Manual
Page 16
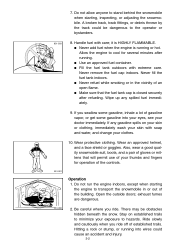
... trails. G Never add fuel when the engine is HIGHLY FLAMMABLE. Do not run the engine indoors, except when starting , inspecting, or adjusting the snowmobile. Be careful where you ride off of an open flame. Never remove the fuel cap indoors. G Make sure that will permit use of the controls. Handle fuel with extreme care. G Fill the fuel tank outdoors with care; Stay...
... trails. G Never add fuel when the engine is HIGHLY FLAMMABLE. Do not run the engine indoors, except when starting , inspecting, or adjusting the snowmobile. Be careful where you ride off of an open flame. Never remove the fuel cap indoors. G Make sure that will permit use of the controls. Handle fuel with extreme care. G Fill the fuel tank outdoors with care; Stay...
Owners Manual
Page 17
... the fuel breather hose. 2. Maintain or replace safety and instruction labels, as ice and hard-packed snow require much longer stopping distances. Use on snow which has a lot of control and may cause loss of dirt or sand mixed in the fuel tank inside a building where ignition sources are present such as hot water and space heaters, an open flame, sparks...
... the fuel breather hose. 2. Maintain or replace safety and instruction labels, as ice and hard-packed snow require much longer stopping distances. Use on snow which has a lot of control and may cause loss of dirt or sand mixed in the fuel tank inside a building where ignition sources are present such as hot water and space heaters, an open flame, sparks...
Owners Manual
Page 19
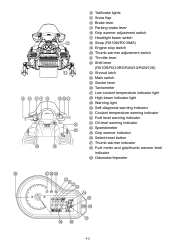
...S T U V W X Y Z [ \ ] Tail/brake lights Snow flap Brake lever Parking brake lever Grip warmer adjustment switch Headlight beam switch Strap (RX10M/RX10MS) Engine stop switch Thumb warmer adjustment switch Throttle lever Shift lever (RX10R/RX10RS/RXW10/RXW10S) Shroud latch Main switch Starter lever Tachometer Low coolant temperature indicator light High beam indicator light Warning light Self-diagnosis warning indicator Coolant temperature warning indicator Fuel level warning indicator Oil level warning indicator Speedometer Grip warmer indicator Select/reset button Thumb warmer indicator Fuel...
...S T U V W X Y Z [ \ ] Tail/brake lights Snow flap Brake lever Parking brake lever Grip warmer adjustment switch Headlight beam switch Strap (RX10M/RX10MS) Engine stop switch Thumb warmer adjustment switch Throttle lever Shift lever (RX10R/RX10RS/RXW10/RXW10S) Shroud latch Main switch Starter lever Tachometer Low coolant temperature indicator light High beam indicator light Warning light Self-diagnosis warning indicator Coolant temperature warning indicator Fuel level warning indicator Oil level warning indicator Speedometer Grip warmer indicator Select/reset button Thumb warmer indicator Fuel...

Owners Manual
Page 21
... prevent overheating. Because the throttle is warm. NOTE: Refer the "Starting the engine" section for at least 3 minutes and the coolant temperature has risen above 100 °C (212 °F), the engine automatically shuts off to idle when it shuts off. 5-2 Regulate the speed of the drive system. Warming up a cold engine. 1 2 3 4 @ Starter lever (choke) When starting the engine. @ ESU00361 Engine overheating prevention system This model is equipped with an engine overheating...
... prevent overheating. Because the throttle is warm. NOTE: Refer the "Starting the engine" section for at least 3 minutes and the coolant temperature has risen above 100 °C (212 °F), the engine automatically shuts off to idle when it shuts off. 5-2 Regulate the speed of the drive system. Warming up a cold engine. 1 2 3 4 @ Starter lever (choke) When starting the engine. @ ESU00361 Engine overheating prevention system This model is equipped with an engine overheating...
Owners Manual
Page 24
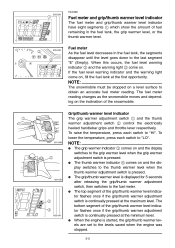
...switch is displayed for 5 seconds after releasing the grip/thumb warmer adjustment switch, then switches to obtain an accurate fuel meter reading. When the engine is continually pressed at the maximum level. Fuel meter As the fuel level decreases in the fuel tank...The grip warmer adjustment switch 1 and the thumb warmer adjustment switch 2 control the electrically heated handlebar grips and throttle lever respectively. When this occurs, the fuel level warning indicator 2 and the warning light 3 come on the inclination of fuel remaining in the fuel tank, the segments disappear ...
...switch is displayed for 5 seconds after releasing the grip/thumb warmer adjustment switch, then switches to obtain an accurate fuel meter reading. When the engine is continually pressed at the maximum level. Fuel meter As the fuel level decreases in the fuel tank...The grip warmer adjustment switch 1 and the thumb warmer adjustment switch 2 control the electrically heated handlebar grips and throttle lever respectively. When this occurs, the fuel level warning indicator 2 and the warning light 3 come on the inclination of fuel remaining in the fuel tank, the segments disappear ...
Owners Manual
Page 31
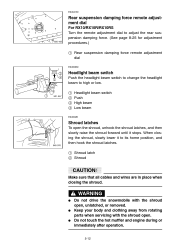
ESU04130 Rear suspension damping force remote adjustment dial For RX10/RX10R/RX10RS Turn the remote adjustment dial to adjust the rear suspension damping force. (See page 8-25 for adjustment procedures.) 1 Rear suspension damping force remote adjustment dial ESU00039 Headlight beam switch Push the headlight beam switch to change the headlight beam to high or low. 1 2 3 4 Headlight beam switch Push High beam Low beam ESU00481 Shroud latches To open the shroud...
ESU04130 Rear suspension damping force remote adjustment dial For RX10/RX10R/RX10RS Turn the remote adjustment dial to adjust the rear suspension damping force. (See page 8-25 for adjustment procedures.) 1 Rear suspension damping force remote adjustment dial ESU00039 Headlight beam switch Push the headlight beam switch to change the headlight beam to high or low. 1 2 3 4 Headlight beam switch Push High beam Low beam ESU00481 Shroud latches To open the shroud...
Owners Manual
Page 45
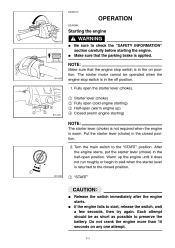
.... Each attempt should be operated when the engine stop switch is in the off position. @ 1. ESU00112 7- Turn the main switch to preserve the battery. OPERATION ESU00366 Starting the engine WARNING @ G G @ Be sure to check the "SAFETY INFORMATION" section carefully before starting ) NOTE: @ The starter lever (choke) is not required when the engine is returned to start, release the switch, wait a few seconds, then try again...
.... Each attempt should be operated when the engine stop switch is in the off position. @ 1. ESU00112 7- Turn the main switch to preserve the battery. OPERATION ESU00366 Starting the engine WARNING @ G G @ Be sure to check the "SAFETY INFORMATION" section carefully before starting ) NOTE: @ The starter lever (choke) is not required when the engine is returned to start, release the switch, wait a few seconds, then try again...
Owners Manual
Page 47
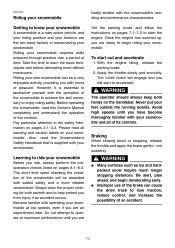
... snowmobile's handling and performance characteristics. With the engine idling, release the parking brake. 2. ESU01272 Riding your snowmobile Getting to accelerate. Riding your feet outside the running boards. WARNING @ The operator should always keep both warmth and to enjoy riding safely. Learning to begin decelerating early. Improper use of its controls. @ Braking When slowing down or stopping, release the throttle and apply the brake gently...
... snowmobile's handling and performance characteristics. With the engine idling, release the parking brake. 2. ESU01272 Riding your snowmobile Getting to accelerate. Riding your feet outside the running boards. WARNING @ The operator should always keep both warmth and to enjoy riding safely. Learning to begin decelerating early. Improper use of its controls. @ Braking When slowing down or stopping, release the throttle and apply the brake gently...
Owners Manual
Page 48
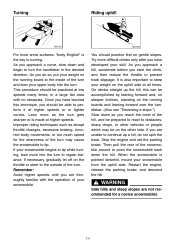
... as the turn to regain balance. As you approach a hill, accelerate before you are thoroughly familiar with no obstacles. If you start the climb, and then reduce the throttle to point the snowmobile back down as abrupt throttle changes, excessive braking, incorrect body movements, or too much speed for a novice snowmobiler. @ 7-4 Stop the engine and set the parking brake. Improper riding...
... as the turn to regain balance. As you approach a hill, accelerate before you are thoroughly familiar with no obstacles. If you start the climb, and then reduce the throttle to point the snowmobile back down as abrupt throttle changes, excessive braking, incorrect body movements, or too much speed for a novice snowmobiler. @ 7-4 Stop the engine and set the parking brake. Improper riding...
Owners Manual
Page 49
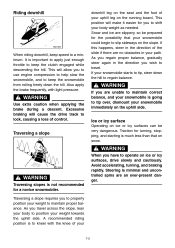
... WARNING @ WARNING @ When you wish to operate on the slope. A recommended riding position is important to apply just enough throttle to keep speed to maintain proper balance. Also apply the brake frequently, with the knee of your body weight as needed. This position will make it easier for a novice snowmobiler. @ Traversing a slope requires you to use engine compression...
... WARNING @ WARNING @ When you wish to operate on the slope. A recommended riding position is important to apply just enough throttle to keep speed to maintain proper balance. Also apply the brake frequently, with the knee of your body weight as needed. This position will make it easier for a novice snowmobiler. @ Traversing a slope requires you to use engine compression...
Owners Manual
Page 56
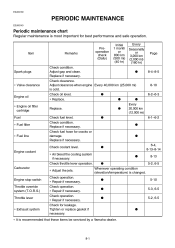
... hr) G Page Spark plugs Check condition. Replace. Check fuel hose for best performance and safe operation. G G G Whenever operating condition (elevation/temperature) is cold. G G G G G G G G G G G Every 20,000 km (12,000 mi) 8-10 6-2-6-3 6-1-6-2 Engine coolant 6-4, 8-13-8-14 8-13 5-2, 6-5 ∗ Air bleed the cooling system if necessary. Adjust clearance when engine Every 40,000 km (25,000 mi) is changed. Tighten or replace gasket if necessary. Check throttle lever operation. ∗...
... hr) G Page Spark plugs Check condition. Replace. Check fuel hose for best performance and safe operation. G G G Whenever operating condition (elevation/temperature) is cold. G G G G G G G G G G G Every 20,000 km (12,000 mi) 8-10 6-2-6-3 6-1-6-2 Engine coolant 6-4, 8-13-8-14 8-13 5-2, 6-5 ∗ Air bleed the cooling system if necessary. Adjust clearance when engine Every 40,000 km (25,000 mi) is changed. Tighten or replace gasket if necessary. Check throttle lever operation. ∗...
Owners Manual
Page 57
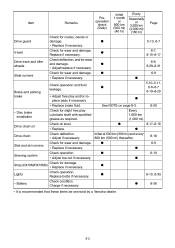
...; Disc brake installation Drive chain oil Drive chain Skis and ski runners Steering system Strap (RX10M/RX10MS) 8-17-8-18 8-18 6-9 6-10 Lights ∗ Battery 6-10, 8-35 8-36 ∗ It is recommended that these items be serviced by a Yamaha dealer. 8-2 Check for damage. ∗ Replace if necessary. Check for wear and damage. Check for slight free play and/or replace pads if necessary. ∗ Replace brake fluid. Check...
...; Disc brake installation Drive chain oil Drive chain Skis and ski runners Steering system Strap (RX10M/RX10MS) 8-17-8-18 8-18 6-9 6-10 Lights ∗ Battery 6-10, 8-35 8-36 ∗ It is recommended that these items be serviced by a Yamaha dealer. 8-2 Check for damage. ∗ Replace if necessary. Check for wear and damage. Check for slight free play and/or replace pads if necessary. ∗ Replace brake fluid. Check...
Owners Manual
Page 58
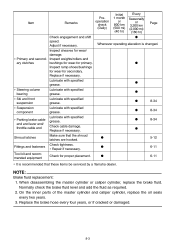
... with specified grease. ∗ Steering column bearing ∗ Ski and front suspension ∗ Suspension component ∗ Parking brake cable end and lever end/ throttle cable end Shroud latches Fittings and fasteners Tool kit and recommended equipment Lubricate with specified grease. Make sure that these items be serviced by a Yamaha dealer. When disassembling the master cylinder or caliper cylinder, replace the brake fluid. Lubricate with specified grease...
... with specified grease. ∗ Steering column bearing ∗ Ski and front suspension ∗ Suspension component ∗ Parking brake cable end and lever end/ throttle cable end Shroud latches Fittings and fasteners Tool kit and recommended equipment Lubricate with specified grease. Make sure that these items be serviced by a Yamaha dealer. When disassembling the master cylinder or caliper cylinder, replace the brake fluid. Lubricate with specified grease...
Owners Manual
Page 92
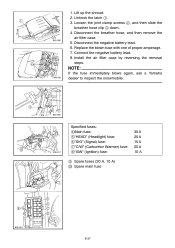
... air filter case by reversing the removal steps. Lift up the shroud. 2. Disconnect the negative battery lead. 6. Replace the blown fuse with one of proper amperage. 7. Connect the negative battery lead. 8. Loosen the joint clamp screws 2, and then slide the breather hose clip 3 down. 4. NOTE: @ If the fuse immediately blows again, ask a Yamaha dealer to inspect the snowmobile. @ Specified fuses: 4Main fuse: 5"HEAD" (Headlight) fuse...
... air filter case by reversing the removal steps. Lift up the shroud. 2. Disconnect the negative battery lead. 6. Replace the blown fuse with one of proper amperage. 7. Connect the negative battery lead. 8. Loosen the joint clamp screws 2, and then slide the breather hose clip 3 down. 4. NOTE: @ If the fuse immediately blows again, ask a Yamaha dealer to inspect the snowmobile. @ Specified fuses: 4Main fuse: 5"HEAD" (Headlight) fuse...
Owners Manual
Page 93
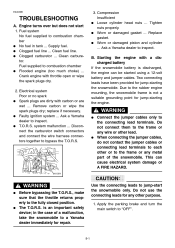
... wipe the spark plugs dry. 2. B. This can be started using a 12-volt battery and jumper cables. Electrical system Poor or no spark G Spark plugs are dirty with a discharged battery If the snowmobile battery is an important safety device; replace if necessary. is discharged, the engine can cause electrical system damage or A FIRE HAZARD. @ CAUTION: @ WARNING @ G G Before bypassing the T.O.R.S., make sure that the throttle returns properly to a Yamaha dealer...
... wipe the spark plugs dry. 2. B. This can be started using a 12-volt battery and jumper cables. Electrical system Poor or no spark G Spark plugs are dirty with a discharged battery If the snowmobile battery is an important safety device; replace if necessary. is discharged, the engine can cause electrical system damage or A FIRE HAZARD. @ CAUTION: @ WARNING @ G G Before bypassing the T.O.R.S., make sure that the throttle returns properly to a Yamaha dealer...

Owners Manual
Page 95
... sheave assembly surfaces ...Clean. 2. D. Faulty spark plugs ...Clean or replace the spark plugs. 3. Incorrect V-belt clutch settings for altitude or temperature ...Carburetor. Tight, loose, or broken drive chain ...Ask a Yamaha dealer to inspect. Leaking coolant ...Ask a Yamaha dealer to inspect. G. above . Discharged battery...Charge battery or see B above . 5. Seized engine ...Seizure is pushed in cooling system ...Bleed air or ask a Yamaha dealer to inspect. 2. Low coolant temperature indicator light is low 1. E. Engine stop switch...
... sheave assembly surfaces ...Clean. 2. D. Faulty spark plugs ...Clean or replace the spark plugs. 3. Incorrect V-belt clutch settings for altitude or temperature ...Carburetor. Tight, loose, or broken drive chain ...Ask a Yamaha dealer to inspect. Leaking coolant ...Ask a Yamaha dealer to inspect. G. above . Discharged battery...Charge battery or see B above . 5. Seized engine ...Seizure is pushed in cooling system ...Bleed air or ask a Yamaha dealer to inspect. 2. Low coolant temperature indicator light is low 1. E. Engine stop switch...

Owners Manual
Page 104
.../Green Y/L...Yellow/Blue Y/R ...Yellow/Red Y/W ...Yellow/White O P Q R AC magneto Rectifier/regulator Main switch Main fuse Starter relay Starter motor Battery Jumper leads Engine stop switch Throttle switch Carburetor switch Carburetor warmer relay Carburetor warmer Grip warmer Thumb warmer CDI unit Ignition coil Spark plug Thermo unit Throttle position sensor Grip warmer adjustment switch Thumb warmer adjustment switch Frame ground DC back buzzer (RX10R/RX10RS/RXW10/RXW10S) Gear position switch (RX10R/RX10RS/RXW10/RXW10S) Brake light switch Tail/brake light Speed sensor
.../Green Y/L...Yellow/Blue Y/R ...Yellow/Red Y/W ...Yellow/White O P Q R AC magneto Rectifier/regulator Main switch Main fuse Starter relay Starter motor Battery Jumper leads Engine stop switch Throttle switch Carburetor switch Carburetor warmer relay Carburetor warmer Grip warmer Thumb warmer CDI unit Ignition coil Spark plug Thermo unit Throttle position sensor Grip warmer adjustment switch Thumb warmer adjustment switch Frame ground DC back buzzer (RX10R/RX10RS/RXW10/RXW10S) Gear position switch (RX10R/RX10RS/RXW10/RXW10S) Brake light switch Tail/brake light Speed sensor