
Owners Manual
Page 6
... spark plug ...6-12 Canister ...6-14 Engine oil and oil filter element ...6-14 Final transmission oil ...6-17 Coolant ...6-18 Air filter elements and check hoses and V-belt case air filter element ...6-20 Adjusting the throttle cable free play ...6-23 Adjusting the valve clearance ...6-23 Tires ...6-23 Cast wheels ...6-25 Accessories and replacement parts ...6-26 Front and rear brake lever free play ...6-26 Adjusting the rear brake lock lever cable ...6-27 Checking the front and rear brake pads ...6-27 Checking the brake fluid...
... spark plug ...6-12 Canister ...6-14 Engine oil and oil filter element ...6-14 Final transmission oil ...6-17 Coolant ...6-18 Air filter elements and check hoses and V-belt case air filter element ...6-20 Adjusting the throttle cable free play ...6-23 Adjusting the valve clearance ...6-23 Tires ...6-23 Cast wheels ...6-25 Accessories and replacement parts ...6-26 Front and rear brake lever free play ...6-26 Adjusting the rear brake lock lever cable ...6-27 Checking the front and rear brake pads ...6-27 Checking the brake fluid...
Owners Manual
Page 9
... road and traffic conditions. The use only. Modifications Modifications made to your legs, ankles, and feet. To avoid the possibility of the scooter. Always signal before turning or changing lanes. Always wear protec1-2 tive clothing that has added cargo or accessories. They become very hot and can see you. G Passengers should always hold onto the operator, the seat...
... road and traffic conditions. The use only. Modifications Modifications made to your legs, ankles, and feet. To avoid the possibility of the scooter. Always signal before turning or changing lanes. Always wear protec1-2 tive clothing that has added cargo or accessories. They become very hot and can see you. G Passengers should always hold onto the operator, the seat...

Owners Manual
Page 10
... any way reduce ground clearance or cornering clearance, limit suspension travel, steering travel or control operation, or obscure lights or reflectors. Use extreme caution when selecting and installing any large or heavy items to distribute the weight as evenly as those provided under "Loading" when mounting accessories. Bulky or large accessories may limit control ability, therefore, such accessories are not recommended...
... any way reduce ground clearance or cornering clearance, limit suspension travel, steering travel or control operation, or obscure lights or reflectors. Use extreme caution when selecting and installing any large or heavy items to distribute the weight as evenly as those provided under "Loading" when mounting accessories. Bulky or large accessories may limit control ability, therefore, such accessories are not recommended...

Owners Manual
Page 11
... signal clearly when making turns. Once you have completed a turn the engine off when refueling. A driver might not see your path. Slow down as you wash the scooter. The brake pads could slide out from the main G G G G G switch. Do not park the scooter on a wet road. Apply the brakes slowly when stopping on your eyes, see you . Be careful when passing parked cars...
... signal clearly when making turns. Once you have completed a turn the engine off when refueling. A driver might not see your path. Slow down as you wash the scooter. The brake pads could slide out from the main G G G G G switch. Do not park the scooter on a wet road. Apply the brakes slowly when stopping on your eyes, see you . Be careful when passing parked cars...

Owners Manual
Page 19
.... INSTRUMENT AND CONTROL FUNCTIONS EAU10460 Main switch/steering lock sidestand is moving, otherwise the electrical systems will 3-1 The key can be removed. To lock the steering 1. EAU10660 OFF All electrical systems are off . EAU10680 be started and stay on until the key is turned to "OFF" or the LOCK The steering is used to "LOCK" while still pushing it . NOTE: The headlights come on automatically when the engine is started...
.... INSTRUMENT AND CONTROL FUNCTIONS EAU10460 Main switch/steering lock sidestand is moving, otherwise the electrical systems will 3-1 The key can be removed. To lock the steering 1. EAU10660 OFF All electrical systems are off . EAU10680 be started and stay on until the key is turned to "OFF" or the LOCK The steering is used to "LOCK" while still pushing it . NOTE: The headlights come on automatically when the engine is started...

Owners Manual
Page 23
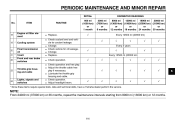
... the code number, and then have a Yamaha dealer check the vehicle. Oil change to be indicated at 5000 km (3000 mi) and every 5000 km (3000 mi) thereafter to indicate that the engine stop switch to " " and turn the key to avoid engine dam- If the top segment and coolant temperature symbol flash, stop the vehicle and let the engine cool. (See page 6-40.) oil change...
... the code number, and then have a Yamaha dealer check the vehicle. Oil change to be indicated at 5000 km (3000 mi) and every 5000 km (3000 mi) thereafter to indicate that the engine stop switch to " " and turn the key to avoid engine dam- If the top segment and coolant temperature symbol flash, stop the vehicle and let the engine cool. (See page 6-40.) oil change...

Owners Manual
Page 25
INSTRUMENT AND CONTROL FUNCTIONS Right EAU12500 EAU12900 1 Horn switch " " Press this switch while applying the front or rear brake to crank the engine with the starter. Engine stop the engine in after it has returned to " ". When released, the switch returns to " ". Front brake lever Dimmer switch " / " Set this switch to the center position. ECA10050 The front brake lever is stuck. To signal a left-hand turn , push this switch to " " for the...
INSTRUMENT AND CONTROL FUNCTIONS Right EAU12500 EAU12900 1 Horn switch " " Press this switch while applying the front or rear brake to crank the engine with the starter. Engine stop the engine in after it has returned to " ". When released, the switch returns to " ". Front brake lever Dimmer switch " / " Set this switch to the center position. ECA10050 The front brake lever is stuck. To signal a left-hand turn , push this switch to " " for the...

Owners Manual
Page 27
... then pull the lever up. Match marks 9 2. Lid 2. Fuel tank cap 2 1. Turn the key counterclockwise to the original position, and then re3-9 Insert the key into the tank opening, and then push down on the cap. 4 5 6 7 8 2. The lock will be released and the fuel tank cap can be removed. 1 1. move it clockwise. Opening lever To install the fuel tank cap 1. INSTRUMENT AND CONTROL FUNCTIONS EAU13161 Fuel tank cap To open the fuel tank cap 1.
... then pull the lever up. Match marks 9 2. Lid 2. Fuel tank cap 2 1. Turn the key counterclockwise to the original position, and then re3-9 Insert the key into the tank opening, and then push down on the cap. 4 5 6 7 8 2. The lock will be released and the fuel tank cap can be removed. 1 1. move it clockwise. Opening lever To install the fuel tank cap 1. INSTRUMENT AND CONTROL FUNCTIONS EAU13161 Fuel tank cap To open the fuel tank cap 1.

Owners Manual
Page 33
... ignition circuit cut -off system (comprising the sidestand switch and brake light switches) has the following procedure. EWA10250 2 3 4 5 6 7 8 9 WARNING If a malfunction is applied. G It prevents starting when either brake is applied, but neither brake is noted, have a Yamaha dealer repair it if it does not function properly. G It prevents starting when the sidestand is up, but the sidestand is moved down . INSTRUMENT AND CONTROL...
... ignition circuit cut -off system (comprising the sidestand switch and brake light switches) has the following procedure. EWA10250 2 3 4 5 6 7 8 9 WARNING If a malfunction is applied. G It prevents starting when either brake is applied, but neither brake is noted, have a Yamaha dealer repair it if it does not function properly. G It prevents starting when the sidestand is up, but the sidestand is moved down . INSTRUMENT AND CONTROL...

Owners Manual
Page 38
... ventilation. Turn the key to "ON" and make sure that there is cold! 1. Close the throttle completely. 3. For safety, always start the engine or operate it in instructions prior to " ". 2. Do not crank the engine more than 10 seconds on page 3-15. Consult a Yamaha dealer regarding any control or function that the engine stop switch is set to operating the vehicle for engine break...
... ventilation. Turn the key to "ON" and make sure that there is cold! 1. Close the throttle completely. 3. For safety, always start the engine or operate it in instructions prior to " ". 2. Do not crank the engine more than 10 seconds on page 3-15. Consult a Yamaha dealer regarding any control or function that the engine stop switch is set to operating the vehicle for engine break...

Owners Manual
Page 42
... following pages. WARNING If you . PERIODIC MAINTENANCE AND MINOR REPAIR EAU17271 1 2 3 4 5 6 7 8 9 Safety is certified (if applicable). The most efficient condition possible. EWA10320 rapid engine wear may be cleaned or replaced more frequently, otherwise 6-1 ESPECIALLY IMPORTANT ARE THE MAINTENANCE SERVICES RELATED TO EMISSIONS CONTROL. THESE CONTROLS NOT ONLY FUNCTION TO ENSURE CLEANER AIR, BUT ARE ALSO VITAL TO PROPER ENGINE OPERATION AND MAXIMUM PERFORMANCE. IN...
... following pages. WARNING If you . PERIODIC MAINTENANCE AND MINOR REPAIR EAU17271 1 2 3 4 5 6 7 8 9 Safety is certified (if applicable). The most efficient condition possible. EWA10320 rapid engine wear may be cleaned or replaced more frequently, otherwise 6-1 ESPECIALLY IMPORTANT ARE THE MAINTENANCE SERVICES RELATED TO EMISSIONS CONTROL. THESE CONTROLS NOT ONLY FUNCTION TO ENSURE CLEANER AIR, BUT ARE ALSO VITAL TO PROPER ENGINE OPERATION AND MAXIMUM PERFORMANCE. IN...

Owners Manual
Page 44
... adjust valve clearance when engine is cold. Check the air cut-off valve, reed valve, and hose for cracks or damage. ITEM ROUTINE 600 mi (1000 km) or 1 month G 1 * Fuel line 3 4 5 6 7 8 9 2 Spark plug G G G G 3 * Valve clearance 4 * 5 * 6 * Crankcase breather system Electronic fuel injection Evaporative emission control system G G G Check fuel hoses for damage. Adjust gap and clean. Replace if necessary. Check breather hose for damage. Replace if necessary. Replace if necessary. Replace any...
... adjust valve clearance when engine is cold. Check the air cut-off valve, reed valve, and hose for cracks or damage. ITEM ROUTINE 600 mi (1000 km) or 1 month G 1 * Fuel line 3 4 5 6 7 8 9 2 Spark plug G G G G 3 * Valve clearance 4 * 5 * 6 * Crankcase breather system Electronic fuel injection Evaporative emission control system G G G Check fuel hoses for damage. Adjust gap and clean. Replace if necessary. Check breather hose for damage. Replace if necessary. Replace if necessary. Replace any...
Owners Manual
Page 47
... 12500 mi (20000 km 19 * Cooling system G 3 4 5 Final transmission 20 oil 21 * V-belt Front and rear brake 22 * switches Throttle grip housing and cable Lights, signals and switches G G G G G G 23 * √ √ √ √ √ 6 7 8 9 G 24 * G G √ √ √ √ √ √ * Since these items require special tools, data and technical skills, have a Yamaha dealer perform the service. Check vehicle for coolant leakage. Check operation and free...
... 12500 mi (20000 km 19 * Cooling system G 3 4 5 Final transmission 20 oil 21 * V-belt Front and rear brake 22 * switches Throttle grip housing and cable Lights, signals and switches G G G G G G 23 * √ √ √ √ √ 6 7 8 9 G 24 * G G √ √ √ √ √ √ * Since these items require special tools, data and technical skills, have a Yamaha dealer perform the service. Check vehicle for coolant leakage. Check operation and free...

Owners Manual
Page 55
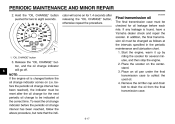
.... Maximum level mark 3. Engine oil filler cap 2. G Make sure that the vehicle is below the minimum level mark, add sufficient oil of fuel vapor into the oil filler hole, and then tighten the oil filler cap. PERIODIC MAINTENANCE AND MINOR REPAIR EAU36110 EAU34181 Canister Engine oil element and oil filter again to check the following: G Check each hose connection. Before operating this vehicle, make sure to...
.... Maximum level mark 3. Engine oil filler cap 2. G Make sure that the vehicle is below the minimum level mark, add sufficient oil of fuel vapor into the oil filler hole, and then tighten the oil filler cap. PERIODIC MAINTENANCE AND MINOR REPAIR EAU36110 EAU34181 Canister Engine oil element and oil filter again to check the following: G Check each hose connection. Before operating this vehicle, make sure to...
Owners Manual
Page 58
... a Yamaha dealer check and repair the scooter. PERIODIC MAINTENANCE AND MINOR REPAIR 2. Place an oil pan under the final transmission case to drain the oil from the final transmission case. 1 2 3 1 4 1. "OIL CHANGE" button 5 6 7 8 9 3. To reset the oil change indicator before the periodic oil change for oil leakage before the oil change to eight seconds. Hold the "OIL CHANGE" button pushed for several minutes, and then stop the engine. 2. Start the engine, warm...
... a Yamaha dealer check and repair the scooter. PERIODIC MAINTENANCE AND MINOR REPAIR 2. Place an oil pan under the final transmission case to drain the oil from the final transmission case. 1 2 3 1 4 1. "OIL CHANGE" button 5 6 7 8 9 3. To reset the oil change indicator before the periodic oil change for oil leakage before the oil change to eight seconds. Hold the "OIL CHANGE" button pushed for several minutes, and then stop the engine. 2. Start the engine, warm...

Owners Manual
Page 65
... heaviest items close to the center of the vehicle, and distribute the weight evenly from country to loss of the cargo, rider, passenger, and accessories (cowling, saddlebags, etc. NEVER OVERLOAD 1 3 1. Have excessively worn tires replaced by a Yamaha dealer immediately. Do not carry loosely packed items that the total weight of control. PERIODIC MAINTENANCE AND MINOR REPAIR Tire air pressure (measured on cold tires): 0-90 kg (0-198 lb...
... heaviest items close to the center of the vehicle, and distribute the weight evenly from country to loss of the cargo, rider, passenger, and accessories (cowling, saddlebags, etc. NEVER OVERLOAD 1 3 1. Have excessively worn tires replaced by a Yamaha dealer immediately. Do not carry loosely packed items that the total weight of control. PERIODIC MAINTENANCE AND MINOR REPAIR Tire air pressure (measured on cold tires): 0-90 kg (0-198 lb...

Owners Manual
Page 76
... fuel injection fuse 7. Ignition fuse 2. Radiator fan fuse 5. PERIODIC MAINTENANCE AND MINOR REPAIR 1 2 3 4 5 6 Specified fuses: Main fuse: 40.0 A Ignition fuse: 10.0 A Signaling system fuse: 10.0 A Headlight fuse: 20.0 A Taillight fuse: 10.0 A Radiator fan fuse: 10.0 A Electronic fuel injection fuse: 10.0 A Backup fuse: 10.0 A ECA10640 check the electrical system. 7 1 2 3 4 5 6 7 8 9 1. Turn the key to "ON" and turn on the electrical circuit in question to the electrical system and possibly a fire. 3. If the fuse immediately blows again, have a Yamaha dealer 6-35 Headlight fuse...
... fuel injection fuse 7. Ignition fuse 2. Radiator fan fuse 5. PERIODIC MAINTENANCE AND MINOR REPAIR 1 2 3 4 5 6 Specified fuses: Main fuse: 40.0 A Ignition fuse: 10.0 A Signaling system fuse: 10.0 A Headlight fuse: 20.0 A Taillight fuse: 10.0 A Radiator fan fuse: 10.0 A Electronic fuel injection fuse: 10.0 A Backup fuse: 10.0 A ECA10640 check the electrical system. 7 1 2 3 4 5 6 7 8 9 1. Turn the key to "ON" and turn on the electrical circuit in question to the electrical system and possibly a fire. 3. If the fuse immediately blows again, have a Yamaha dealer 6-35 Headlight fuse...

Owners Manual
Page 87
...-A 2 3 4 5 6 7 8 9 Spark plug(s): Manufacturer/model: NGK/CR7E Spark plug gap: 0.7-0.8 mm (0.028-0.031 in) Recommended engine oil grade: API service SE, SF, SG type or higher Engine oil quantity: Without oil filter element replacement: 1.50 L (1.59 US qt) (1.32 Imp.qt) With oil filter element replacement: 1.70 L (1.80 US qt) (1.50 Imp.qt) Weight: With oil and fuel: 212.0 kg (467 lb) Clutch: Clutch type: Dry, centrifugal automatic Engine: Engine type: Liquid cooled 4-stroke, DOHC Cylinder arrangement...
...-A 2 3 4 5 6 7 8 9 Spark plug(s): Manufacturer/model: NGK/CR7E Spark plug gap: 0.7-0.8 mm (0.028-0.031 in) Recommended engine oil grade: API service SE, SF, SG type or higher Engine oil quantity: Without oil filter element replacement: 1.50 L (1.59 US qt) (1.32 Imp.qt) With oil filter element replacement: 1.70 L (1.80 US qt) (1.50 Imp.qt) Weight: With oil and fuel: 212.0 kg (467 lb) Clutch: Clutch type: Dry, centrifugal automatic Engine: Engine type: Liquid cooled 4-stroke, DOHC Cylinder arrangement...

Owners Manual
Page 89
SPECIFICATIONS Headlight: Bulb type: Halogen bulb Radiator fan fuse: 10.0 A Electronic fuel injection fuse: 10.0 A Backup fuse: 10.0 A Bulb voltage, wattage x quantity: Headlight: 12 V, 60 W/55.0 W × 2 Tail/brake light: LED Front turn signal/position light: 12 V, 21 W/5.0 W × 2 Rear turn signal light: 12 V, 21.0 W × 2 Licence plate light: 12 V, 5.0 W × 1 Meter lighting: 12 V, 2.0 W × 3 High beam indicator light: 12 V, 1.4 W × 1 Turn signal indicator light: 12 V, 1.4 W × 2 Engine trouble warning light: 12 V, 1.4 W × 1 2 3 4 5 6 7 8 9 Fuses: Main fuse: ...
SPECIFICATIONS Headlight: Bulb type: Halogen bulb Radiator fan fuse: 10.0 A Electronic fuel injection fuse: 10.0 A Backup fuse: 10.0 A Bulb voltage, wattage x quantity: Headlight: 12 V, 60 W/55.0 W × 2 Tail/brake light: LED Front turn signal/position light: 12 V, 21 W/5.0 W × 2 Rear turn signal light: 12 V, 21.0 W × 2 Licence plate light: 12 V, 5.0 W × 1 Meter lighting: 12 V, 2.0 W × 3 High beam indicator light: 12 V, 1.4 W × 1 Turn signal indicator light: 12 V, 1.4 W × 2 Engine trouble warning light: 12 V, 1.4 W × 1 2 3 4 5 6 7 8 9 Fuses: Main fuse: ...
Owners Manual
Page 99
...hoses and V-belt case air filter element...6-20 Front fork, checking...6-31 Fuel ...3-10 Fuel tank cap...3-9 Fuses, replacing ...6-34 R Rear brake lock lever ...3-8 Rear brake lock lever cable, adjusting ...6-27 Rider seat, adjusting ...3-12 H Handlebar switches ...3-6 Headlight bulb, replacing...6-36 High beam indicator light...3-2 Horn switch...3-7 B Battery ...6-33 Brake fluid, changing ...6-29 Brake fluid level, checking ...6-28 Brake lever, front ...3-7 Brake lever, rear ...3-8 Brake levers, lubricating ...6-30 Braking ...5-2 S Safe-riding points ...1-4 Safety information ...1-1 Seats...
...hoses and V-belt case air filter element...6-20 Front fork, checking...6-31 Fuel ...3-10 Fuel tank cap...3-9 Fuses, replacing ...6-34 R Rear brake lock lever ...3-8 Rear brake lock lever cable, adjusting ...6-27 Rider seat, adjusting ...3-12 H Handlebar switches ...3-6 Headlight bulb, replacing...6-36 High beam indicator light...3-2 Horn switch...3-7 B Battery ...6-33 Brake fluid, changing ...6-29 Brake fluid level, checking ...6-28 Brake lever, front ...3-7 Brake lever, rear ...3-8 Brake levers, lubricating ...6-30 Braking ...5-2 S Safe-riding points ...1-4 Safety information ...1-1 Seats...