
Owners Manual
Page 7
... ...3-9 Front storage compartment ...3-10 Carrier ...3-11 4 PRE-OPERATION CHECKS ...4-1 Pre-operation check list ...4-1 OPERATION AND IMPORTANT RIDING POINTS ...5-1 Starting and warming up a cold engine ...5-1 Starting off ...5-2 Acceleration and deceleration ...5-3 Braking ...5-3 Engine break-in ...5-4 Parking ...5-5 PERIODIC MAINTENANCE AND MINOR REPAIR ...6-1 Owner's tool kit ...6-1 Periodic maintenance and lubrication chart ...6-2 Removing and installing the panel ...6-5 Checking the spark plug ...6-5 Final transmission oil ...6-7 Cleaning the air filter element ...6-8 1 2 5 3 6
... ...3-9 Front storage compartment ...3-10 Carrier ...3-11 4 PRE-OPERATION CHECKS ...4-1 Pre-operation check list ...4-1 OPERATION AND IMPORTANT RIDING POINTS ...5-1 Starting and warming up a cold engine ...5-1 Starting off ...5-2 Acceleration and deceleration ...5-3 Braking ...5-3 Engine break-in ...5-4 Parking ...5-5 PERIODIC MAINTENANCE AND MINOR REPAIR ...6-1 Owner's tool kit ...6-1 Periodic maintenance and lubrication chart ...6-2 Removing and installing the panel ...6-5 Checking the spark plug ...6-5 Final transmission oil ...6-7 Cleaning the air filter element ...6-8 1 2 5 3 6

Owners Manual
Page 8
... front and rear brake levers ...6-17 Checking and lubricating the centerstand ...6-18 Checking the front fork ...6-18 Checking the steering ...6-19 Checking the wheel bearings ...6-20 Battery ...6-20 Replacing the fuse ...6-22 Troubleshooting ...6-22 Troubleshooting chart ...6-23 7 SCOOTER CARE AND STORAGE ...7-1 Care ...7-1 Storage ...7-4 SPECIFICATIONS ...8-1 CONSUMER INFORMATION ...9-1 Identification numbers ...9-1 Key identification number ...9-1 Vehicle identification number ...9-1 Model label ...9-2 Reporting safety defects ...9-3 SCOOTER NOISE REGULATION ...9-4 YAMAHA MOTOR CORPORATION...
... front and rear brake levers ...6-17 Checking and lubricating the centerstand ...6-18 Checking the front fork ...6-18 Checking the steering ...6-19 Checking the wheel bearings ...6-20 Battery ...6-20 Replacing the fuse ...6-22 Troubleshooting ...6-22 Troubleshooting chart ...6-23 7 SCOOTER CARE AND STORAGE ...7-1 Care ...7-1 Storage ...7-4 SPECIFICATIONS ...8-1 CONSUMER INFORMATION ...9-1 Identification numbers ...9-1 Key identification number ...9-1 Vehicle identification number ...9-1 Model label ...9-2 Reporting safety defects ...9-3 SCOOTER NOISE REGULATION ...9-4 YAMAHA MOTOR CORPORATION...
Owners Manual
Page 12
... provided under "Loading" when mounting accessories. 1. Check accessory mounts and cargo restraints frequently. 3. Certain accessories can create unstable handling or a slow steering response. This improper position limits the freedom of movement of your scooter. Q SAFETY INFORMATION minimize imbalance or instability. 2. Accessories Genuine Yamaha accessories have been specifically designed for the proper selection, installation and use on this scooter. Shifting weights can create instability due...
... provided under "Loading" when mounting accessories. 1. Check accessory mounts and cargo restraints frequently. 3. Certain accessories can create unstable handling or a slow steering response. This improper position limits the freedom of movement of your scooter. Q SAFETY INFORMATION minimize imbalance or instability. 2. Accessories Genuine Yamaha accessories have been specifically designed for the proper selection, installation and use on this scooter. Shifting weights can create instability due...
Owners Manual
Page 13
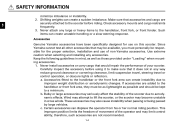
...SAFETY INFORMATION 2. Use caution when adding electrical accessories. Gasoline and exhaust gas 1. b. Never refuel while smoking or in a closed area. Always turn the engine off before leaving the scooter unattended and remove the key from the main switch. Do not park the scooter near a flammable source (e.g., a kerosene heater, or near an open flame. 2. If any length of lights or engine power... ground, otherwise it may cause loss of an open flame), otherwise it run for any gasoline spills on your skin or clothing, immediately wash the affected area with soap and water and change ...
...SAFETY INFORMATION 2. Use caution when adding electrical accessories. Gasoline and exhaust gas 1. b. Never refuel while smoking or in a closed area. Always turn the engine off before leaving the scooter unattended and remove the key from the main switch. Do not park the scooter near a flammable source (e.g., a kerosene heater, or near an open flame. 2. If any length of lights or engine power... ground, otherwise it may cause loss of an open flame), otherwise it run for any gasoline spills on your skin or clothing, immediately wash the affected area with soap and water and change ...

Owners Manual
Page 14
... flap), and a bright colored jacket. 8. Q SAFETY INFORMATION EAU00023 Further safe-riding points 1 1. Do not carry too much luggage on road construction sites, and manhole covers become extremely slippery when wet. Once you and open a door in the "Loading and accessories" section for instructions on carrying a load.) 1-6 A driver might not see you have completed a turn . The brake lining could slide...
... flap), and a bright colored jacket. 8. Q SAFETY INFORMATION EAU00023 Further safe-riding points 1 1. Do not carry too much luggage on road construction sites, and manhole covers become extremely slippery when wet. Once you and open a door in the "Loading and accessories" section for instructions on carrying a load.) 1-6 A driver might not see you have completed a turn . The brake lining could slide...

Owners Manual
Page 21
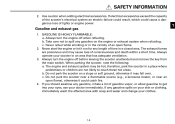
... engine oil level warning light should come on automatically when the engine is used to lock the steering. The various positions are off . The key cannot be removed. See page 3-3 for an explanation of the engine oil level warning light. EAU00027 INSTRUMENT AND CONTROL FUNCTIONS * OFF LOCK ON EAU00038 EAU00040 OFF All electrical systems are off . EAU00029 3 Main switch/steering lock The main switch/steering lock controls the ignition and lighting systems, and is started . The key can...
... engine oil level warning light should come on automatically when the engine is used to lock the steering. The various positions are off . The key cannot be removed. See page 3-3 for an explanation of the engine oil level warning light. EAU00027 INSTRUMENT AND CONTROL FUNCTIONS * OFF LOCK ON EAU00038 EAU00040 OFF All electrical systems are off . EAU00029 3 Main switch/steering lock The main switch/steering lock controls the ignition and lighting systems, and is started . The key can...
Owners Manual
Page 24
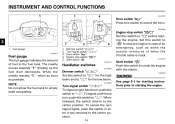
... allow the fuel tank to the center position. When released, the switch returns to empty itself completely. INSTRUMENT AND CONTROL FUNCTIONS 1 1 4 ENGINE STOP EAU00129 Horn switch "*" Press this switch to crank the engine with the starter. EAU00143 Handlebar switches EAU03888 Dimmer switch "&/%" Set this switch to "4". To signal a left-hand turn, push this switch to "&" for the high beam and to "%" for starting instructions prior to "#" before starting the engine. To cancel...
... allow the fuel tank to the center position. When released, the switch returns to empty itself completely. INSTRUMENT AND CONTROL FUNCTIONS 1 1 4 ENGINE STOP EAU00129 Horn switch "*" Press this switch to crank the engine with the starter. EAU00143 Handlebar switches EAU03888 Dimmer switch "&/%" Set this switch to "4". To signal a left-hand turn, push this switch to "&" for the high beam and to "%" for starting instructions prior to "#" before starting the engine. To cancel...
Owners Manual
Page 26
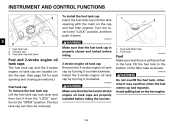
... seat opening with the mark on the hot engine. Fuel tank filler tube 2. Fill the fuel tank to the "OPEN" position. Avoid spilling fuel on the cap and fuel filler aligned. Oil tank cap 3. Turn the lever to the "LOCK" position, and then push it counterclockwise. INSTRUMENT AND CONTROL FUNCTIONS 3 To install the fuel tank cap Insert the fuel tank cap into the tank opening and closing procedures.) Fuel tank cap To remove the fuel tank cap Lift the fuel tank cap lock lever...
... seat opening with the mark on the hot engine. Fuel tank filler tube 2. Fill the fuel tank to the "OPEN" position. Avoid spilling fuel on the cap and fuel filler aligned. Oil tank cap 3. Turn the lever to the "LOCK" position, and then push it counterclockwise. INSTRUMENT AND CONTROL FUNCTIONS 3 To install the fuel tank cap Insert the fuel tank cap into the tank opening and closing procedures.) Fuel tank cap To remove the fuel tank cap Lift the fuel tank cap lock lever...
Owners Manual
Page 27
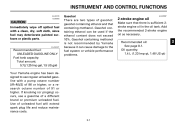
EAU04204* Recommended fuel: UNLEADED GASOLINE ONLY Fuel tank capacity: Total amount: 5.7L(1.25 Imp gal, 1.5 US gal) Your Yamaha engine has been designed to the fuel system or vehicle performance problems. EAU02999* 2-stroke engine oil Make sure that containing methanol. Gasohol There are two types of unleaded fuel will extend spark plug life and reduce maintenance costs. Oil quantity: 1.4 L (1.23 Imp qt, 1.48 US qt) 3 3-7 Use of gasohol: gasohol...
EAU04204* Recommended fuel: UNLEADED GASOLINE ONLY Fuel tank capacity: Total amount: 5.7L(1.25 Imp gal, 1.5 US gal) Your Yamaha engine has been designed to the fuel system or vehicle performance problems. EAU02999* 2-stroke engine oil Make sure that containing methanol. Gasohol There are two types of unleaded fuel will extend spark plug life and reduce maintenance costs. Oil quantity: 1.4 L (1.23 Imp qt, 1.48 US qt) 3 3-7 Use of gasohol: gasohol...
Owners Manual
Page 32
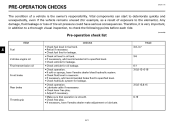
...vehicle is the owner's responsibility. Therefore, it is smooth. 9 Check free play . 9 Adjust if necessary. 9 Make sure that operation is very important, in reservoir. 9 If necessary, add recommended brake fluid to check the following points before each ride. Vital components can start...The condition of exposure to the elements). Any damage, fluid leakage or loss of tire air pressure could have Yamaha dealer make adjustment or lubricate. 3-6~3-7 PAGE 4 Fuel 3-6 2-stroke engine oil Final transmission oil 6-7 3-5,6-13~6-16 Front brake 3-5,6-13,6-15 Rear brake 6-10 Throttle grip ...
...vehicle is the owner's responsibility. Therefore, it is smooth. 9 Check free play . 9 Adjust if necessary. 9 Make sure that operation is very important, in reservoir. 9 If necessary, add recommended brake fluid to check the following points before each ride. Vital components can start...The condition of exposure to the elements). Any damage, fluid leakage or loss of tire air pressure could have Yamaha dealer make adjustment or lubricate. 3-6~3-7 PAGE 4 Fuel 3-6 2-stroke engine oil Final transmission oil 6-7 3-5,6-13~6-16 Front brake 3-5,6-13,6-15 Rear brake 6-10 Throttle grip ...
Owners Manual
Page 34
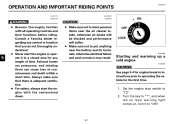
Turn the key to "*", and when the oil level warning light comes on, turn it in instructions prior to "ON". 5-1 Always make sure that you do not thoroughly understand. 8 Never start the engine with all operating controls and their functions before riding. Set the engine stop switch to put anything near the air cleaner intake, otherwise air intake will be blocked and performance will suffer. 8 Make sure...
Turn the key to "*", and when the oil level warning light comes on, turn it in instructions prior to "ON". 5-1 Always make sure that you do not thoroughly understand. 8 Never start the engine with all operating controls and their functions before riding. Set the engine stop switch to put anything near the air cleaner intake, otherwise air intake will be blocked and performance will suffer. 8 Make sure...

Owners Manual
Page 35
... engine does not start switch, release the switch, wait a few seconds, and then try using the kickstarter. Starting off NOTE: Before starting attempt should be as short as possible to warm up before starting off , allow the engine to preserve the battery. Each starting off . Start switch "," 2. Do not crank the engine more than 5 seconds on , have a Yamaha dealer check the electrical circuit. 3. ECA00055 ENGINE STOP START 1 1. Switch the turn signal...
... engine does not start switch, release the switch, wait a few seconds, and then try using the kickstarter. Starting off NOTE: Before starting attempt should be as short as possible to warm up before starting off , allow the engine to preserve the battery. Each starting off . Start switch "," 2. Do not crank the engine more than 5 seconds on , have a Yamaha dealer check the electrical circuit. 3. ECA00055 ENGINE STOP START 1 1. Switch the turn signal...
Owners Manual
Page 39
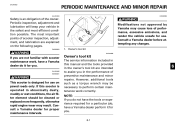
... is designed for proper maintenance intervals. The most efficient condition possible. If this manual and the tools provided in the performance of preventive maintenance and minor repairs. EW000060 1 w Modifications not approved by Yamaha may cause loss of performance, excessive emissions, and render the vehicle unsafe for you in the owner's tool kit are intended to perform certain maintenance work , have a Yamaha dealer perform it for use...
... is designed for proper maintenance intervals. The most efficient condition possible. If this manual and the tools provided in the performance of preventive maintenance and minor repairs. EW000060 1 w Modifications not approved by Yamaha may cause loss of performance, excessive emissions, and render the vehicle unsafe for you in the owner's tool kit are intended to perform certain maintenance work , have a Yamaha dealer perform it for use...
Owners Manual
Page 40
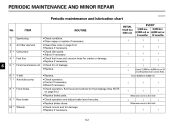
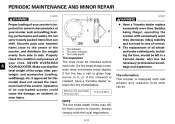
PERIODIC MAINTENANCE AND MINOR REPAIR EAU00473 Periodic maintenance and lubrication chart No. 1 2 3 * 4 * ITEM Spark plug Air filter element Carburetor Fuel line Final transmission oil ROUTINE 9 Check condition. 9 Clean regap or replace if necessary. 9 Clean.(See note on page 6-4.) 9 Replace brake pads. 9 Check operation and adjust brake lever free play. 9 Replace brake shoes. 9 Check runout and for oil leakage. 9 Replace. INITIAL 10,00 km (600 mi) √ EVERY 6,000 km 3,000 km...
PERIODIC MAINTENANCE AND MINOR REPAIR EAU00473 Periodic maintenance and lubrication chart No. 1 2 3 * 4 * ITEM Spark plug Air filter element Carburetor Fuel line Final transmission oil ROUTINE 9 Check condition. 9 Clean regap or replace if necessary. 9 Clean.(See note on page 6-4.) 9 Replace brake pads. 9 Check operation and adjust brake lever free play. 9 Replace brake shoes. 9 Check runout and for oil leakage. 9 Replace. INITIAL 10,00 km (600 mi) √ EVERY 6,000 km 3,000 km...
Owners Manual
Page 44
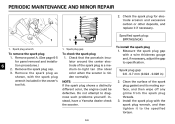
... the spark plug shows a distinctly different color, the engine could be defective. Spark plug gap: 0.6 - 0.7 mm (0.024 - 0.028 in the owner's tool kit. Remove the spark plug as shown, with a wire thickness gauge and, if necessary, adjust the gap to the specified torque. 1 1. Do not attempt to -light tan (the ideal color when the scooter is a medium-to diagnose such problems yourself. Measure the spark plug gap...
... the spark plug shows a distinctly different color, the engine could be defective. Spark plug gap: 0.6 - 0.7 mm (0.024 - 0.028 in the owner's tool kit. Remove the spark plug as shown, with a wire thickness gauge and, if necessary, adjust the gap to the specified torque. 1 1. Do not attempt to -light tan (the ideal color when the scooter is a medium-to diagnose such problems yourself. Measure the spark plug gap...
Owners Manual
Page 45
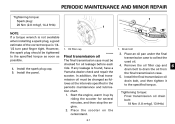
... a spark plug, a good estimate of the correct torque is found, have a Yamaha dealer check and repair the scooter. Install the panel. 1 1 1. Place an oil pan under the final transmission case to drain the oil from the final transmission case. 5. Oil filler cap EAU04228 1. Start the engine, warm it to the specified torque as soon as follows at the intervals specified in the periodic maintenance...
... a spark plug, a good estimate of the correct torque is found, have a Yamaha dealer check and repair the scooter. Install the panel. 1 1 1. Place an oil pan under the final transmission case to drain the oil from the final transmission case. 5. Oil filler cap EAU04228 1. Start the engine, warm it to the specified torque as soon as follows at the intervals specified in the periodic maintenance...
Owners Manual
Page 50
... comply with valves. 1. Do not carry loosely packed items that the total weight of your scooter, such as handling, braking, performance and safety. if approved for several characteristics of the cargo, rider, passenger, and accessories (cowling, saddlebags, etc. Tire information This scooter is equipped with cast wheels and tubeless tires with the local regulations. 6-12 Tire sidewall 2. Tire tread depth 6 Tire inspection The tires must be...
... comply with valves. 1. Do not carry loosely packed items that the total weight of your scooter, such as handling, braking, performance and safety. if approved for several characteristics of the cargo, rider, passenger, and accessories (cowling, saddlebags, etc. Tire information This scooter is equipped with cast wheels and tubeless tires with the local regulations. 6-12 Tire sidewall 2. Tire tread depth 6 Tire inspection The tires must be...
Owners Manual
Page 63
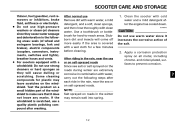
...remain well into spring. 1. NOTE: Salt sprayed on roads in the rain, near the sea or on a small hidden part of wheel and swingarm bearings, fork and brakes), electric components (couplers, connectors, instruments, switches and lights), breather hoses and vents. 8 For scooters equipped with a windshield: Do not ..., fuel (gasoline), rust removers or inhibitors, brake fluid, antifreeze or electrolyte. 8 Do not use high-pressure washers or steam-jet cleaners since it does not leave any marks. If the windshield is covered with water, carry out the following areas: seals (of the windshield to...
...remain well into spring. 1. NOTE: Salt sprayed on roads in the rain, near the sea or on a small hidden part of wheel and swingarm bearings, fork and brakes), electric components (couplers, connectors, instruments, switches and lights), breather hoses and vents. 8 For scooters equipped with a windshield: Do not ..., fuel (gasoline), rust removers or inhibitors, brake fluid, antifreeze or electrolyte. 8 Do not use high-pressure washers or steam-jet cleaners since it does not leave any marks. If the windshield is covered with water, carry out the following areas: seals (of the windshield to...

Owners Manual
Page 68
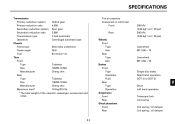
....2 in) 120 mm (4.7 in) 2,000 mm (78.7 in) Engine oil Type Quantity Total amount Final transmission oil Type Quantity Periodic oil change Total amount Air filter Fuel Type Fuel tank capacity Carburetor Manufacturer Type × quantity Spark plug Manufacturer/model Gap Clutch type EAU01038 YAMALUBE 2 or 2-stroke engine oil 1.4L (1.23 lmp qt, 1.48 US qt) Yamalube 4, SAE10W30SE or GL gear oil 0.11L (0.10 lmp qt, 0.12 US qt) 0.13L...
....2 in) 120 mm (4.7 in) 2,000 mm (78.7 in) Engine oil Type Quantity Total amount Final transmission oil Type Quantity Periodic oil change Total amount Air filter Fuel Type Fuel tank capacity Carburetor Manufacturer Type × quantity Spark plug Manufacturer/model Gap Clutch type EAU01038 YAMALUBE 2 or 2-stroke engine oil 1.4L (1.23 lmp qt, 1.48 US qt) Yamalube 4, SAE10W30SE or GL gear oil 0.11L (0.10 lmp qt, 0.12 US qt) 0.13L...
Owners Manual
Page 69
... system Secondary reduction ratio Transmission type Operation Chassis Frame type Caster angle Trail Tires Front Type Size Manufacturer Rear Type Size Manufacturer Maximum load* Helical gear 4.000 Spur gear 3.666 V-belt automatic Centrifugal automatic type Steel tube underbone 26.5° 93 mm(3.7 in) Tire air pressure (measured on cold tires) Front Rear Wheels Front Type Size Rear Type Size Brakes Front Type Operation Fluid Rear Type Operation Suspension Front Rear Shock absorbers Front Rear 200 kPa (2.00...
... system Secondary reduction ratio Transmission type Operation Chassis Frame type Caster angle Trail Tires Front Type Size Manufacturer Rear Type Size Manufacturer Maximum load* Helical gear 4.000 Spur gear 3.666 V-belt automatic Centrifugal automatic type Steel tube underbone 26.5° 93 mm(3.7 in) Tire air pressure (measured on cold tires) Front Rear Wheels Front Type Size Rear Type Size Brakes Front Type Operation Fluid Rear Type Operation Suspension Front Rear Shock absorbers Front Rear 200 kPa (2.00...