
Owners Manual
Page 6
...-in ...5-4 Parking ...5-5 PERIODIC MAINTENANCE AND MINOR REPAIR ...6-1 PERIODIC MAINTENANCE ...6-1 Owner's tool kit ...6-1 Periodic maintenance chart for the emission control system ...6-3 General maintenance and lubrication chart ...6-4 Removing and installing panels ...6-8 Checking the spark plugs ...6-9 Engine oil and oil filter element ...6-11 Final gear oil ...6-13 Cleaning the air filter element ...6-14 Adjusting the carburetors ...6-15 Adjusting the throttle cable free play ...6-15 Adjusting the valve clearance ...6-16 Tires ...6-16 Spoke wheels ...6-18 Accessories and replacement parts...
...-in ...5-4 Parking ...5-5 PERIODIC MAINTENANCE AND MINOR REPAIR ...6-1 PERIODIC MAINTENANCE ...6-1 Owner's tool kit ...6-1 Periodic maintenance chart for the emission control system ...6-3 General maintenance and lubrication chart ...6-4 Removing and installing panels ...6-8 Checking the spark plugs ...6-9 Engine oil and oil filter element ...6-11 Final gear oil ...6-13 Cleaning the air filter element ...6-14 Adjusting the carburetors ...6-15 Adjusting the throttle cable free play ...6-15 Adjusting the valve clearance ...6-16 Tires ...6-16 Spoke wheels ...6-18 Accessories and replacement parts...

Owners Manual
Page 7
......9-7 YAMAHA EXTENDED SERVICE (Y.E.S.) ...9-9 TABLE OF CONTENTS Checking the wheel bearings ...6-28 Battery ...6-28 Replacing the fuses ...6-29 Replacing the headlight bulb ...6-30 Replacing a turn signal light bulb or the tail/brake light bulb ...6-32 Supporting the motorcycle ...6-32 Front wheel ...6-33 Rear wheel ...6-34 Troubleshooting ...6-36 Troubleshooting chart ...6-37 MOTORCYCLE CARE AND STORAGE ...7-1 Care ...7-1 Storage ...7-3 SPECIFICATIONS ...8-1 CONSUMER INFORMATION...9-1 Identification numbers ...9-1 Reporting safety defects ...9-3 Motorcycle noise regulation ...9-4 Maintenance...
......9-7 YAMAHA EXTENDED SERVICE (Y.E.S.) ...9-9 TABLE OF CONTENTS Checking the wheel bearings ...6-28 Battery ...6-28 Replacing the fuses ...6-29 Replacing the headlight bulb ...6-30 Replacing a turn signal light bulb or the tail/brake light bulb ...6-32 Supporting the motorcycle ...6-32 Front wheel ...6-33 Rear wheel ...6-34 Troubleshooting ...6-36 Troubleshooting chart ...6-37 MOTORCYCLE CARE AND STORAGE ...7-1 Care ...7-1 Storage ...7-3 SPECIFICATIONS ...8-1 CONSUMER INFORMATION...9-1 Identification numbers ...9-1 Reporting safety defects ...9-3 Motorcycle noise regulation ...9-4 Maintenance...
Owners Manual
Page 9
.... G Never touch the engine or exhaust system during operation to maintain control of the motorcycle. • The passenger should also observe the precautions mentioned above. 1 Modifications Modifications made to this motorcycle not approved by road and traffic conditions. • Always signal before turning or changing lanes. Always wear protective clothing that has added cargo or accessories. Modifications may cause severe...
.... G Never touch the engine or exhaust system during operation to maintain control of the motorcycle. • The passenger should also observe the precautions mentioned above. 1 Modifications Modifications made to this motorcycle not approved by road and traffic conditions. • Always signal before turning or changing lanes. Always wear protective clothing that has added cargo or accessories. Modifications may cause severe...
Owners Manual
Page 10
... cargo as possible. Accessories Genuine Yamaha accessories have been specifically designed for the proper selection, installation and use on both sides of your motorcycle. Check accessory mounts and cargo restraints frequently. Use caution when adding electrical accessories. SAFETY INFORMATION Loading The total weight of the operator, passenger, accessories and cargo must not exceed the maximum load limit of lights or engine power. G Shifting weights can create instability...
... cargo as possible. Accessories Genuine Yamaha accessories have been specifically designed for the proper selection, installation and use on both sides of your motorcycle. Check accessory mounts and cargo restraints frequently. Use caution when adding electrical accessories. SAFETY INFORMATION Loading The total weight of the operator, passenger, accessories and cargo must not exceed the maximum load limit of lights or engine power. G Shifting weights can create instability...
Owners Manual
Page 11
... water and change your doctor immediately. If any gasoline, inhale a lot of consciousness and death within a short time. If it run for manual type). If you should lean over . • Do not park the motorcycle near an open flame. G Always turn the engine off before leaving the motorcycle unattended and remove the key from the main switch. SAFETY INFORMATION Gasoline and exhaust gas...
... water and change your doctor immediately. If any gasoline, inhale a lot of consciousness and death within a short time. If it run for manual type). If you should lean over . • Do not park the motorcycle near an open flame. G Always turn the engine off before leaving the motorcycle unattended and remove the key from the main switch. SAFETY INFORMATION Gasoline and exhaust gas...
Owners Manual
Page 20
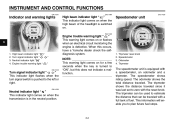
... plan future fuel stops. 3-2 " " EAU11020 Turn signal indicator light " " This indicator light flashes when the turn signal switch is equipped with a full tank of the headlight is switched on when the transmission is in the neutral position. The odometer shows the total distance traveled. When this does not indicate a malfunction. 1. 2. 3. 4. INSTRUMENT AND CONTROL FUNCTIONS EAU11001 EAU11080 EAU11630 Indicator and warning lights High beam indicator light " " This indicator light comes...
... plan future fuel stops. 3-2 " " EAU11020 Turn signal indicator light " " This indicator light flashes when the turn signal switch is equipped with a full tank of the headlight is switched on when the transmission is in the neutral position. The odometer shows the total distance traveled. When this does not indicate a malfunction. 1. 2. 3. 4. INSTRUMENT AND CONTROL FUNCTIONS EAU11001 EAU11080 EAU11630 Indicator and warning lights High beam indicator light " " This indicator light comes...
Owners Manual
Page 21
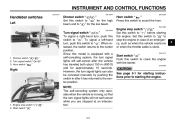
... an intersection. Engine stop switch " 2. Start switch " " / " 3-3 EAU12710 3 Start switch " " Push this switch to " " before starting instructions prior to " ". EAU12660 1. Horn switch " " Right Turn signal switch " / " To signal a right-hand turn signal lights can also be canceled manually by pushing the switch in case of an emergency, such as when the vehicle overturns or when the throttle cable is stuck. However, the turn , push this switch to the center position. INSTRUMENT AND CONTROL FUNCTIONS EAU12341 EAU12400...
... an intersection. Engine stop switch " 2. Start switch " " / " 3-3 EAU12710 3 Start switch " " Push this switch to " " before starting instructions prior to " ". EAU12660 1. Horn switch " " Right Turn signal switch " / " To signal a right-hand turn signal lights can also be canceled manually by pushing the switch in case of an emergency, such as when the vehicle overturns or when the throttle cable is stuck. However, the turn , push this switch to the center position. INSTRUMENT AND CONTROL FUNCTIONS EAU12341 EAU12400...

Owners Manual
Page 30
... passenger and rider seats. 3-12 For proper handling, read and understand the following information before handling the shock absorber. G Do not deform or damage the gas cylinder in poor damping performance. G Always have a Yamaha dealer service the shock absorber. 3 1. 2. 3. 4. To decrease the spring preload and thereby soften the suspension, turn the adjusting ring in direction (a). Spring preload setting: Minimum (soft): 1 Standard: 3 Maximum (hard): 7 EWA10220 WARNING This shock...
... passenger and rider seats. 3-12 For proper handling, read and understand the following information before handling the shock absorber. G Do not deform or damage the gas cylinder in poor damping performance. G Always have a Yamaha dealer service the shock absorber. 3 1. 2. 3. 4. To decrease the spring preload and thereby soften the suspension, turn the adjusting ring in direction (a). Spring preload setting: Minimum (soft): 1 Standard: 3 Maximum (hard): 7 EWA10220 WARNING This shock...

Owners Manual
Page 36
PRE-OPERATION CHECKS ITEM CHECKS Check for damage. Check air pressure. PAGE Wheels and tires 6-16, 6-18 Brake and shift pedals Brake and clutch levers Sidestand • Make sure that operation is smooth. &#...bolts and screws are properly tightened. • Tighten if necessary. • Check operation. • Correct if necessary. • Check operation of ignition circuit cut-off system. • If system is defective, have Yamaha dealer check vehicle. 6-25 6-26 6-26 - - 3-13 4 Chassis fasteners Instruments, lights, signals and switches Sidestand switch 4-3 Check tire condition...
PRE-OPERATION CHECKS ITEM CHECKS Check for damage. Check air pressure. PAGE Wheels and tires 6-16, 6-18 Brake and shift pedals Brake and clutch levers Sidestand • Make sure that operation is smooth. &#...bolts and screws are properly tightened. • Tighten if necessary. • Check operation. • Correct if necessary. • Check operation of ignition circuit cut-off system. • If system is defective, have Yamaha dealer check vehicle. 6-25 6-26 6-26 - - 3-13 4 Chassis fasteners Instruments, lights, signals and switches Sidestand switch 4-3 Check tire condition...
Owners Manual
Page 37
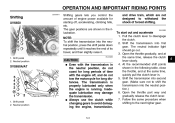
... is in the neutral position. NOTE: When the transmission is not raised completely, it in a possible loss of control. Turn the fuel cock lever to " ". 3. Never ride with all operating controls and their functions before riding. OPERATION AND IMPORTANT RIDING POINTS EAU15950 EAU16390 EWA10270 WARNING G Starting and warming up a cold engine In order for any length of time. Never start the engine or operate...
... is in the neutral position. NOTE: When the transmission is not raised completely, it in a possible loss of control. Turn the fuel cock lever to " ". 3. Never ride with all operating controls and their functions before riding. OPERATION AND IMPORTANT RIDING POINTS EAU15950 EAU16390 EWA10270 WARNING G Starting and warming up a cold engine In order for any length of time. Never start the engine or operate...
Owners Manual
Page 39
... gear positions are not designed to withstand the shock of engine power available for starting off , and do not coast for long distances. Shift the transmission into the neutral position, press the shift pedal down repeatedly until it reaches the end of time with the transmission in the following table, close the throttle, and at the same time, release the clutch lever slowly. 4. Open the throttle...
... gear positions are not designed to withstand the shock of engine power available for starting off , and do not coast for long distances. Shift the transmission into the neutral position, press the shift pedal down repeatedly until it reaches the end of time with the transmission in the following table, close the throttle, and at the same time, release the clutch lever slowly. 4. Open the throttle...
Owners Manual
Page 44
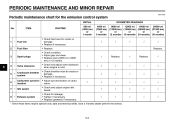
... valve clearance when engine is cold. • Check breather hose for cracks or damage. • Replace if necessary. • Adjust synchronization of carburetors. • Check and adjust engine idle speed. • Check for the emission control system INITIAL No. Replace. 6 4 * Valve clearance Crankcase breather system Carburetor synchronization Idle speed 5 * 6 * 7 * 8 * Exhaust system * Since these items require special tools, data and technical skills, have a Yamaha dealer perform the service...
... valve clearance when engine is cold. • Check breather hose for cracks or damage. • Replace if necessary. • Adjust synchronization of carburetors. • Check and adjust engine idle speed. • Check for the emission control system INITIAL No. Replace. 6 4 * Valve clearance Crankcase breather system Carburetor synchronization Idle speed 5 * 6 * 7 * 8 * Exhaust system * Since these items require special tools, data and technical skills, have a Yamaha dealer perform the service...

Owners Manual
Page 58
..., passenger, and accessories (cowling, saddlebags, etc. Properly adjust the suspension for your load, and check the condition and pressure of your heaviest items close to the center of the vehicle, and distribute the weight evenly from side to side. Make sure that can shift. EWA10460 WARNING G The front and rear tires should be of the same make and design, otherwise the handling characteristics...
..., passenger, and accessories (cowling, saddlebags, etc. Properly adjust the suspension for your load, and check the condition and pressure of your heaviest items close to the center of the vehicle, and distribute the weight evenly from side to side. Make sure that can shift. EWA10460 WARNING G The front and rear tires should be of the same make and design, otherwise the handling characteristics...

Owners Manual
Page 63
... brake rod in direction (a). Brake pedal free play , turn the adjusting nut in place. Turn the adjusting nut while holding the rear brake light switch in direction (b). 6 6-22 Rear brake light switch adjusting nut The rear brake light switch, which is activated by the brake pedal, is properly adjusted when the brake light comes on later, turn the adjusting nut at the brake pedal end. Rear brake light switch 2. PERIODIC MAINTENANCE AND MINOR REPAIR To increase the brake...
... brake rod in direction (a). Brake pedal free play , turn the adjusting nut in place. Turn the adjusting nut while holding the rear brake light switch in direction (b). 6 6-22 Rear brake light switch adjusting nut The rear brake light switch, which is activated by the brake pedal, is properly adjusted when the brake light comes on later, turn the adjusting nut at the brake pedal end. Rear brake light switch 2. PERIODIC MAINTENANCE AND MINOR REPAIR To increase the brake...

Owners Manual
Page 71
... the fuse immediately blows again, have a Yamaha dealer check the electrical system. Turn the key to "ON" and turn on the electrical circuit in question to the electrical system and possibly a fire. 3. Replacing the headlight bulb This model is equipped with a quartz bulb headlight. Disconnect the headlight coupler, and then remove the bulb cover. 6-30 PERIODIC MAINTENANCE AND MINOR REPAIR ECA10640 EAU23791 CAUTION: Do not use a fuse of a higher amperage rating than...
... the fuse immediately blows again, have a Yamaha dealer check the electrical system. Turn the key to "ON" and turn on the electrical circuit in question to the electrical system and possibly a fire. 3. Replacing the headlight bulb This model is equipped with a quartz bulb headlight. Disconnect the headlight coupler, and then remove the bulb cover. 6-30 PERIODIC MAINTENANCE AND MINOR REPAIR ECA10640 EAU23791 CAUTION: Do not use a fuse of a higher amperage rating than...

Owners Manual
Page 76
... brake rod from the brake camshaft lever. Install the rear wheel, wheel axle, final gear case, and drive shaft by pushing the wheel forward and guiding the drive shaft into the middle gear universal joint. 1. While supporting the drive shaft, pull the rear wheel back to the procedure on the ground. 6-35 NOTE: Make sure to the swingarm. 7. Install the brake torque rod bolt at the brake shoe plate. 5. Lower the rear wheel...
... brake rod from the brake camshaft lever. Install the rear wheel, wheel axle, final gear case, and drive shaft by pushing the wheel forward and guiding the drive shaft into the middle gear universal joint. 1. While supporting the drive shaft, pull the rear wheel back to the procedure on the ground. 6-35 NOTE: Make sure to the swingarm. 7. Install the brake torque rod bolt at the brake shoe plate. 5. Lower the rear wheel...

Owners Manual
Page 79
... also keep your motorcycle looking good, extend its life and optimize its performance. For motorcycles equipped with plastic bags after washing. 7 ucts onto seals, gaskets and wheel axles. Some cleaning compounds for plastic may go unnoticed on a small hidden part of wheel and swingarm bearings, fork and brakes), electric components (couplers, connectors, instruments, switches and lights), breather hoses and vents. MOTORCYCLE CARE AND...
... also keep your motorcycle looking good, extend its life and optimize its performance. For motorcycles equipped with plastic bags after washing. 7 ucts onto seals, gaskets and wheel axles. Some cleaning compounds for plastic may go unnoticed on a small hidden part of wheel and swingarm bearings, fork and brakes), electric components (couplers, connectors, instruments, switches and lights), breather hoses and vents. MOTORCYCLE CARE AND...
Owners Manual
Page 83
... in) Compression ratio: 9.00 :1 Starting system: Electric starter Lubrication system: Wet sump With oil filter element replacement: 2.80 L (2.96 US qt) (2.46 Imp.qt) Final gear oil: Type: SAE80API "GL-4" hypoid gear oil Air filter: Air filter element: Dry element Fuel: Recommended fuel: Unleaded gasoline only Fuel tank capacity: 16.0 L (4.23 US gal) (3.52 Imp.gal) Fuel reserve amount: 3.0 L (0.79 US gal) (0.66 Imp.gal) Engine oil: Type: YAMALUBE 4, SAE10W30 or SAE20W40...
... in) Compression ratio: 9.00 :1 Starting system: Electric starter Lubrication system: Wet sump With oil filter element replacement: 2.80 L (2.96 US qt) (2.46 Imp.qt) Final gear oil: Type: SAE80API "GL-4" hypoid gear oil Air filter: Air filter element: Dry element Fuel: Recommended fuel: Unleaded gasoline only Fuel tank capacity: 16.0 L (4.23 US gal) (3.52 Imp.gal) Fuel reserve amount: 3.0 L (0.79 US gal) (0.66 Imp.gal) Engine oil: Type: YAMALUBE 4, SAE10W30 or SAE20W40...

Owners Manual
Page 85
... W × 1 Turn signal indicator light: 12 V, 1.7 W × 1 Engine trouble warning light 12 V, 1.7 W × 1 Front suspension: Type: Telescopic fork Spring/shock absorber type: Coil spring/oil damper Wheel travel: 140.0 mm (5.51 in) Rear suspension: Type: Swingarm (monocross) Spring/shock absorber type: Coil spring/gas-oil damper Wheel travel: XVS650 86.0 mm (3.39 in) XVS650A 98.0 mm (3.86 in) XVS650AT 98.0 mm (3.86 in) 8 Fuses: Main fuse: 30.0 A Headlight fuse: 15.0 A 8-3 Electrical system: Ignition system: Transistorized coil ignition (digital) SPECIFICATIONS Rim size: 15M/C x MT3...
... W × 1 Turn signal indicator light: 12 V, 1.7 W × 1 Engine trouble warning light 12 V, 1.7 W × 1 Front suspension: Type: Telescopic fork Spring/shock absorber type: Coil spring/oil damper Wheel travel: 140.0 mm (5.51 in) Rear suspension: Type: Swingarm (monocross) Spring/shock absorber type: Coil spring/gas-oil damper Wheel travel: XVS650 86.0 mm (3.39 in) XVS650A 98.0 mm (3.86 in) XVS650AT 98.0 mm (3.86 in) 8 Fuses: Main fuse: 30.0 A Headlight fuse: 15.0 A 8-3 Electrical system: Ignition system: Transistorized coil ignition (digital) SPECIFICATIONS Rim size: 15M/C x MT3...

Owners Manual
Page 96
INDEX A Accessories and replacement parts...6-18 Air filter element, cleaning...6-14 Fuel...3-6 Fuel cock ...3-7 Fuel tank cap ...3-5 Fuses, replacing ...6-29 R Rear brake light switch, adjusting ...6-22 S Safety defects, reporting ...9-3 Safety information ...1-1 Seats ...3-8, 3-9 Shifting ...5-3 Shift pedal ...3-4 Shock absorber assembly, adjusting ...3-12 Sidestand ...3-13 Sidestand, checking and lubricating...6-26 Spark plugs, checking ...6-9 Specifications ...8-1 Speedometer unit...3-2 Starter (choke) knob...3-8 Starting and warming up a cold engine...5-1 Start switch...3-3 Steering, ...
INDEX A Accessories and replacement parts...6-18 Air filter element, cleaning...6-14 Fuel...3-6 Fuel cock ...3-7 Fuel tank cap ...3-5 Fuses, replacing ...6-29 R Rear brake light switch, adjusting ...6-22 S Safety defects, reporting ...9-3 Safety information ...1-1 Seats ...3-8, 3-9 Shifting ...5-3 Shift pedal ...3-4 Shock absorber assembly, adjusting ...3-12 Sidestand ...3-13 Sidestand, checking and lubricating...6-26 Spark plugs, checking ...6-9 Specifications ...8-1 Speedometer unit...3-2 Starter (choke) knob...3-8 Starting and warming up a cold engine...5-1 Start switch...3-3 Steering, ...