
Owners Manual
Page 6
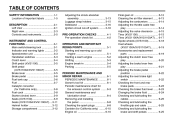
... and warming up a cold engine ...5-1 Starting a warm engine ...5-2 Shifting ...5-3 Engine break-in ...5-4 Parking ...5-5 PERIODIC MAINTENANCE AND MINOR REPAIR ...6-1 PERIODIC MAINTENANCE ...6-1 Owner's tool kit ...6-1 Periodic maintenance chart for the emission control system ...6-3 General maintenance and lubrication chart ...6-4 Removing and installing the panel ...6-8 Checking the spark plugs ...6-8 Canister (for California only) ...6-10 Engine oil ...6-10 Final gear oil ...6-12 Cleaning the air filter element ...6-13 Adjusting the carburetors ...6-14 Adjusting the throttle cable free play...
... and warming up a cold engine ...5-1 Starting a warm engine ...5-2 Shifting ...5-3 Engine break-in ...5-4 Parking ...5-5 PERIODIC MAINTENANCE AND MINOR REPAIR ...6-1 PERIODIC MAINTENANCE ...6-1 Owner's tool kit ...6-1 Periodic maintenance chart for the emission control system ...6-3 General maintenance and lubrication chart ...6-4 Removing and installing the panel ...6-8 Checking the spark plugs ...6-8 Canister (for California only) ...6-10 Engine oil ...6-10 Final gear oil ...6-12 Cleaning the air filter element ...6-13 Adjusting the carburetors ...6-14 Adjusting the throttle cable free play...

Owners Manual
Page 7
... ENDURO MOTORCYCLE LIMITED WARRANTY ...9-7 YAMAHA EXTENDED SERVICE (Y.E.S.) ...9-9 TABLE OF CONTENTS Checking and lubricating the brake and clutch levers ...6-26 Checking and lubricating the sidestand ...6-26 Lubricating the rear suspension ...6-27 Checking the front fork ...6-27 Checking the steering ...6-28 Checking the wheel bearings ...6-28 Battery ...6-29 Replacing the fuses ...6-30 Replacing the headlight bulb ...6-32 Replacing a turn signal light bulb or the tail/brake light bulb ...6-33 Supporting the motorcycle ...6-33 Troubleshooting ...6-34 Troubleshooting chart ...6-35 MOTORCYCLE...
... ENDURO MOTORCYCLE LIMITED WARRANTY ...9-7 YAMAHA EXTENDED SERVICE (Y.E.S.) ...9-9 TABLE OF CONTENTS Checking and lubricating the brake and clutch levers ...6-26 Checking and lubricating the sidestand ...6-26 Lubricating the rear suspension ...6-27 Checking the front fork ...6-27 Checking the steering ...6-28 Checking the wheel bearings ...6-28 Battery ...6-29 Replacing the fuses ...6-30 Replacing the headlight bulb ...6-32 Replacing a turn signal light bulb or the tail/brake light bulb ...6-33 Supporting the motorcycle ...6-33 Troubleshooting ...6-34 Troubleshooting chart ...6-35 MOTORCYCLE...
Owners Manual
Page 9
... abrasions or lacerations. G Never touch the engine or exhaust system during operation to an impairment of head injuries. Passengers should always hold onto the operator, seat strap, or grab bar, if equipped, with both hands and keep...passenger footrests. • Never carry a passenger unless he or she can see you. Always wear protective clothing that has added cargo or accessories. G Always wear an approved helmet. Loading and accessories Adding accessories or cargo to this motorcycle not approved by road and traffic conditions. • Always signal before turning or changing...
... abrasions or lacerations. G Never touch the engine or exhaust system during operation to an impairment of head injuries. Passengers should always hold onto the operator, seat strap, or grab bar, if equipped, with both hands and keep...passenger footrests. • Never carry a passenger unless he or she can see you. Always wear protective clothing that has added cargo or accessories. G Always wear an approved helmet. Loading and accessories Adding accessories or cargo to this motorcycle not approved by road and traffic conditions. • Always signal before turning or changing...
Owners Manual
Page 10
... way reduce ground clearance or cornering clearance, limit suspension travel, steering travel or control operation, or obscure lights or reflectors. • Accessories fitted to the motorcycle as sleeping bags, duffel bags, or tents, can displace the operator from his or her normal riding position. G Never attach any accessories. Make sure to aerodynamic effects. Accessories Genuine Yamaha accessories have been specifically designed...
... way reduce ground clearance or cornering clearance, limit suspension travel, steering travel or control operation, or obscure lights or reflectors. • Accessories fitted to the motorcycle as sleeping bags, duffel bags, or tents, can displace the operator from his or her normal riding position. G Never attach any accessories. Make sure to aerodynamic effects. Accessories Genuine Yamaha accessories have been specifically designed...
Owners Manual
Page 11
... in an area that the fuel cock is turned to spill any length of time in a place where pedestrians or children are not recommended. If electrical accessories exceed the capacity of the motorcycle's electrical system, an electric failure could result, which could catch fire. G Never start the engine or let it could cause a dangerous loss of lights or engine power. SAFETY INFORMATION tor and may cause...
... in an area that the fuel cock is turned to spill any length of time in a place where pedestrians or children are not recommended. If electrical accessories exceed the capacity of the motorcycle's electrical system, an electric failure could result, which could catch fire. G Never start the engine or let it could cause a dangerous loss of lights or engine power. SAFETY INFORMATION tor and may cause...

Owners Manual
Page 20
... a Yamaha dealer check the electrical circuit. Turn signal indicator light " " This indicator light flashes when the turn signal switch is pushed to "ON". The electrical circuit of the warning light can be checked by turning the key to "ON". Oil level warning light " " Neutral indicator light " " Turn signal indicator light " Engine trouble warning light " High beam indicator light " " " " Oil level warning light " " This warning light comes on or flashes when an electrical circuit monitoring the engine is defective. The electrical circuit of the warning light...
... a Yamaha dealer check the electrical circuit. Turn signal indicator light " " This indicator light flashes when the turn signal switch is pushed to "ON". The electrical circuit of the warning light can be checked by turning the key to "ON". Oil level warning light " " Neutral indicator light " " Turn signal indicator light " Engine trouble warning light " High beam indicator light " " " " Oil level warning light " " This warning light comes on or flashes when an electrical circuit monitoring the engine is defective. The electrical circuit of the warning light...
Owners Manual
Page 22
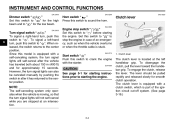
....) 3-4 INSTRUMENT AND CONTROL FUNCTIONS EAU12400 EAU12500 EAU12820 Dimmer switch " / " Set this switch to " ". Since this model is moving, so that the turn , push this switch to " " for the high beam and to " " for starting instructions prior to starting the engine. To engage the clutch, release the lever. The clutch lever is part of an emergency, such as when the vehicle overturns or when the throttle...
....) 3-4 INSTRUMENT AND CONTROL FUNCTIONS EAU12400 EAU12500 EAU12820 Dimmer switch " / " Set this switch to " ". Since this model is moving, so that the turn , push this switch to " " for the high beam and to " " for starting instructions prior to starting the engine. To engage the clutch, release the lever. The clutch lever is part of an emergency, such as when the vehicle overturns or when the throttle...
Owners Manual
Page 25
... is not recommended by Yamaha because it may deteriorate painted surfaces or plastic parts. The use of leaded gasoline will extend spark plug life and reduce maintenance costs. Fill the fuel tank to the bottom of the filler tube as to use a gasoline of a different brand or premium unleaded fuel. EWA10880 Recommended fuel: UNLEADED GASOLINE ONLY Fuel tank capacity: 17.0 L (4.49 US gal...
... is not recommended by Yamaha because it may deteriorate painted surfaces or plastic parts. The use of leaded gasoline will extend spark plug life and reduce maintenance costs. Fill the fuel tank to the bottom of the filler tube as to use a gasoline of a different brand or premium unleaded fuel. EWA10880 Recommended fuel: UNLEADED GASOLINE ONLY Fuel tank capacity: 17.0 L (4.49 US gal...

Owners Manual
Page 26
... the illustrations. G Never park the vehicle near possible fire hazards such as follows and shown in this position when starting the engine and riding. G Do not allow the engine to this position, fuel will cause unrepairable damage to prevent a fire hazard or other materials that the exhaust system has cooled down before doing any maintenance work. OFF ON WARNING 3 The exhaust system is hot...
... the illustrations. G Never park the vehicle near possible fire hazards such as follows and shown in this position when starting the engine and riding. G Do not allow the engine to this position, fuel will cause unrepairable damage to prevent a fire hazard or other materials that the exhaust system has cooled down before doing any maintenance work. OFF ON WARNING 3 The exhaust system is hot...

Owners Manual
Page 34
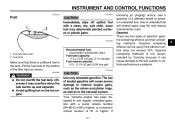
... running engine when the transmission is in gear and the sidestand is not pulled. Therefore, check this system regularly as described 3-16 WARNING If a malfunction is located on the left side of the ignition circuit cut-off system (comprising the sidestand switch, clutch switch and neutral switch) has the following procedure. INSTRUMENT AND CONTROL FUNCTIONS EAU15300 Sidestand The sidestand is noted, have a Yamaha...
... running engine when the transmission is in gear and the sidestand is not pulled. Therefore, check this system regularly as described 3-16 WARNING If a malfunction is located on the left side of the ignition circuit cut-off system (comprising the sidestand switch, clutch switch and neutral switch) has the following procedure. INSTRUMENT AND CONTROL FUNCTIONS EAU15300 Sidestand The sidestand is noted, have a Yamaha...
Owners Manual
Page 39
... throttle. (See page 3-9.) 5. CAUTION: G The oil level warning light should be on, otherwise have a Yamaha dealer check the electrical circuit. 4. Never ride with all operating controls and their functions before riding. NOTE: When the transmission is set to " ". 3. Shift the transmission into the neutral position. Consult a Yamaha dealer regarding any control or function that the engine stop switch is in a closed area for the ignition...
... throttle. (See page 3-9.) 5. CAUTION: G The oil level warning light should be on, otherwise have a Yamaha dealer check the electrical circuit. 4. Never ride with all operating controls and their functions before riding. NOTE: When the transmission is set to " ". 3. Shift the transmission into the neutral position. Consult a Yamaha dealer regarding any control or function that the engine stop switch is in a closed area for the ignition...
Owners Manual
Page 41
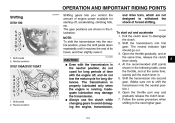
... RIDING POINTS EAU16671 Shifting XVS1100 Shifting gears lets you control the amount of engine power available for long distances. Neutral position G Even with the engine off, and do not tow the motorcycle for starting off, accelerating, climbing hills, etc. Always use the clutch while changing gears to shift the transmission into the neutral position.) 6. The neutral indicator light should go out. 3. and drive train, which are...
... RIDING POINTS EAU16671 Shifting XVS1100 Shifting gears lets you control the amount of engine power available for long distances. Neutral position G Even with the engine off, and do not tow the motorcycle for starting off, accelerating, climbing hills, etc. Always use the clutch while changing gears to shift the transmission into the neutral position.) 6. The neutral indicator light should go out. 3. and drive train, which are...
Owners Manual
Page 46
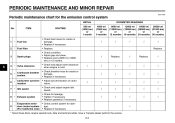
... breather hose for cracks or damage. • Replace if necessary. • Adjust synchronization of carburetors. • Check and adjust engine idle speed. • Check for leakage. • Tighten if necessary. • Replace gasket(s) if necessary. • Check control system for the emission control system INITIAL No. PERIODIC MAINTENANCE AND MINOR REPAIR EAU17600 Periodic maintenance chart for damage. • Replace if necessary. √ √ 3 Spark plugs Replace.
... breather hose for cracks or damage. • Replace if necessary. • Adjust synchronization of carburetors. • Check and adjust engine idle speed. • Check for leakage. • Tighten if necessary. • Replace gasket(s) if necessary. • Check control system for the emission control system INITIAL No. PERIODIC MAINTENANCE AND MINOR REPAIR EAU17600 Periodic maintenance chart for damage. • Replace if necessary. √ √ 3 Spark plugs Replace.
Owners Manual
Page 58
... valve clearance must be checked and, if necessary, adjusted before each ride. PERIODIC MAINTENANCE AND MINOR REPAIR EAU21400 EAU32520 Adjusting the valve clearance The valve clearance changes with the total weight of rider, passenger, cargo, and accessories approved for this from side to side. Tire air pressure The tire air pressure should be adjusted by a Yamaha dealer at the intervals specified in improper air-fuel mixture and/or engine noise...
... valve clearance must be checked and, if necessary, adjusted before each ride. PERIODIC MAINTENANCE AND MINOR REPAIR EAU21400 EAU32520 Adjusting the valve clearance The valve clearance changes with the total weight of rider, passenger, cargo, and accessories approved for this from side to side. Tire air pressure The tire air pressure should be adjusted by a Yamaha dealer at the intervals specified in improper air-fuel mixture and/or engine noise...

Owners Manual
Page 73
... you do not have a Yamaha dealer charge your battery. Remove the rider seat. (See page 3-9.) 2. To charge a sealed-type (MF) battery, a special (constant-voltage) battery charger is located under the ignitor unit panel. Fuse box Headlight fuse Signaling system fuse Ignition fuse Carburetor heater fuse Ignitor unit fuse (for the main fuse. 1. The fuse box, which contains the fuses for the individual circuits, is blown, replace it as follows. 6-30...
... you do not have a Yamaha dealer charge your battery. Remove the rider seat. (See page 3-9.) 2. To charge a sealed-type (MF) battery, a special (constant-voltage) battery charger is located under the ignitor unit panel. Fuse box Headlight fuse Signaling system fuse Ignition fuse Carburetor heater fuse Ignitor unit fuse (for the main fuse. 1. The fuse box, which contains the fuses for the individual circuits, is blown, replace it as follows. 6-30...

Owners Manual
Page 74
... until it is flush with the fastener head. 1. Main fuse 6 4. Quick fastener (before installation) 10. Ignitor unit panel 2. PERIODIC MAINTENANCE AND MINOR REPAIR Specified fuses: Main fuse: 30.0 A Backup fuse: 5.0 A Ignition fuse: 10.0 A Headlight fuse: 15.0 A Carburetor heater fuse: 15.0 A Signaling system fuse: 10.0 A Ignitor unit fuse: 5.0 A (CAL) ECA10640 8. NOTE: To install a quick fastener, push its pin back so that it will protrude from the fastener...
... until it is flush with the fastener head. 1. Main fuse 6 4. Quick fastener (before installation) 10. Ignitor unit panel 2. PERIODIC MAINTENANCE AND MINOR REPAIR Specified fuses: Main fuse: 30.0 A Backup fuse: 5.0 A Ignition fuse: 10.0 A Headlight fuse: 15.0 A Carburetor heater fuse: 15.0 A Signaling system fuse: 10.0 A Ignitor unit fuse: 5.0 A (CAL) ECA10640 8. NOTE: To install a quick fastener, push its pin back so that it will protrude from the fastener...

Owners Manual
Page 79
... keep your motorcycle looking good, extend its life and optimize its performance. ucts onto seals, gaskets and wheel axles. Do not use a quality plastic polishing compound after the engine has cooled down. 2. Always rinse the dirt and degreaser off with strong or abrasive cleaning products, solvent or 7-1 G thinner, fuel (gasoline), rust removers or inhibitors, brake fluid, antifreeze or electrolyte. Improper...
... keep your motorcycle looking good, extend its life and optimize its performance. ucts onto seals, gaskets and wheel axles. Do not use a quality plastic polishing compound after the engine has cooled down. 2. Always rinse the dirt and degreaser off with strong or abrasive cleaning products, solvent or 7-1 G thinner, fuel (gasoline), rust removers or inhibitors, brake fluid, antifreeze or electrolyte. Improper...

Owners Manual
Page 83
...; 2.95 in) Compression ratio: 8.30 :1 Starting system: Electric starter Lubrication system: Wet sump Final gear oil: Type: SAE80API "GL-4" hypoid gear oil Quantity: 0.20 L (0.21 US qt) (0.18 Imp.qt) Air filter: Air filter element: Dry element Fuel: Recommended fuel: Unleaded gasoline only Fuel tank capacity: 17.0 L (4.49 US gal) (3.74 Imp.gal) Fuel reserve amount: 4.5 L (1.19 US gal) (0.99 Imp.gal) Engine oil: Type: YAMALUBE 4, SAE10W30 or SAE20W40...
...; 2.95 in) Compression ratio: 8.30 :1 Starting system: Electric starter Lubrication system: Wet sump Final gear oil: Type: SAE80API "GL-4" hypoid gear oil Quantity: 0.20 L (0.21 US qt) (0.18 Imp.qt) Air filter: Air filter element: Dry element Fuel: Recommended fuel: Unleaded gasoline only Fuel tank capacity: 17.0 L (4.49 US gal) (3.74 Imp.gal) Fuel reserve amount: 4.5 L (1.19 US gal) (0.99 Imp.gal) Engine oil: Type: YAMALUBE 4, SAE10W30 or SAE20W40...

Owners Manual
Page 85
..., wattage x quantity: Headlight: 12 V, 60 W/55.0 W × 1 Tail/brake light: 12 V, 8 W/27.0 W × 1 Front turn signal/position light: 12 V, 27 W/8.0 W × 2 Rear turn signal light: 12 V, 27.0 W × 2 Meter lighting: 14 V, 1.4 W × 2 Neutral indicator light: 12 V, 1.7 W × 1 High beam indicator light: 12 V, 1.7 W × 1 Oil level warning light: 12 V, 1.7 W × 1 Turn signal indicator light: 12 V, 1.7 W × 1 Engine trouble warning light: 12 V, 1.7 W x 1 Front suspension: Type: Telescopic fork Spring/shock absorber type: Coil spring/oil damper Wheel travel: 140.0 mm...
..., wattage x quantity: Headlight: 12 V, 60 W/55.0 W × 1 Tail/brake light: 12 V, 8 W/27.0 W × 1 Front turn signal/position light: 12 V, 27 W/8.0 W × 2 Rear turn signal light: 12 V, 27.0 W × 2 Meter lighting: 14 V, 1.4 W × 2 Neutral indicator light: 12 V, 1.7 W × 1 High beam indicator light: 12 V, 1.7 W × 1 Oil level warning light: 12 V, 1.7 W × 1 Turn signal indicator light: 12 V, 1.7 W × 1 Engine trouble warning light: 12 V, 1.7 W x 1 Front suspension: Type: Telescopic fork Spring/shock absorber type: Coil spring/oil damper Wheel travel: 140.0 mm...

Owners Manual
Page 97
... Fuel tank cap...3-6 Fuses, replacing...6-30 P Panel, removing and installing...6-8 Parking...5-5 Part locations ...2-1 Pre-operation check list ...4-2 B Battery ...6-29 Brake and clutch levers, checking and lubricating ...6-26 Brake and shift pedals, checking and lubricating ...6-25 Brake fluid, changing ...6-24 Brake fluid level, checking ...6-23 Brake lever ...3-5 Brake lever free play, adjusting ...6-21 Brake pedal ...3-6 Brake pedal position, adjusting...6-22 R Rear brake light switch, adjusting ...6-22 Rear suspension, lubricating ...6-27 H Handlebar switches ...3-3 Headlight bulb...
... Fuel tank cap...3-6 Fuses, replacing...6-30 P Panel, removing and installing...6-8 Parking...5-5 Part locations ...2-1 Pre-operation check list ...4-2 B Battery ...6-29 Brake and clutch levers, checking and lubricating ...6-26 Brake and shift pedals, checking and lubricating ...6-25 Brake fluid, changing ...6-24 Brake fluid level, checking ...6-23 Brake lever ...3-5 Brake lever free play, adjusting ...6-21 Brake pedal ...3-6 Brake pedal position, adjusting...6-22 R Rear brake light switch, adjusting ...6-22 Rear suspension, lubricating ...6-27 H Handlebar switches ...3-3 Headlight bulb...