

Owners Manual
Page 7
... ...1-2 Modifications ...1-3 Loading and accessories ...1-3 Gasoline and exhaust gas ...1-5 Further safe-riding points ...1-6 Location of important labels ...1-7 DESCRIPTION ...2-1 Left view ...2-1 Right view ...2-2 Controls and instruments ...2-3 INSTRUMENT AND CONTROL FUNCTIONS ...3-1 Main switch/steering lock ...3-1 Indicator and warning lights ...3-2 Speedometer unit ...3-3 Fuel gauge ...3-4 Handlebar switches ...3-4 Front brake lever ...3-5 Rear brake lever ...3-5 Fuel tank cap ...3-6 Fuel ...3-7 2-stroke engine oil ...3-8 Kickstarter ...3-9 Seat ...3-9 Helmet holder ...3-10 Storage...
... ...1-2 Modifications ...1-3 Loading and accessories ...1-3 Gasoline and exhaust gas ...1-5 Further safe-riding points ...1-6 Location of important labels ...1-7 DESCRIPTION ...2-1 Left view ...2-1 Right view ...2-2 Controls and instruments ...2-3 INSTRUMENT AND CONTROL FUNCTIONS ...3-1 Main switch/steering lock ...3-1 Indicator and warning lights ...3-2 Speedometer unit ...3-3 Fuel gauge ...3-4 Handlebar switches ...3-4 Front brake lever ...3-5 Rear brake lever ...3-5 Fuel tank cap ...3-6 Fuel ...3-7 2-stroke engine oil ...3-8 Kickstarter ...3-9 Seat ...3-9 Helmet holder ...3-10 Storage...
Owners Manual
Page 8
...the throttle grip and cable ...6-13 Adjusting the Autolube pump ...6-14 Lubricating the front and rear brake levers ...6-14 Battery ...6-14 Replacing the fuse ...6-16 Troubleshooting ...6-17 Troubleshooting chart ...6-18 Reporting safety defects ...9-3 Scooter noise regulation ...9-4 Riva limited warranty ...9-6 Yamaha extended service (Y.E.S.) ...9-8 7 SCOOTER CARE AND STORAGE ...7-1 Care ...7-1 Storage ...7-4 SPECIFICATIONS ...8-1 Specifications ...8-1 CONSUMER INFORMATION ...9-1 Identification numbers ...9-1 Key identification number ...9-1 Vehicle identification number ...9-1 Model label...
...the throttle grip and cable ...6-13 Adjusting the Autolube pump ...6-14 Lubricating the front and rear brake levers ...6-14 Battery ...6-14 Replacing the fuse ...6-16 Troubleshooting ...6-17 Troubleshooting chart ...6-18 Reporting safety defects ...9-3 Scooter noise regulation ...9-4 Riva limited warranty ...9-6 Yamaha extended service (Y.E.S.) ...9-8 7 SCOOTER CARE AND STORAGE ...7-1 Care ...7-1 Storage ...7-4 SPECIFICATIONS ...8-1 Specifications ...8-1 CONSUMER INFORMATION ...9-1 Identification numbers ...9-1 Key identification number ...9-1 Vehicle identification number ...9-1 Model label...
Owners Manual
Page 12
... the handlebar, front fork, or front fender. Never install accessories or carry cargo that may also cause instability when passing or being passed by large vehicles. 1 1-4 If accessories are securely attached to aerodynamic effects. Q SAFETY INFORMATION 2. Shifting weights can create unstable handling or a slow steering response. b. Never attach any accessories. Accessories Genuine Yamaha accessories have been specifically designed for the proper selection, installation and...
... the handlebar, front fork, or front fender. Never install accessories or carry cargo that may also cause instability when passing or being passed by large vehicles. 1 1-4 If accessories are securely attached to aerodynamic effects. Q SAFETY INFORMATION 2. Shifting weights can create unstable handling or a slow steering response. b. Never attach any accessories. Accessories Genuine Yamaha accessories have been specifically designed for the proper selection, installation and...
Owners Manual
Page 13
... freedom of movement of lights or engine power. 1 Gasoline and exhaust gas 1. Q SAFETY INFORMATION c. c. Use caution when adding electrical accessories. Always turn the engine off before leaving the scooter unattended and remove the key from his or her normal riding position. If any length of time in the vicinity of an open flame), otherwise it may limit control ability, therefore, such accessories are not likely...
... freedom of movement of lights or engine power. 1 Gasoline and exhaust gas 1. Q SAFETY INFORMATION c. c. Use caution when adding electrical accessories. Always turn the engine off before leaving the scooter unattended and remove the key from his or her normal riding position. If any length of time in the vicinity of an open flame), otherwise it may limit control ability, therefore, such accessories are not likely...
Owners Manual
Page 14
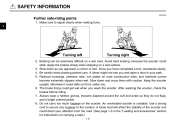
... completed a turn . Use a strong cord to secure any luggage to signal clearly when making turns. 1 2. A loose load will affect the stability of the scooter and could slide out from the road. (See page 1-3 in your attention from under you. 6. Braking can be ...door in the "Loading and accessories" section for instructions on carrying a load.) 1-6 Always wear a helmet, gloves, trousers (tapered around the cuff and ankle so they do not flap), and a bright colored jacket. 8. An overloaded scooter is unstable. A driver might not see you wash the scooter. Be careful when passing parked cars...
... completed a turn . Use a strong cord to secure any luggage to signal clearly when making turns. 1 2. A loose load will affect the stability of the scooter and could slide out from the road. (See page 1-3 in your attention from under you. 6. Braking can be ...door in the "Loading and accessories" section for instructions on carrying a load.) 1-6 Always wear a helmet, gloves, trousers (tapered around the cuff and ankle so they do not flap), and a bright colored jacket. 8. An overloaded scooter is unstable. A driver might not see you wash the scooter. Be careful when passing parked cars...
Owners Manual
Page 21
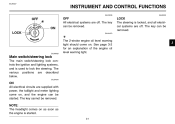
... of the engine oil level warning light. 3 Main switch/steering lock The main switch/steering lock controls the ignition and lighting systems, and is locked, and all electrical systems are supplied with power, the taillight and meter lighting come on. The key can be removed. The various positions are off . NOTE: The headlight comes on , and the engine can be started . 3-1 The key cannot be removed. * The 2-stroke engine oil level warning EAU00029 light should come...
... of the engine oil level warning light. 3 Main switch/steering lock The main switch/steering lock controls the ignition and lighting systems, and is locked, and all electrical systems are supplied with power, the taillight and meter lighting come on. The key can be removed. The various positions are off . NOTE: The headlight comes on , and the engine can be started . 3-1 The key cannot be removed. * The 2-stroke engine oil level warning EAU00029 light should come...
Owners Manual
Page 23
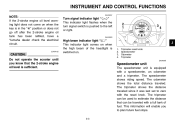
... with a full tank of the headlight is in the " " position or does not go off after the 2-stroke engine oil tank has been refilled, have a Yamaha dealer check the electrical circuit. The speedometer shows riding speed. INSTRUMENT AND CONTROL FUNCTIONS NOTE: If the 2-stroke engine oil level warning light does not come on when the key is switched on when the high beam of fuel. The odometer...
... with a full tank of the headlight is in the " " position or does not go off after the 2-stroke engine oil tank has been refilled, have a Yamaha dealer check the electrical circuit. The speedometer shows riding speed. INSTRUMENT AND CONTROL FUNCTIONS NOTE: If the 2-stroke engine oil level warning light does not come on when the key is switched on when the high beam of fuel. The odometer...
Owners Manual
Page 24
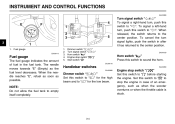
.... Engine stop switch "#/$" Set this switch to "4". To signal a left-hand turn, push this switch to stop switch "$/#" Start switch "," EAU00118 Horn switch "*" Press this switch to "&" for the low beam. When the needle reaches "E", refuel as soon as the fuel level decreases. NOTE: Do not allow the fuel tank to the center position. INSTRUMENT AND CONTROL FUNCTIONS EAU03889 E F 4 1 2 3 5 3 1. Fuel gauge 1 EAU00113 Turn signal switch "4/6" To signal a right-hand turn signal lights, push the switch in the fuel tank. When released...
.... Engine stop switch "#/$" Set this switch to "4". To signal a left-hand turn, push this switch to stop switch "$/#" Start switch "," EAU00118 Horn switch "*" Press this switch to "&" for the low beam. When the needle reaches "E", refuel as soon as the fuel level decreases. NOTE: Do not allow the fuel tank to the center position. INSTRUMENT AND CONTROL FUNCTIONS EAU03889 E F 4 1 2 3 5 3 1. Fuel gauge 1 EAU00113 Turn signal switch "4/6" To signal a right-hand turn signal lights, push the switch in the fuel tank. When released...
Owners Manual
Page 28
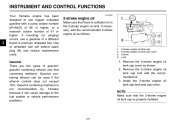
...: gasohol containing ethanol and that containing methanol. Lock. 3 b 1. Gasohol There are two types of unleaded fuel will extend spark plug life and reduce maintenance costs. If necessary, add the recommended 2-stroke engine oil as shown. 2. Install the 2-stroke engine oil tank cap and tank cap cover. a. b. 2-stroke engine oil tank cap 2-stroke engine oil tank cap cover Unlock. If knocking (or pinging) occurs, use regular unleaded gasoline with a pump octane number [(R+M)/2] of 86 or higher, or...
...: gasohol containing ethanol and that containing methanol. Lock. 3 b 1. Gasohol There are two types of unleaded fuel will extend spark plug life and reduce maintenance costs. If necessary, add the recommended 2-stroke engine oil as shown. 2. Install the 2-stroke engine oil tank cap and tank cap cover. a. b. 2-stroke engine oil tank cap 2-stroke engine oil tank cap cover Unlock. If knocking (or pinging) occurs, use regular unleaded gasoline with a pump octane number [(R+M)/2] of 86 or higher, or...
Owners Manual
Page 32
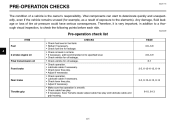
.... • Check fuel line for oil leakage. Check vehicle for leakage Check oil level in addition to a thorough visual inspection, to specified level. Check operation. Check cable free play . EAU01114 PRE-OPERATION CHECKS The condition of a vehicle is smooth. Check lever free play . CHECKS PAGE 3-6-3-8 4 2-stroke engine oil Final transmission oil Front brake 3-8-3-9 6-7 3-5, 6-12-6-13, 6-14 Rear brake 3-5, 6-12-6-13, 6-14 Throttle grip 6-10...
.... • Check fuel line for oil leakage. Check vehicle for leakage Check oil level in addition to a thorough visual inspection, to specified level. Check operation. Check cable free play . EAU01114 PRE-OPERATION CHECKS The condition of a vehicle is smooth. Check lever free play . CHECKS PAGE 3-6-3-8 4 2-stroke engine oil Final transmission oil Front brake 3-8-3-9 6-7 3-5, 6-12-6-13, 6-14 Rear brake 3-5, 6-12-6-13, 6-14 Throttle grip 6-10...
Owners Manual
Page 34
... a Yamaha dealer regarding any control or function that there is adequate ventilation. 8 For safety, always start the engine or operate it in instructions prior to operating the vehicle for any length of consciousness and death within a short time. Exhaust fumes are poisonous, and inhaling them can cause loss of time. Turn the key to " ", and when the 2-stroke engine oil level warning light comes on, turn the key...
... a Yamaha dealer regarding any control or function that there is adequate ventilation. 8 For safety, always start the engine or operate it in instructions prior to operating the vehicle for any length of consciousness and death within a short time. Exhaust fumes are poisonous, and inhaling them can cause loss of time. Turn the key to " ", and when the 2-stroke engine oil level warning light comes on, turn the key...
Owners Manual
Page 35
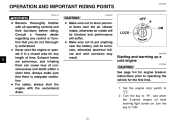
... seat, and then adjust the rear view mirrors. 3. Close the throttle completely. 4. OPERATION AND IMPORTANT RIDING POINTS NOTE: If the engine fails to preserve the battery. Never accelerate hard when the engine is cold! 5-2 Each starting off the centerstand. 2. If the engine does not start switch, release the switch, wait a few seconds, and then try using the kickstarter. 2 1 1. Switch the turn signal on. 5 If the 2-stroke engine oil level warning light...
... seat, and then adjust the rear view mirrors. 3. Close the throttle completely. 4. OPERATION AND IMPORTANT RIDING POINTS NOTE: If the engine fails to preserve the battery. Never accelerate hard when the engine is cold! 5-2 Each starting off the centerstand. 2. If the engine does not start switch, release the switch, wait a few seconds, and then try using the kickstarter. 2 1 1. Switch the turn signal on. 5 If the 2-stroke engine oil level warning light...
Owners Manual
Page 39
... or wet conditions, the air filter element should be cleaned or replaced more frequently, otherwise rapid engine wear may result. If you . 6 6-1 The most efficient condition possible. w EAU00466 w EW000060 This scooter is operated in the safest and most important points of the owner. If this scooter is designed for proper maintenance intervals. EAU00462 PERIODIC MAINTENANCE AND MINOR REPAIR EAU03453 Safety is...
... or wet conditions, the air filter element should be cleaned or replaced more frequently, otherwise rapid engine wear may result. If you . 6 6-1 The most efficient condition possible. w EAU00466 w EW000060 This scooter is operated in the safest and most important points of the owner. If this scooter is designed for proper maintenance intervals. EAU00462 PERIODIC MAINTENANCE AND MINOR REPAIR EAU03453 Safety is...

Owners Manual
Page 40
...; Correct if necessary. • Moderately repack every 8,000 mi (12,000 km) or 24 months.** • Check operation/oil leakage. • Replace if necessary. 6-2 INITIAL 300 mi (500 km) √ EVERY 2,000 mi 4,000 mi (3,000 km) or (6,000 km) or 6 months 12 months 1 2 3 4 Spark plug Air filter element * * * Carburetor Fuel line 5 Final transmission oil REPLACE. 6 6 7 8 9 10 11 * Autolube pump Brakes * * * * Wheels Wheel bearings Steering bearings Rear shock absorber
...; Correct if necessary. • Moderately repack every 8,000 mi (12,000 km) or 24 months.** • Check operation/oil leakage. • Replace if necessary. 6-2 INITIAL 300 mi (500 km) √ EVERY 2,000 mi 4,000 mi (3,000 km) or (6,000 km) or 6 months 12 months 1 2 3 4 Spark plug Air filter element * * * Carburetor Fuel line 5 Final transmission oil REPLACE. 6 6 7 8 9 10 11 * Autolube pump Brakes * * * * Wheels Wheel bearings Steering bearings Rear shock absorber
Owners Manual
Page 44
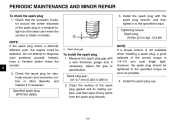
... the spark plug shows a distinctly different color, the engine could be tightened to the specified torque. Install the spark plug with a wire thickness gauge and, if necessary, adjust the gap to diagnose such problems yourself. However, the spark plug should be defective. Measure the spark plug gap with the spark plug wrench, and then tighten it if necessary. Do not attempt to specification. Instead, have a Yamaha dealer...
... the spark plug shows a distinctly different color, the engine could be tightened to the specified torque. Install the spark plug with a wire thickness gauge and, if necessary, adjust the gap to diagnose such problems yourself. However, the spark plug should be defective. Measure the spark plug gap with the spark plug wrench, and then tighten it if necessary. Do not attempt to specification. Instead, have a Yamaha dealer...
Owners Manual
Page 45
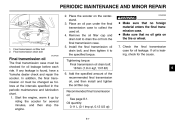
... sure that no oil gets on the centerstand. 3. Place an oil pan under the final transmission case to collect the used oil. 4. Check the final transmission case for several minutes, and then stop the engine. 6 6-7 Start the engine, warm it to drain the oil from the final transmission case. 5. PERIODIC MAINTENANCE AND MINOR REPAIR 2. Place the scooter on the tire or wheel. 7. Final transmission oil filler bolt 2.
... sure that no oil gets on the centerstand. 3. Place an oil pan under the final transmission case to collect the used oil. 4. Check the final transmission case for several minutes, and then stop the engine. 6 6-7 Start the engine, warm it to drain the oil from the final transmission case. 5. PERIODIC MAINTENANCE AND MINOR REPAIR 2. Place the scooter on the tire or wheel. 7. Final transmission oil filler bolt 2.

Owners Manual
Page 58
... of wheel and swingarm bearings, fork and brakes), electric components (couplers, connectors, instruments, switches and lights), breather hoses and vents. 8 For scooters equipped with water, carry out the following areas: seals (of the salt. 2. Some cleaning compounds for hard-to prevent corrosion. 7-2 If the windshield is covered with strong or abrasive cleaning products, solvent or thinner, fuel (gasoline), rust removers or inhibitors, brake fluid...
... of wheel and swingarm bearings, fork and brakes), electric components (couplers, connectors, instruments, switches and lights), breather hoses and vents. 8 For scooters equipped with water, carry out the following areas: seals (of the salt. 2. Some cleaning compounds for hard-to prevent corrosion. 7-2 If the windshield is covered with strong or abrasive cleaning products, solvent or thinner, fuel (gasoline), rust removers or inhibitors, brake fluid...
Owners Manual
Page 62
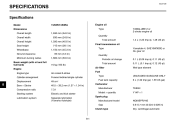
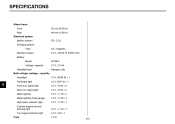
EAU01038 SPECIFICATIONS Specifications Model Dimensions Overall length Overall width Overall height Seat height Wheelbase Ground clearance Minimum turning radius Basic weight (with oil and full fuel tank) Engine Engine type Cylinder arrangement Displacement Air cooled 2-stroke Forward inclined single cylinder 49 cm3 40.0 × 39.2 mm (1.57 × 1.54 in) 7.3:1 Electric and kick starter Separate lubrication (Yamaha Autolube) 1,630 mm (64.2 in) 630 mm (24.8 in) 1,030 mm (40.6 in) 715 mm (28...
EAU01038 SPECIFICATIONS Specifications Model Dimensions Overall length Overall width Overall height Seat height Wheelbase Ground clearance Minimum turning radius Basic weight (with oil and full fuel tank) Engine Engine type Cylinder arrangement Displacement Air cooled 2-stroke Forward inclined single cylinder 49 cm3 40.0 × 39.2 mm (1.57 × 1.54 in) 7.3:1 Electric and kick starter Separate lubrication (Yamaha Autolube) 1,630 mm (64.2 in) 630 mm (24.8 in) 1,030 mm (40.6 in) 715 mm (28...
Owners Manual
Page 63
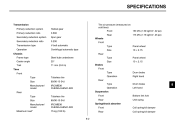
...; 71 mm (2.8 in) Helical gear 3.692 Spur gear 3.230 V-belt automatic Centrifugal automatic type Tire air pressure (measured on cold tires) 150 kPa (1.50 kgf/cm2, 22 psi) Front Rear Wheels Front Type Size Rear Type Size Brakes Front Type Operation Rear Type Operation Suspension Front Rear Spring/shock absorber Front Rear Coil spring/oil damper Coil spring/oil damper Bottom link fork Unit swing Drum brake Left hand Drum brake Right hand Panel wheel 10 × 2.15 Panel wheel 10 × 2.15 175...
...; 71 mm (2.8 in) Helical gear 3.692 Spur gear 3.230 V-belt automatic Centrifugal automatic type Tire air pressure (measured on cold tires) 150 kPa (1.50 kgf/cm2, 22 psi) Front Rear Wheels Front Type Size Rear Type Size Brakes Front Type Operation Rear Type Operation Suspension Front Rear Spring/shock absorber Front Rear Coil spring/oil damper Coil spring/oil damper Bottom link fork Unit swing Drum brake Left hand Drum brake Right hand Panel wheel 10 × 2.15 Panel wheel 10 × 2.15 175...
Owners Manual
Page 64
C.D.I. 52 mm (2.05 in) 48 mm (1.89 in) 8 Front turn signal light Rear turn signal light Meter lighting Meter lighting (Fuel gauge) High beam indicator light 2-stroke engine oil level warning light Turn signal indicator light Fuse magneto 14 V, 120 W @ 5,000 r/min DC. SPECIFICATIONS Wheel travel Front Rear Electrical system Ignition system Charging system Type Standard output Battery Model Voltage, capacity Headlight type Bulb voltage, wattage × quantity Headlight Tail/brake light 12 V, 35/35 W × 1 12 V, 8/27 W × 1 12 V, 10 W × 2 12 V, 10 W ×...
C.D.I. 52 mm (2.05 in) 48 mm (1.89 in) 8 Front turn signal light Rear turn signal light Meter lighting Meter lighting (Fuel gauge) High beam indicator light 2-stroke engine oil level warning light Turn signal indicator light Fuse magneto 14 V, 120 W @ 5,000 r/min DC. SPECIFICATIONS Wheel travel Front Rear Electrical system Ignition system Charging system Type Standard output Battery Model Voltage, capacity Headlight type Bulb voltage, wattage × quantity Headlight Tail/brake light 12 V, 35/35 W × 1 12 V, 8/27 W × 1 12 V, 10 W × 2 12 V, 10 W ×...