
Owners Manual
Page 6
... plug holders...5-13 Carburetor heating knob...5-13 Storage compartment ...5-13 PRE-OPERATION CHECKS ...6-1 Fuel ...6-1 Engine oil...6-2 Coolant ...6-2 Throttle lever ...6-3 Recoil starter ...6-3 Throttle override system (T.O.R.S.) ...6-3 Brake ...6-4 Brake fluid leakage ...6-5 V-belt ...6-5 Drive guard ...6-5 Drive track ...6-6 51-mm (2.0-in) high-profile pattern drive track...6-6 Slide runners ...6-6 Skis and ski runners ...6-7 Steering system...6-7 Lights ...6-7 Battery ...6-8 Air filter ...6-8 Fittings and fasteners ...6-9 Tool kit and recommended equipment...6-9 OPERATION ...7-1 Starting...
... plug holders...5-13 Carburetor heating knob...5-13 Storage compartment ...5-13 PRE-OPERATION CHECKS ...6-1 Fuel ...6-1 Engine oil...6-2 Coolant ...6-2 Throttle lever ...6-3 Recoil starter ...6-3 Throttle override system (T.O.R.S.) ...6-3 Brake ...6-4 Brake fluid leakage ...6-5 V-belt ...6-5 Drive guard ...6-5 Drive track ...6-6 51-mm (2.0-in) high-profile pattern drive track...6-6 Slide runners ...6-6 Skis and ski runners ...6-7 Steering system...6-7 Lights ...6-7 Battery ...6-8 Air filter ...6-8 Fittings and fasteners ...6-9 Tool kit and recommended equipment...6-9 OPERATION ...7-1 Starting...
Owners Manual
Page 7
... ...7-13 PERIODIC MAINTENANCE ...8-1 Periodic maintenance chart ...8-1 Tool kit ...8-4 Spark plug inspection ...8-4 Engine idle speed adjustment ...8-5 Throttle cable adjustment ...8-6 Oil pump cable adjustment ...8-6 Carburetor adjustment...8-7 Yamaha Power Valve System (Y.P.V.S.)...8-9 High altitude adjustments ...8-10 Cooling system ...8-11 V-belt replacement ...8-13 Checking the oil level of the drive chain housing ...8-15 Checking the brake pads...8-17 Checking the parking brake pads...8-17 Checking the brake fluid level...8-18 Brake fluid replacement...8-18 Suspension...8-18 Drive track...
... ...7-13 PERIODIC MAINTENANCE ...8-1 Periodic maintenance chart ...8-1 Tool kit ...8-4 Spark plug inspection ...8-4 Engine idle speed adjustment ...8-5 Throttle cable adjustment ...8-6 Oil pump cable adjustment ...8-6 Carburetor adjustment...8-7 Yamaha Power Valve System (Y.P.V.S.)...8-9 High altitude adjustments ...8-10 Cooling system ...8-11 V-belt replacement ...8-13 Checking the oil level of the drive chain housing ...8-15 Checking the brake pads...8-17 Checking the parking brake pads...8-17 Checking the brake fluid level...8-18 Brake fluid replacement...8-18 Suspension...8-18 Drive track...
Owners Manual
Page 14
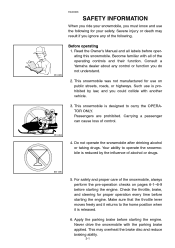
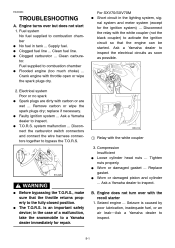
... steering for proper operation every time before starting the engine. Make sure that the throttle lever moves freely and it returns to the home position when it is prohibited by the influence of the snowmobile, always perform the pre-operation checks on public streets, roads, or highways. SAFETY INFORMATION When you ride your safety. Never drive the snowmobile with another vehicle...
... steering for proper operation every time before starting the engine. Make sure that the throttle lever moves freely and it returns to the home position when it is prohibited by the influence of the snowmobile, always perform the pre-operation checks on public streets, roads, or highways. SAFETY INFORMATION When you ride your safety. Never drive the snowmobile with another vehicle...
Owners Manual
Page 15
... use of the controls. Wear an approved helmet, and a face shield or goggles. Do not allow anyone to cool for operation of your doctor immediately. Handle fuel with soap and water, and change your skin with care; Allow the engine to stand behind the snowmobile when starting the engine to the operator or bystanders. 8. G Fill the fuel tank outdoors with extreme...
... use of the controls. Wear an approved helmet, and a face shield or goggles. Do not allow anyone to cool for operation of your doctor immediately. Handle fuel with soap and water, and change your skin with care; Allow the engine to stand behind the snowmobile when starting the engine to the operator or bystanders. 8. G Fill the fuel tank outdoors with extreme...

Owners Manual
Page 16
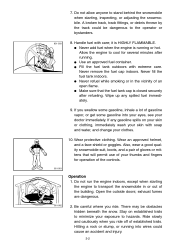
..., slide runners, and drive sprockets. 5. Fuel may damage the snowmobile. 4. Modifications made to release the throttle and apply the brake gently-not suddenly. Always refer to the "STORAGE" section if the snowmobile is to the snowmobile not approved by Yamaha, or the removal of control and may leak out from the fuel breather hose. 2. Allow the engine to use that may...
..., slide runners, and drive sprockets. 5. Fuel may damage the snowmobile. 4. Modifications made to release the throttle and apply the brake gently-not suddenly. Always refer to the "STORAGE" section if the snowmobile is to the snowmobile not approved by Yamaha, or the removal of control and may leak out from the fuel breather hose. 2. Allow the engine to use that may...
Owners Manual
Page 19
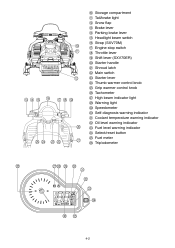
0 A B C D E F G H I J K L M N O P Q R S T U V W X Y Z Storage compartment Tail/brake light Snow flap Brake lever Parking brake lever Headlight beam switch Strap (SXV70M) Engine stop switch Throttle lever Shift lever (SXV70ER) Starter handle Shroud latch Main switch Starter lever Thumb warmer control knob Grip warmer control knob Tachometer High beam indicator light Warning light Speedometer Self-diagnosis warning indicator Coolant temperature warning indicator Oil level warning indicator Fuel level warning indicator Select/reset button Fuel meter Trip/odometer 4-2
0 A B C D E F G H I J K L M N O P Q R S T U V W X Y Z Storage compartment Tail/brake light Snow flap Brake lever Parking brake lever Headlight beam switch Strap (SXV70M) Engine stop switch Throttle lever Shift lever (SXV70ER) Starter handle Shroud latch Main switch Starter lever Thumb warmer control knob Grip warmer control knob Tachometer High beam indicator light Warning light Speedometer Self-diagnosis warning indicator Coolant temperature warning indicator Oil level warning indicator Fuel level warning indicator Select/reset button Fuel meter Trip/odometer 4-2
Owners Manual
Page 22
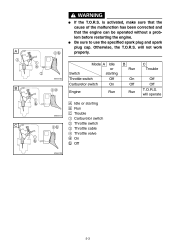
... not work properly. will operate CA-01E Mode A Idle or Switch starting Throttle switch Off Carburetor switch On B Engine È É Ê 1 2 3 4 a b Idle or starting Run Trouble Carburetor switch Throttle switch Throttle cable Throttle valve On Off Run C 5-3 Be sure to use the specified spark plug and spark plug cap. is activated, make sure that the cause of the malfunction has been corrected and that the engine can be operated without a problem before restarting the engine. WARNING...
... not work properly. will operate CA-01E Mode A Idle or Switch starting Throttle switch Off Carburetor switch On B Engine È É Ê 1 2 3 4 a b Idle or starting Run Trouble Carburetor switch Throttle switch Throttle cable Throttle valve On Off Run C 5-3 Be sure to use the specified spark plug and spark plug cap. is activated, make sure that the cause of the malfunction has been corrected and that the engine can be operated without a problem before restarting the engine. WARNING...
Owners Manual
Page 23
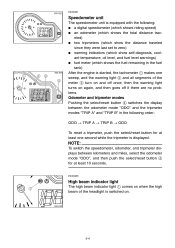
... of the meter 3 turn on and off once, then the warning light turns on again, and then goes off if there are no problems. Odometer and tripmeter modes Pushing the select/reset button 4 switches the display between the odometer mode "ODO" and the tripmeter modes "TRIP A" and "TRIP B" in the fuel tank) After the engine is started, the tachometer 1 makes...
... of the meter 3 turn on and off once, then the warning light turns on again, and then goes off if there are no problems. Odometer and tripmeter modes Pushing the select/reset button 4 switches the display between the odometer mode "ODO" and the tripmeter modes "TRIP A" and "TRIP B" in the fuel tank) After the engine is started, the tachometer 1 makes...
Owners Manual
Page 46
... start the engine. WARNING Learning to ride your snowmobile Before you are an experienced rider. Do not attempt to operate at low speeds, even if you ride, always perform the preoperation checks listed on pages 3-1-3-3. Apply the throttle slowly and smoothly. Set the parking brake and follow the instructions on your snowmobile. With the engine idling, release the parking brake. 2. Avoid high speeds until...
... start the engine. WARNING Learning to ride your snowmobile Before you are an experienced rider. Do not attempt to operate at low speeds, even if you ride, always perform the preoperation checks listed on pages 3-1-3-3. Apply the throttle slowly and smoothly. Set the parking brake and follow the instructions on your snowmobile. With the engine idling, release the parking brake. 2. Avoid high speeds until...
Owners Manual
Page 47
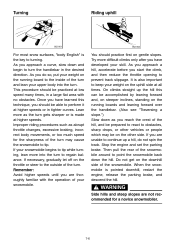
... the throttle opening to tip. Turning Riding uphill For most snow surfaces, "body English" is pointed downhill, restart the engine, release the parking brake, and descend the hill. If your snowmobile. As you approach a hill, accelerate before you are thoroughly familiar with no obstacles. Stop the engine and set the parking brake. When the snowmobile is the key to keep your weight...
... the throttle opening to tip. Turning Riding uphill For most snow surfaces, "body English" is pointed downhill, restart the engine, release the parking brake, and descend the hill. If your snowmobile. As you approach a hill, accelerate before you are thoroughly familiar with no obstacles. Stop the engine and set the parking brake. When the snowmobile is the key to keep your weight...
Owners Manual
Page 48
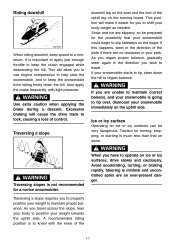
...speed to a minimum. This position will make it easier for a novice snowmobiler. @ Traversing a slope requires you to properly position your weight to maintain proper balance. If your weight towards the uphill side. As you are no obstacles in your body weight as needed. It is to kneel with light pressure... important to apply just enough throttle to keep the clutch engaged while descending the hill. Traversing a slope WARNING @ WARNING @ When you wish to travel across the slope, lean your body to position your snowmobile starts to tip, steer down the hill. Riding downhill...
...speed to a minimum. This position will make it easier for a novice snowmobiler. @ Traversing a slope requires you to properly position your weight to maintain proper balance. If your weight towards the uphill side. As you are no obstacles in your body weight as needed. It is to kneel with light pressure... important to apply just enough throttle to keep the clutch engaged while descending the hill. Traversing a slope WARNING @ WARNING @ When you wish to travel across the slope, lean your body to position your snowmobile starts to tip, steer down the hill. Riding downhill...
Owners Manual
Page 55
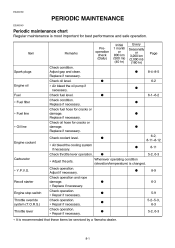
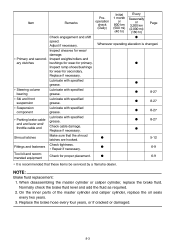
...) G Page Spark plugs Check condition. Check operation. ∗ Repair if necessary. Check coolant level. G G 8-4-8-5 6-2 Engine oil Fuel ∗ Fuel filter ∗ Fuel line G 6-1-6-2 G G ∗ Oil line G 6-2, 8-11-8-12 G G Whenever operating condition (elevation/temperature) is recommended that these items be serviced by a Yamaha dealer. 8-1 Check operation. ∗ Repair if necessary. G G G G G 8-9 6-3 5-9 5-2-5-3, 6-3 5-2, 6-3 8-11 5-2, 6-3 Engine coolant ∗ Air bleed the cooling system if necessary. PERIODIC MAINTENANCE ESU00140 Periodic maintenance chart...
...) G Page Spark plugs Check condition. Check operation. ∗ Repair if necessary. Check coolant level. G G 8-4-8-5 6-2 Engine oil Fuel ∗ Fuel filter ∗ Fuel line G 6-1-6-2 G G ∗ Oil line G 6-2, 8-11-8-12 G G Whenever operating condition (elevation/temperature) is recommended that these items be serviced by a Yamaha dealer. 8-1 Check operation. ∗ Repair if necessary. G G G G G 8-9 6-3 5-9 5-2-5-3, 6-3 5-2, 6-3 8-11 5-2, 6-3 Engine coolant ∗ Air bleed the cooling system if necessary. PERIODIC MAINTENANCE ESU00140 Periodic maintenance chart...
Owners Manual
Page 56
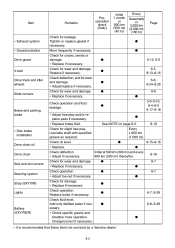
... as required. Check oil level. ∗ Replace. Check for wear and damage. ∗ Adjust/replace if necessary. Check fluid level. Check deflection. ∗ Adjust if necessary. Check operation. Add only distilled water if necessary. ∗ Check specific gravity and breather hose operation. G G 8-16 6-7 6-7 G Lights 6-7, 8-28 6-8, 8-29 Battery (SXV70ER) G ∗ It is recommended that these items be serviced by a Yamaha dealer. 8-2 Check...
... as required. Check oil level. ∗ Replace. Check for wear and damage. ∗ Adjust/replace if necessary. Check fluid level. Check deflection. ∗ Adjust if necessary. Check operation. Add only distilled water if necessary. ∗ Check specific gravity and breather hose operation. G G 8-16 6-7 6-7 G Lights 6-7, 8-28 6-8, 8-29 Battery (SXV70ER) G ∗ It is recommended that these items be serviced by a Yamaha dealer. 8-2 Check...
Owners Manual
Page 57
... cylinder, replace the brake fluid. On the inner parts of the master cylinder and caliper cylinder, replace the oil seals every two years. 3. Replace the brake hose every four years, or if cracked or damaged. @ 8-3 Inspect weights/rollers and bushings for wear-for secondary. Lubricate with specified grease. ∗ Steering column bearing ∗ Ski and front suspension ∗ Suspension component ∗ Parking brake cable end and lever end/ throttle...
... cylinder, replace the brake fluid. On the inner parts of the master cylinder and caliper cylinder, replace the oil seals every two years. 3. Replace the brake hose every four years, or if cracked or damaged. @ 8-3 Inspect weights/rollers and bushings for wear-for secondary. Lubricate with specified grease. ∗ Steering column bearing ∗ Ski and front suspension ∗ Suspension component ∗ Parking brake cable end and lever end/ throttle...
Owners Manual
Page 59
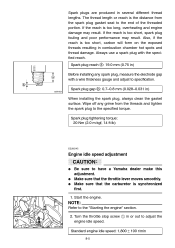
... installing the spark plug, always clean the gasket surface. Spark plug gap b: 0.7-0.8 mm (0.028-0.031 in ) Before installing any grime from the spark plug gasket seat to the specified torque. Standard engine idle speed: 1,800 ± 100 r/min 8-5 Wipe off any spark plug, measure the electrode gap with the specified reach. The thread length or reach is synchronized first. 1. Always use a spark plug with a wire thickness gauge and adjust...
... installing the spark plug, always clean the gasket surface. Spark plug gap b: 0.7-0.8 mm (0.028-0.031 in ) Before installing any grime from the spark plug gasket seat to the specified torque. Standard engine idle speed: 1,800 ± 100 r/min 8-5 Wipe off any spark plug, measure the electrode gap with the specified reach. The thread length or reach is synchronized first. 1. Always use a spark plug with a wire thickness gauge and adjust...
Owners Manual
Page 63
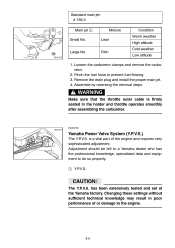
... and set at the Yamaha factory. Pinch the fuel hose to do so properly. .V.S. 1 Y.P CAUTION: @ The Y.P.V.S. Changing these settings without sufficient technical knowledge may result in the holder and throttle operates smoothly after assembling the carburetor. @ ESU00156 Yamaha Power Valve System (Y.P.V.S.) The Y.P .V.S. Standard main jet: # 156.3 CD-04E Main jet 1 Mixture Lean Rich Condition Warm weather High altitude Cold weather Low altitude...
... and set at the Yamaha factory. Pinch the fuel hose to do so properly. .V.S. 1 Y.P CAUTION: @ The Y.P.V.S. Changing these settings without sufficient technical knowledge may result in the holder and throttle operates smoothly after assembling the carburetor. @ ESU00156 Yamaha Power Valve System (Y.P.V.S.) The Y.P .V.S. Standard main jet: # 156.3 CD-04E Main jet 1 Mixture Lean Rich Condition Warm weather High altitude Cold weather Low altitude...
Owners Manual
Page 74
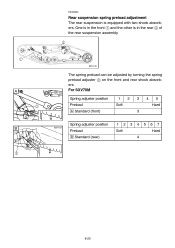
A The spring preload can be adjusted by turning the spring preload adjuster 3 on the front and rear shock absorbers. One is in the rear 2 of the rear suspension assembly. For SXV70M CD-13E Spring adjuster position Preload È Standard (front) CD-14E 1 Soft 2 3 3 4 5 Hard Spring adjuster position B Preload É Standard (rear) 1 Soft 2 3 4 4 5 6 7 Hard 8-20 ESU00324 Rear suspension spring preload adjustment The rear suspension is in the front 1 and the other is equipped with two shock absorbers.
A The spring preload can be adjusted by turning the spring preload adjuster 3 on the front and rear shock absorbers. One is in the rear 2 of the rear suspension assembly. For SXV70M CD-13E Spring adjuster position Preload È Standard (front) CD-14E 1 Soft 2 3 3 4 5 Hard Spring adjuster position B Preload É Standard (rear) 1 Soft 2 3 4 4 5 6 7 Hard 8-20 ESU00324 Rear suspension spring preload adjustment The rear suspension is in the front 1 and the other is equipped with two shock absorbers.
Owners Manual
Page 85
..., inadequate fuel, or an air leak-Ask a Yamaha dealer to the fully-closed position. system malfunction ...Disconnect the carburetor switch connectors and connect the wire harness connectors together to inspect. G Worn or damaged gasket ...Replace gasket. Fuel supplied to inspect the electrical circuits as soon as possible. 1 Relay with the recoil starter 1. Seized engine ...Seizure is an important safety device; in the lighting system, signal system and...
..., inadequate fuel, or an air leak-Ask a Yamaha dealer to the fully-closed position. system malfunction ...Disconnect the carburetor switch connectors and connect the wire harness connectors together to inspect. G Worn or damaged gasket ...Replace gasket. Fuel supplied to inspect the electrical circuits as soon as possible. 1 Relay with the recoil starter 1. Seized engine ...Seizure is an important safety device; in the lighting system, signal system and...

Owners Manual
Page 86
... engine mount ...Ask a Yamaha dealer to inspect. 3. C. Discharged battery...Check battery fluid and charge battery. 3. system ...See A.2. Incorrect V-belt clutch offset ...Ask a Yamaha dealer to inspect. Problem with the correct V-belt. 2. Engine overheats 1. Drive track does not move 1. H. Faulty wire connections ...Check connections or ask a Yamaha dealer to inspect. Improper fuel flow ...See A.1. Tight, loose, or broken drive chain ...Ask a Yamaha dealer to inspect. 2. Worn or sticking secondary sheave assembly ...Ask a Yamaha...
... engine mount ...Ask a Yamaha dealer to inspect. 3. C. Discharged battery...Check battery fluid and charge battery. 3. system ...See A.2. Incorrect V-belt clutch offset ...Ask a Yamaha dealer to inspect. Problem with the correct V-belt. 2. Engine overheats 1. Drive track does not move 1. H. Faulty wire connections ...Check connections or ask a Yamaha dealer to inspect. Improper fuel flow ...See A.1. Tight, loose, or broken drive chain ...Ask a Yamaha dealer to inspect. 2. Worn or sticking secondary sheave assembly ...Ask a Yamaha...
Owners Manual
Page 95
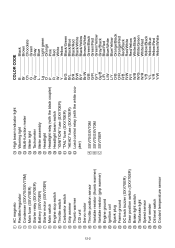
...9 0 A B C D E F G H I J K L M N O P Q R S T AC magneto Rectifier/regulator Condenser (SXV70/SXV70M) Main fuse (SXV70ER) Starter relay (SXV70ER) Battery (SXV70ER) Starter motor (SXV70ER) Main switch Engine stop switch Throttle switch Carburetor switch Grip warmer Thumb warmer CDI unit Servo motor Throttle position sensor Variable resistor (thumb warmer) Variable resistor (grip warmer) Engine ground Ignition coil Spark plug Frame ground DC back buzzer (SXV70ER) Gear position switch (SXV70ER) Brake light switch Tail/brake light Speed sensor Fuel sender Oil level switch Coolant temperature sensor
...9 0 A B C D E F G H I J K L M N O P Q R S T AC magneto Rectifier/regulator Condenser (SXV70/SXV70M) Main fuse (SXV70ER) Starter relay (SXV70ER) Battery (SXV70ER) Starter motor (SXV70ER) Main switch Engine stop switch Throttle switch Carburetor switch Grip warmer Thumb warmer CDI unit Servo motor Throttle position sensor Variable resistor (thumb warmer) Variable resistor (grip warmer) Engine ground Ignition coil Spark plug Frame ground DC back buzzer (SXV70ER) Gear position switch (SXV70ER) Brake light switch Tail/brake light Speed sensor Fuel sender Oil level switch Coolant temperature sensor