

Owners Manual
Page 3
... in these standards without reducing the performance or economy of operation of fine sporting, touring, and pacesetting racing machines. This model is important that have any questions concerning the operation or maintenance of the Yamaha Royal Star™ VENTURE®. The design and manufacture of manufacture. Yamaha has met these fields. This manual will give you an understanding of...
... in these standards without reducing the performance or economy of operation of fine sporting, touring, and pacesetting racing machines. This model is important that have any questions concerning the operation or maintenance of the Yamaha Royal Star™ VENTURE®. The design and manufacture of manufacture. Yamaha has met these fields. This manual will give you an understanding of...

Owners Manual
Page 12
..." when mounting accessories. 1. Never install accessories or carry cargo that it to the motorcycle as possible. SAFETY INFORMATION Loading The total weight of the operator, passenger, accessories and cargo must personally be kept as low and close to make sure that would impair the performance of your motorcycle. Never attach any accessories. Shifting weights can create unstable handling or slow steering response. Carefully...
..." when mounting accessories. 1. Never install accessories or carry cargo that it to the motorcycle as possible. SAFETY INFORMATION Loading The total weight of the operator, passenger, accessories and cargo must personally be kept as low and close to make sure that would impair the performance of your motorcycle. Never attach any accessories. Shifting weights can create unstable handling or slow steering response. Carefully...

Owners Manual
Page 21
INSTRUMENT AND CONTROL FUNCTIONS Main switch/steering lock ...3-1 Indicator and warning lights ...3-2 Speedometer unit ...3-4 Cruise control system ...3-5 Fuel gauge ...3-7 Handlebar switches ...3-7 Clutch lever ...3-9 Shift pedal ...3-9 Brake lever ...3-9 Brake pedal ...3-10 Fuel tank cap ...3-10 Fuel ...3-11 Fuel cock ...3-12 Starter (choke) knob ...3-13 Locking the steering with a padlock ...3-13 Rider seat ...3-13 Helmet holders ...3-14 Side cases and travel trunk ...3-15 Adjusting the front fork ...3-17 Adjusting the shock absorber assembly ...3-18 Locks for the optional side cases and...
INSTRUMENT AND CONTROL FUNCTIONS Main switch/steering lock ...3-1 Indicator and warning lights ...3-2 Speedometer unit ...3-4 Cruise control system ...3-5 Fuel gauge ...3-7 Handlebar switches ...3-7 Clutch lever ...3-9 Shift pedal ...3-9 Brake lever ...3-9 Brake pedal ...3-10 Fuel tank cap ...3-10 Fuel ...3-11 Fuel cock ...3-12 Starter (choke) knob ...3-13 Locking the steering with a padlock ...3-13 Rider seat ...3-13 Helmet holders ...3-14 Side cases and travel trunk ...3-15 Adjusting the front fork ...3-17 Adjusting the shock absorber assembly ...3-18 Locks for the optional side cases and...

Owners Manual
Page 22
... extended period of time, otherwise the battery may discharge. EAU00038 Main switch/steering lock The main switch/steering lock controls the ignition and lighting systems, and is locked, and all the way to "OFF" while still pushing it to the left. 2. The various positions are off . Turn the handlebars all electrical systems are supplied with power, and the headlight, meter lighting, taillight and position lights come on, and the engine...
... extended period of time, otherwise the battery may discharge. EAU00038 Main switch/steering lock The main switch/steering lock controls the ignition and lighting systems, and is locked, and all the way to "OFF" while still pushing it to the left. 2. The various positions are off . Turn the handlebars all electrical systems are supplied with power, and the headlight, meter lighting, taillight and position lights come on, and the engine...
Owners Manual
Page 23
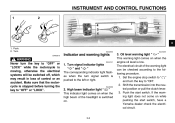
... headlight is stopped before turning the key to the following procedure. 1. Shift the transmission into the neutral position or pull the clutch lever. 3. Push. 2. The electrical circuit of control or an accident. Push the start switch, have a Yamaha dealer check the electrical circuit. 3-2 Turn. High beam indicator light " " This indicator light comes on . 3. Oil level warning light " " This warning light comes on while pushing the start switch. Set the engine stop switch to " " and turn...
... headlight is stopped before turning the key to the following procedure. 1. Shift the transmission into the neutral position or pull the clutch lever. 3. Push. 2. The electrical circuit of control or an accident. Push the start switch, have a Yamaha dealer check the electrical circuit. 3-2 Turn. High beam indicator light " " This indicator light comes on . 3. Oil level warning light " " This warning light comes on while pushing the start switch. Set the engine stop switch to " " and turn...
Owners Manual
Page 24
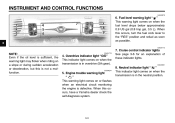
... an electrical circuit monitoring the engine is in overdrive (5th gear). Engine trouble warning light " " This warning light comes on when the fuel level drops below approximately 0.9 US gal (0.8 Imp gal, 3.5 L). When this occurs, turn the fuel cock lever to the "RES" position and refuel as soon as possible. Neutral indicator light " " This indicator light comes on when the transmission is defective. INSTRUMENT AND CONTROL FUNCTIONS...
... an electrical circuit monitoring the engine is in overdrive (5th gear). Engine trouble warning light " " This warning light comes on when the fuel level drops below approximately 0.9 US gal (0.8 Imp gal, 3.5 L). When this occurs, turn the fuel cock lever to the "RES" position and refuel as soon as possible. Neutral indicator light " " This indicator light comes on when the transmission is defective. INSTRUMENT AND CONTROL FUNCTIONS...
Owners Manual
Page 25
When this occurs, stop switch to " " and turn the key to cool. Set the engine stop the engine immediately and allow the engine to "ON". 2. Shift the transmission into the neutral position or pull the clutch lever. 3. The electrical circuit of the warning light can be checked according to the fuel reserve tripmeter mode "TRIP F" and start counting the distance traveled from that case, pushing the...
When this occurs, stop switch to " " and turn the key to cool. Set the engine stop the engine immediately and allow the engine to "ON". 2. Shift the transmission into the neutral position or pull the clutch lever. 3. The electrical circuit of the warning light can be checked according to the fuel reserve tripmeter mode "TRIP F" and start counting the distance traveled from that case, pushing the...

Owners Manual
Page 29
... 6. To cancel the turn signal lights, push the switch in case of all turn signal lights). EAU03890 5. Cruise control switches See page 3-5 for an extended length of the cruise control system. To signal a left-hand turn , push this switch to starting the engine. @ @ EC000006 CAUTION: Do not use the hazard light for an explanation of time, otherwise the battery may discharge. @ @ 3 EAU01859 4. Start switch " " Push this switch to sound the horn. INSTRUMENT AND CONTROL FUNCTIONS EAU03889...
... 6. To cancel the turn signal lights, push the switch in case of all turn signal lights). EAU03890 5. Cruise control switches See page 3-5 for an extended length of the cruise control system. To signal a left-hand turn , push this switch to starting the engine. @ @ EC000006 CAUTION: Do not use the hazard light for an explanation of time, otherwise the battery may discharge. @ @ 3 EAU01859 4. Start switch " " Push this switch to sound the horn. INSTRUMENT AND CONTROL FUNCTIONS EAU03889...

Owners Manual
Page 77
.... @ EAU00423 Shifting Shifting gears lets you control the amount of engine power available for starting a cold engine with the exception that the starter (choke) is not required when the engine is running. G Always use the clutch while changing gears to withstand the shock of forced shifting. 6 NOTE: To shift the transmission into the neutral position, press the shift pedal down repeatedly until it reaches the end of time with the transmission in...
.... @ EAU00423 Shifting Shifting gears lets you control the amount of engine power available for starting a cold engine with the exception that the starter (choke) is not required when the engine is running. G Always use the clutch while changing gears to withstand the shock of forced shifting. 6 NOTE: To shift the transmission into the neutral position, press the shift pedal down repeatedly until it reaches the end of time with the transmission in...
Owners Manual
Page 81
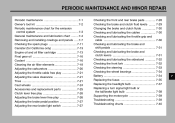
... emission control system ...7-3 General maintenance and lubrication chart ...7-4 Removing and installing cowlings and panels ...7-7 Checking the spark plugs ...7-11 Canister (for California only) ...7-13 Engine oil and oil filter cartridge ...7-13 Final gear oil ...7-16 Coolant ...7-16 Cleaning the air filter elements ...7-18 Adjusting the carburetors ...7-20 Adjusting the throttle cable free play ...7-21 Adjusting the valve clearance ...7-21 Tires ...7-21 Cast wheels ...7-24 Accessories and replacement parts ...7-25 Clutch lever...
... emission control system ...7-3 General maintenance and lubrication chart ...7-4 Removing and installing cowlings and panels ...7-7 Checking the spark plugs ...7-11 Canister (for California only) ...7-13 Engine oil and oil filter cartridge ...7-13 Final gear oil ...7-16 Coolant ...7-16 Cleaning the air filter elements ...7-18 Adjusting the carburetors ...7-20 Adjusting the throttle cable free play ...7-21 Adjusting the valve clearance ...7-21 Tires ...7-21 Cast wheels ...7-24 Accessories and replacement parts ...7-25 Clutch lever...
Owners Manual
Page 84
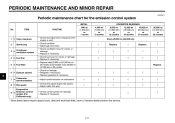
...,000 km) or 30 months 1 2 3 4 5 * Valve clearance Spark plug Crankcase ventilation system Fuel line Fuel filter • Check and adjust valve clearance when engine is cold. • Check condition. • Adjust gap and clean. • Check ventilation hose for cracks or damage. • Replace if necessary. • Check fuel hose for cracks or damage. • Replace if necessary. • Replace initial 20,000 mi (31,000...
...,000 km) or 30 months 1 2 3 4 5 * Valve clearance Spark plug Crankcase ventilation system Fuel line Fuel filter • Check and adjust valve clearance when engine is cold. • Check condition. • Adjust gap and clean. • Check ventilation hose for cracks or damage. • Replace if necessary. • Check fuel hose for cracks or damage. • Replace if necessary. • Replace initial 20,000 mi (31,000...

Owners Manual
Page 85
...; Check and replace pads if necessary. • Check operation and fluid leakage. (See NOTE page 7-6.) • Correct if necessary. √ √ √ √ Replace brake fluid. √ 7 - 6 √ √ √ √ √ √ 7 Final gear oil • Check vehicle for cracks or damage, replace if necessary. • Replace coolant every 24 months. Replace. 8 Control cable √ √ √ √ √ √ 9 Rear arm pivot bearing √ Repack...
...; Check and replace pads if necessary. • Check operation and fluid leakage. (See NOTE page 7-6.) • Correct if necessary. √ √ √ √ Replace brake fluid. √ 7 - 6 √ √ √ √ √ √ 7 Final gear oil • Check vehicle for cracks or damage, replace if necessary. • Replace coolant every 24 months. Replace. 8 Control cable √ √ √ √ √ √ 9 Rear arm pivot bearing √ Repack...

Owners Manual
Page 108
... MAINTENANCE AND MINOR REPAIR EW000109 EAU01799 a. WARNING A soft or spongy feeling in the brake pedal can indicate the presence of air in (100 mm) above the top of control and an accident. @ @ Adjusting the rear brake light switch The rear brake light switch, which is activated by a Yamaha dealer, who has the necessary professional knowledge and experience. 7 7-27 If there is properly adjusted when the brake light...
... MAINTENANCE AND MINOR REPAIR EW000109 EAU01799 a. WARNING A soft or spongy feeling in the brake pedal can indicate the presence of air in (100 mm) above the top of control and an accident. @ @ Adjusting the rear brake light switch The rear brake light switch, which is activated by a Yamaha dealer, who has the necessary professional knowledge and experience. 7 7-27 If there is properly adjusted when the brake light...

Owners Manual
Page 117
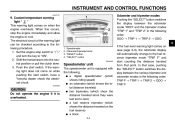
... MAINTENANCE AND MINOR REPAIR Specified fuses: Fuse box 1 Cruise control fuse: Carburetor heater fuse: Auxiliary DC terminal fuse: Auxiliary DC jack fuse: Audio system fuse: Fuse box 2 Ignition fuse: Signaling system fuse: Headlight fuse: Radiator fan fuse: Odometer fuse: Main fuse: 10 A 10 A 5A 5A 10 A 10 A 15 A 15 A 10 A 10 A 30 A EC000103 1. 2. 3. 4. 5. 6. Turn the key to the electrical system and possibly a fire. @ 7-36 Remove the blown fuse, and then install a new fuse of the specified amperage. @ 7 CAUTION: Do not use a fuse...
... MAINTENANCE AND MINOR REPAIR Specified fuses: Fuse box 1 Cruise control fuse: Carburetor heater fuse: Auxiliary DC terminal fuse: Auxiliary DC jack fuse: Audio system fuse: Fuse box 2 Ignition fuse: Signaling system fuse: Headlight fuse: Radiator fan fuse: Odometer fuse: Main fuse: 10 A 10 A 5A 5A 10 A 10 A 15 A 15 A 10 A 10 A 30 A EC000103 1. 2. 3. 4. 5. 6. Turn the key to the electrical system and possibly a fire. @ 7-36 Remove the blown fuse, and then install a new fuse of the specified amperage. @ 7 CAUTION: Do not use a fuse...

Owners Manual
Page 126
... prevent sparking while turning the engine over several minutes to crank the engine. _ _ 3. EW000127 WARNING To prevent sparking, make sure to remove the spark plug leads and ground them before using the starter motor to insure the newly conditioned fuel enters the entire fuel system and carburetors. When finished, start the engine and let it for several minutes. EAU03722 Operate the engine for several times to coat the cylinder...
... prevent sparking while turning the engine over several minutes to crank the engine. _ _ 3. EW000127 WARNING To prevent sparking, make sure to remove the spark plug leads and ground them before using the starter motor to insure the newly conditioned fuel enters the entire fuel system and carburetors. When finished, start the engine and let it for several minutes. EAU03722 Operate the engine for several times to coat the cylinder...

Owners Manual
Page 132
SPECIFICATIONS Bulb voltage, wattage × quantity Headlight Tail/brake light Front turn signal/position light Rear turn signal light Neutral indicator light High beam indicator light Oil level warning light Turn signal indicator light Fuel level warning light Coolant temperature warning light Overdrive indicator light Engine trouble warning light Cruise control "SET" indicator light Cruise control "RES" indicator light Cruise control "ON" indicator light Audio system amplifier Output power Speaker Headset Auto-volume range 14 W × 4 1W×2 5 steps 9-4 12 V, 60/55 W × 1 12 V, 8/...
SPECIFICATIONS Bulb voltage, wattage × quantity Headlight Tail/brake light Front turn signal/position light Rear turn signal light Neutral indicator light High beam indicator light Oil level warning light Turn signal indicator light Fuel level warning light Coolant temperature warning light Overdrive indicator light Engine trouble warning light Cruise control "SET" indicator light Cruise control "RES" indicator light Cruise control "ON" indicator light Audio system amplifier Output power Speaker Headset Auto-volume range 14 W × 4 1W×2 5 steps 9-4 12 V, 60/55 W × 1 12 V, 8/...

Owners Manual
Page 133
CONSUMER INFORMATION Identification numbers ...10-1 Key identification number ...10-1 Vehicle identification number ...10-1 Model label ...10-2 Reporting safety defects ...10-3 Motorcycle noise regulation ...10-4 Maintenance record ...10-5 YAMAHA MOTOR CORPORARION, U.S.A. ROYAL STAR™ VENTURE® LIMITED WARRANTY ...10-7 10
CONSUMER INFORMATION Identification numbers ...10-1 Key identification number ...10-1 Vehicle identification number ...10-1 Model label ...10-2 Reporting safety defects ...10-3 Motorcycle noise regulation ...10-4 Maintenance record ...10-5 YAMAHA MOTOR CORPORARION, U.S.A. ROYAL STAR™ VENTURE® LIMITED WARRANTY ...10-7 10

Owners Manual
Page 140
ROYAL STAR™ VENTURE® LIMITED WARRANTY 10 10-7 CONSUMER INFORMATION EAU03066 YAMAHA MOTOR CORPORARION, U.S.A.
ROYAL STAR™ VENTURE® LIMITED WARRANTY 10 10-7 CONSUMER INFORMATION EAU03066 YAMAHA MOTOR CORPORARION, U.S.A.

Owners Manual
Page 143
... travel trunk...3-19 E Engine break-in ...6-6 Engine oil and oil filter cartridge ...7-13 Engine stop switch...3-8 Engine trouble warning light ...3-3 M Main switch/steering lock ...3-1 Maintenance and lubrication, periodic ...7-4 Maintenance, emission control system...7-3 Maintenance, periodic ...7-1 Maintenance record ...10-5 Model label ...10-2 F Final gear oil...7-16 Front fork, adjusting...3-17 Front fork, checking ...7-32 Fuel ...3-11 Fuel cock...3-12 Fuel gauge ...3-7 Fuel level warning light ...3-3 Fuel tank cap...3-10 Fuses, replacing ...7-35 N Neutral indicator light ...3-3 Noise...
... travel trunk...3-19 E Engine break-in ...6-6 Engine oil and oil filter cartridge ...7-13 Engine stop switch...3-8 Engine trouble warning light ...3-3 M Main switch/steering lock ...3-1 Maintenance and lubrication, periodic ...7-4 Maintenance, emission control system...7-3 Maintenance, periodic ...7-1 Maintenance record ...10-5 Model label ...10-2 F Final gear oil...7-16 Front fork, adjusting...3-17 Front fork, checking ...7-32 Fuel ...3-11 Fuel cock...3-12 Fuel gauge ...3-7 Fuel level warning light ...3-3 Fuel tank cap...3-10 Fuses, replacing ...7-35 N Neutral indicator light ...3-3 Noise...

Owners Manual
Page 144
... Starter (choke) knob ...3-13 Starting and warming up a cold engine...6-2 Starting a warm engine...6-4 Start switch...3-8 Steering, checking ...7-33 Steering, locking with a padlock...3-13 Storage...8-3 Supporting the motorcycle ...7-39 Throttle grip and cable, checking and lubricating ...7-30 Tires...7-21 Tool kit ...7-2 Troubleshooting ...7-39 Troubleshooting charts...7-40 Turn signal indicator lights...3-2 Turn signal light or tail/brake light bulb, replacing ...7-38 Turn signal switch ...3-8 V Valve clearance, adjusting ...7-21 Vehicle identification number...10-1 W Warranty, limited...
... Starter (choke) knob ...3-13 Starting and warming up a cold engine...6-2 Starting a warm engine...6-4 Start switch...3-8 Steering, checking ...7-33 Steering, locking with a padlock...3-13 Storage...8-3 Supporting the motorcycle ...7-39 Throttle grip and cable, checking and lubricating ...7-30 Tires...7-21 Tool kit ...7-2 Troubleshooting ...7-39 Troubleshooting charts...7-40 Turn signal indicator lights...3-2 Turn signal light or tail/brake light bulb, replacing ...7-38 Turn signal switch ...3-8 V Valve clearance, adjusting ...7-21 Vehicle identification number...10-1 W Warranty, limited...