
Owners Manual
Page 3
... emissions standards for clean air applicable at the date of the Yamaha Road Star™/Road Star™ Silverado™. This model is important that have any questions concerning the operation or maintenance of the motorcycle. EAU00002 INTRODUCTION Congratulations on your Yamaha dealer pay close attention to the recommended maintenance schedules and operating instructions contained within this manual. This manual will give you...
... emissions standards for clean air applicable at the date of the Yamaha Road Star™/Road Star™ Silverado™. This model is important that have any questions concerning the operation or maintenance of the motorcycle. EAU00002 INTRODUCTION Congratulations on your Yamaha dealer pay close attention to the recommended maintenance schedules and operating instructions contained within this manual. This manual will give you...
Owners Manual
Page 20
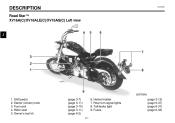
Shift pedal 2. Rider seat 5. 2- Fuses (page 3-12) (page 6-37) (page 6-37) (page 6-33) Starter (choke) knob 3. Tail/brake light 9. Fuel cock 4. Rear turn signal lights 8. DESCRIPTION EAU00026 Road Star™ XV16A(C)/XV16ALE(C)/XV16AS(C) Left view 2 (XV16A) 1. Owner's tool kit (page 3-7) (page 3-11) (page 3-10) (page 3-11) (page 6-2) 2-1 6. Helmet holder 7.
Shift pedal 2. Rider seat 5. 2- Fuses (page 3-12) (page 6-37) (page 6-37) (page 6-33) Starter (choke) knob 3. Tail/brake light 9. Fuel cock 4. Rear turn signal lights 8. DESCRIPTION EAU00026 Road Star™ XV16A(C)/XV16ALE(C)/XV16AS(C) Left view 2 (XV16A) 1. Owner's tool kit (page 3-7) (page 3-11) (page 3-10) (page 3-11) (page 6-2) 2-1 6. Helmet holder 7.
Owners Manual
Page 21
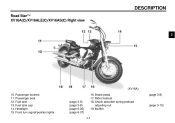
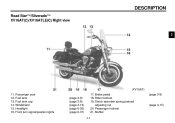
Headlight 15. Front turn signal/position lights 16. Fuel tank cap 14. Passenger seat 12. Muffler 2-2 (page 3-8) (page 3-9) (page 3-8) (page 6-35) (page 6-37) (page 3-15) DESCRIPTION Road Star™ XV16A(C)/XV16ALE(C)/XV16AS(C) Right view 2 (XV16A) 10. Rider footrest 18. Brake pedal 17. Passenger footrest 11. Fuel tank 13. Shock absorber spring preload adjusting nut 19.
Headlight 15. Front turn signal/position lights 16. Fuel tank cap 14. Passenger seat 12. Muffler 2-2 (page 3-8) (page 3-9) (page 3-8) (page 6-35) (page 6-37) (page 3-15) DESCRIPTION Road Star™ XV16A(C)/XV16ALE(C)/XV16AS(C) Right view 2 (XV16A) 10. Rider footrest 18. Brake pedal 17. Passenger footrest 11. Fuel tank 13. Shock absorber spring preload adjusting nut 19.
Owners Manual
Page 22
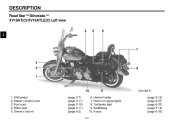
Owner's tool kit (page 3-7) (page 3-11) (page 3-10) (page 3-11) (page 6-2) 2-3 6. Saddlebag 10. Fuel cock 4. Tail/brake light 9. Fuses (page 3-12) (page 6-37) (page 6-37) (page 3-14) (page 6-33) Shift pedal 2. Rider seat 5. Starter (choke) knob 3. Helmet holder 7. DESCRIPTION Road Star™/Silverado™ XV16AT(C)/XV16ATLE(C) Left view 2 (XV16AT) 1. Rear turn signal lights 8.
Owner's tool kit (page 3-7) (page 3-11) (page 3-10) (page 3-11) (page 6-2) 2-3 6. Saddlebag 10. Fuel cock 4. Tail/brake light 9. Fuses (page 3-12) (page 6-37) (page 6-37) (page 3-14) (page 6-33) Shift pedal 2. Rider seat 5. Starter (choke) knob 3. Helmet holder 7. DESCRIPTION Road Star™/Silverado™ XV16AT(C)/XV16ATLE(C) Left view 2 (XV16AT) 1. Rear turn signal lights 8.
Owners Manual
Page 23
DESCRIPTION Road Star™/Silverado™ XV16AT(C)/XV16ATLE(C) Right view 2 (XV16AT) 11. Passenger seat 12. Windshield 15. Shock absorber spring preload adjusting nut 20. Headlight 16. Brake pedal 18. Muffler (page 3-8) (page 3-15) Rider footrest 19. Fuel tank 13. Fuel tank cap 14. Passenger footrest 21. Front turn signal/position lights (page 3-9) (page 3-8) (page 3-13) (page 6-35) (page 6-37) 2-4 17.
DESCRIPTION Road Star™/Silverado™ XV16AT(C)/XV16ATLE(C) Right view 2 (XV16AT) 11. Passenger seat 12. Windshield 15. Shock absorber spring preload adjusting nut 20. Headlight 16. Brake pedal 18. Muffler (page 3-8) (page 3-15) Rider footrest 19. Fuel tank 13. Fuel tank cap 14. Passenger footrest 21. Front turn signal/position lights (page 3-9) (page 3-8) (page 3-13) (page 6-35) (page 6-37) 2-4 17.

Owners Manual
Page 25
INSTRUMENT AND CONTROL FUNCTIONS Main switch/steering lock ...3-1 Indicator and warning lights ...3-2 Speedometer unit ...3-3 Self-diagnosis device ...3-4 Fuel gauge ...3-4 Clock ...3-5 Handlebar switches ...3-6 Clutch lever ...3-7 Shift pedal ...3-7 Brake lever ...3-7 Brake pedal ...3-8 Fuel tank cap ...3-8 Fuel ...3-9 Fuel cock ...3-10 Starter (choke) knob ...3-11 Locking the steering with a padlock ...3-11 Rider seat ...3-11 Helmet holder ...3-12 Windshield [XV16AT(C)/XV16ATLE(C)] ...3-13 Saddlebags [XV16AT(C)/XV16ATLE(C)] ...3-14 Adjusting the shock absorber assembly ...3-15 Sidestand ...
INSTRUMENT AND CONTROL FUNCTIONS Main switch/steering lock ...3-1 Indicator and warning lights ...3-2 Speedometer unit ...3-3 Self-diagnosis device ...3-4 Fuel gauge ...3-4 Clock ...3-5 Handlebar switches ...3-6 Clutch lever ...3-7 Shift pedal ...3-7 Brake lever ...3-7 Brake pedal ...3-8 Fuel tank cap ...3-8 Fuel ...3-9 Fuel cock ...3-10 Starter (choke) knob ...3-11 Locking the steering with a padlock ...3-11 Rider seat ...3-11 Helmet holder ...3-12 Windshield [XV16AT(C)/XV16ATLE(C)] ...3-13 Saddlebags [XV16AT(C)/XV16ATLE(C)] ...3-14 Adjusting the shock absorber assembly ...3-15 Sidestand ...
Owners Manual
Page 47
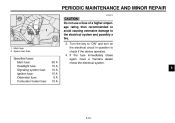
.... • If system is defective, have it assures is more than worth the time involved. @ @ EWA00033 WARNING If any item in the Pre-operation check list is used. Wheels and tires 6-18-6-20 Brake and shift pedals Brake and clutch levers Sidestand Chassis fasteners Instruments, lights, signals and switches Sidestand switch • Make sure that operation is smooth. • Lubricate pedal pivoting points...
.... • If system is defective, have it assures is more than worth the time involved. @ @ EWA00033 WARNING If any item in the Pre-operation check list is used. Wheels and tires 6-18-6-20 Brake and shift pedals Brake and clutch levers Sidestand Chassis fasteners Instruments, lights, signals and switches Sidestand switch • Make sure that operation is smooth. • Lubricate pedal pivoting points...
Owners Manual
Page 50
... riding. Consult a Yamaha dealer regarding any length of the following conditions must be blocked and performance will suffer. ● Make sure not to put anything near the air cleaner intake, otherwise air intake will be met: ● The transmission is in the neutral position. ● The transmission is adequate ventilation. OPERATION AND IMPORTANT RIDING POINTS ● EAU00372 Before starting the engine, check the...
... riding. Consult a Yamaha dealer regarding any length of the following conditions must be blocked and performance will suffer. ● Make sure not to put anything near the air cleaner intake, otherwise air intake will be met: ● The transmission is in the neutral position. ● The transmission is adequate ventilation. OPERATION AND IMPORTANT RIDING POINTS ● EAU00372 Before starting the engine, check the...
Owners Manual
Page 51
... with the starter (choke) turned off. Shift the transmission into the neutral position. Each starting the engine, move the starter (choke) knob back halfway. 5-2 NOTE: The engine is warm when it responds normally to "ON" and make sure that the engine stop switch is warm, turn the starter (choke) off . Turn the key to the throttle with the starter (choke) in the neutral position, the neutral indicator light should be...
... with the starter (choke) turned off. Shift the transmission into the neutral position. Each starting the engine, move the starter (choke) knob back halfway. 5-2 NOTE: The engine is warm when it responds normally to "ON" and make sure that the engine stop switch is warm, turn the starter (choke) off . Turn the key to the throttle with the starter (choke) in the neutral position, the neutral indicator light should be...

Owners Manual
Page 52
... damage the transmission. ● Always use the clutch while changing gears to avoid damaging the engine, transmission, and drive train, which are shown in the illustration. @ CAUTION: ● Even with the transmission in the neutral position, do not coast for long periods of engine power available for starting a cold engine with the engine off , accelerating, climbing hills, etc. NOTE: To shift the transmission into the neutral position, press...
... damage the transmission. ● Always use the clutch while changing gears to avoid damaging the engine, transmission, and drive train, which are shown in the illustration. @ CAUTION: ● Even with the transmission in the neutral position, do not coast for long periods of engine power available for starting a cold engine with the engine off , accelerating, climbing hills, etc. NOTE: To shift the transmission into the neutral position, press...

Owners Manual
Page 57
... Changing the brake fluid ...6-25 Drive belt slack ...6-25 Checking and lubricating the throttle grip and cable ...6-27 Checking and lubricating the brake and shift pedals ...6-28 Checking and lubricating the brake and clutch levers ...6-29 Checking and lubricating the sidestand ...6-29 Checking the front fork ...6-30 Checking the steering ...6-31 Checking the wheel bearings ...6-31 Battery ...6-32 Replacing the fuses ...6-33 Replacing the headlight bulb ...6-35 Replacing a turn signal light bulb or the tail/brake light bulb...
... Changing the brake fluid ...6-25 Drive belt slack ...6-25 Checking and lubricating the throttle grip and cable ...6-27 Checking and lubricating the brake and shift pedals ...6-28 Checking and lubricating the brake and clutch levers ...6-29 Checking and lubricating the sidestand ...6-29 Checking the front fork ...6-30 Checking the steering ...6-31 Checking the wheel bearings ...6-31 Battery ...6-32 Replacing the fuses ...6-33 Replacing the headlight bulb ...6-35 Replacing a turn signal light bulb or the tail/brake light bulb...
Owners Manual
Page 60
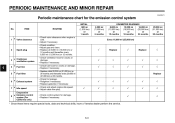
.... 2 Spark plug √ Replace √ Replace √ 3 4 5 * * * * * * Crankcase ventilation system Fuel line Fuel filter √ √ √ √ √ √ √ √ √ √ Replace 6 6 7 Exhaust system Idle speed Evaporative Emission control system (For California only) √ √ √ √ √ √ √ √ √ √ √ √ √ 8 * Since these items require special tools, data and technical skills, have a Yamaha dealer perform the service...
.... 2 Spark plug √ Replace √ Replace √ 3 4 5 * * * * * * Crankcase ventilation system Fuel line Fuel filter √ √ √ √ √ √ √ √ √ √ Replace 6 6 7 Exhaust system Idle speed Evaporative Emission control system (For California only) √ √ √ √ √ √ √ √ √ √ √ √ √ 8 * Since these items require special tools, data and technical skills, have a Yamaha dealer perform the service...

Owners Manual
Page 61
... case oil • Replace every 16,000 mi hypoid gear oil (25,000 km) or 24 months. Yamaha chain and cable lube or SAE 10W30 motor oil Medium weight wheel bearing grease 8 √ √ √ √ √ √ 9 Rear arm pivot bearing √ Repack * Since these items require special tools, data and technical skills, have a Yamaha dealer perform the service. 6-4 Control cable • Apply chain lube thoroughly. • Check bearing assembly...
... case oil • Replace every 16,000 mi hypoid gear oil (25,000 km) or 24 months. Yamaha chain and cable lube or SAE 10W30 motor oil Medium weight wheel bearing grease 8 √ √ √ √ √ √ 9 Rear arm pivot bearing √ Repack * Since these items require special tools, data and technical skills, have a Yamaha dealer perform the service. 6-4 Control cable • Apply chain lube thoroughly. • Check bearing assembly...

Owners Manual
Page 65
... diagnose such problems yourself. In addition, the condition of the spark plugs can reveal the condition of the engine. 6 Specified spark plug: DPR7EA-9/NGK or X22EPR-U9/DENSO Before installing a spark plug, the spark plug gap should be defective. If any grime from the spark plug threads. PERIODIC MAINTENANCE AND MINOR REPAIR The porcelain insulator around the center electrode of each spark plug should be a medium-to-light tan (the...
... diagnose such problems yourself. In addition, the condition of the spark plugs can reveal the condition of the engine. 6 Specified spark plug: DPR7EA-9/NGK or X22EPR-U9/DENSO Before installing a spark plug, the spark plug gap should be defective. If any grime from the spark plug threads. PERIODIC MAINTENANCE AND MINOR REPAIR The porcelain insulator around the center electrode of each spark plug should be a medium-to-light tan (the...
Owners Manual
Page 75
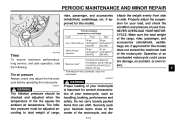
... ensure maximum performance, long service, and safe operation, note the following: Tire air pressure Always check and adjust the tire pressure before operating the motorcycle. Properly adjust the suspension for this model). _ CE-05E Tire air pressure (measured on cold tires) Load* Up to the center of the motorcycle, and dis_ 6-18 Make sure the total weight of your motorcycle, such as handling, braking, performance and safety. Tire inflation pressure must be...
... ensure maximum performance, long service, and safe operation, note the following: Tire air pressure Always check and adjust the tire pressure before operating the motorcycle. Properly adjust the suspension for this model). _ CE-05E Tire air pressure (measured on cold tires) Load* Up to the center of the motorcycle, and dis_ 6-18 Make sure the total weight of your motorcycle, such as handling, braking, performance and safety. Tire inflation pressure must be...
Owners Manual
Page 82
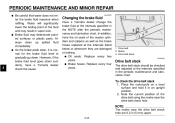
... drive belt using the marks near the drive belt check hole are damaged or leaking. ● Oil seals: Replace every two years. ● Brake hoses: Replace every four years. 1. To check the drive belt slack 1. PERIODIC MAINTENANCE AND MINOR REPAIR ● 6 Be careful that water does not enter the brake fluid reservoir when refilling. Always clean up spilled fluid immediately. ● As the brake pads wear, it in vapor lock. ● Brake fluid...
... drive belt using the marks near the drive belt check hole are damaged or leaking. ● Oil seals: Replace every two years. ● Brake hoses: Replace every four years. 1. To check the drive belt slack 1. PERIODIC MAINTENANCE AND MINOR REPAIR ● 6 Be careful that water does not enter the brake fluid reservoir when refilling. Always clean up spilled fluid immediately. ● As the brake pads wear, it in vapor lock. ● Brake fluid...
Owners Manual
Page 90
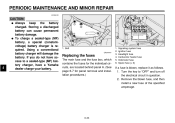
PERIODIC MAINTENANCE AND MINOR REPAIR EC000102 @ 6 @ CAUTION: keep the battery ● Always charged. Signaling system fuse Ignition fuse Headlight fuse Carburetor heater fuse Odometer fuse Spare fuse (× 3) If a fuse is required. Bolt EAU04190* Replacing the fuses The main fuse and the fuse box, which contains the fuses for the individual circuits, are located behind panel A. (See page 6-7 for panel removal and installation procedures.) 1. 2. 3. 4. 5. 6. Storing a discharged battery can cause permanent battery damage. ● To charge...
PERIODIC MAINTENANCE AND MINOR REPAIR EC000102 @ 6 @ CAUTION: keep the battery ● Always charged. Signaling system fuse Ignition fuse Headlight fuse Carburetor heater fuse Odometer fuse Spare fuse (× 3) If a fuse is required. Bolt EAU04190* Replacing the fuses The main fuse and the fuse box, which contains the fuses for the individual circuits, are located behind panel A. (See page 6-7 for panel removal and installation procedures.) 1. 2. 3. 4. 5. 6. Storing a discharged battery can cause permanent battery damage. ● To charge...
Owners Manual
Page 91
PERIODIC MAINTENANCE AND MINOR REPAIR EC000103 CAUTION: Do not use a fuse of a higher amperage rating than recommended to avoid causing extensive damage to check if the device operates. 4. If the fuse immediately blows again, have a Yamaha dealer check the electrical system. 6 6-34 Spare main fuse Specified fuses: Main fuse: Headlight fuse: Signaling system fuse: Ignition fuse: Odometer fuse: Carburetor heater fuse: 30 A 15 A 10 A 15 A 5A 10 A 3. Turn the key to "ON...
PERIODIC MAINTENANCE AND MINOR REPAIR EC000103 CAUTION: Do not use a fuse of a higher amperage rating than recommended to avoid causing extensive damage to check if the device operates. 4. If the fuse immediately blows again, have a Yamaha dealer check the electrical system. 6 6-34 Spare main fuse Specified fuses: Main fuse: Headlight fuse: Signaling system fuse: Ignition fuse: Odometer fuse: Carburetor heater fuse: 30 A 15 A 10 A 15 A 5A 10 A 3. Turn the key to "ON...
Owners Manual
Page 109
...A @ 5,000 r/min Transistorized coil ignition (digital) Fuses Main fuse Ignition fuse Signaling system fuse Headlight fuse Carburetor heater fuse Odometer fuse 30 A 15 A 10 A 15 A 10 A 5A 8 8-4 SPECIFICATIONS Electrical Ignition system Charging system Type Standard output Battery Type Voltage, capacity Headlight type Bulb voltage, wattage × quantity Headlight Tail/brake light Front turn signal / Front position light Rear turn signal light Meter lighting Neutral indicator light High beam indicator light Turn indicator light Fuel level warning light Engine trouble warning light 12 V, 60/55...
...A @ 5,000 r/min Transistorized coil ignition (digital) Fuses Main fuse Ignition fuse Signaling system fuse Headlight fuse Carburetor heater fuse Odometer fuse 30 A 15 A 10 A 15 A 10 A 5A 8 8-4 SPECIFICATIONS Electrical Ignition system Charging system Type Standard output Battery Type Voltage, capacity Headlight type Bulb voltage, wattage × quantity Headlight Tail/brake light Front turn signal / Front position light Rear turn signal light Meter lighting Neutral indicator light High beam indicator light Turn indicator light Fuel level warning light Engine trouble warning light 12 V, 60/55...
Owners Manual
Page 122
...Brake fluid level, checking...6-24 Brake lever...3-7 Brake lever free play, adjusting ...6-21 Brake light switch (rear), adjusting ...6-23 Brake pedal...3-8 Brake pedal position, adjusting ...6-22 F Front and rear brake pads, checking ...6-23 Front fork, checking ...6-30 Fuel ...3-9 Fuel cock...3-10 Fuel gauge ...3-4 Fuel level warning light ...3-2 Fuel tank cap...3-8 Fuses, replacing ...6-33 N Neutral indicator light ...3-2 Noise regulation ...9-4 P Panel, removing and installing...6-7 Parking...5-6 Part locations ...2-1 Pre-operation check list...4-1 H Handlebar switches ...3-6 Headlight...
...Brake fluid level, checking...6-24 Brake lever...3-7 Brake lever free play, adjusting ...6-21 Brake light switch (rear), adjusting ...6-23 Brake pedal...3-8 Brake pedal position, adjusting ...6-22 F Front and rear brake pads, checking ...6-23 Front fork, checking ...6-30 Fuel ...3-9 Fuel cock...3-10 Fuel gauge ...3-4 Fuel level warning light ...3-2 Fuel tank cap...3-8 Fuses, replacing ...6-33 N Neutral indicator light ...3-2 Noise regulation ...9-4 P Panel, removing and installing...6-7 Parking...5-6 Part locations ...2-1 Pre-operation check list...4-1 H Handlebar switches ...3-6 Headlight...