
Owners Manual
Page 6
......5-12 Drive guard ...5-12 V-belt holders ...5-13 Storage compartment ...5-13 PRE-OPERATION CHECKS ...6-1 Fuel ...6-1 Engine oil...6-2 Engine oil level ...6-3 Coolant ...6-4 Throttle lever ...6-5 Throttle override system (T.O.R.S.) ...6-5 Brake ...6-6 Brake fluid leakage ...6-7 V-belt ...6-7 Drive guard ...6-7 Drive track ...6-8 51-mm (2.0-in) high-profile pattern drive track...6-8 Slide runners ...6-8 Skis and ski runners ...6-9 Steering system...6-9 Lights ...6-9 Air filter ...6-10 Fittings and fasteners ...6-10 Tool kit and recommended equipment...6-10 OPERATION ...7-1 Starting the engine...
......5-12 Drive guard ...5-12 V-belt holders ...5-13 Storage compartment ...5-13 PRE-OPERATION CHECKS ...6-1 Fuel ...6-1 Engine oil...6-2 Engine oil level ...6-3 Coolant ...6-4 Throttle lever ...6-5 Throttle override system (T.O.R.S.) ...6-5 Brake ...6-6 Brake fluid leakage ...6-7 V-belt ...6-7 Drive guard ...6-7 Drive track ...6-8 51-mm (2.0-in) high-profile pattern drive track...6-8 Slide runners ...6-8 Skis and ski runners ...6-9 Steering system...6-9 Lights ...6-9 Air filter ...6-10 Fittings and fasteners ...6-10 Tool kit and recommended equipment...6-10 OPERATION ...7-1 Starting the engine...
Owners Manual
Page 7
...13 V-belt replacement ...8-15 Checking the oil level of the drive chain housing ...8-17 Checking the brake pads...8-19 Checking the parking brake pads...8-19 Checking the brake fluid level...8-20 Brake fluid replacement...8-20 Suspension...8-20 Drive track adjustment...8-26 Ski alignment ...8-28 Handlebar adjustment ...8-28 Lubrication ...8-30 Headlight bulb replacement...8-31 Headlight beam adjustment...8-31 Battery ...8-32 Fuse replacement...8-32 TROUBLESHOOTING ...9-1 STORAGE ...10-1 SPECIFICATIONS ...11-1 Dimensions...11-1 Engine ...11-1 Chassis...11-2 Electric...11-3 WIRING DIAGRAM ...12...
...13 V-belt replacement ...8-15 Checking the oil level of the drive chain housing ...8-17 Checking the brake pads...8-19 Checking the parking brake pads...8-19 Checking the brake fluid level...8-20 Brake fluid replacement...8-20 Suspension...8-20 Drive track adjustment...8-26 Ski alignment ...8-28 Handlebar adjustment ...8-28 Lubrication ...8-30 Headlight bulb replacement...8-31 Headlight beam adjustment...8-31 Battery ...8-32 Fuse replacement...8-32 TROUBLESHOOTING ...9-1 STORAGE ...10-1 SPECIFICATIONS ...11-1 Dimensions...11-1 Engine ...11-1 Chassis...11-2 Electric...11-3 WIRING DIAGRAM ...12...

Owners Manual
Page 11
... with genuine Yamaha Extended Service (Y.E.S.). • Y.E.S. Y.E.S. He can make your Yamaha is only available to $150 reimbursement per occurrence for you need to get the Y.E.S. We'll be . You choose the plan that's right for any warranty repairs as well as covered repairs during your warranty period. There's no mileage limitations. TRIP gives you up to Yamaha owners like the warranty. plan coverage...
... with genuine Yamaha Extended Service (Y.E.S.). • Y.E.S. Y.E.S. He can make your Yamaha is only available to $150 reimbursement per occurrence for you need to get the Y.E.S. We'll be . You choose the plan that's right for any warranty repairs as well as covered repairs during your warranty period. There's no mileage limitations. TRIP gives you up to Yamaha owners like the warranty. plan coverage...
Owners Manual
Page 14
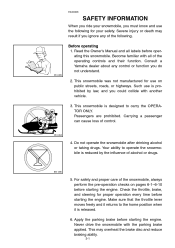
... snowmobile is released. 6. Check the throttle, brake, and steering for proper operation every time before starting the engine. Do not operate the snowmobile after drinking alcohol or taking drugs. Apply the parking brake before starting the engine. Become familiar with the parking brake applied. Passengers are prohibited. ESU00008 3- Such use the following . Your ability to carry the OPERATOR ONLY. For safety and proper care of control. 4.
... snowmobile is released. 6. Check the throttle, brake, and steering for proper operation every time before starting the engine. Do not operate the snowmobile after drinking alcohol or taking drugs. Apply the parking brake before starting the engine. Become familiar with the parking brake applied. Passengers are prohibited. ESU00008 3- Such use the following . Your ability to carry the OPERATOR ONLY. For safety and proper care of control. 4.
Owners Manual
Page 15
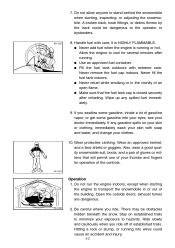
... skin or clothing, immediately wash your skin with soap and water, and change your exposure to minimize your clothes. 10. Wear protective clothing. Do not run the engine indoors, except when starting , inspecting, or adjusting the snowmobile. If any spilled fuel immediately. 9. G Fill the fuel tank outdoors with care; exhaust fumes are dangerous. 2. Be careful where you swallow some...
... skin or clothing, immediately wash your skin with soap and water, and change your exposure to minimize your clothes. 10. Wear protective clothing. Do not run the engine indoors, except when starting , inspecting, or adjusting the snowmobile. If any spilled fuel immediately. 9. G Fill the fuel tank outdoors with care; exhaust fumes are dangerous. 2. Be careful where you swallow some...
Owners Manual
Page 16
3. Always ride with fuel in the fuel tank inside a building where ignition sources are present such as hot water and space heaters, an open flame, sparks, clothes dryers, and the like. Maintain or replace safety and instruction labels, as ice and hard-packed snow require much longer stopping distances. Fuel may also make the snowmobile illegal to use. 3. Avoid operating on...
3. Always ride with fuel in the fuel tank inside a building where ignition sources are present such as hot water and space heaters, an open flame, sparks, clothes dryers, and the like. Maintain or replace safety and instruction labels, as ice and hard-packed snow require much longer stopping distances. Fuel may also make the snowmobile illegal to use. 3. Avoid operating on...
Owners Manual
Page 18
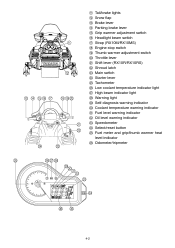
...P Q R S T U V W X Y Tail/brake lights Snow flap Brake lever Parking brake lever Grip warmer adjustment switch Headlight beam switch Strap (RX10M/RX10MS) Engine stop switch Thumb warmer adjustment switch Throttle lever Shift lever (RX10R/RX10RS) Shroud latch Main switch Starter lever Tachometer Low coolant temperature indicator light High beam indicator light Warning light Self-diagnosis warning indicator Coolant temperature warning indicator Fuel level warning indicator Oil level warning indicator Speedometer Select/reset button Fuel meter and grip/thumb warmer heat level indicator Z Odometer...
...P Q R S T U V W X Y Tail/brake lights Snow flap Brake lever Parking brake lever Grip warmer adjustment switch Headlight beam switch Strap (RX10M/RX10MS) Engine stop switch Thumb warmer adjustment switch Throttle lever Shift lever (RX10R/RX10RS) Shroud latch Main switch Starter lever Tachometer Low coolant temperature indicator light High beam indicator light Warning light Self-diagnosis warning indicator Coolant temperature warning indicator Fuel level warning indicator Oil level warning indicator Speedometer Select/reset button Fuel meter and grip/thumb warmer heat level indicator Z Odometer...

Owners Manual
Page 20
... the coolant temperature has risen above 100 °C (212 °F), the engine automatically shuts off . 5-2 Warming up a cold engine. 1 2 3 4 Starter lever (choke) When starting a cold engine. NOTE: @ Refer the "Starting the engine" section for proper operation before starting the engine. @ ESU00361 Engine overheating prevention system This model is equipped with an engine overheating prevention system to prevent overheating. WARNING @ Check the throttle, brake, and steering for proper operation. @ ESU00022 Throttle lever Once the engine is running...
... the coolant temperature has risen above 100 °C (212 °F), the engine automatically shuts off . 5-2 Warming up a cold engine. 1 2 3 4 Starter lever (choke) When starting a cold engine. NOTE: @ Refer the "Starting the engine" section for proper operation before starting the engine. @ ESU00361 Engine overheating prevention system This model is equipped with an engine overheating prevention system to prevent overheating. WARNING @ Check the throttle, brake, and steering for proper operation. @ ESU00022 Throttle lever Once the engine is running...
Owners Manual
Page 21
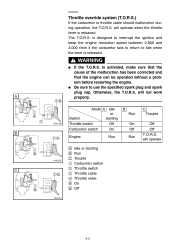
... is released. will operate CA-01E Mode A Idle or Switch starting Throttle switch Off Carburetor switch On B Engine È É Ê 1 2 3 4 a b Idle or starting Run Trouble Carburetor switch Throttle switch Throttle cable Throttle valve On Off Run C 5-3 B Run On Off Run C Trouble Off Off T.O.R.S. will not work properly. The T.O.R.S. WARNING @ G G A @ If the T.O.R.S. is activated, make sure that the cause of the malfunction has been corrected and that the engine can be operated without a problem...
... is released. will operate CA-01E Mode A Idle or Switch starting Throttle switch Off Carburetor switch On B Engine È É Ê 1 2 3 4 a b Idle or starting Run Trouble Carburetor switch Throttle switch Throttle cable Throttle valve On Off Run C 5-3 B Run On Off Run C Trouble Off Off T.O.R.S. will not work properly. The T.O.R.S. WARNING @ G G A @ If the T.O.R.S. is activated, make sure that the cause of the malfunction has been corrected and that the engine can be operated without a problem...
Owners Manual
Page 22
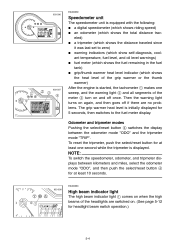
... select/reset button for 5 seconds, then switches to zero) G warning indicators (which show self-diagnosis, coolant temperature, fuel level, and oil level warnings) G fuel meter (which shows the fuel remaining in the fuel tank) G grip/thumb warmer heat level indicator (which shows the heat level of the grip warmer or the thumb warmer) After the engine is started, the tachometer 1 makes one second while...
... select/reset button for 5 seconds, then switches to zero) G warning indicators (which show self-diagnosis, coolant temperature, fuel level, and oil level warnings) G fuel meter (which shows the fuel remaining in the fuel tank) G grip/thumb warmer heat level indicator (which shows the heat level of the grip warmer or the thumb warmer) After the engine is started, the tachometer 1 makes one second while...

Owners Manual
Page 23
... fuel level warning indicator and the warning light come on and the display switches to the maximum levels. 5-5 To raise the temperature, press each switch to "LO". Every time the engine is started, the grip/thumb heat levels return to the grip warmer heat level when the grip warmer adjustment switch is pressed. The thumb warmer heat level indicator 4 comes on , fill the fuel tank...
... fuel level warning indicator and the warning light come on and the display switches to the maximum levels. 5-5 To raise the temperature, press each switch to "LO". Every time the engine is started, the grip/thumb heat levels return to the grip warmer heat level when the grip warmer adjustment switch is pressed. The thumb warmer heat level indicator 4 comes on , fill the fuel tank...

Owners Manual
Page 42
ESU00112 7- NOTE: @ Make sure that the parking brake is applied. The starter motor cannot be as short as possible to preserve the battery. Turn the main switch to start, release the switch, wait a few seconds, then try again. If the engine fails to the "START" position. Fully open the starter lever (choke). 1 2 3 4 Starter lever (choke) Fully open (cold engine starting) Half-open position. Each attempt should be operated...
ESU00112 7- NOTE: @ Make sure that the parking brake is applied. The starter motor cannot be as short as possible to preserve the battery. Turn the main switch to start, release the switch, wait a few seconds, then try again. If the engine fails to the "START" position. Fully open the starter lever (choke). 1 2 3 4 Starter lever (choke) Fully open (cold engine starting) Half-open position. Each attempt should be operated...
Owners Manual
Page 44
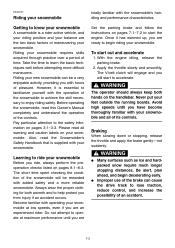
... reliable snowmobile. Do not attempt to operate at low speeds, even if you are the two basic factors of its controls. @ Braking When slowing down or stopping, release the throttle and apply the brake gently-not suddenly. Please read this Owner's Manual completely and understand the operation of time. Once it is essential to familiarize yourself with the snowmobile's handling and performance...
... reliable snowmobile. Do not attempt to operate at low speeds, even if you are the two basic factors of its controls. @ Braking When slowing down or stopping, release the throttle and apply the brake gently-not suddenly. Please read this Owner's Manual completely and understand the operation of time. Once it is essential to familiarize yourself with the snowmobile's handling and performance...

Owners Manual
Page 45
... gentle slopes. WARNING @ Side hills and steep slopes are not recommended for the sharpness of your skill. As you start the climb, and then reduce the throttle opening to turning. When the snowmobile is the key to prevent track slippage. Turning Riding uphill For most snow surfaces, "body English" is pointed downhill, restart the engine, release the parking brake, and descend...
... gentle slopes. WARNING @ Side hills and steep slopes are not recommended for the sharpness of your skill. As you start the climb, and then reduce the throttle opening to turning. When the snowmobile is the key to prevent track slippage. Turning Riding uphill For most snow surfaces, "body English" is pointed downhill, restart the engine, release the parking brake, and descend...

Owners Manual
Page 46
... hill. Avoid accelerating, turning, or braking rapidly. Riding downhill When riding downhill, keep speed to operate on ice or icy surfaces, drive slowly and cautiously. downhill leg on the seat and the foot of control. @ If you to use engine compression to help slow the snowmobile, and to tip over, dismount your body weight as needed. Steering is minimal and...
... hill. Avoid accelerating, turning, or braking rapidly. Riding downhill When riding downhill, keep speed to operate on ice or icy surfaces, drive slowly and cautiously. downhill leg on the seat and the foot of control. @ If you to use engine compression to help slow the snowmobile, and to tip over, dismount your body weight as needed. Steering is minimal and...
Owners Manual
Page 53
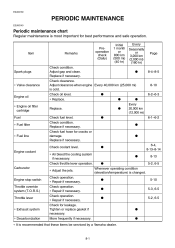
... Fuel ∗ Fuel filter ∗ Fuel line Check clearance. Check oil level. ∗ Replace. Check throttle lever operation. ∗ Adjust the jets. Replace. Replace if necessary. Check fuel hose for leakage. Check operation. ∗ Repair if necessary. Adjust clearance when engine Every 40,000 km (25,000 mi) is changed. G G G G G G G G G G G G Every 20,000 km (12,000 mi) 8-10 6-2-6-3 6-1-6-2 Engine coolant 6-4, 8-13-8-14 8-13 5-2, 6-5 ∗ Air bleed the cooling...
... Fuel ∗ Fuel filter ∗ Fuel line Check clearance. Check oil level. ∗ Replace. Check throttle lever operation. ∗ Adjust the jets. Replace. Replace if necessary. Check fuel hose for leakage. Check operation. ∗ Repair if necessary. Adjust clearance when engine Every 40,000 km (25,000 mi) is changed. G G G G G G G G G G G G Every 20,000 km (12,000 mi) 8-10 6-2-6-3 6-1-6-2 Engine coolant 6-4, 8-13-8-14 8-13 5-2, 6-5 ∗ Air bleed the cooling...

Owners Manual
Page 85
... snowmobile. @ Specified fuses: 4Main fuse: 5"HEAD" (Headlight) fuse: 6"SIG" (Signal) fuse: 7"C/W" (Carburetor Warmer) fuse: 8"IGN" (Ignition) fuse: 9 Spare fuses (20 A, 10 A) 0 Spare main fuse 30 A 20 A 10 A 20 A 10 A 8-33 1. Lift up the shroud. 2. Install the air filter case by reversing the removal steps. Loosen the joint clamp screws 2, and then slide the breather hose clip 3 down. 4. Replace the blown fuse with one of proper amperage. 6. Unhook the latch 1. 3.
... snowmobile. @ Specified fuses: 4Main fuse: 5"HEAD" (Headlight) fuse: 6"SIG" (Signal) fuse: 7"C/W" (Carburetor Warmer) fuse: 8"IGN" (Ignition) fuse: 9 Spare fuses (20 A, 10 A) 0 Spare main fuse 30 A 20 A 10 A 20 A 10 A 8-33 1. Lift up the shroud. 2. Install the air filter case by reversing the removal steps. Loosen the joint clamp screws 2, and then slide the breather hose clip 3 down. 4. Replace the blown fuse with one of proper amperage. 6. Unhook the latch 1. 3.

Owners Manual
Page 86
.... G T.O.R.S. G Worn or damaged gasket ...Replace gasket. Starting the engine with a discharged battery If the snowmobile battery is discharged, the engine can cause electrical system damage or A FIRE HAZARD. @ CAUTION: @ WARNING @ G G Before bypassing the T.O.R.S., make sure that the throttle returns properly to "OFF". @ 9-1 This can be started using a 12-volt battery and jumper cables. The T.O.R.S. in tank ...Supply fuel. Apply the parking brake and turn the main switch to the fully...
.... G T.O.R.S. G Worn or damaged gasket ...Replace gasket. Starting the engine with a discharged battery If the snowmobile battery is discharged, the engine can cause electrical system damage or A FIRE HAZARD. @ CAUTION: @ WARNING @ G G Before bypassing the T.O.R.S., make sure that the throttle returns properly to "OFF". @ 9-1 This can be started using a 12-volt battery and jumper cables. The T.O.R.S. in tank ...Supply fuel. Apply the parking brake and turn the main switch to the fully...
Owners Manual
Page 88
... are seated securely in cooling system ...Bleed air or ask a Yamaha dealer to inspect. Ask a Yamaha dealer to pull the lead covers back over several times with the ignition off to inspect. D. Engine constantly backfires or misfires 1. system ...See A.2. above . 4. Air in the lead holders. @ 4. G. Tight, loose, or broken drive chain ...Ask a Yamaha dealer to inspect. 3. Low coolant temperature indicator light is low 1. Malfunctioning V-belt clutch ...Ask a Yamaha...
... are seated securely in cooling system ...Bleed air or ask a Yamaha dealer to inspect. Ask a Yamaha dealer to pull the lead covers back over several times with the ignition off to inspect. D. Engine constantly backfires or misfires 1. system ...See A.2. above . 4. Air in the lead holders. @ 4. G. Tight, loose, or broken drive chain ...Ask a Yamaha dealer to inspect. 3. Low coolant temperature indicator light is low 1. Malfunctioning V-belt clutch ...Ask a Yamaha...

Owners Manual
Page 97
... Y/B ...Yellow/Black Y/G...Yellow/Green Y/L...Yellow/Blue Y/R ...Yellow/Red Y/W ...Yellow/White P Q R S AC magneto Rectifier/regulator Main switch Main fuse Starter relay Starter motor Battery Jumper leads Engine stop switch Throttle switch Carburetor switch Carburetor warmer relay Carburetor warmer Grip warmer Thumb warmer CDI unit Ignition coil Spark plug Thermo unit Throttle position sensor Grip warmer adjustment switch Thumb warmer adjustment switch Frame ground DC back buzzer (RX10R/RX10RS) Gear position switch (RX10R/RX10RS) Brake light switch Tail/brake light Speed sensor Fuel sender
... Y/B ...Yellow/Black Y/G...Yellow/Green Y/L...Yellow/Blue Y/R ...Yellow/Red Y/W ...Yellow/White P Q R S AC magneto Rectifier/regulator Main switch Main fuse Starter relay Starter motor Battery Jumper leads Engine stop switch Throttle switch Carburetor switch Carburetor warmer relay Carburetor warmer Grip warmer Thumb warmer CDI unit Ignition coil Spark plug Thermo unit Throttle position sensor Grip warmer adjustment switch Thumb warmer adjustment switch Frame ground DC back buzzer (RX10R/RX10RS) Gear position switch (RX10R/RX10RS) Brake light switch Tail/brake light Speed sensor Fuel sender