
Owners Manual
Page 6
...11 PRE-OPERATION CHECKS ...6-1 Fuel ...6-1 Engine oil...6-2 Coolant ...6-2 Throttle lever ...6-3 Recoil starter ...6-3 Throttle override system (T.O.R.S.) ...6-3 Brake ...6-4 Brake fluid leakage ...6-5 V-belt ...6-5 Drive guard ...6-5 Drive track ...6-6 51-mm (2.0-in) high-profile pattern drive track ...6-6 Slide runners ...6-6 Skis and ski runners ...6-7 Steering system...6-7 Lights ...6-7 Battery ...6-8 Air filter ...6-8 Fittings and fasteners ...6-9 Tool kit and recommended equipment...6-9 OPERATION ...7-1 Starting the engine ...7-1 Emergency engine starting...7-2 Break-in ...7-4 Riding...
...11 PRE-OPERATION CHECKS ...6-1 Fuel ...6-1 Engine oil...6-2 Coolant ...6-2 Throttle lever ...6-3 Recoil starter ...6-3 Throttle override system (T.O.R.S.) ...6-3 Brake ...6-4 Brake fluid leakage ...6-5 V-belt ...6-5 Drive guard ...6-5 Drive track ...6-6 51-mm (2.0-in) high-profile pattern drive track ...6-6 Slide runners ...6-6 Skis and ski runners ...6-7 Steering system...6-7 Lights ...6-7 Battery ...6-8 Air filter ...6-8 Fittings and fasteners ...6-9 Tool kit and recommended equipment...6-9 OPERATION ...7-1 Starting the engine ...7-1 Emergency engine starting...7-2 Break-in ...7-4 Riding...
Owners Manual
Page 7
...10 V-belt replacement ...8-12 Checking the oil level of the drive chain housing ...8-14 Checking the brake pads...8-16 Checking the parking brake pads...8-16 Checking the brake fluid level...8-17 Brake fluid replacement...8-17 Suspension...8-18 Drive track adjustment...8-21 Ski alignment ...8-23 Handlebar adjustment ...8-24 Lubrication ...8-26 Headlight bulb replacement...8-27 Headlight beam adjustment...8-27 Battery ...8-28 Fuse replacement...8-29 TROUBLESHOOTING ...9-1 STORAGE ...10-1 SPECIFICATIONS ...11-1 Dimensions...11-1 Engine ...11-1 Chassis...11-2 Electric...11-3 WIRING DIAGRAM ...12...
...10 V-belt replacement ...8-12 Checking the oil level of the drive chain housing ...8-14 Checking the brake pads...8-16 Checking the parking brake pads...8-16 Checking the brake fluid level...8-17 Brake fluid replacement...8-17 Suspension...8-18 Drive track adjustment...8-21 Ski alignment ...8-23 Handlebar adjustment ...8-24 Lubrication ...8-26 Headlight bulb replacement...8-27 Headlight beam adjustment...8-27 Battery ...8-28 Fuse replacement...8-29 TROUBLESHOOTING ...9-1 STORAGE ...10-1 SPECIFICATIONS ...11-1 Dimensions...11-1 Engine ...11-1 Chassis...11-2 Electric...11-3 WIRING DIAGRAM ...12...
Owners Manual
Page 14
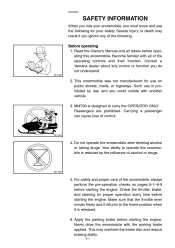
... care of the operating controls and their function. SAFETY INFORMATION When you could collide with the parking brake applied. Such use on pages 6-1-6-9 before starting the engine. Make sure that the throttle lever moves freely and it is reduced by law, and you ride your safety. Read the Owner's Manual and all of the snowmobile, always perform the pre-operation checks...
... care of the operating controls and their function. SAFETY INFORMATION When you could collide with the parking brake applied. Such use on pages 6-1-6-9 before starting the engine. Make sure that the throttle lever moves freely and it is reduced by law, and you ride your safety. Read the Owner's Manual and all of the snowmobile, always perform the pre-operation checks...
Owners Manual
Page 15
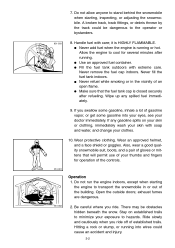
...controls. Ride slowly and cautiously when you ride off of an open flame. 7. Allow the engine to cool for operation of your clothes. 10. G Use an approved fuel container. G Never refuel while smoking or in or out of gasoline vapor, or get some gasoline into wires...fuel immediately. 9. Operation 1. Open the outside doors; Be careful where you swallow some gasoline, inhale a lot of the building. Handle fuel with extreme care. Never fill the fuel tank indoors. If you ride. Hitting a rock or stump, or running or hot. Do not run the engine indoors, except when starting...
...controls. Ride slowly and cautiously when you ride off of an open flame. 7. Allow the engine to cool for operation of your clothes. 10. G Use an approved fuel container. G Never refuel while smoking or in or out of gasoline vapor, or get some gasoline into wires...fuel immediately. 9. Operation 1. Open the outside doors; Be careful where you swallow some gasoline, inhale a lot of the building. Handle fuel with extreme care. Never fill the fuel tank indoors. If you ride. Hitting a rock or stump, or running or hot. Do not run the engine indoors, except when starting...
Owners Manual
Page 16
...Maintenance and storage 1. Operation under such conditions will damage or result in . Modifications made to the snowmobile not approved by Yamaha, or the removal of ski runners, drive track, slide runners, and drive sprockets. 5. Always ride with fuel in an enclosed space. 4. Fuel may also make the snowmobile illegal to release the throttle and apply the brake... cool off before storing the snowmobile in the fuel tank inside a building where ignition sources are present such as hot water and space heaters, an open flame, sparks, clothes dryers, and the like. Allow the engine ...
...Maintenance and storage 1. Operation under such conditions will damage or result in . Modifications made to the snowmobile not approved by Yamaha, or the removal of ski runners, drive track, slide runners, and drive sprockets. 5. Always ride with fuel in an enclosed space. 4. Fuel may also make the snowmobile illegal to release the throttle and apply the brake... cool off before storing the snowmobile in the fuel tank inside a building where ignition sources are present such as hot water and space heaters, an open flame, sparks, clothes dryers, and the like. Allow the engine ...
Owners Manual
Page 18
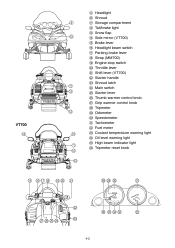
VT700 9 0 A B C D E F G H I J K L M N O P Q R S T U V W X Y Z Headlight Shroud Storage compartment Tail/brake light Snow flap Side mirror (VT700) Brake lever Headlight beam switch Parking brake lever Strap (MM700) Engine stop switch Throttle lever Shift lever (VT700) Starter handle Shroud latch Main switch Starter lever Thumb warmer control knob Grip warmer control knob Tripmeter Odometer Speedometer Tachometer Fuel meter Coolant temperature warning light Oil level warning light High beam indicator light Tripmeter reset knob 4-2
VT700 9 0 A B C D E F G H I J K L M N O P Q R S T U V W X Y Z Headlight Shroud Storage compartment Tail/brake light Snow flap Side mirror (VT700) Brake lever Headlight beam switch Parking brake lever Strap (MM700) Engine stop switch Throttle lever Shift lever (VT700) Starter handle Shroud latch Main switch Starter lever Thumb warmer control knob Grip warmer control knob Tripmeter Odometer Speedometer Tachometer Fuel meter Coolant temperature warning light Oil level warning light High beam indicator light Tripmeter reset knob 4-2
Owners Manual
Page 21
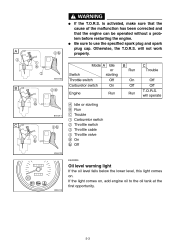
... to the oil tank at the first opportunity. 5-3 will not work properly. WARNING @ G G A @ If the T.O.R.S. will operate CA-01E B Mode A Idle or Switch starting Throttle switch Off Carburetor switch On Engine È É Ê 1 2 3 4 a b Idle or starting Run Trouble Carburetor switch Throttle switch Throttle cable Throttle valve On Off Run C ESU00026 Oil level warning light If the oil level falls below the lower level, this light comes on , add engine oil to use the specified spark plug and spark plug cap. B Run On Off Run C Trouble...
... to the oil tank at the first opportunity. 5-3 will not work properly. WARNING @ G G A @ If the T.O.R.S. will operate CA-01E B Mode A Idle or Switch starting Throttle switch Off Carburetor switch On Engine È É Ê 1 2 3 4 a b Idle or starting Run Trouble Carburetor switch Throttle switch Throttle cable Throttle valve On Off Run C ESU00026 Oil level warning light If the oil level falls below the lower level, this light comes on , add engine oil to use the specified spark plug and spark plug cap. B Run On Off Run C Trouble...

Owners Manual
Page 27
...closing the shroud. @ WARNING @ G G G @ Do not drive the snowmobile with the shroud open. Do not touch the hot muffler and engine during or immediately after operation. 5-9 ESU00044 Passenger grip warmer switch For VT700 The passenger grip warmer switch controls the electrically heated passenger grips. 1 Passenger grip warmer switch 2 "OFF" 3 ... the shroud latches. 1 Shroud latch 2 Shroud CAUTION: @ Make sure that all cables and wires are in place when closing the shroud, slowly lower it stops. Keep your body and clothing away from rotating parts when servicing with the shroud...
...closing the shroud. @ WARNING @ G G G @ Do not drive the snowmobile with the shroud open. Do not touch the hot muffler and engine during or immediately after operation. 5-9 ESU00044 Passenger grip warmer switch For VT700 The passenger grip warmer switch controls the electrically heated passenger grips. 1 Passenger grip warmer switch 2 "OFF" 3 ... the shroud latches. 1 Shroud latch 2 Shroud CAUTION: @ Make sure that all cables and wires are in place when closing the shroud, slowly lower it stops. Keep your body and clothing away from rotating parts when servicing with the shroud...
Owners Manual
Page 28
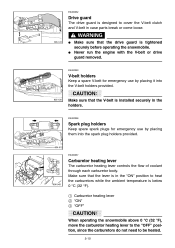
... run the engine with the V-belt or drive guard removed. ESU00057 Carburetor heating lever The carburetor heating lever controls the flow of coolant through each carburetor body. CAUTION: @ Make sure that the V-belt is designed to cover the V-belt clutch and V-belt in case parts break or come loose. ESU00053 V-belt holders Keep a spare V-belt for emergency use by placing them into the V-belt holders provided. ESU00052 Drive guard The drive guard...
... run the engine with the V-belt or drive guard removed. ESU00057 Carburetor heating lever The carburetor heating lever controls the flow of coolant through each carburetor body. CAUTION: @ Make sure that the V-belt is designed to cover the V-belt clutch and V-belt in case parts break or come loose. ESU00053 V-belt holders Keep a spare V-belt for emergency use by placing them into the V-belt holders provided. ESU00052 Drive guard The drive guard...
Owners Manual
Page 43
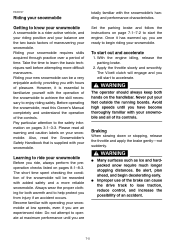
... 8-1-8-3. Avoid high speeds until you with operating your snowmobile at maximum performance until you will be a very enjoyable activity, providing you are an experienced rider. Riding your new snowmobile can cause the drive track to lose traction, reduce control, and increase the possibility of an accident. @ 7-5 To start the engine. With the engine idling, release the parking brake. 2. WARNING Learning to ride...
... 8-1-8-3. Avoid high speeds until you with operating your snowmobile at maximum performance until you will be a very enjoyable activity, providing you are an experienced rider. Riding your new snowmobile can cause the drive track to lose traction, reduce control, and increase the possibility of an accident. @ 7-5 To start the engine. With the engine idling, release the parking brake. 2. WARNING Learning to ride...
Owners Manual
Page 44
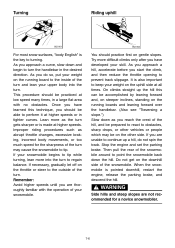
... side of the turn. Try more as abrupt throttle changes, excessive braking, incorrect body movements, or too much speed for a novice snowmobiler. @ 7-6 As you do not spin the track. Do not get on gentle slopes. Turning Riding uphill For most snow surfaces, "body English" is the key to turn the handlebar in the desired direction. Stop the engine and set the parking brake.
... side of the turn. Try more as abrupt throttle changes, excessive braking, incorrect body movements, or too much speed for a novice snowmobiler. @ 7-6 As you do not spin the track. Do not get on gentle slopes. Turning Riding uphill For most snow surfaces, "body English" is the key to turn the handlebar in the desired direction. Stop the engine and set the parking brake.
Owners Manual
Page 45
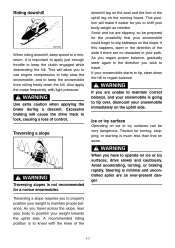
... the seat and the foot of control. @ If you wish to travel across the slope, lean your body to position your snowmobile is to tip over, dismount your body weight as needed. A recommended riding position is going to kneel with light pressure. WARNING @ WARNING @ Use extra caution when applying the brake during a descent. As you to operate on the running board...
... the seat and the foot of control. @ If you wish to travel across the slope, lean your body to position your snowmobile is to tip over, dismount your body weight as needed. A recommended riding position is going to kneel with light pressure. WARNING @ WARNING @ Use extra caution when applying the brake during a descent. As you to operate on the running board...
Owners Manual
Page 52
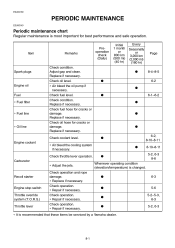
... Engine oil Fuel ∗ Fuel filter ∗ Fuel line G 6-1-6-2 G G ∗ Oil line G 6-2, 8-10-8-11 G G Whenever operating condition (elevation/temperature) is recommended that these items be serviced by a Yamaha dealer. 8-1 Check oil level. Replace if necessary. G G G G 6-3 5-6 5-2-5-3, 6-3 5-2, 6-3 8-10-8-11 5-2, 6-3 8-6 Engine coolant ∗ Air bleed the cooling system if necessary. PERIODIC MAINTENANCE ESU00140 Periodic maintenance chart Regular maintenance is most important for cracks or damage. Check condition. ESU00139 8- Adjust gap and clean. Check fuel hose...
... Engine oil Fuel ∗ Fuel filter ∗ Fuel line G 6-1-6-2 G G ∗ Oil line G 6-2, 8-10-8-11 G G Whenever operating condition (elevation/temperature) is recommended that these items be serviced by a Yamaha dealer. 8-1 Check oil level. Replace if necessary. G G G G 6-3 5-6 5-2-5-3, 6-3 5-2, 6-3 8-10-8-11 5-2, 6-3 8-6 Engine coolant ∗ Air bleed the cooling system if necessary. PERIODIC MAINTENANCE ESU00140 Periodic maintenance chart Regular maintenance is most important for cracks or damage. Check condition. ESU00139 8- Adjust gap and clean. Check fuel hose...
Owners Manual
Page 53
...-8-15 Drive chain oil Drive chain Skis and ski runners Steering system Strap (MM700) 8-15 6-7 6-7 G Lights 6-7, 8-27 6-8, 8-28 Battery (VT700) G ∗ It is recommended that these items be serviced by a Yamaha dealer. 8-2 More frequently if necessary. Tighten or replace gasket if necessary. Replace if necessary. Check deflection, and for leakage. Check operation and fluid leakage. ∗ Adjust free play and/or replace pads if necessary. ∗ Replace brake fluid...
...-8-15 Drive chain oil Drive chain Skis and ski runners Steering system Strap (MM700) 8-15 6-7 6-7 G Lights 6-7, 8-27 6-8, 8-28 Battery (VT700) G ∗ It is recommended that these items be serviced by a Yamaha dealer. 8-2 More frequently if necessary. Tighten or replace gasket if necessary. Replace if necessary. Check deflection, and for leakage. Check operation and fluid leakage. ∗ Adjust free play and/or replace pads if necessary. ∗ Replace brake fluid...
Owners Manual
Page 54
.... ∗ Repair if necessary. G G G G G G G G G G 5-9 6-9 6-9 8-26 8-26 8-26 8-26 ∗ It is changed. On the inner parts of the master cylinder and caliper cylinder, replace the oil seals every two years. 3. Lubricate with specified grease. ∗ Steering column bearing ∗ Ski and front suspension ∗ Suspension component ∗ Parking brake cable end and lever end/ throttle cable end Shroud latches Fittings and fasteners Tool kit and...
.... ∗ Repair if necessary. G G G G G G G G G G 5-9 6-9 6-9 8-26 8-26 8-26 8-26 ∗ It is changed. On the inner parts of the master cylinder and caliper cylinder, replace the oil seals every two years. 3. Lubricate with specified grease. ∗ Steering column bearing ∗ Ski and front suspension ∗ Suspension component ∗ Parking brake cable end and lever end/ throttle cable end Shroud latches Fittings and fasteners Tool kit and...
Owners Manual
Page 56
... is synchronized first. 1. Turn the throttle stop screw 1 in ) When installing the spark plug, always clean the gasket surface. Start the engine. Standard engine idle speed: 1,600 ± 100 r/min 8-5 If the reach is too short, spark plug fouling and poor performance may result. Always use a spark plug with a wire thickness gauge and adjust to adjust the engine idle speed. NOTE: @ Refer to have a Yamaha dealer make this adjustment. Spark plug gap b: 0.7-0.8 mm...
... is synchronized first. 1. Turn the throttle stop screw 1 in ) When installing the spark plug, always clean the gasket surface. Start the engine. Standard engine idle speed: 1,600 ± 100 r/min 8-5 If the reach is too short, spark plug fouling and poor performance may result. Always use a spark plug with a wire thickness gauge and adjust to adjust the engine idle speed. NOTE: @ Refer to have a Yamaha dealer make this adjustment. Spark plug gap b: 0.7-0.8 mm...
Owners Manual
Page 60
... can cause poor performance. WARNING @ Make sure that the throttle outer cable is firmly seated in high altitude riding. Less air at a Yamaha dealer carefully. Large No. 1. Carburetor adjustments are hard starting, bogging, and plug fouling. Less air means less oxygen available for every 305 m (1,000 ft) of the problems found in the holder and throttle operates smoothly after assembling the carburetor. @ ESU00157...
... can cause poor performance. WARNING @ Make sure that the throttle outer cable is firmly seated in high altitude riding. Less air at a Yamaha dealer carefully. Large No. 1. Carburetor adjustments are hard starting, bogging, and plug fouling. Less air means less oxygen available for every 305 m (1,000 ft) of the problems found in the holder and throttle operates smoothly after assembling the carburetor. @ ESU00157...
Owners Manual
Page 81
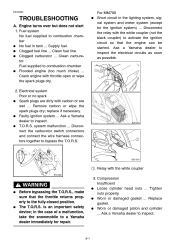
... G No fuel in the lighting system, signal system and meter system (except for repair. @ 9-1 G Worn or damaged gasket ...Replace gasket. The T.O.R.S. Electrical system Poor or no spark G Spark plugs are dirty with the white coupler 3. G Faulty ignition system ...Ask a Yamaha dealer to the fully-closed position. WARNING @ G G Before bypassing the T.O.R.S., make sure that the engine can be started. Ask a Yamaha dealer to inspect. Fuel system No fuel supplied to...
... G No fuel in the lighting system, signal system and meter system (except for repair. @ 9-1 G Worn or damaged gasket ...Replace gasket. The T.O.R.S. Electrical system Poor or no spark G Spark plugs are dirty with the white coupler 3. G Faulty ignition system ...Ask a Yamaha dealer to the fully-closed position. WARNING @ G G Before bypassing the T.O.R.S., make sure that the engine can be started. Ask a Yamaha dealer to inspect. Fuel system No fuel supplied to...
Owners Manual
Page 90
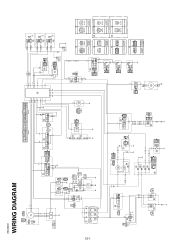
... L / W L / W Lg L N B L (BLACK) (BLACK) R L/R O/B G /Y B O/B L/R B G /Y L L R (BLACK) WIRE HARNESS R L/W L/R R /Y (BLACK) LO S OFF G B G/B B (GREEN) G /Y L/R L/R G/Y ON G/Y L G /Y L/R Lg B L/W L/ W Y Lg G B Y/B B Y/B Y/B ] \ A B B (GREEN) B U SUB-WIRE HARNESS 1 WIRE HARNESS WIRE HARNESS (BLACK) c Y Lg G B Y/L G/R (BLACK) C C L/R G/Y L/R P L/R G/Y D D L/R G/Y P L/R G/Y P Br P B L (BLACK) O Q B O/B L/R B G/Y D Y B G [ Z Y G/R G/R A G /R L/R O/B G/Y B B B L Y G Y TAIL/BRAKE SUB-WIRE LIGHT SUB-WIRE HARNESS 1 HARNESS Y G Y G X R/B R/B A R/B R/B G G T B Gy...
... L / W L / W Lg L N B L (BLACK) (BLACK) R L/R O/B G /Y B O/B L/R B G /Y L L R (BLACK) WIRE HARNESS R L/W L/R R /Y (BLACK) LO S OFF G B G/B B (GREEN) G /Y L/R L/R G/Y ON G/Y L G /Y L/R Lg B L/W L/ W Y Lg G B Y/B B Y/B Y/B ] \ A B B (GREEN) B U SUB-WIRE HARNESS 1 WIRE HARNESS WIRE HARNESS (BLACK) c Y Lg G B Y/L G/R (BLACK) C C L/R G/Y L/R P L/R G/Y D D L/R G/Y P L/R G/Y P Br P B L (BLACK) O Q B O/B L/R B G/Y D Y B G [ Z Y G/R G/R A G /R L/R O/B G/Y B B B L Y G Y TAIL/BRAKE SUB-WIRE LIGHT SUB-WIRE HARNESS 1 HARNESS Y G Y G X R/B R/B A R/B R/B G G T B Gy...
Owners Manual
Page 91
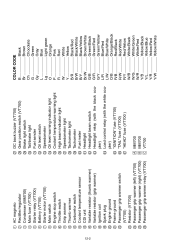
.../White 1 2 3 4 5 6 7 8 9 0 A B C D E F G H I J K L M N O P AC magneto Rectifier/regulator Condenser (MM700) Main fuse (VT700) Starter relay (VT700) Battery (VT700) Starter motor (VT700) Main switch Engine stop switch Throttle switch Grip warmer Thumb warmer Carburetor switch Coolant temperature sensor CDI unit Variable resistor (thumb warmer) Variable resistor (grip warmer) Ignition coil Spark plug Engine ground Frame ground Passenger grip warmer switch (VT700) Resistor (VT700) Passenger grip warmer (left) (VT700) Passenger grip warmer (right) (VT700) Passenger grip warmer relay (VT700)
.../White 1 2 3 4 5 6 7 8 9 0 A B C D E F G H I J K L M N O P AC magneto Rectifier/regulator Condenser (MM700) Main fuse (VT700) Starter relay (VT700) Battery (VT700) Starter motor (VT700) Main switch Engine stop switch Throttle switch Grip warmer Thumb warmer Carburetor switch Coolant temperature sensor CDI unit Variable resistor (thumb warmer) Variable resistor (grip warmer) Ignition coil Spark plug Engine ground Frame ground Passenger grip warmer switch (VT700) Resistor (VT700) Passenger grip warmer (left) (VT700) Passenger grip warmer (right) (VT700) Passenger grip warmer relay (VT700)