

Owners Manual
Page 7
... apparel ...1-2 Modifications ...1-3 Loading and accessories ...1-3 Gasoline and exhaust gas ...1-5 Further safe-riding points ...1-6 Location of important labels ...1-7 DESCRIPTION ...2-1 Left view ...2-1 Right view ...2-2 Controls and instruments ...2-3 INSTRUMENT AND CONTROL FUNCTIONS . 3-1 Main switch/steering lock ...3-1 Indicator and warning lights ...3-2 Speedometer unit ...3-3 Fuel gauge ...3-4 Handlebar switches ...3-4 Front brake lever ...3-5 Rear brake lever ...3-5 Fuel tank cap ...3-6 Fuel ...3-7 2-stroke engine oil ...3-8 Kickstarter ...3-9 Seat ...3-9 Helmet holder ...3-9 Storage...
... apparel ...1-2 Modifications ...1-3 Loading and accessories ...1-3 Gasoline and exhaust gas ...1-5 Further safe-riding points ...1-6 Location of important labels ...1-7 DESCRIPTION ...2-1 Left view ...2-1 Right view ...2-2 Controls and instruments ...2-3 INSTRUMENT AND CONTROL FUNCTIONS . 3-1 Main switch/steering lock ...3-1 Indicator and warning lights ...3-2 Speedometer unit ...3-3 Fuel gauge ...3-4 Handlebar switches ...3-4 Front brake lever ...3-5 Rear brake lever ...3-5 Fuel tank cap ...3-6 Fuel ...3-7 2-stroke engine oil ...3-8 Kickstarter ...3-9 Seat ...3-9 Helmet holder ...3-9 Storage...
Owners Manual
Page 8
... and rear brake shoes ...6-13 Checking and lubricating the throttle grip and cable ...6-13 Adjusting the Autolube pump ...6-14 Lubricating the brake lever ...6-14 Battery ...6-14 Replacing the fuse ...6-16 Troubleshooting ...6-17 Troubleshooting chart ...6-18 Riva limited warranty ...9-6 Yamaha extended service ...9-8 7 SCOOTER CARE AND STORAGE ...7-1 Care ...7-1 Storage ...7-4 SPECIFICATIONS ...8-1 CONSUMER INFORMATION ...9-1 Identification numbers ...9-1 Key identification number ...9-1 Vehicle identification number ...9-1 Model label ...9-2 Reporting safety defects ...9-3 Scooter noise...
... and rear brake shoes ...6-13 Checking and lubricating the throttle grip and cable ...6-13 Adjusting the Autolube pump ...6-14 Lubricating the brake lever ...6-14 Battery ...6-14 Replacing the fuse ...6-16 Troubleshooting ...6-17 Troubleshooting chart ...6-18 Riva limited warranty ...9-6 Yamaha extended service ...9-8 7 SCOOTER CARE AND STORAGE ...7-1 Care ...7-1 Storage ...7-4 SPECIFICATIONS ...8-1 CONSUMER INFORMATION ...9-1 Identification numbers ...9-1 Key identification number ...9-1 Vehicle identification number ...9-1 Model label ...9-2 Reporting safety defects ...9-3 Scooter noise...

Owners Manual
Page 12
... and should be responsible for use of non-Yamaha accessories. Wind may attempt to improper weight distribution or aerodynamic changes. Never attach any way reduce ground clearance or cornering clearance, limit suspension travel, steering travel or control operation, or obscure lights or reflectors. Check accessory mounts and cargo restraints frequently. 3. a. Bulky or large accessories may be available, you must be as lightweight...
... and should be responsible for use of non-Yamaha accessories. Wind may attempt to improper weight distribution or aerodynamic changes. Never attach any way reduce ground clearance or cornering clearance, limit suspension travel, steering travel or control operation, or obscure lights or reflectors. Check accessory mounts and cargo restraints frequently. 3. a. Bulky or large accessories may be available, you must be as lightweight...
Owners Manual
Page 13
... spill any gasoline spills on the engine or exhaust system when refueling. Q SAFETY INFORMATION c. Use caution when adding electrical accessories. Take care not to get in the vicinity of lights or engine power. 1 Gasoline and exhaust gas 1. Never start the engine or let it could cause a dangerous loss of an open flame), otherwise it run for any length of time in an area that has...
... spill any gasoline spills on the engine or exhaust system when refueling. Q SAFETY INFORMATION c. Use caution when adding electrical accessories. Take care not to get in the vicinity of lights or engine power. 1 Gasoline and exhaust gas 1. Never start the engine or let it could cause a dangerous loss of an open flame), otherwise it run for any length of time in an area that has...
Owners Manual
Page 14
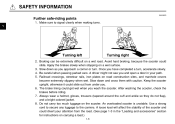
...secure any luggage to signal clearly when making turns. 1 2. Avoid hard braking, because the scooter could get wet when you . 6. An overloaded scooter is unstable. Once you and open a door in the "Loading and accessories" section for instructions on carrying a load.) 1-6 Q SAFETY INFORMATION EAU00023 Further safe-...divert your path. 5. Braking can be extremely difficult on the scooter. Do not carry too much luggage on a wet road. Make sure to the carriers. The brake lining could slide. Slow down and cross them with caution. Be careful when passing parked cars.
...secure any luggage to signal clearly when making turns. 1 2. Avoid hard braking, because the scooter could get wet when you . 6. An overloaded scooter is unstable. Once you and open a door in the "Loading and accessories" section for instructions on carrying a load.) 1-6 Q SAFETY INFORMATION EAU00023 Further safe-...divert your path. 5. Braking can be extremely difficult on the scooter. Do not carry too much luggage on a wet road. Make sure to the carriers. The brake lining could slide. Slow down and cross them with caution. Be careful when passing parked cars.
Owners Manual
Page 21
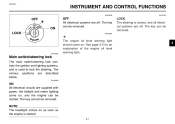
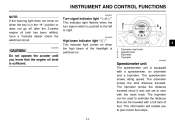
... power, the taillight and meter lighting come on as soon as the engine is started . EAU04384 ON All electrical circuits are described below. The key cannot be removed. See page 3-2 for an explanation of the engine oil level warning light. 3 Main switch/steering lock Main switch/steering lock The main switch/steering lock controls the ignition and lighting systems, and is locked, and all electrical systems are off . The key can be removed. EAU00027 INSTRUMENT AND CONTROL...
... power, the taillight and meter lighting come on as soon as the engine is started . EAU04384 ON All electrical circuits are described below. The key cannot be removed. See page 3-2 for an explanation of the engine oil level warning light. 3 Main switch/steering lock Main switch/steering lock The main switch/steering lock controls the ignition and lighting systems, and is locked, and all electrical systems are off . The key can be removed. EAU00027 INSTRUMENT AND CONTROL...
Owners Manual
Page 23
... traveled with a full tank of the headlight is switched on when the key is pushed to zero with a speedometer, an odometer and a tripmeter. The speedometer shows riding speed. EAU00057 * Turn signal indicator light "4/6" This indicator light flashes when the turn signal switch is in the " " position or does not go off after the 2-stroke engine oil tank has been refilled, have a Yamaha dealer check the electrical circuit.
... traveled with a full tank of the headlight is switched on when the key is pushed to zero with a speedometer, an odometer and a tripmeter. The speedometer shows riding speed. EAU00057 * Turn signal indicator light "4/6" This indicator light flashes when the turn signal switch is in the " " position or does not go off after the 2-stroke engine oil tank has been refilled, have a Yamaha dealer check the electrical circuit.

Owners Manual
Page 24
INSTRUMENT AND CONTROL FUNCTIONS EAU03889 E F 4 1 2 3 5 3 1. To cancel the turn , push this switch to "&" for the low beam. The needle moves towards "E" (Empty) as possible. EAU03890 EAU03888 Handlebar switches Dimmer switch "&/%" Set this switch to "4". Engine stop switch "$/#" Start switch "," EAU00118 Horn switch "*" Press this switch to "$" to "#" before starting the engine. To signal a left-hand turn signal lights, push the switch in the fuel tank. Set this switch to the center position. EAU00129 Fuel gauge The fuel gauge indicates the...
INSTRUMENT AND CONTROL FUNCTIONS EAU03889 E F 4 1 2 3 5 3 1. To cancel the turn , push this switch to "&" for the low beam. The needle moves towards "E" (Empty) as possible. EAU03890 EAU03888 Handlebar switches Dimmer switch "&/%" Set this switch to "4". Engine stop switch "$/#" Start switch "," EAU00118 Horn switch "*" Press this switch to "$" to "#" before starting the engine. To signal a left-hand turn signal lights, push the switch in the fuel tank. Set this switch to the center position. EAU00129 Fuel gauge The fuel gauge indicates the...
Owners Manual
Page 32
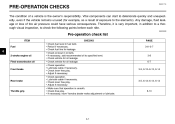
...Check oil level in fuel tank. Check operation. Any damage, fluid leakage or loss of a vehicle is the owner's responsibility. EAU03439 Pre-operation check list ITEM Fuel CHECKS Check fuel level in oil tank. ...engine oil Final transmission oil Front brake 3-8 6-7 3-5, 6-12-6-13, 6-14 Rear brake 3-5, 6-12-6-13, 6-14 Throttle grip 6-10 4-1 Check vehicle for example, as a result of exposure to deteriorate quickly and unexpectedly, even if the vehicle remains unused (for oil leakage. EAU01114 PRE-OPERATION CHECKS The condition of tire air pressure could have Yamaha...
...Check oil level in fuel tank. Check operation. Any damage, fluid leakage or loss of a vehicle is the owner's responsibility. EAU03439 Pre-operation check list ITEM Fuel CHECKS Check fuel level in oil tank. ...engine oil Final transmission oil Front brake 3-8 6-7 3-5, 6-12-6-13, 6-14 Rear brake 3-5, 6-12-6-13, 6-14 Throttle grip 6-10 4-1 Check vehicle for example, as a result of exposure to deteriorate quickly and unexpectedly, even if the vehicle remains unused (for oil leakage. EAU01114 PRE-OPERATION CHECKS The condition of tire air pressure could have Yamaha...
Owners Manual
Page 34
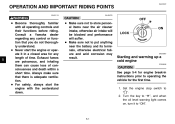
... the air cleaner intake, otherwise air intake will be blocked and performance will suffer. 8 Make sure not to "#". 2. Always make sure that you do not thoroughly understand. 8 Never start the engine with all operating controls and their functions before riding. Turn the key to " ", and when the oil level warning light comes on, turn it in instructions prior to "ON". * 5-1 Set the engine stop switch to...
... the air cleaner intake, otherwise air intake will be blocked and performance will suffer. 8 Make sure not to "#". 2. Always make sure that you do not thoroughly understand. 8 Never start the engine with all operating controls and their functions before riding. Turn the key to " ", and when the oil level warning light comes on, turn it in instructions prior to "ON". * 5-1 Set the engine stop switch to...
Owners Manual
Page 35
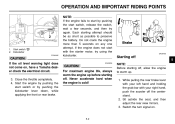
... turn signal on. 5 If the oil level warning light does not come on any one attempt. Never accelerate hard when the engine is cold! 5-2 Close the throttle completely. 4. Each starting off, allow the engine to warm up before starting off. Kickstarter EAU00433 cC EC000045 Starting off the centerstand. 2. If the engine does not start with your left hand and holding the grab bar with the starter motor...
... turn signal on. 5 If the oil level warning light does not come on any one attempt. Never accelerate hard when the engine is cold! 5-2 Close the throttle completely. 4. Each starting off, allow the engine to warm up before starting off. Kickstarter EAU00433 cC EC000045 Starting off the centerstand. 2. If the engine does not start with your left hand and holding the grab bar with the starter motor...
Owners Manual
Page 39
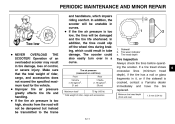
... your vehicle in abnormally dusty, muddy or wet conditions, the air filter element should be cleaned or replaced more frequently, otherwise rapid engine wear may result. w EAU00466 w EW000060 This scooter is an obligation of scooter inspection, adjustment, and lubrication are not familiar with scooter maintenance work, have a Yamaha dealer do it for proper maintenance intervals. EAU00462 PERIODIC MAINTENANCE AND MINOR REPAIR EAU03453 Safety...
... your vehicle in abnormally dusty, muddy or wet conditions, the air filter element should be cleaned or replaced more frequently, otherwise rapid engine wear may result. w EAU00466 w EW000060 This scooter is an obligation of scooter inspection, adjustment, and lubrication are not familiar with scooter maintenance work, have a Yamaha dealer do it for proper maintenance intervals. EAU00462 PERIODIC MAINTENANCE AND MINOR REPAIR EAU03453 Safety...
Owners Manual
Page 40
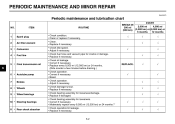
...) or 6 months 12 months 1 2 3 4 Spark plug Air filter element * * * Carburetor Fuel line 5 Final transmission oil REPLACE. 6 6 7 8 9 10 11 * Autolube pump Brakes * * * * Wheels Wheel bearings Steering bearings Rear shock absorber 6-2 ITEM ROUTINE • Check condition. • Clean or replace if necessary. • Clean. • Replace if necessary. • Check idle speed. • Adjust if necessary. • Check fuel hose and vacuum pipe for cracks or damage. • Replace if necessary. • Check oil leakage. • Correct if necessary...
...) or 6 months 12 months 1 2 3 4 Spark plug Air filter element * * * Carburetor Fuel line 5 Final transmission oil REPLACE. 6 6 7 8 9 10 11 * Autolube pump Brakes * * * * Wheels Wheel bearings Steering bearings Rear shock absorber 6-2 ITEM ROUTINE • Check condition. • Clean or replace if necessary. • Clean. • Replace if necessary. • Check idle speed. • Adjust if necessary. • Check fuel hose and vacuum pipe for cracks or damage. • Replace if necessary. • Check oil leakage. • Correct if necessary...
Owners Manual
Page 44
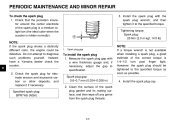
... deposits, and replace it to the specified torque as soon as possible. 4. a 1. PERIODIC MAINTENANCE AND MINOR REPAIR To check the spark plug 1. Specified spark plug: BPR7HS (NGK) 3. Install the spark plug with a wire thickness gauge and, if necessary, adjust the gap to diagnose such problems yourself. Clean the surface of the correct torque is 1/4-1/2 turn past finger tight. Instead, have a Yamaha dealer check the...
... deposits, and replace it to the specified torque as soon as possible. 4. a 1. PERIODIC MAINTENANCE AND MINOR REPAIR To check the spark plug 1. Specified spark plug: BPR7HS (NGK) 3. Install the spark plug with a wire thickness gauge and, if necessary, adjust the gap to diagnose such problems yourself. Clean the surface of the correct torque is 1/4-1/2 turn past finger tight. Instead, have a Yamaha dealer check the...
Owners Manual
Page 45
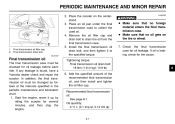
... changed as follows at the intervals specified in the periodic maintenance and lubrication chart. 1. Check the final transmission case for several minutes, and then stop the engine. 6 6-7 If oil is found, have a Yamaha dealer check and repair the scooter. If any leakage is leaking, check for oil leakage before each ride. Place the scooter on the tire or wheel. 7. Final transmission oil filler cap...
... changed as follows at the intervals specified in the periodic maintenance and lubrication chart. 1. Check the final transmission case for several minutes, and then stop the engine. 6 6-7 If oil is found, have a Yamaha dealer check and repair the scooter. If any leakage is leaking, check for oil leakage before each ride. Place the scooter on the tire or wheel. 7. Final transmission oil filler cap...
Owners Manual
Page 49
... tire air pressure greatly affects tire life and handling. 8 If the tire air pressure is too high, shocks from the road will be unstable in curves. 8 If the tire air pressure is cracked, contact a Yamaha dealer immediately and have the tire replaced. In addition, the scooter will not be dampened but instead be damaged and the tire life shortened. In addition, the tires could slip off the wheel rims during braking...
... tire air pressure greatly affects tire life and handling. 8 If the tire air pressure is too high, shocks from the road will be unstable in curves. 8 If the tire air pressure is cracked, contact a Yamaha dealer immediately and have the tire replaced. In addition, the scooter will not be dampened but instead be damaged and the tire life shortened. In addition, the tires could slip off the wheel rims during braking...
Owners Manual
Page 58
...spring. 1. Apply a corrosion protection spray on all metal, including chrome- Test the product on a small hidden part of wheel and swingarm bearings, fork and brakes), electric components (couplers, connectors, instruments, switches and lights), breather hoses and vents. 8 For scooters equipped with clean water. NOTE: Salt sprayed on roads...products, solvent or thinner, fuel (gasoline), rust removers or inhibitors, brake fluid, antifreeze or electrolyte. 8 Do not use any marks. Be sure to prevent corrosion. 7-2 SCOOTER CARE AND STORAGE 8 Do not use high-pressure washers or steam-jet ...
...spring. 1. Apply a corrosion protection spray on all metal, including chrome- Test the product on a small hidden part of wheel and swingarm bearings, fork and brakes), electric components (couplers, connectors, instruments, switches and lights), breather hoses and vents. 8 For scooters equipped with clean water. NOTE: Salt sprayed on roads...products, solvent or thinner, fuel (gasoline), rust removers or inhibitors, brake fluid, antifreeze or electrolyte. 8 Do not use any marks. Be sure to prevent corrosion. 7-2 SCOOTER CARE AND STORAGE 8 Do not use high-pressure washers or steam-jet ...
Owners Manual
Page 62
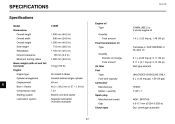
EAU01038 SPECIFICATIONS Specifications Engine oil Model Dimensions Overall length Overall width Overall height Seat height Wheelbase Ground clearance Minimum turning radius Basic weight (with oil and full fuel tank) Engine Engine type Cylinder arrangement Air cooled 2-stroke Forward inclined single cylinder 49 cm3 40.0 × 39.2 mm (1.57 × 1.54 in) 7.3:1 Electric and kick starter Separate lubrication (Yamaha autolube) 1,630 mm (64.2 in) 630 mm (24.8 in) 1,030 mm (40.6 in) 715 mm (28.2 in...
EAU01038 SPECIFICATIONS Specifications Engine oil Model Dimensions Overall length Overall width Overall height Seat height Wheelbase Ground clearance Minimum turning radius Basic weight (with oil and full fuel tank) Engine Engine type Cylinder arrangement Air cooled 2-stroke Forward inclined single cylinder 49 cm3 40.0 × 39.2 mm (1.57 × 1.54 in) 7.3:1 Electric and kick starter Separate lubrication (Yamaha autolube) 1,630 mm (64.2 in) 630 mm (24.8 in) 1,030 mm (40.6 in) 715 mm (28.2 in...
Owners Manual
Page 63
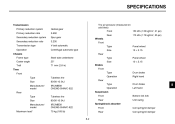
...; 71 mm (2.8 in) Helical gear 3.692 Spur gear 3.230 V-belt automatic Centrifugal automatic type Tire air pressure (measured on cold tires) 150 kPa (1.50 kgf/cm2, 21 psi) Front Rear Wheels Front Type Size Rear Type Size Brakes Front Type Operation Rear Type Operation Suspension Front Rear Spring/shock absorber Front Rear Coil spring/oil damper Coil spring/oil damper Bottom link fork Unit swing Drum brake Left hand Drum brake Right hand Panel wheel 10 × 2.15 Panel wheel 10 × 2.15 175...
...; 71 mm (2.8 in) Helical gear 3.692 Spur gear 3.230 V-belt automatic Centrifugal automatic type Tire air pressure (measured on cold tires) 150 kPa (1.50 kgf/cm2, 21 psi) Front Rear Wheels Front Type Size Rear Type Size Brakes Front Type Operation Rear Type Operation Suspension Front Rear Spring/shock absorber Front Rear Coil spring/oil damper Coil spring/oil damper Bottom link fork Unit swing Drum brake Left hand Drum brake Right hand Panel wheel 10 × 2.15 Panel wheel 10 × 2.15 175...
Owners Manual
Page 64
C.D.I. 52 mm (2.05 in) 46 mm (1.81 in) 8 Front turn signal light Rear turn signal light Meter lighting High beam indicator light 2-stroke engine oil level warning light Turn signal indicator light Fuse SPECIFICATIONS Wheel travel Front Rear Electrical system Ignition system Charging system Type Standard output Battery Model Voltage, capacity Headlight type Bulb voltage, wattage × quantity Headlight Tail/brake light 12 V, 35/35 W × 1 12 V, 8/27 W × 1 12 V, 10 W × 2 12 V, 10 W × 2 12 V, 1.7 W × 1 12 V, 1.7 W × 1 12 V, 1.7 W × 1 14...
C.D.I. 52 mm (2.05 in) 46 mm (1.81 in) 8 Front turn signal light Rear turn signal light Meter lighting High beam indicator light 2-stroke engine oil level warning light Turn signal indicator light Fuse SPECIFICATIONS Wheel travel Front Rear Electrical system Ignition system Charging system Type Standard output Battery Model Voltage, capacity Headlight type Bulb voltage, wattage × quantity Headlight Tail/brake light 12 V, 35/35 W × 1 12 V, 8/27 W × 1 12 V, 10 W × 2 12 V, 10 W × 2 12 V, 1.7 W × 1 12 V, 1.7 W × 1 12 V, 1.7 W × 1 14...