
Owners Manual
Page 3
... the recommended maintenance schedules and operating instructions contained within this Yamaha motorcycle fully comply with the emissions standards for clean air applicable at the date of the motorcycle. It represents the high degree of the Yamaha Road Star™/Road Star™ Silverado™. Yamaha has met these fields. EAU00002 INTRODUCTION Congratulations on your purchase of craftsmanship and reliability that you...
... the recommended maintenance schedules and operating instructions contained within this Yamaha motorcycle fully comply with the emissions standards for clean air applicable at the date of the motorcycle. It represents the high degree of the Yamaha Road Star™/Road Star™ Silverado™. Yamaha has met these fields. EAU00002 INTRODUCTION Congratulations on your purchase of craftsmanship and reliability that you...
Owners Manual
Page 12
... cargo that it to minimize imbalance or instability. 2. Carefully inspect the accessory before riding. SAFETY INFORMATION Loading The total weight of the operator, passenger, accessories and cargo must personally be responsible for use of non-Yamaha accessories. Check accessory mounts and cargo restraints frequently. 3. Shifting weights can create unstable handling or slow steering response. These items, including such cargo as possible on this...
... cargo that it to minimize imbalance or instability. 2. Carefully inspect the accessory before riding. SAFETY INFORMATION Loading The total weight of the operator, passenger, accessories and cargo must personally be responsible for use of non-Yamaha accessories. Check accessory mounts and cargo restraints frequently. 3. Shifting weights can create unstable handling or slow steering response. These items, including such cargo as possible on this...
Owners Manual
Page 18
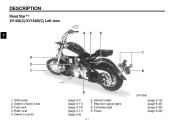
Owner's tool kit (page 3-7) (page 3-11) (page 3-10) (page 3-11) (page 6-2) 2-1 6. Fuses (page 3-12) (page 6-35) (page 6-35) (page 6-32) Starter (choke) knob 3. Tail/brake light 9. Fuel cock 4. 2- Helmet holder 7. Shift pedal 2. Rider seat 5. DESCRIPTION EAU00026 Road Star™ XV16A(C)/XV16AS(C) Left view 2 (XV16A) 1. Rear turn signal lights 8.
Owner's tool kit (page 3-7) (page 3-11) (page 3-10) (page 3-11) (page 6-2) 2-1 6. Fuses (page 3-12) (page 6-35) (page 6-35) (page 6-32) Starter (choke) knob 3. Tail/brake light 9. Fuel cock 4. 2- Helmet holder 7. Shift pedal 2. Rider seat 5. DESCRIPTION EAU00026 Road Star™ XV16A(C)/XV16AS(C) Left view 2 (XV16A) 1. Rear turn signal lights 8.
Owners Manual
Page 19
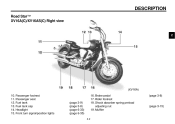
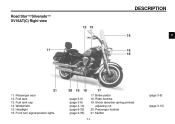
Fuel tank 13. Brake pedal 17. Muffler 2-2 (page 3-8) (page 3-9) (page 3-8) (page 6-33) (page 6-35) (page 3-15) Shock absorber spring preload adjusting nut 19. Fuel tank cap 14. Front turn signal/position lights 16. Passenger seat 12. Headlight 15. Passenger footrest 11. Rider footrest 18. DESCRIPTION Road Star™ XV16A(C)/XV16AS(C) Right view 2 (XV16A) 10.
Fuel tank 13. Brake pedal 17. Muffler 2-2 (page 3-8) (page 3-9) (page 3-8) (page 6-33) (page 6-35) (page 3-15) Shock absorber spring preload adjusting nut 19. Fuel tank cap 14. Front turn signal/position lights 16. Passenger seat 12. Headlight 15. Passenger footrest 11. Rider footrest 18. DESCRIPTION Road Star™ XV16A(C)/XV16AS(C) Right view 2 (XV16A) 10.

Owners Manual
Page 20
Owner's tool kit (page 3-7) (page 3-11) (page 3-10) (page 3-11) (page 6-2) 2-3 6. Helmet holder 7. Rear turn signal lights 8. Saddlebag 10. Fuses (page 3-12) (page 6-35) (page 6-35) (page 3-14) (page 6-32) Starter (choke) knob 3. Rider seat 5. Fuel cock 4. Tail/brake light 9. DESCRIPTION Road Star™/Silverado™ XV16AT(C) Left view 2 1. Shift pedal 2.
Owner's tool kit (page 3-7) (page 3-11) (page 3-10) (page 3-11) (page 6-2) 2-3 6. Helmet holder 7. Rear turn signal lights 8. Saddlebag 10. Fuses (page 3-12) (page 6-35) (page 6-35) (page 3-14) (page 6-32) Starter (choke) knob 3. Rider seat 5. Fuel cock 4. Tail/brake light 9. DESCRIPTION Road Star™/Silverado™ XV16AT(C) Left view 2 1. Shift pedal 2.
Owners Manual
Page 21
Windshield 15. Fuel tank 13. Fuel tank cap 14. Front turn signal/position lights (page 3-9) (page 3-8) (page 3-13) (page 6-33) (page 6-35) 2-4 17. Shock absorber spring preload adjusting nut 20. Muffler (page 3-8) (page 3-15) Brake pedal 18. Passenger seat 12. DESCRIPTION Road Star™/Silverado™ XV16AT(C) Right view 2 11. Rider footrest 19. Headlight 16. Passenger footrest 21.
Windshield 15. Fuel tank 13. Fuel tank cap 14. Front turn signal/position lights (page 3-9) (page 3-8) (page 3-13) (page 6-33) (page 6-35) 2-4 17. Shock absorber spring preload adjusting nut 20. Muffler (page 3-8) (page 3-15) Brake pedal 18. Passenger seat 12. DESCRIPTION Road Star™/Silverado™ XV16AT(C) Right view 2 11. Rider footrest 19. Headlight 16. Passenger footrest 21.
Owners Manual
Page 22
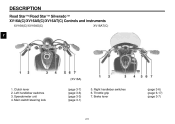
Right handlebar switches 6. Brake lever (page 3-6) (page 6-17) (page 3-7) 2-5 Speedometer unit 4. Main switch/steering lock (page 3-7) (page 3-6) (page 3-3) (page 3-1) 5. Clutch lever 2. Left handlebar switches 3. DESCRIPTION Road Star™/Road Star™ Silverado™ XV16A(C)/XV16AS(C)/XV16AT(C) Controls and instruments XV16A(C)/XV16AS(C) 2 XV16AT(C) (XV16A) 1. Throttle grip 7.
Right handlebar switches 6. Brake lever (page 3-6) (page 6-17) (page 3-7) 2-5 Speedometer unit 4. Main switch/steering lock (page 3-7) (page 3-6) (page 3-3) (page 3-1) 5. Clutch lever 2. Left handlebar switches 3. DESCRIPTION Road Star™/Road Star™ Silverado™ XV16A(C)/XV16AS(C)/XV16AT(C) Controls and instruments XV16A(C)/XV16AS(C) 2 XV16AT(C) (XV16A) 1. Throttle grip 7.
Owners Manual
Page 23
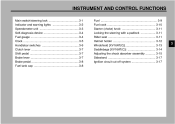
INSTRUMENT AND CONTROL FUNCTIONS Main switch/steering lock ...3-1 Indicator and warning lights ...3-2 Speedometer unit ...3-3 Self-diagnosis device ...3-4 Fuel gauge ...3-4 Clock ...3-5 Handlebar switches ...3-6 Clutch lever ...3-7 Shift pedal ...3-7 Brake lever ...3-7 Brake pedal ...3-8 Fuel tank cap ...3-8 Fuel ...3-9 Fuel cock ...3-10 Starter (choke) knob ...3-11 Locking the steering with a padlock ...3-11 Rider seat ...3-11 Helmet holder ...3-12 Windshield [XV16AT(C)]...3-13 Saddlebags [XV16AT(C)] ...3-14 Adjusting the shock absorber assembly ...3-15 Sidestand ...3-17 Ignition circuit cut-...
INSTRUMENT AND CONTROL FUNCTIONS Main switch/steering lock ...3-1 Indicator and warning lights ...3-2 Speedometer unit ...3-3 Self-diagnosis device ...3-4 Fuel gauge ...3-4 Clock ...3-5 Handlebar switches ...3-6 Clutch lever ...3-7 Shift pedal ...3-7 Brake lever ...3-7 Brake pedal ...3-8 Fuel tank cap ...3-8 Fuel ...3-9 Fuel cock ...3-10 Starter (choke) knob ...3-11 Locking the steering with a padlock ...3-11 Rider seat ...3-11 Helmet holder ...3-12 Windshield [XV16AT(C)]...3-13 Saddlebags [XV16AT(C)] ...3-14 Adjusting the shock absorber assembly ...3-15 Sidestand ...3-17 Ignition circuit cut-...
Owners Manual
Page 44
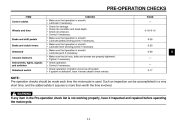
... than worth the time involved. @ @ EWA00033 WARNING If any item in the Pre-operation check list is not working properly, have Yamaha dealer check vehicle. 6-28 6-29 6-29 - - 3-17 4 NOTE: Pre-operation checks should be accomplished in a very short time; Check air pressure. Wheels and tires 6-18-6-19 Brake and shift pedals Brake and clutch levers Sidestand Chassis fasteners Instruments, lights, signals and switches Sidestand switch • Make sure...
... than worth the time involved. @ @ EWA00033 WARNING If any item in the Pre-operation check list is not working properly, have Yamaha dealer check vehicle. 6-28 6-29 6-29 - - 3-17 4 NOTE: Pre-operation checks should be accomplished in a very short time; Check air pressure. Wheels and tires 6-18-6-19 Brake and shift pedals Brake and clutch levers Sidestand Chassis fasteners Instruments, lights, signals and switches Sidestand switch • Make sure...
Owners Manual
Page 47
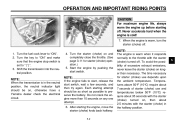
... completely close the throttle. (See page 3-11 for starter (choke) use and temperatures below 50°F (10°C) require about 2.5 minutes with the starter (choke) turned on any one attempt. @ 6. NOTE: When the transmission is warm when it responds normally to start, release the start switch. Turn the starter (choke) on , otherwise have a Yamaha dealer check the electrical circuit. @ @ @ 4. Shift the transmission into the neutral...
... completely close the throttle. (See page 3-11 for starter (choke) use and temperatures below 50°F (10°C) require about 2.5 minutes with the starter (choke) turned on any one attempt. @ 6. NOTE: When the transmission is warm when it responds normally to start, release the start switch. Turn the starter (choke) on , otherwise have a Yamaha dealer check the electrical circuit. @ @ @ 4. Shift the transmission into the neutral...
Owners Manual
Page 48
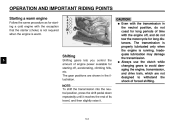
... Shifting 5 Shifting gears lets you control the amount of time with the transmission in the neutral position, do not coast for long periods of engine power available for starting off , and do not tow the motorcycle for starting a cold engine with the exception that the starter (choke) is not required when the engine is running. Inadequate lubrication may damage the transmission. ● Always use the clutch while changing gears to...
... Shifting 5 Shifting gears lets you control the amount of time with the transmission in the neutral position, do not coast for long periods of engine power available for starting off , and do not tow the motorcycle for starting a cold engine with the exception that the starter (choke) is not required when the engine is running. Inadequate lubrication may damage the transmission. ● Always use the clutch while changing gears to...
Owners Manual
Page 52
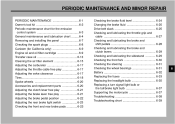
... MINOR REPAIR PERIODIC MAINTENANCE ...6-1 Owner's tool kit ...6-2 Periodic maintenance chart for the emission control system ...6-3 General maintenance and lubrication chart ...6-4 Removing and installing the panel ...6-7 Checking the spark plugs ...6-8 Canister (for California only) ...6-9 Engine oil and oil filter cartridge ...6-9 Transfer case oil ...6-13 Cleaning the air filter element ...6-15 Adjusting the carburetor ...6-17 Adjusting the throttle cable free play ...6-17 Adjusting the valve clearance ...6-17 Tires...6-18 Spoke wheels ...6-20 Accessories and replacement...
... MINOR REPAIR PERIODIC MAINTENANCE ...6-1 Owner's tool kit ...6-2 Periodic maintenance chart for the emission control system ...6-3 General maintenance and lubrication chart ...6-4 Removing and installing the panel ...6-7 Checking the spark plugs ...6-8 Canister (for California only) ...6-9 Engine oil and oil filter cartridge ...6-9 Transfer case oil ...6-13 Cleaning the air filter element ...6-15 Adjusting the carburetor ...6-17 Adjusting the throttle cable free play ...6-17 Adjusting the valve clearance ...6-17 Tires...6-18 Spoke wheels ...6-20 Accessories and replacement...
Owners Manual
Page 55
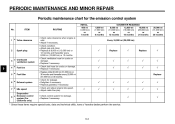
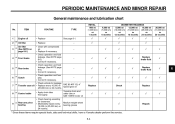
...; Replace gasket(s) if necessary. • Check and adjust engine idle speed. • Adjust cable free play. • Check control system for the emission control system No. PERIODIC MAINTENANCE AND MINOR REPAIR EAU00471 Periodic maintenance chart for damage. • Replace if necessary. 2 Spark plug √ Replace √ Replace √ 3 4 5 * * * * * * Crankcase ventilation system Fuel line Fuel filter √ √ √ √ √ √ √ √ √ √ Replace 6 6 7 Exhaust system Idle speed Evaporative Emission control...
...; Replace gasket(s) if necessary. • Check and adjust engine idle speed. • Adjust cable free play. • Check control system for the emission control system No. PERIODIC MAINTENANCE AND MINOR REPAIR EAU00471 Periodic maintenance chart for damage. • Replace if necessary. 2 Spark plug √ Replace √ Replace √ 3 4 5 * * * * * * Crankcase ventilation system Fuel line Fuel filter √ √ √ √ √ √ √ √ √ √ Replace 6 6 7 Exhaust system Idle speed Evaporative Emission control...
Owners Manual
Page 56
...; Apply chain lube thoroughly. • Check bearing assembly for leakage. PERIODIC MAINTENANCE AND MINOR REPAIR EAU00472 General maintenance and lubrication chart No. SAE 80 API "GL-4" Transfer case oil • Replace every 16,000 mi hypoid gear oil (25,000 km) or 24 months. Yamaha chain and cable lube or SAE 10W30 motor oil Medium weight wheel bearing grease 8 √ √ √ √ √ √ 9 Rear arm pivot bearing √...
...; Apply chain lube thoroughly. • Check bearing assembly for leakage. PERIODIC MAINTENANCE AND MINOR REPAIR EAU00472 General maintenance and lubrication chart No. SAE 80 API "GL-4" Transfer case oil • Replace every 16,000 mi hypoid gear oil (25,000 km) or 24 months. Yamaha chain and cable lube or SAE 10W30 motor oil Medium weight wheel bearing grease 8 √ √ √ √ √ √ 9 Rear arm pivot bearing √...
Owners Manual
Page 60
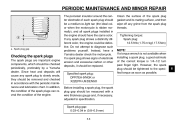
... the spark plugs can reveal the condition of the engine. 6 However, the spark plug should have a Yamaha dealer check the motorcycle. PERIODIC MAINTENANCE AND MINOR REPAIR The porcelain insulator around the center electrode of each spark plug should be a medium-to-light tan (the ideal color when the motorcycle is 1/4-1/2 turn past finger tight. Do not attempt to specification. Spark plug gap: 0.03-0.04 in accordance with a wire thickness gauge...
... the spark plugs can reveal the condition of the engine. 6 However, the spark plug should have a Yamaha dealer check the motorcycle. PERIODIC MAINTENANCE AND MINOR REPAIR The porcelain insulator around the center electrode of each spark plug should be a medium-to-light tan (the ideal color when the motorcycle is 1/4-1/2 turn past finger tight. Do not attempt to specification. Spark plug gap: 0.03-0.04 in accordance with a wire thickness gauge...
Owners Manual
Page 70
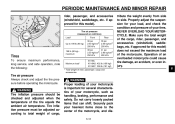
... ambient air temperature. PERIODIC MAINTENANCE AND MINOR REPAIR rider, passenger, and accessories (windshield, saddlebags, etc. if approved for your heaviest items close to the center of the cargo, rider, passenger, and accessories (windshield, saddlebags, etc. NEVER OVERLOAD YOUR MOTORCYCLE. EWA00011 198 lb (90 kg)- Tire inflation pressure must be checked and adjusted when the temperature of your motorcycle, such as handling, braking, performance and safety. if...
... ambient air temperature. PERIODIC MAINTENANCE AND MINOR REPAIR rider, passenger, and accessories (windshield, saddlebags, etc. if approved for your heaviest items close to the center of the cargo, rider, passenger, and accessories (windshield, saddlebags, etc. NEVER OVERLOAD YOUR MOTORCYCLE. EWA00011 198 lb (90 kg)- Tire inflation pressure must be checked and adjusted when the temperature of your motorcycle, such as handling, braking, performance and safety. if...
Owners Manual
Page 85
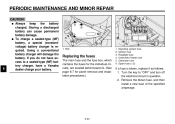
... battery. Bolt EAU04190* Replacing the fuses The main fuse and the fuse box, which contains the fuses for the individual circuits, are located behind panel A. (See page 6-7 for panel removal and installation procedures.) 1. 2. 3. 4. 5. 6. Turn the key to a sealed-type (MF) battery charger, have a Yamaha dealer charge your battery. 1. If you do not have access to "OFF" and turn off the electrical circuit in question. 2. Signaling system fuse Ignition fuse Headlight fuse Carburetor heater fuse...
... battery. Bolt EAU04190* Replacing the fuses The main fuse and the fuse box, which contains the fuses for the individual circuits, are located behind panel A. (See page 6-7 for panel removal and installation procedures.) 1. 2. 3. 4. 5. 6. Turn the key to a sealed-type (MF) battery charger, have a Yamaha dealer charge your battery. 1. If you do not have access to "OFF" and turn off the electrical circuit in question. 2. Signaling system fuse Ignition fuse Headlight fuse Carburetor heater fuse...
Owners Manual
Page 86
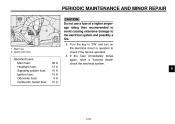
Turn the key to "ON" and turn on the electrical circuit in question to the electrical system and possibly a fire. _ _ 1. PERIODIC MAINTENANCE AND MINOR REPAIR EC000103 CAUTION: Do not use a fuse of a higher amperage rating than recommended to avoid causing extensive damage to check if the device operates. 4. Main fuse 2. Spare main fuse Specified fuses: Main fuse: Headlight fuse: Signaling system fuse: Ignition fuse: Odometer fuse: Carburetor heater fuse: 30 A 15 A 10 A 15 A 5A...
Turn the key to "ON" and turn on the electrical circuit in question to the electrical system and possibly a fire. _ _ 1. PERIODIC MAINTENANCE AND MINOR REPAIR EC000103 CAUTION: Do not use a fuse of a higher amperage rating than recommended to avoid causing extensive damage to check if the device operates. 4. Main fuse 2. Spare main fuse Specified fuses: Main fuse: Headlight fuse: Signaling system fuse: Ignition fuse: Odometer fuse: Carburetor heater fuse: 30 A 15 A 10 A 15 A 5A...
Owners Manual
Page 100
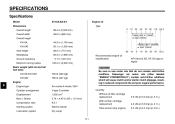
... Lubrication system Air-cooled 4-stroke, OHV V-type 2-cylinder 1,602 cm 3 3.74 × 4.45 in (980 mm) Recommended engine oil classification API Service SE, SF, SG type or higher 8 Be sure to use motor oils that do not contain anti-friction modifiers. SPECIFICATIONS Model Dimensions Overall length Overall width Overall height XV16A XV16AT Seat height Wheelbase Ground clearance Minimum turning radius Basic weight (with oil and full fuel tank) XV16A/XV16AS...
... Lubrication system Air-cooled 4-stroke, OHV V-type 2-cylinder 1,602 cm 3 3.74 × 4.45 in (980 mm) Recommended engine oil classification API Service SE, SF, SG type or higher 8 Be sure to use motor oils that do not contain anti-friction modifiers. SPECIFICATIONS Model Dimensions Overall length Overall width Overall height XV16A XV16AT Seat height Wheelbase Ground clearance Minimum turning radius Basic weight (with oil and full fuel tank) XV16A/XV16AS...
Owners Manual
Page 115
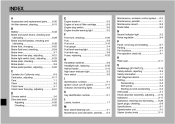
... (rear), adjusting ...6-23 Brake pads, checking...6-23 Brake pedal...3-8 Brake pedal position, adjusting ...6-22 Maintenance, emission control system...6-3 Maintenance, periodic ...6-1 Maintenance record ...9-5 Model label ...9-2 N Neutral indicator light ...3-2 Noise regulation ...9-4 F Front fork, checking ...6-30 Fuel ...3-9 Fuel cock...3-10 Fuel gauge ...3-4 Fuel level warning light ...3-2 Fuel tank cap...3-8 Fuses, replacing ...6-33 P Panel, removing and installing...6-7 Parking...5-6 Part locations ...2-1 Pre-operation check list...4-1 H Handlebar switches ...3-6 Headlight bulb...
... (rear), adjusting ...6-23 Brake pads, checking...6-23 Brake pedal...3-8 Brake pedal position, adjusting ...6-22 Maintenance, emission control system...6-3 Maintenance, periodic ...6-1 Maintenance record ...9-5 Model label ...9-2 N Neutral indicator light ...3-2 Noise regulation ...9-4 F Front fork, checking ...6-30 Fuel ...3-9 Fuel cock...3-10 Fuel gauge ...3-4 Fuel level warning light ...3-2 Fuel tank cap...3-8 Fuses, replacing ...6-33 P Panel, removing and installing...6-7 Parking...5-6 Part locations ...2-1 Pre-operation check list...4-1 H Handlebar switches ...3-6 Headlight bulb...