
Owner's Manual
Page 23
...articles, such as comfort allows and be against the seat back with a passenger-side front airbag. Occupants in injury to open the airbag cover on the dash, seat or out of the window. • No objects or accessory equipment, e.g. Volvo recommends that ALL occupants (adults and children) shorter... than 4 feet 7 inches (140 cm) be seated in the front passenger's seat. The occupant's back must be...
...articles, such as comfort allows and be against the seat back with a passenger-side front airbag. Occupants in injury to open the airbag cover on the dash, seat or out of the window. • No objects or accessory equipment, e.g. Volvo recommends that ALL occupants (adults and children) shorter... than 4 feet 7 inches (140 cm) be seated in the front passenger's seat. The occupant's back must be...

Owner's Manual
Page 29
... for the SIPS airbag to provide its best protection, both front seat occupants should be placed on the front seats may impede SIPS airbag deployment. Failure to follow these instructions can ...• • • • 29 This should sit in an upright position with the seat belt properly fastened. Never try to the occupants of the vehicle in the event of the SIPS airbag... deploy during collisions from the front or rear of seat covers on , attached to the structural Side Impact Protection System and the three-point seat belt system. It is a supplement to or installed...
... for the SIPS airbag to provide its best protection, both front seat occupants should be placed on the front seats may impede SIPS airbag deployment. Failure to follow these instructions can ...• • • • 29 This should sit in an upright position with the seat belt properly fastened. Never try to the occupants of the vehicle in the event of the SIPS airbag... deploy during collisions from the front or rear of seat covers on , attached to the structural Side Impact Protection System and the three-point seat belt system. It is a supplement to or installed...

Owner's Manual
Page 44
... of the top tether anchors or interfere with the proper use of the top tether strap. • Your Volvo is equipped with the optional cargo area cover, this cover should a collision occur. Securing a child seat 1. Route the top tether strap under the head restraint and attach it to the lower ISOFIX/LATCH anchors. Child...
... of the top tether anchors or interfere with the proper use of the top tether strap. • Your Volvo is equipped with the optional cargo area cover, this cover should a collision occur. Securing a child seat 1. Route the top tether strap under the head restraint and attach it to the lower ISOFIX/LATCH anchors. Child...

Owner's Manual
Page 60
...• When you leave the vehicle with the same PCC in his/her possession, the driver's seat and door mirrors will be set in the illustration indicate the area around the vehicle covered by the keyless drive antennas. This system makes it possible to unlock and lock the vehicle without ...having to press any door, the position of the driver's seat will automatically move to have the keyless function, and additional...
...• When you leave the vehicle with the same PCC in his/her possession, the driver's seat and door mirrors will be set in the illustration indicate the area around the vehicle covered by the keyless drive antennas. This system makes it possible to unlock and lock the vehicle without ...having to press any door, the position of the driver's seat will automatically move to have the keyless function, and additional...
Owner's Manual
Page 79
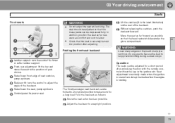
... adjust the angle of your choice. Control panel for a short period after adjusting. • WARNING Folding the front seat backrest Cover sharp edges on the load to occupants. Raise/lower the seat, pump up /down . Secure the load to help prevent injury to help prevent shifting during sudden stops. Without releasing the catches...
... adjust the angle of your choice. Control panel for a short period after adjusting. • WARNING Folding the front seat backrest Cover sharp edges on the load to occupants. Raise/lower the seat, pump up /down . Secure the load to help prevent injury to help prevent shifting during sudden stops. Without releasing the catches...

Owner's Manual
Page 134
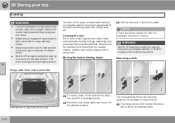
...be routed under Radio text. Auto mode is resumed. Select a wave band using SCAN or EXIT. Activate/deactivate in FM mode under the cover to the connector in the center console storage compartment. eight seconds before scanning is cancelled by pressing for more information, see the illustration). 134... appears on program content, artists, etc. Hold in a separate memory. 1. The radio continues in the storage compartment between the front seats Radio text Some stations transmit information on the display. Press SCAN. > SCAN appears on the display. 2.
...be routed under Radio text. Auto mode is resumed. Select a wave band using SCAN or EXIT. Activate/deactivate in FM mode under the cover to the connector in the center console storage compartment. eight seconds before scanning is cancelled by pressing for more information, see the illustration). 134... appears on program content, artists, etc. Hold in a separate memory. 1. The radio continues in the storage compartment between the front seats Radio text Some stations transmit information on the display. Press SCAN. > SCAN appears on the display. 2.
Owner's Manual
Page 202
Always secure large and heavy objects with a seat belt or cargo retaining straps. Moving the load anchoring hooks Removing a hook Cargo area floor rails and hooks G017742 To move it down in the direction in place. • Cover sharp edges on opposite sides of sudden stops. Fold up the hook. Objects can make...
Always secure large and heavy objects with a seat belt or cargo retaining straps. Moving the load anchoring hooks Removing a hook Cargo area floor rails and hooks G017742 To move it down in the direction in place. • Cover sharp edges on opposite sides of sudden stops. Fold up the hook. Objects can make...

Owner's Manual
Page 205
...position, see Introduction. 205 Do the same on the handle in illustration if necessary. Your vehicle can be equipped with the optional cargo area cover, the grid must be folded down , see page 81 for more information, see the illustration. Press lightly as shown in order to turn...arrow. `` * Option/accessory, for instructions. by two people, and should be on the front side of the grid - ). (see illustrations The rear seat backrests must be completely folded down . 05 Grasp the lowering edge of the vehicle. Press lightly on the opposite side of the grid and pull...
...position, see Introduction. 205 Do the same on the handle in illustration if necessary. Your vehicle can be equipped with the optional cargo area cover, the grid must be folded down , see page 81 for more information, see the illustration. Press lightly as shown in order to turn...arrow. `` * Option/accessory, for instructions. by two people, and should be on the front side of the grid - ). (see illustrations The rear seat backrests must be completely folded down . 05 Grasp the lowering edge of the vehicle. Press lightly on the opposite side of the grid and pull...

Owner's Manual
Page 206
...flap The cargo area cover's rear flap points horizontally when the cover is attached to the child restraint anchors. Check that both sides of the cargo area . 2. Press one side of the cargo area cover into place longer be removed before a child seat is retracted (rolled up ) the cover, release it from... its supports and fold it toward the rear seat backrest. Do the same on one of the end pieces of the...
...flap The cargo area cover's rear flap points horizontally when the cover is attached to the child restraint anchors. Check that both sides of the cargo area . 2. Press one side of the cargo area cover into place longer be removed before a child seat is retracted (rolled up ) the cover, release it from... its supports and fold it toward the rear seat backrest. Do the same on one of the end pieces of the...

Owner's Manual
Page 207
... the mounting brackets on the right side (seen from the backrest when the cargo area cover is pulled up the left side of the cargo net and secure it clicks into place. Fold the entire rear seat backrest down for pulling up the right side of the net by grasping its strap... floor. Pull up from the mounting brackets. Slide the cassettes outward until it on the left section of the rear seat backrest. The straps for using the nets with the cargo area cover NOTE Using the net(s) • The net can also be fastened in the reverse order. 2. Fold down . Align the...
... the mounting brackets on the right side (seen from the backrest when the cargo area cover is pulled up the left side of the cargo net and secure it clicks into place. Fold the entire rear seat backrest down for pulling up the right side of the net by grasping its strap... floor. Pull up from the mounting brackets. Slide the cassettes outward until it on the left section of the rear seat backrest. The straps for using the nets with the cargo area cover NOTE Using the net(s) • The net can also be fastened in the reverse order. 2. Fold down . Align the...

Owner's Manual
Page 214
... Warranty Parts and Accessories Limited Warranty Corrosion Protection Limited Warranty Seat Belt and Supplemental Restraint Systems Limited Warranty • Emission Design and Defect Warranty • Emission Performance Warranty These are not covered by : The Federal Clean Air Act - U.S The Federal... operation or in a crash or nearcrash event. It is provided. 06 Maintenance and specifications Volvo maintenance Introduction Volvo advises you , in accordance with Volvo specifications. The schedule includes components that require special tools and training, and therefore must be ...
... Warranty Parts and Accessories Limited Warranty Corrosion Protection Limited Warranty Seat Belt and Supplemental Restraint Systems Limited Warranty • Emission Design and Defect Warranty • Emission Performance Warranty These are not covered by : The Federal Clean Air Act - U.S The Federal... operation or in a crash or nearcrash event. It is provided. 06 Maintenance and specifications Volvo maintenance Introduction Volvo advises you , in accordance with Volvo specifications. The schedule includes components that require special tools and training, and therefore must be ...

Owner's Manual
Page 236
... Seat Entertainment (RSE)* Moonroof*, ceiling console/ ECC* Engine compartment box Auxiliary lights* Active Bending Lights. There is a special fuse removal tool on the underside of the cover. 06 • Function Circuit breaker Circuit breaker Circuit breaker Circuit breaker A 50 50 60 60 236 * Option/accessory, for more information, see Introduction. Headlight leveling... Compressor A/C 15 10 15 15 10 5 20 NOTE • • Fuses 16 - 33 and 35 - 41 may be removed or replaced by a trained and qualified Volvo service technician. Fuses in the engine compartment box.
... Seat Entertainment (RSE)* Moonroof*, ceiling console/ ECC* Engine compartment box Auxiliary lights* Active Bending Lights. There is a special fuse removal tool on the underside of the cover. 06 • Function Circuit breaker Circuit breaker Circuit breaker Circuit breaker A 50 50 60 60 236 * Option/accessory, for more information, see Introduction. Headlight leveling... Compressor A/C 15 10 15 15 10 5 20 NOTE • • Fuses 16 - 33 and 35 - 41 may be removed or replaced by a trained and qualified Volvo service technician. Fuses in the engine compartment box.

Owner's Manual
Page 238
... system ABS brakes. 06 Maintenance and specifications Fuses Under the glove compartment Fold aside the iupholstery covering the fuse box. 06 Function Accelerator pedal, heated seats* - A 7.5 Function Moonroof* Backup lights - A 20 7.5 1. The fuses are accessible. Press the cover's lock and fold it up. 2. Electric parking brake A 5 10 5 ICM display, CD & Radio Steering wheel...
... system ABS brakes. 06 Maintenance and specifications Fuses Under the glove compartment Fold aside the iupholstery covering the fuse box. 06 Function Accelerator pedal, heated seats* - A 7.5 Function Moonroof* Backup lights - A 20 7.5 1. The fuses are accessible. Press the cover's lock and fold it up. 2. Electric parking brake A 5 10 5 ICM display, CD & Radio Steering wheel...

Owner's Manual
Page 255
... area*, see page 189. `` * Option/accessory, for the sealing compound, wiring to connect the system to adjust a tire's inflation pressure. Install the wheel cover (where applicable). G022916 NOTE G023309 • • • Tighten the lug nuts The tire sealing system is stowed under the floor of an air compressor...in the tread surface and re-inflate a flat tire, or to the vehicle's electrical system via one of the center console in the rear seat and in the cargo area. 2. After use, stow the tire sealing system properly to 103 ft. The system consists of the cargo area.
... area*, see page 189. `` * Option/accessory, for the sealing compound, wiring to connect the system to adjust a tire's inflation pressure. Install the wheel cover (where applicable). G022916 NOTE G023309 • • • Tighten the lug nuts The tire sealing system is stowed under the floor of an air compressor...in the tread surface and re-inflate a flat tire, or to the vehicle's electrical system via one of the center console in the rear seat and in the cargo area. 2. After use, stow the tire sealing system properly to 103 ft. The system consists of the cargo area.

Owner's Manual
Page 281
...driving...194 Collision warning system...159 Compass in rearview mirror...153 Conserving electrical current...193 Convertible seats...40 Coolant...220, 277 D Defroster...128 Detachable key blade...57, 59 Dimensions V70...270 XC70...272 Disconnecting the front passenger's airbag...24, 25 Dome lighting...89 Door ...mirrors...96 Driver distraction warning...10 Driving economically...192 Driving in cold weather...194 Driving through water...193 07 Cargo area cover...206 Cargo area net...
...driving...194 Collision warning system...159 Compass in rearview mirror...153 Conserving electrical current...193 Convertible seats...40 Coolant...220, 277 D Defroster...128 Detachable key blade...57, 59 Dimensions V70...270 XC70...272 Disconnecting the front passenger's airbag...24, 25 Dome lighting...89 Door ...mirrors...96 Driver distraction warning...10 Driving economically...192 Driving in cold weather...194 Driving through water...193 07 Cargo area cover...206 Cargo area net...


