
Owner's Manual
Page 9
...including tensioners) should go out after 7 seconds or when the engine is due. The light is detected, the warning light will illuminate. Check that the other components in the instrument panel. There is no maintenance to positions I, II or III and should be replaced every ten years and that this time.... Normally, the SRS warning lamp should light up when the ignition key is turned to perform on the edge of the left rear door. The above is started. This service must be placed on, attached to the nearest authorized Volvo retailer for inspection as soon as possible. This...
...including tensioners) should go out after 7 seconds or when the engine is due. The light is detected, the warning light will illuminate. Check that the other components in the instrument panel. There is no maintenance to positions I, II or III and should be replaced every ten years and that this time.... Normally, the SRS warning lamp should light up when the ignition key is turned to perform on the edge of the left rear door. The above is started. This service must be placed on, attached to the nearest authorized Volvo retailer for inspection as soon as possible. This...

Owner's Manual
Page 20
...location and read the message shown in the text window. Drive to an authorized Volvo retailer for reservoir position. Canadian models are equipped with this warning light: Park Brake NOTE: The parking brake reminder light will not go off until the parking brake has been fully released. Warning lamp... in the center of the instrument panel This lamp lights up red or orange ...
...location and read the message shown in the text window. Drive to an authorized Volvo retailer for reservoir position. Canadian models are equipped with this warning light: Park Brake NOTE: The parking brake reminder light will not go off until the parking brake has been fully released. Warning lamp... in the center of the instrument panel This lamp lights up red or orange ...

Owner's Manual
Page 30
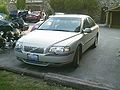
...carrying long loads. Folding passenger's seat backrest The passenger seat backrest can be in the ignition switch during sudden stops. pg. 48 Interior lighting Courtesy lights However, it can also be adjusted: · Within 40 seconds after the ignition has been switched off (even if the key has ...driver's door has been unlocked with the same remote control and open the driver's door, the driver's seat will automatically move to the position it with the key or remote control and opened. Cover sharp edges on the load to help prevent shifting during this function. Remote control ...
...carrying long loads. Folding passenger's seat backrest The passenger seat backrest can be in the ignition switch during sudden stops. pg. 48 Interior lighting Courtesy lights However, it can also be adjusted: · Within 40 seconds after the ignition has been switched off (even if the key has ...driver's door has been unlocked with the same remote control and open the driver's door, the driver's seat will automatically move to the position it with the key or remote control and opened. Cover sharp edges on the load to help prevent shifting during this function. Remote control ...
Owner's Manual
Page 31
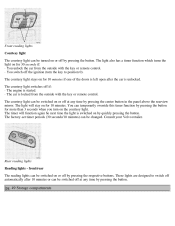
... timer periods (30 seconds/10 minutes) can be switched off at any time by pressing the button. Consult your Volvo retailer. These lights are designed to position 0). The light will function again he next time the light is locked from the outside with the key or remote control. · You switch off the ignition (turn...
... timer periods (30 seconds/10 minutes) can be switched off at any time by pressing the button. Consult your Volvo retailer. These lights are designed to position 0). The light will function again he next time the light is locked from the outside with the key or remote control. · You switch off the ignition (turn...

Owner's Manual
Page 35
Contents | Top of the rear seat backrest for transporting long, light objects such as skis, etc. Secure long loads with the optional integrated child booster cushion, this cushion must be folded down before you fold down ... by pushing the catch (located on the rear side of the backrest) upward and pulling the flap forward. · Return the backrest to the upright position. * If your car is equipped with the seat belt Carrying long loads There is a flap in the trunk to release the backrest. · From the...
Contents | Top of the rear seat backrest for transporting long, light objects such as skis, etc. Secure long loads with the optional integrated child booster cushion, this cushion must be folded down before you fold down ... by pushing the catch (located on the rear side of the backrest) upward and pulling the flap forward. · Return the backrest to the upright position. * If your car is equipped with the seat belt Carrying long loads There is a flap in the trunk to release the backrest. · From the...

Owner's Manual
Page 39
...Buttons in the button will enable you to position II. · Press the "trunk lock" button. Exterior courtesy lights pg. 56 Remote keyless entry system Remote keyless entry system Your car is misplaced, contact the nearest authorized Volvo retailer for assistance. Open trunk 4 -... An LED in certain situations (valet parking, etc.), Volvo recommends that this function is activated...
...Buttons in the button will enable you to position II. · Press the "trunk lock" button. Exterior courtesy lights pg. 56 Remote keyless entry system Remote keyless entry system Your car is misplaced, contact the nearest authorized Volvo retailer for assistance. Open trunk 4 -... An LED in certain situations (valet parking, etc.), Volvo recommends that this function is activated...
Owner's Manual
Page 42
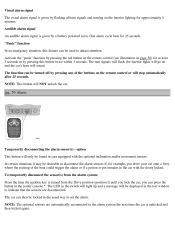
... the alarm system: From the time the ignition key is turned from the Drive position (position I) until you lock the car, you drive your car onto a ferry where the rocking of the buttons on the interior lighting for 25 seconds. Audible alarm signal An audible alarm signal is given by pressing ... Alarm Temporarily disconnecting the alarm sensor(s) - Visual alarm signal The visual alarm signal is given by flashing all turn signals will flash, the interior lights will go on page 56) for at least 3 seconds or by pressing this feature can be used to attract attention. The car can press ...
... the alarm system: From the time the ignition key is turned from the Drive position (position I) until you lock the car, you drive your car onto a ferry where the rocking of the buttons on the interior lighting for 25 seconds. Audible alarm signal An audible alarm signal is given by pressing ... Alarm Temporarily disconnecting the alarm sensor(s) - Visual alarm signal The visual alarm signal is given by flashing all turn signals will flash, the interior lights will go on page 56) for at least 3 seconds or by pressing this feature can be used to attract attention. The car can press ...

Owner's Manual
Page 46
..., such factors as possible when the needle nears the red zone, or when the fuel warning light comes on , an incorrect reading could also cause damage to painted surfaces, which may not be... Warranty. · Do not use gasolines containing methanol (methyl alcohol, wood alcohol). Use only Volvo original or approved fuel filler caps. When the fuel level is on . Turn the ignition off...tank cover is not obstructed and is completely closed tightly or if the engine is advisable to position I. Fuel tank cover The fuel tank cover, located on cars equipped with the engine running...
..., such factors as possible when the needle nears the red zone, or when the fuel warning light comes on , an incorrect reading could also cause damage to painted surfaces, which may not be... Warranty. · Do not use gasolines containing methanol (methyl alcohol, wood alcohol). Use only Volvo original or approved fuel filler caps. When the fuel level is on . Turn the ignition off...tank cover is not obstructed and is completely closed tightly or if the engine is advisable to position I. Fuel tank cover The fuel tank cover, located on cars equipped with the engine running...
Owner's Manual
Page 49
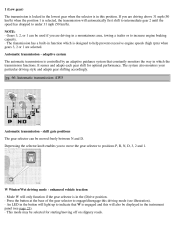
... mode - NOTE: · Gears 3, 2, or 1 can be displayed in the instrument panel (see illustration). · An LED in the button will light up to indicate that constantly monitors the way in which is in the (D)rive position. · Press the button at the base of the gear selector to engage/disengage this...
... mode - NOTE: · Gears 3, 2, or 1 can be displayed in the instrument panel (see illustration). · An LED in the button will light up to indicate that constantly monitors the way in which is in the (D)rive position. · Press the button at the base of the gear selector to engage/disengage this...
Owner's Manual
Page 52
... vehicle traction · Mode W will only function if the gear selector is in the (D)rive position. · Press the button at the base of the gear selector to engage/disengage this will light up to normal operating temperature as soon as possible by thinking ahead, avoiding rapid starts and stops... places an additional load on than it is not required. gear). · When starting in the (M)anual position, 3rd gear is the highest gear that may be obtained by driving with a light foot on the accelerator pedal for starting/moving off and the windows down. · If your vehicle to ...
... vehicle traction · Mode W will only function if the gear selector is in the (D)rive position. · Press the button at the base of the gear selector to engage/disengage this will light up to normal operating temperature as soon as possible by thinking ahead, avoiding rapid starts and stops... places an additional load on than it is not required. gear). · When starting in the (M)anual position, 3rd gear is the highest gear that may be obtained by driving with a light foot on the accelerator pedal for starting/moving off and the windows down. · If your vehicle to ...

Owner's Manual
Page 59
...wheel with the guide stud on the wheel hub prior to installation. · Install the wheel bolts crosswise (see illustration above) and tighten by turning lightly clockwise. · Lower the vehicle to the ground and alternately tighten the bolts crosswise to winter tires/wheels). lbs. (120 Nm). · ...Install the wheel cap (where applicable). Before raising the car, check that the jack is still correctly positioned in the attachment. · Raise the vehicle until the wheel to the ground. WARNING! The base of the jack must be flat on the hub...
...wheel with the guide stud on the wheel hub prior to installation. · Install the wheel bolts crosswise (see illustration above) and tighten by turning lightly clockwise. · Lower the vehicle to the ground and alternately tighten the bolts crosswise to winter tires/wheels). lbs. (120 Nm). · ...Install the wheel cap (where applicable). Before raising the car, check that the jack is still correctly positioned in the attachment. · Raise the vehicle until the wheel to the ground. WARNING! The base of the jack must be flat on the hub...


