
Owners Manual
Page 19
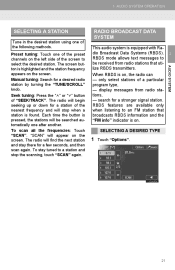
... Data Systems (RBDS). To scan all the frequencies: Touch "SCAN". The radio will stop the scanning, touch "SCAN" again. SELECTING A DESIRED TYPE 2 AUDIO SYSTEM 1 Touch "Options". 21 The radio will begin seeking up or down for a station of the nearest frequency and will find the next station and stay there for...
... Data Systems (RBDS). To scan all the frequencies: Touch "SCAN". The radio will stop the scanning, touch "SCAN" again. SELECTING A DESIRED TYPE 2 AUDIO SYSTEM 1 Touch "Options". 21 The radio will begin seeking up or down for a station of the nearest frequency and will find the next station and stay there for...
Owners Manual
Page 22
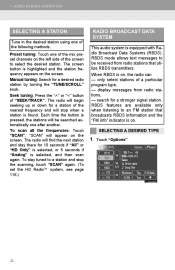
... " " button of the following methods. When RBDS is on the left side of the mix preset channels on , the radio can - SELECTING A DESIRED TYPE 1 Touch "Options". 24 1. only select stations of the nearest frequency and will appear on the screen. The screen button is on. The radio will be received from...
... " " button of the following methods. When RBDS is on the left side of the mix preset channels on , the radio can - SELECTING A DESIRED TYPE 1 Touch "Options". 24 1. only select stations of the nearest frequency and will appear on the screen. The screen button is on. The radio will be received from...
Owners Manual
Page 28
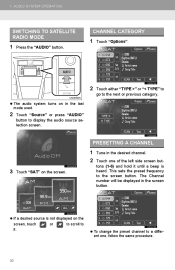
AUDIO SYSTEM OPERATION SWITCHING TO SATELLITE RADIO MODE CHANNEL CATEGORY 1 Touch "Options". 1 Press the "AUDIO" button. 2 The audio system turns on the screen. This sets the preset frequency to display the audio source selection screen. 1. The Channel ...
AUDIO SYSTEM OPERATION SWITCHING TO SATELLITE RADIO MODE CHANNEL CATEGORY 1 Touch "Options". 1 Press the "AUDIO" button. 2 The audio system turns on the screen. This sets the preset frequency to display the audio source selection screen. 1. The Channel ...

Owners Manual
Page 106
... from the "Speed Dials" screen. INFORMATION ● When you want to delete or touch "All Delete". Touch "Phone". Touch "Manage Speed Dials". Touch "Contacts". Touch "Options". 5 Touch the items to the following way. 5 SETUP 1 2 3 4 Press the wheel or the switch on the steering button. 1 2 3 4 Press the "SETUP" button. 1. SPEED DIALS SETTING...
... from the "Speed Dials" screen. INFORMATION ● When you want to delete or touch "All Delete". Touch "Phone". Touch "Manage Speed Dials". Touch "Contacts". Touch "Options". 5 Touch the items to the following way. 5 SETUP 1 2 3 4 Press the wheel or the switch on the steering button. 1 2 3 4 Press the "SETUP" button. 1. SPEED DIALS SETTING...

Owners Manual
Page 109
Touch "Call History". Select the data from the list. Touch "Options". Touch the desired phone number. Touch "Contacts". From "Call History" screen 1 2 3 4 From "Contact" screen Press the wheel or the switch on the steering button. Touch "Add Speed Dial". 1 2 3 4 Press the wheel or the switch on the steering button. 1. SETUP OPERATION 6 Touch the desired phone number.
Touch "Call History". Select the data from the list. Touch "Options". Touch the desired phone number. Touch "Contacts". From "Call History" screen 1 2 3 4 From "Contact" screen Press the wheel or the switch on the steering button. Touch "Add Speed Dial". 1 2 3 4 Press the wheel or the switch on the steering button. 1. SETUP OPERATION 6 Touch the desired phone number.

Owners Manual
Page 134
...can be added as a waypoint to a destination. Touch to the "My Destinations", "Enter Destination", "Traffic Messages" or "Route Options" screen. Touch the corresponding icon to change to display the "Enter Destination" screen. NAVIGATION OPERATION To display the "Navigation" menu screen...destinations, previous destinations or the addresses from the list of traffic messages relating to display the "Route Options" screen. Traffic messages function is using advanced options. A destination can be changed. A destination can be entered by selecting an item from the connected ...
...can be added as a waypoint to a destination. Touch to the "My Destinations", "Enter Destination", "Traffic Messages" or "Route Options" screen. Touch the corresponding icon to change to display the "Enter Destination" screen. NAVIGATION OPERATION To display the "Navigation" menu screen...destinations, previous destinations or the addresses from the list of traffic messages relating to display the "Route Options" screen. Traffic messages function is using advanced options. A destination can be changed. A destination can be entered by selecting an item from the connected ...

Owners Manual
Page 135
Function This symbol indicates a map layout. Displays the distance, the estimated travel time to display the "Options" screen. Touch to the destination, or the estimated arrival time at the destination. Touch to display the "Navigation" menu screen. Touch to change the map ...
Function This symbol indicates a map layout. Displays the distance, the estimated travel time to display the "Options" screen. Touch to the destination, or the estimated arrival time at the destination. Touch to display the "Navigation" menu screen. Touch to change the map ...

Owners Manual
Page 156
.... Touch the desired item. INFORMATION ● Setting the route preference and avoidance can be recalculated. 3 4 Touch . The route will be also changed from the "Route Options" screen. (See page 64.) 43 Touch the desired item. 2 1 2 Touch "Preferences" on the starting route guidance screen.
.... Touch the desired item. INFORMATION ● Setting the route preference and avoidance can be recalculated. 3 4 Touch . The route will be also changed from the "Route Options" screen. (See page 64.) 43 Touch the desired item. 2 1 2 Touch "Preferences" on the starting route guidance screen.

Owners Manual
Page 159
... page 47.) (The current status is displayed on the right of the route. ROUTE GUIDANCE 3. No. SETTING FROM THE "Options" SCREEN Checking and setting routes is mainly performed from the "Options" screen. 1 Touch "Options". 2 Touch the desired items. Touch to block a fixed distance on the road ahead. (See page 48.) (The current status...
... page 47.) (The current status is displayed on the right of the route. ROUTE GUIDANCE 3. No. SETTING FROM THE "Options" SCREEN Checking and setting routes is mainly performed from the "Options" screen. 1 Touch "Options". 2 Touch the desired items. Touch to block a fixed distance on the road ahead. (See page 48.) (The current status...

Owners Manual
Page 160
... CRITERIA DISPLAYING THE ROUTE LIST A list of the different segments of the segment is displayed. 3 The route will be displayed. 1 2 Touch "Route Options For Current Route" on the "Options" screen. Touch the desired item to display the next or previous segment. Touch "Detour" to the point are displayed. 3 The detail of the...
... CRITERIA DISPLAYING THE ROUTE LIST A list of the different segments of the segment is displayed. 3 The route will be displayed. 1 2 Touch "Route Options For Current Route" on the "Options" screen. Touch the desired item to display the next or previous segment. Touch "Detour" to the point are displayed. 3 The detail of the...

Owners Manual
Page 161
... is displayed. "Deactivate Block Road Ahead": Touch to select the desired detour distance. 1 2 Touch "Destination Information" on the "Options" screen. "Deactivate Block Road Ahead" can be deactivated. On this screen, the following information is displayed. 1 2 Touch "Block Road Ahead" ...on the "Options" screen. Touch the desired item to deactivate the function. "Block Next 1 mi" ~ "Block Next 12mi": Touch to destination Address of ...
... is displayed. "Deactivate Block Road Ahead": Touch to select the desired detour distance. 1 2 Touch "Destination Information" on the "Options" screen. "Deactivate Block Road Ahead" can be deactivated. On this screen, the following information is displayed. 1 2 Touch "Block Road Ahead" ...on the "Options" screen. Touch the desired item to deactivate the function. "Block Next 1 mi" ~ "Block Next 12mi": Touch to destination Address of ...

Owners Manual
Page 171
MY DESTINATIONS 2. NO. The entry options screen of entries in the "Stored" list on the "My Destinations" screen. DISPLAYING AND EDITING THE...(See page 54.) 58 Function Touch to display the details of the entry information. (See page 59.) The entry options screen of "Phone Book" list 1 Touch next to register the entry in the list can be displayed or edited. The entry... options screen of "Stored" list Touch to change the entry name. (See page 59.) Touch to edit the address. ...
MY DESTINATIONS 2. NO. The entry options screen of entries in the "Stored" list on the "My Destinations" screen. DISPLAYING AND EDITING THE...(See page 54.) 58 Function Touch to display the details of the entry information. (See page 59.) The entry options screen of "Phone Book" list 1 Touch next to register the entry in the list can be displayed or edited. The entry... options screen of "Stored" list Touch to change the entry name. (See page 59.) Touch to edit the address. ...

Owners Manual
Page 172
... CHANGING THE ENTRY NAME ● This function cannot be marked on the entry options screen. MY DESTINATIONS SHOW DETAILS OF THE ENTRY EDITING THE ADDRESS 1 2 1 2 Touch "Show Details" on the entry options screen. Touch "Save Changes". The address and a picture, if available, of...165.) 1 2 Touch "Rename XX" on the map. INFORMATION ● This function cannot be displayed. Touch "Edit Address" on the entry options screen. This screen will be displayed. When you touch "Start", the starting route guidance screen will be displayed. Input the new name. 3 Touch ...
... CHANGING THE ENTRY NAME ● This function cannot be marked on the entry options screen. MY DESTINATIONS SHOW DETAILS OF THE ENTRY EDITING THE ADDRESS 1 2 1 2 Touch "Show Details" on the entry options screen. Touch "Save Changes". The address and a picture, if available, of...165.) 1 2 Touch "Rename XX" on the map. INFORMATION ● This function cannot be displayed. Touch "Edit Address" on the entry options screen. This screen will be displayed. When you touch "Start", the starting route guidance screen will be displayed. Input the new name. 3 Touch ...

Owners Manual
Page 174
.... ● The current setting of each item is displayed on its right. ● Selected item's checkboxes will change the vehicle icon. (See page 62.) 2 1 Touch "Options". APPLICATION-"Map" 2 Touch "Map Settings". MAP SETTINGS SETTING THE MAP On this screen, the following functions can be set the display of the traffic message...
.... ● The current setting of each item is displayed on its right. ● Selected item's checkboxes will change the vehicle icon. (See page 62.) 2 1 Touch "Options". APPLICATION-"Map" 2 Touch "Map Settings". MAP SETTINGS SETTING THE MAP On this screen, the following functions can be set the display of the traffic message...

Owners Manual
Page 177
... 3 4 Touch "Preferences" on the way back to select the route type between "Fast Route", "Short Route" and "Ecological Route". Touch "Route Options". 5 Touch INFORMATION . ● "Show Route Alternatives" and "Make a Round Trip" are not selectable at the same time. Touch the desired item. ...64 The "Route Options" screen can be set destination has been reached. ROUTE SETTINGS SETTING THE ROUTE OPTIONS SETTING THE ROUTE CALCULATION The route preferences for the route calculation can be considered on the "...
... 3 4 Touch "Preferences" on the way back to select the route type between "Fast Route", "Short Route" and "Ecological Route". Touch "Route Options". 5 Touch INFORMATION . ● "Show Route Alternatives" and "Make a Round Trip" are not selectable at the same time. Touch the desired item. ...64 The "Route Options" screen can be set destination has been reached. ROUTE SETTINGS SETTING THE ROUTE OPTIONS SETTING THE ROUTE CALCULATION The route preferences for the route calculation can be considered on the "...

Owners Manual
Page 178
... touching "Navigation" screens. Touch the desired item. "Avoid Border Crossings": Touch to avoid tunnels. on any of the 3 4 Touch "Avoid" on the map. Touch "Route Options". "Avoid Tunnels": Touch to avoid border crossings. 5 Touch . 65 5. NAVIGATION SETTING SETTING THE AVOIDANCE CRITERIA FOR THE ROUTE CALCULATION The avoidance criteria for the route...
... touching "Navigation" screens. Touch the desired item. "Avoid Border Crossings": Touch to avoid tunnels. on any of the 3 4 Touch "Avoid" on the map. Touch "Route Options". "Avoid Tunnels": Touch to avoid border crossings. 5 Touch . 65 5. NAVIGATION SETTING SETTING THE AVOIDANCE CRITERIA FOR THE ROUTE CALCULATION The avoidance criteria for the route...
Owners Manual
Page 182
... of the Database. LIMITATIONS ON USE The Database is or will have under the legal warranty against NAVTEQ. TRANSFER OF LICENSE You may have the option to performance of the Database in accordance with NAVTEQ's Criteria for which it will use of the Database in the system for which it was...
... of the Database. LIMITATIONS ON USE The Database is or will have under the legal warranty against NAVTEQ. TRANSFER OF LICENSE You may have the option to performance of the Database in accordance with NAVTEQ's Criteria for which it will use of the Database in the system for which it was...

Owners Manual
Page 188
APPLICATIONS OPERATION PLAYING PICTURE SLIDESHOWS A slideshow can be played, paused, and desired images can be selected. 1 Touch "Show". 2 Operating switches will be displayed. INFORMATION ● When the slideshow is playing, the pause and skip screen buttons disappear automatically after a few seconds. 76 1. "Hide": Touch to close the slideshow options. : Touch to pause the slideshow. : Touch to play the slideshow again. : Touch to display the previous picture. : Touch to display the next picture.
APPLICATIONS OPERATION PLAYING PICTURE SLIDESHOWS A slideshow can be played, paused, and desired images can be selected. 1 Touch "Show". 2 Operating switches will be displayed. INFORMATION ● When the slideshow is playing, the pause and skip screen buttons disappear automatically after a few seconds. 76 1. "Hide": Touch to close the slideshow options. : Touch to pause the slideshow. : Touch to play the slideshow again. : Touch to display the previous picture. : Touch to display the next picture.

Owners Manual
Page 214
...AUTOMATIC SOUND LEVELIZER (ASL) The system adjusts to the optimum volume and tone quality according to vehicle speed to display this screen. Touch "Options" and then touch "Sound Settings" on the next screen. With JBL sound system Touch "On" of "Automatic Sound Levelizer". Touch "OK...". 3 Touch the "DSP" tab to compensate for increased vehicle noise. Without JBL sound system DSP control can be set from the "Options" screen. Touch "OK". 104 Modes other than USB memory/iPod and Bluetooth® audio 1 2 1 2 Touch "High", "Mid" or "Low" ...
...AUTOMATIC SOUND LEVELIZER (ASL) The system adjusts to the optimum volume and tone quality according to vehicle speed to display this screen. Touch "Options" and then touch "Sound Settings" on the next screen. With JBL sound system Touch "On" of "Automatic Sound Levelizer". Touch "OK...". 3 Touch the "DSP" tab to compensate for increased vehicle noise. Without JBL sound system DSP control can be set from the "Options" screen. Touch "OK". 104 Modes other than USB memory/iPod and Bluetooth® audio 1 2 1 2 Touch "High", "Mid" or "Low" ...

Owners Manual
Page 215
... and bass. USB memory/iPod and Bluetooth® audio modes "Treble" "+" or "-": To adjust highpitched tones. INFORMATION Tone and balance can be set from the "Options" screen. 1. Modes other than USB memory/iPod and Bluetooth® audio 3 Touch the "Sound" tab to a stereo recording or broadcast, changing the right/left ... important. In fact, different kinds of music and vocal programs usually sound better with different mixes of the treble, mid and bass levels. Touch "Options" and then touch "Sound Settings" on the next screen. ● The tone of each mode can be adjusted. 105
... and bass. USB memory/iPod and Bluetooth® audio modes "Treble" "+" or "-": To adjust highpitched tones. INFORMATION Tone and balance can be set from the "Options" screen. 1. Modes other than USB memory/iPod and Bluetooth® audio 3 Touch the "Sound" tab to a stereo recording or broadcast, changing the right/left ... important. In fact, different kinds of music and vocal programs usually sound better with different mixes of the treble, mid and bass levels. Touch "Options" and then touch "Sound Settings" on the next screen. ● The tone of each mode can be adjusted. 105
