
Owners Manual
Page 37
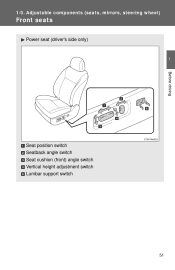
1 -3 . Adjust a ble c om pone nt s (se a t s, m irrors, st e e ring w he e l) Front se at s Power seat (driver's side only) 1 Before driving Seat position switch Seatback angle switch Seat cushion (front) angle switch Vertical height adjustment switch Lumbar support switch 51
1 -3 . Adjust a ble c om pone nt s (se a t s, m irrors, st e e ring w he e l) Front se at s Power seat (driver's side only) 1 Before driving Seat position switch Seatback angle switch Seat cushion (front) angle switch Vertical height adjustment switch Lumbar support switch 51

Owners Manual
Page 40
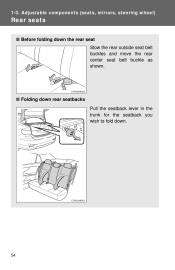
1 -3 . Adjust a ble c om pone nt s (se a t s, m irrors, st e e ring w he e l) Re a r se at s
1 -3 . Adjust a ble c om pone nt s (se a t s, m irrors, st e e ring w he e l) Re a r se at s
Owners Manual
Page 42
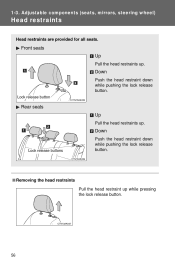
Front seats Up Pull the head restraints up . Lock release buttons Adjust a ble c om pone nt s (se a t s, m irrors, st e e ring w he e l) H e a d re st ra int s Head restraints are provided for all seats. Lock release button Rear seats Up Pull the head restraints up . 1 -3 . Down Push the head restraint down while pushing the lock release button. Down Push the head restraint down while pushing the lock release button.
Front seats Up Pull the head restraints up . Lock release buttons Adjust a ble c om pone nt s (se a t s, m irrors, st e e ring w he e l) H e a d re st ra int s Head restraints are provided for all seats. Lock release button Rear seats Up Pull the head restraints up . 1 -3 . Down Push the head restraint down while pushing the lock release button. Down Push the head restraint down while pushing the lock release button.

Owners Manual
Page 44
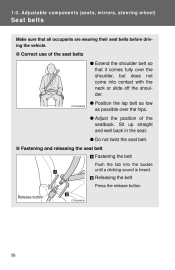
1 -3 . Adjust a ble c om pone nt s (se a t s, m irrors, st e e ring w he e l) Se at be lt s Make sure that all occupants are wearing their seat belts before driving the vehicle.
1 -3 . Adjust a ble c om pone nt s (se a t s, m irrors, st e e ring w he e l) Se at be lt s Make sure that all occupants are wearing their seat belts before driving the vehicle.
Owners Manual
Page 52
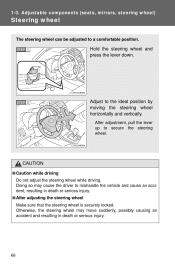
After adjustment, pull the lever up to a comfortable position. Adjust a ble c om pone nt s (se a t s, m irrors, st e e ring w he e l) St e e ring w he e l The steering wheel can be adjusted to secure the steering wheel. CAUTION STEP 2 Adjust to the ideal position by moving the steering wheel horizontally and vertically. STEP 1 Hold the steering wheel and press the lever down. 1 -3 .
After adjustment, pull the lever up to a comfortable position. Adjust a ble c om pone nt s (se a t s, m irrors, st e e ring w he e l) St e e ring w he e l The steering wheel can be adjusted to secure the steering wheel. CAUTION STEP 2 Adjust to the ideal position by moving the steering wheel horizontally and vertically. STEP 1 Hold the steering wheel and press the lever down. 1 -3 .

Owners Manual
Page 53
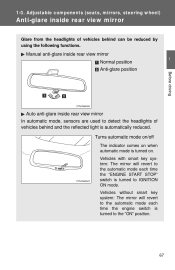
1 -3 . Adjust a ble c om pone nt s (se a t s, m irrors, st e e ring w he e l) Ant i-gla re inside rear view mirror In automatic mode, sensors are used to IGNITION ON mode. Vehicles with smart key ...
1 -3 . Adjust a ble c om pone nt s (se a t s, m irrors, st e e ring w he e l) Ant i-gla re inside rear view mirror In automatic mode, sensors are used to IGNITION ON mode. Vehicles with smart key ...

Owners Manual
Page 55
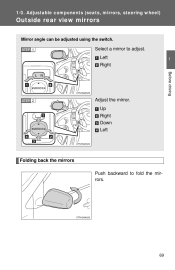
Up Right Down Left Folding back the mirrors Push backward to adjust. Adjust a ble c om pone nt s (se a t s, m irrors, st e e ring w he e l) Out side re a r vie w m irrors Mirror angle can be adjusted using the switch. Left Right Before driving 1 STEP 2 Adjust the mirror. STEP 1 Select a mirror to fold the mirrors. 69 1 -3 .
Up Right Down Left Folding back the mirrors Push backward to adjust. Adjust a ble c om pone nt s (se a t s, m irrors, st e e ring w he e l) Out side re a r vie w m irrors Mirror angle can be adjusted using the switch. Left Right Before driving 1 STEP 2 Adjust the mirror. STEP 1 Select a mirror to fold the mirrors. 69 1 -3 .

Owners Manual
Page 309
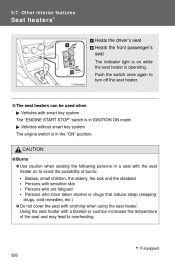
3 -7 . Push the switch once again to turn off the seat heater. Ot he r int e rior fe a t ure s Se at he at e rs ∗ Heats the driver's seat Heats the front passenger's seat The indicator light is on while the seat heater is operating.
3 -7 . Push the switch once again to turn off the seat heater. Ot he r int e rior fe a t ure s Se at he at e rs ∗ Heats the driver's seat Heats the front passenger's seat The indicator light is on while the seat heater is operating.

Owners Manual
Page 327
... • FMVSS No.116 DOT 3 or SAE J1703 brake fluid • Rag or paper towel • Funnel (used only for adding brake fluid) • "Toyota Super Long Life Coolant" or similar high quality ethylene glycol based non-silicate, nonamine, non-nitrite and non-borate coolant with long-life hybrid organic... and care Engine coolant level (→P. 360) Engine oil level (→P. 356) 345 Do-it -yourse lf m a int e na nc e Do-it -yourse lf se r vic e pre c a ut ions If you perform maintenance yourself, be sure to follow the correct procedures as given in these sections. For the...
... • FMVSS No.116 DOT 3 or SAE J1703 brake fluid • Rag or paper towel • Funnel (used only for adding brake fluid) • "Toyota Super Long Life Coolant" or similar high quality ethylene glycol based non-silicate, nonamine, non-nitrite and non-borate coolant with long-life hybrid organic... and care Engine coolant level (→P. 360) Engine oil level (→P. 356) 345 Do-it -yourse lf m a int e na nc e Do-it -yourse lf se r vic e pre c a ut ions If you perform maintenance yourself, be sure to follow the correct procedures as given in these sections. For the...

Owners Manual
Page 543
Adjust a ble c om pone nt s (se a t s, m irrors, st e e ring w he e l) Front se at s Power seat (driver's side only) 1 Before driving Seat position switch Seatback angle switch Seat cushion (front) angle switch Vertical height adjustment switch Lumbar support switch 51 1 -3 .
Adjust a ble c om pone nt s (se a t s, m irrors, st e e ring w he e l) Front se at s Power seat (driver's side only) 1 Before driving Seat position switch Seatback angle switch Seat cushion (front) angle switch Vertical height adjustment switch Lumbar support switch 51 1 -3 .
Owners Manual
Page 546
1 -3 . Adjust a ble c om pone nt s (se a t s, m irrors, st e e ring w he e l) Re a r se at s
1 -3 . Adjust a ble c om pone nt s (se a t s, m irrors, st e e ring w he e l) Re a r se at s

Owners Manual
Page 548
Lock release button Rear seats Up Pull the head restraints up . Front seats Up Pull the head restraints up . Down Push the head restraint down while pushing the lock release button. Adjust a ble c om pone nt s (se a t s, m irrors, st e e ring w he e l) H e a d re st ra int s Head restraints are provided for all seats. Lock release buttons Down Push the head restraint down while pushing the lock release button. 1 -3 .
Lock release button Rear seats Up Pull the head restraints up . Front seats Up Pull the head restraints up . Down Push the head restraint down while pushing the lock release button. Adjust a ble c om pone nt s (se a t s, m irrors, st e e ring w he e l) H e a d re st ra int s Head restraints are provided for all seats. Lock release buttons Down Push the head restraint down while pushing the lock release button. 1 -3 .
Owners Manual
Page 550
Adjust a ble c om pone nt s (se a t s, m irrors, st e e ring w he e l) Se at be lt s Make sure that all occupants are wearing their seat belts before driving the vehicle. 1 -3 .
Adjust a ble c om pone nt s (se a t s, m irrors, st e e ring w he e l) Se at be lt s Make sure that all occupants are wearing their seat belts before driving the vehicle. 1 -3 .

Owners Manual
Page 558
1 -3 . STEP 1 Hold the steering wheel and press the lever down. After adjustment, pull the lever up to a comfortable position. Adjust a ble c om pone nt s (se a t s, m irrors, st e e ring w he e l) St e e ring w he e l The steering wheel can be adjusted to secure the steering wheel. STEP 2 Adjust to the ideal position by moving the steering wheel horizontally and vertically. CAUTION
1 -3 . STEP 1 Hold the steering wheel and press the lever down. After adjustment, pull the lever up to a comfortable position. Adjust a ble c om pone nt s (se a t s, m irrors, st e e ring w he e l) St e e ring w he e l The steering wheel can be adjusted to secure the steering wheel. STEP 2 Adjust to the ideal position by moving the steering wheel horizontally and vertically. CAUTION
Owners Manual
Page 559
...-glare inside re a r vie w m irror Glare from the headlights of vehicles behind can be reduced by using the following functions. Adjust a ble c om pone nt s (se a t s, m irrors, st e e ring w he e l) Ant i-gla re inside rear view mirror In automatic mode, sensors are used to IGNITION ON mode.
...-glare inside re a r vie w m irror Glare from the headlights of vehicles behind can be reduced by using the following functions. Adjust a ble c om pone nt s (se a t s, m irrors, st e e ring w he e l) Ant i-gla re inside rear view mirror In automatic mode, sensors are used to IGNITION ON mode.
Owners Manual
Page 561
Adjust a ble c om pone nt s (se a t s, m irrors, st e e ring w he e l) Out side re a r vie w m irrors Mirror angle can be adjusted using the switch. STEP 1 Select a mirror to fold the mirrors. 69 1 -3 . Up Right Down Left Folding back the mirrors Push backward to adjust. Left Right Before driving 1 STEP 2 Adjust the mirror.
Adjust a ble c om pone nt s (se a t s, m irrors, st e e ring w he e l) Out side re a r vie w m irrors Mirror angle can be adjusted using the switch. STEP 1 Select a mirror to fold the mirrors. 69 1 -3 . Up Right Down Left Folding back the mirrors Push backward to adjust. Left Right Before driving 1 STEP 2 Adjust the mirror.
Owners Manual
Page 815
Ot he r int e rior fe a t ure s Se at he at e rs ∗ Heats the driver's seat Heats the front passenger's seat The indicator light is on while the seat heater is operating. Push the switch once again to turn off the seat heater. 3 -7 .
Ot he r int e rior fe a t ure s Se at he at e rs ∗ Heats the driver's seat Heats the front passenger's seat The indicator light is on while the seat heater is operating. Push the switch once again to turn off the seat heater. 3 -7 .
Owners Manual
Page 833
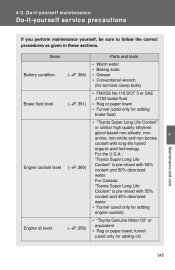
Do-it -yourse lf m a int e na nc e Do-it -yourse lf se r vic e pre c a ut ions If you perform maintenance yourself, be sure to follow the correct procedures as given in these sections. For Canada: "Toyota Super Long Life Coolant" is pre-mixed with long-life hybrid organic acid technology. 4 -3 ....; FMVSS No.116 DOT 3 or SAE J1703 brake fluid • Rag or paper towel • Funnel (used only for adding brake fluid) • "Toyota Super Long Life Coolant" or similar high quality ethylene glycol based non-silicate, nonamine, non-nitrite and non-borate coolant with 50% coolant and 50...
Do-it -yourse lf m a int e na nc e Do-it -yourse lf se r vic e pre c a ut ions If you perform maintenance yourself, be sure to follow the correct procedures as given in these sections. For Canada: "Toyota Super Long Life Coolant" is pre-mixed with long-life hybrid organic acid technology. 4 -3 ....; FMVSS No.116 DOT 3 or SAE J1703 brake fluid • Rag or paper towel • Funnel (used only for adding brake fluid) • "Toyota Super Long Life Coolant" or similar high quality ethylene glycol based non-silicate, nonamine, non-nitrite and non-borate coolant with 50% coolant and 50...

