Owners Manual
Page 2
... door OVERVIEW 2010 Venza This Quick Reference Guide is not intended as a substitute for tire changing and jack positioning procedures. 25 The Quick Reference Guide is a summary of Toyota Motor Sales, U.S.A., Inc. Every Venza owner should review the Owner's Manual that accompanies this Quick Reference Guide is not a full description of satisfied driving in color...
... door OVERVIEW 2010 Venza This Quick Reference Guide is not intended as a substitute for tire changing and jack positioning procedures. 25 The Quick Reference Guide is a summary of Toyota Motor Sales, U.S.A., Inc. Every Venza owner should review the Owner's Manual that accompanies this Quick Reference Guide is not a full description of satisfied driving in color...
Owners Manual
Page 12
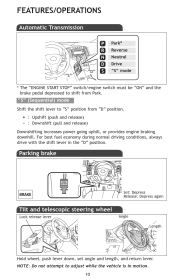
FEATURES/OPERATIONS Automatic Transmission Park* Reverse Neutral Drive "S" "D" "S" mode * The "ENGINE START STOP" switch/engine switch must be "ON" and the brake pedal depressed to adjust while the vehicle is in the "D" position. ... steering wheel Lock release lever Angle Length Hold wheel, push lever down, set angle and length, and return lever. For best fuel economy during normal driving conditions, always drive with the shift lever in motion. 10 "S" (Sequential) mode Shift the shift lever to "S" position from Park.
FEATURES/OPERATIONS Automatic Transmission Park* Reverse Neutral Drive "S" "D" "S" mode * The "ENGINE START STOP" switch/engine switch must be "ON" and the brake pedal depressed to adjust while the vehicle is in the "D" position. ... steering wheel Lock release lever Angle Length Hold wheel, push lever down, set angle and length, and return lever. For best fuel economy during normal driving conditions, always drive with the shift lever in motion. 10 "S" (Sequential) mode Shift the shift lever to "S" position from Park.
Owners Manual
Page 15
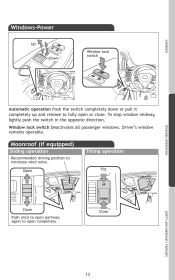
Open Tilt Tilting operation Close Push once to minimize wind noise. Moonroof (if equipped) Sliding operation Recommended driving position to open partway; Driver's window remains operable. Close SAFETY AND EMERGENCY FEATURES 13 FEATURES/OPERATIONS Window lock switch Deactivates all passenger windows. Windows-Power OVERVIEW Up Window lock switch Down Automatic operation Push the switch completely down or pull it completely up and release to open completely. again to fully open or close. To stop window midway, lightly push the switch in the opposite direction.
Open Tilt Tilting operation Close Push once to minimize wind noise. Moonroof (if equipped) Sliding operation Recommended driving position to open partway; Driver's window remains operable. Close SAFETY AND EMERGENCY FEATURES 13 FEATURES/OPERATIONS Window lock switch Deactivates all passenger windows. Windows-Power OVERVIEW Up Window lock switch Down Automatic operation Push the switch completely down or pull it completely up and release to open completely. again to fully open or close. To stop window midway, lightly push the switch in the opposite direction.
Owners Manual
Page 27
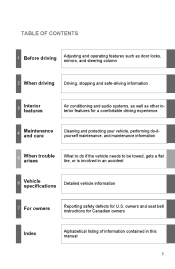
... and operating features such as door locks, mirrors, and steering column 2 When driving Driving, stopping and safe-driving information 3 Interior features Air conditioning and audio systems, as well as other interior features for a comfortable driving experience 4 Maintenance and care Cleaning and protecting your vehicle, performing do-ityourself maintenance, and maintenance information 5 When trouble arises...
... and operating features such as door locks, mirrors, and steering column 2 When driving Driving, stopping and safe-driving information 3 Interior features Air conditioning and audio systems, as well as other interior features for a comfortable driving experience 4 Maintenance and care Cleaning and protecting your vehicle, performing do-ityourself maintenance, and maintenance information 5 When trouble arises...
Owners Manual
Page 28
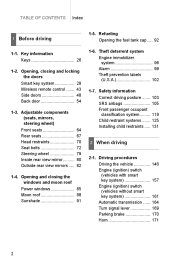
...moon roof Power windows ...85 Moon roof ...88 Sunshade ...91 64 67 70 72 79 80 82 28 43 48 54 2 When driving 2-1. Driving procedures Driving the vehicle ...Engine (ignition) switch (vehicles with smart key system) ...Engine (ignition) switch (vehicles without smart key system) ......Automatic transmission ...Turn signal lever ...Parking brake ...Horn...146 157 161 164 169 170 171 2 Refueling 1 Before driving Opening the fuel tank cap...92 1-6. Key information Keys ...26 1-2. Opening and closing and locking the doors Smart key system...Wireless remote ...
...moon roof Power windows ...85 Moon roof ...88 Sunshade ...91 64 67 70 72 79 80 82 28 43 48 54 2 When driving 2-1. Driving procedures Driving the vehicle ...Engine (ignition) switch (vehicles with smart key system) ...Engine (ignition) switch (vehicles without smart key system) ......Automatic transmission ...Turn signal lever ...Parking brake ...Horn...146 157 161 164 169 170 171 2 Refueling 1 Before driving Opening the fuel tank cap...92 1-6. Key information Keys ...26 1-2. Opening and closing and locking the doors Smart key system...Wireless remote ...

Owners Manual
Page 29
... 289 299 309 316 324 329 330 6 5 3 1 2 200 207 208 210 4 2-4. Using other driving systems Cruise control...Rear view monitor system...Hill-start assist control...Driving assist systems ...2-5. Driving information Utility vehicle precautions ...Cargo and luggage ...Vehicle load limits ...Winter driving tips ...Trailer towing ...Dinghy towing ...226 231 236 238 243 255 211 214...
... 289 299 309 316 324 329 330 6 5 3 1 2 200 207 208 210 4 2-4. Using other driving systems Cruise control...Rear view monitor system...Hill-start assist control...Driving assist systems ...2-5. Driving information Utility vehicle precautions ...Cargo and luggage ...Vehicle load limits ...Winter driving tips ...Trailer towing ...Dinghy towing ...226 231 236 238 243 255 211 214...

Owners Manual
Page 52
After using the mechanical key, store it in the electronic key. If the electronic key battery depletes or entry function does not operate properly, you will need the mechanical key. (→P. 586) 1 Before driving Carry the mechanical key together with smart key system) Take out the mechanical key. Key information Using the mechanical key (vehicles with the electronic key. 1-1.
After using the mechanical key, store it in the electronic key. If the electronic key battery depletes or entry function does not operate properly, you will need the mechanical key. (→P. 586) 1 Before driving Carry the mechanical key together with smart key system) Take out the mechanical key. Key information Using the mechanical key (vehicles with the electronic key. 1-1.

Owners Manual
Page 54
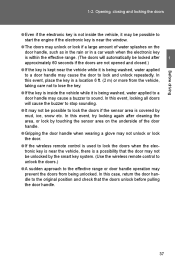
1-2. Make sure to unlock the doors. Opening, closing and locking the doors Unlocking and locking the doors Side door handle Grip the handle to touch the sensor on the back of the handle. The doors cannot be unlocked for 3 seconds after the doors are locked. 1 Before driving Touch the sensor area to lock the doors. 29
1-2. Make sure to unlock the doors. Opening, closing and locking the doors Unlocking and locking the doors Side door handle Grip the handle to touch the sensor on the back of the handle. The doors cannot be unlocked for 3 seconds after the doors are locked. 1 Before driving Touch the sensor area to lock the doors. 29
Owners Manual
Page 62
... may not unlock or lock the door. ● If the wireless remote control is a possibility that the doors unlock before pulling the door handle. 1 Before driving 37 In this case, return the door handle to the original position and check that the door may not be possible to start the engine...
... may not unlock or lock the door. ● If the wireless remote control is a possibility that the doors unlock before pulling the door handle. 1 Before driving 37 In this case, return the door handle to the original position and check that the door may not be possible to start the engine...
Owners Manual
Page 64
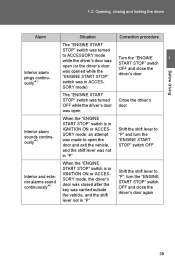
..., and the shift lever not in "P" Correction procedure Interior alarm pings continuously*1 Turn the "ENGINE START STOP" switch OFF and close the driver's door 1 Before driving Close the driver's door Interior alarm sounds continuously*1 Shift the shift lever to "P" and turn the "ENGINE START STOP" switch OFF Interior and exterior alarms...
..., and the shift lever not in "P" Correction procedure Interior alarm pings continuously*1 Turn the "ENGINE START STOP" switch OFF and close the driver's door 1 Before driving Close the driver's door Interior alarm sounds continuously*1 Shift the shift lever to "P" and turn the "ENGINE START STOP" switch OFF Interior and exterior alarms...

Owners Manual
Page 68
Vehicles with smart key system Locks all doors Unlocks all doors Pressing the button unlocks the driver's door. Pressing the button again within 3 seconds unlocks the other doors. 1 Before driving Pressing and holding: Opens and closes the power back door (if equipped) Pressing and holding: Sounds alarm (→P. 99) 43 Opening, closing and locking the doors Wireless remote control The wireless remote control can be used to lock and unlock the vehicle from outside the vehicle. 1-2.
Vehicles with smart key system Locks all doors Unlocks all doors Pressing the button unlocks the driver's door. Pressing the button again within 3 seconds unlocks the other doors. 1 Before driving Pressing and holding: Opens and closes the power back door (if equipped) Pressing and holding: Sounds alarm (→P. 99) 43 Opening, closing and locking the doors Wireless remote control The wireless remote control can be used to lock and unlock the vehicle from outside the vehicle. 1-2.
Owners Manual
Page 76
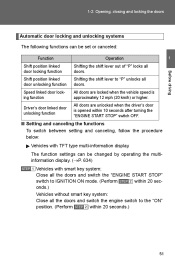
... "P" locks all doors. All doors are locked when the vehicle speed is opened within 10 seconds after turning the "ENGINE START STOP" switch OFF. 1 Before driving 1-2.
... "P" locks all doors. All doors are locked when the vehicle speed is opened within 10 seconds after turning the "ENGINE START STOP" switch OFF. 1 Before driving 1-2.
Owners Manual
Page 90
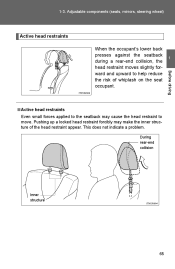
1-3. Adjustable components (seats, mirrors, steering wheel) Active head restraints When the occupant's lower back presses against the seatback during a rear-end collision, the head restraint moves slightly forward and upward to help reduce the risk of whiplash on the seat occupant. 1 Before driving
1-3. Adjustable components (seats, mirrors, steering wheel) Active head restraints When the occupant's lower back presses against the seatback during a rear-end collision, the head restraint moves slightly forward and upward to help reduce the risk of whiplash on the seat occupant. 1 Before driving
Owners Manual
Page 92
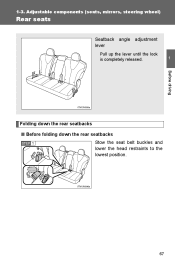
1-3. Adjustable components (seats, mirrors, steering wheel) Rear seats Seatback angle adjustment lever Pull up the lever until the lock is completely released. 1 Before driving Folding down the rear seatbacks
1-3. Adjustable components (seats, mirrors, steering wheel) Rear seats Seatback angle adjustment lever Pull up the lever until the lock is completely released. 1 Before driving Folding down the rear seatbacks
Owners Manual
Page 97
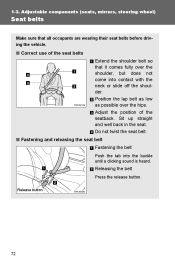
1-3. Adjustable components (seats, mirrors, steering wheel) Seat belts Make sure that all occupants are wearing their seat belts before driving the vehicle.
1-3. Adjustable components (seats, mirrors, steering wheel) Seat belts Make sure that all occupants are wearing their seat belts before driving the vehicle.

Owners Manual
Page 104
After adjustment, pull the lever up to the ideal position by moving the steering wheel horizontally and vertically. CAUTION STEP 1 Hold the steering wheel and press the lever down. 1 Before driving STEP 2 Adjust to secure the steering wheel. 1-3. Adjustable components (seats, mirrors, steering wheel) Steering wheel The steering wheel can be adjusted to a comfortable position.
After adjustment, pull the lever up to the ideal position by moving the steering wheel horizontally and vertically. CAUTION STEP 1 Hold the steering wheel and press the lever down. 1 Before driving STEP 2 Adjust to secure the steering wheel. 1-3. Adjustable components (seats, mirrors, steering wheel) Steering wheel The steering wheel can be adjusted to a comfortable position.

Owners Manual
Page 106
1-3. Adjustable components (seats, mirrors, steering wheel) Manual anti-glare inside rear view mirror Normal position Anti-glare position 1 Before driving
1-3. Adjustable components (seats, mirrors, steering wheel) Manual anti-glare inside rear view mirror Normal position Anti-glare position 1 Before driving
Owners Manual
Page 110
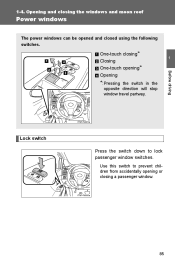
Lock switch Press the switch down to prevent children from accidentally opening * Opening 1 Before driving *:Pressing the switch in the opposite direction will stop window travel partway. 1-4. Opening and closing a passenger window. 85 One-touch closing* Closing One-touch opening or closing the windows and moon roof Power windows The power windows can be opened and closed using the following switches. Use this switch to lock passenger window switches.
Lock switch Press the switch down to prevent children from accidentally opening * Opening 1 Before driving *:Pressing the switch in the opposite direction will stop window travel partway. 1-4. Opening and closing a passenger window. 85 One-touch closing* Closing One-touch opening or closing the windows and moon roof Power windows The power windows can be opened and closed using the following switches. Use this switch to lock passenger window switches.

Owners Manual
Page 116
Front Slide the sunshade. The front sunshade will open automatically when the moon roof is opened and closed manually. Opening and closing the windows and moon roof The sunshade can be opened . (→P. 88) 1 Before driving Rear Slide the sunshade. ∗: If equipped 91 Sunshade∗ 1-4.
Front Slide the sunshade. The front sunshade will open automatically when the moon roof is opened and closed manually. Opening and closing the windows and moon roof The sunshade can be opened . (→P. 88) 1 Before driving Rear Slide the sunshade. ∗: If equipped 91 Sunshade∗ 1-4.
Owners Manual
Page 118
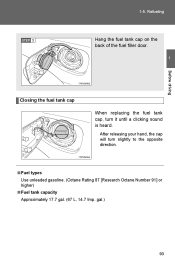
1-5. After releasing your hand, the cap will turn it until a clicking sound is heard. Refueling STEP 3 Hang the fuel tank cap on the back of the fuel filler door. 1 Before driving Closing the fuel tank cap When replacing the fuel tank cap, turn slightly to the opposite direction.
1-5. After releasing your hand, the cap will turn it until a clicking sound is heard. Refueling STEP 3 Hang the fuel tank cap on the back of the fuel filler door. 1 Before driving Closing the fuel tank cap When replacing the fuel tank cap, turn slightly to the opposite direction.


