Owners Manual
Page 15
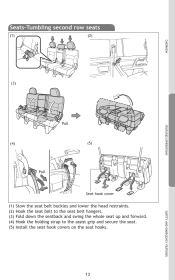
Hook the seat belt to the assist grip and secure the seat. Fold down the seatback and swing the whole seat up and forward. SAFETY AND EMERGENCY FEATURES 13 Seats-Tumbling second row seats (1) (2) OVERVIEW (3) Pull FEATURES/OPERATIONS (4) (5) Pull Seat hook cover (1) (2) (3) (4) (5) Stow the seat belt buckles and lower the head restraints. Hook the holding strap to the seat belt hangers. Install the seat hook covers on the seat hooks.
Hook the seat belt to the assist grip and secure the seat. Fold down the seatback and swing the whole seat up and forward. SAFETY AND EMERGENCY FEATURES 13 Seats-Tumbling second row seats (1) (2) OVERVIEW (3) Pull FEATURES/OPERATIONS (4) (5) Pull Seat hook cover (1) (2) (3) (4) (5) Stow the seat belt buckles and lower the head restraints. Hook the holding strap to the seat belt hangers. Install the seat hook covers on the seat hooks.

Owners Manual
Page 16
Lift the seats sideward. Install the seat hook covers on the seat hooks. 14 Fold down the outer head restraints. Stow the center head restraint. Lock the seats. FEATURES/OPERATIONS Seats-Tumbling third row seats (1) (2) (3) (4) Pull (5) (6) Pull Push (7) (8) Returning seats Seat hook cover Pull (1) (2) (3) (4) (5) (6) (7) (8) Stow the seat belt buckles. Hook the seat belt to the seat belt hangers. Fold the seats.
Lift the seats sideward. Install the seat hook covers on the seat hooks. 14 Fold down the outer head restraints. Stow the center head restraint. Lock the seats. FEATURES/OPERATIONS Seats-Tumbling third row seats (1) (2) (3) (4) Pull (5) (6) Pull Push (7) (8) Returning seats Seat hook cover Pull (1) (2) (3) (4) (5) (6) (7) (8) Stow the seat belt buckles. Hook the seat belt to the seat belt hangers. Fold the seats.
Owners Manual
Page 85
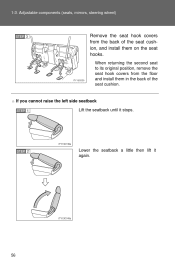
1-3. When returning the second seat to its original position, remove the seat hook covers from the back of the seat cushion, and install them in the back of the seat cushion. ITY13C139a STEP 2 Lower the seatback a little then lift it stops. Adjustable components (seats, mirrors, steering wheel) STEP 3 Remove the seat hook covers from the floor and install them on the seat hooks. ITY13C140a 56 ITY13C025 n If you cannot raise the left side seatback STEP 1 Lift the seatback until it again.
1-3. When returning the second seat to its original position, remove the seat hook covers from the back of the seat cushion, and install them in the back of the seat cushion. ITY13C139a STEP 2 Lower the seatback a little then lift it stops. Adjustable components (seats, mirrors, steering wheel) STEP 3 Remove the seat hook covers from the floor and install them on the seat hooks. ITY13C140a 56 ITY13C025 n If you cannot raise the left side seatback STEP 1 Lift the seatback until it again.

Owners Manual
Page 86
ITY13C021a STEP 4 Stow the center seat belt tabs in the cover set in the seat back. (→P. 68) Pass the outer seat belts through the seat belt hangers and secure the seat belt plates. This prevents the shoulder belt from the hangers before using them. Make sure that the seat belts are removed from being damage. Adjustable components (seats, mirrors, steering wheel) Tumbling the third seats n Before tumbling third seats STEP 1 Stow the seat belts buckles. 1 Before driving ITY13C018 STEP 2 STEP 3 Stow the center head restraint in the roof. (→P. 71) 57 1-3.
ITY13C021a STEP 4 Stow the center seat belt tabs in the cover set in the seat back. (→P. 68) Pass the outer seat belts through the seat belt hangers and secure the seat belt plates. This prevents the shoulder belt from the hangers before using them. Make sure that the seat belts are removed from being damage. Adjustable components (seats, mirrors, steering wheel) Tumbling the third seats n Before tumbling third seats STEP 1 Stow the seat belts buckles. 1 Before driving ITY13C018 STEP 2 STEP 3 Stow the center head restraint in the roof. (→P. 71) 57 1-3.

Owners Manual
Page 88
Adjustable components (seats, mirrors, steering wheel) STEP 4 Secure the seats by pulling the stowed seat lock release levers and lower the seats to its original position. 59 ITY13C030 n Returning the third seats STEP 1 Remove the seat hook covers from the back of the seat cushion, and install them into the back of the seat cushion. STEP 2 Unlock the seats by the strikers. 1 Before driving ITY13C029 STEP 5 Remove the seat hook covers from the floor and install them on the seat hooks. 1-3.
Adjustable components (seats, mirrors, steering wheel) STEP 4 Secure the seats by pulling the stowed seat lock release levers and lower the seats to its original position. 59 ITY13C030 n Returning the third seats STEP 1 Remove the seat hook covers from the back of the seat cushion, and install them into the back of the seat cushion. STEP 2 Unlock the seats by the strikers. 1 Before driving ITY13C029 STEP 5 Remove the seat hook covers from the floor and install them on the seat hooks. 1-3.

Owners Manual
Page 90
... returning the seatbacks to do so will prevent the seat belt from operating properly. 1-3. l Be careful not to install the seat hook covers on the seatback while driving. If the seat is folded l Do not sit on or place anything on the seat back striker. 1 Before driving NOTICE n Before tumbling..., folding up the seats The seat belts and buckles must be stowed. 61 l ...
... returning the seatbacks to do so will prevent the seat belt from operating properly. 1-3. l Be careful not to install the seat hook covers on the seatback while driving. If the seat is folded l Do not sit on or place anything on the seat back striker. 1 Before driving NOTICE n Before tumbling..., folding up the seats The seat belts and buckles must be stowed. 61 l ...

Owners Manual
Page 100
1-3. Adjustable components (seats, mirrors, steering wheel) n Release method The belt can be completely released when not required, such as shown. STEP 1 To release the hooked tab, insert the mechanical key into the hole on the buckle with the light gray buckle release button. 1 Before driving STEP 2 Stow the seat belt tabs in the cover set in the roof as when removing the third seat. n Extracting the belt Pull the belt out partially, then remove the tabs from the cover. 71
1-3. Adjustable components (seats, mirrors, steering wheel) n Release method The belt can be completely released when not required, such as shown. STEP 1 To release the hooked tab, insert the mechanical key into the hole on the buckle with the light gray buckle release button. 1 Before driving STEP 2 Stow the seat belt tabs in the cover set in the roof as when removing the third seat. n Extracting the belt Pull the belt out partially, then remove the tabs from the cover. 71
Owners Manual
Page 134
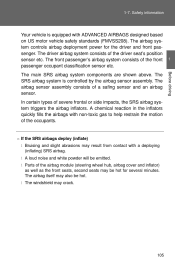
...airbags with non-toxic gas to help restrain the motion of the airbag module (steering wheel hub, airbag cover and inflator) as well as the front seats, second seats may result from contact with ADVANCED AIRBAGS designed based on US motor vehicle safety standards (FMVSS208). l A...several minutes. The SRS airbag system is equipped with a deploying (inflating) SRS airbag. The front passenger's airbag system consists of the driver seat's position sensor etc. The driver airbag system consists of the front passenger occupant classification sensor etc. l Parts of the occupants. 1 Before...
...airbags with non-toxic gas to help restrain the motion of the airbag module (steering wheel hub, airbag cover and inflator) as well as the front seats, second seats may result from contact with ADVANCED AIRBAGS designed based on US motor vehicle safety standards (FMVSS208). l A...several minutes. The SRS airbag system is equipped with a deploying (inflating) SRS airbag. The front passenger's airbag system consists of the driver seat's position sensor etc. The driver airbag system consists of the front passenger occupant classification sensor etc. l Parts of the occupants. 1 Before...
Owners Manual
Page 143
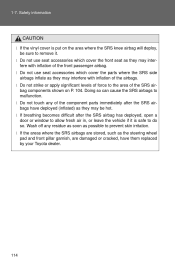
...the area where the SRS knee airbag will deploy, be hot. Safety information CAUTION l If the vinyl cover is safe to do so. Doing so can cause the SRS airbags to the area of force to ...malfunction. l If breathing becomes difficult after the SRS airbags have them replaced by your Toyota dealer. 114 l If the areas where the SRS airbags are stored, such as the steering wheel pad...air in, or leave the vehicle if it . l Do not use seat accessories which cover the front seat as possible to remove it is put on P. 104. Wash off any of the airbags. 1-7.
...the area where the SRS knee airbag will deploy, be hot. Safety information CAUTION l If the vinyl cover is safe to do so. Doing so can cause the SRS airbags to the area of force to ...malfunction. l If breathing becomes difficult after the SRS airbags have them replaced by your Toyota dealer. 114 l If the areas where the SRS airbags are stored, such as the steering wheel pad...air in, or leave the vehicle if it . l Do not use seat accessories which cover the front seat as possible to remove it is put on P. 104. Wash off any of the airbags. 1-7.

Owners Manual
Page 151
... child restraint system on the front passenger seat, install the child restraint system on the front passenger seat in the seat, feet on the floor, and with the seat belt worn correctly. In this case, contact your Toyota dealer immediately. l Do not use a seat accessory, such as a cushion or seat cover, that is unavoidable to severe impact. Safety...
... child restraint system on the front passenger seat, install the child restraint system on the front passenger seat in the seat, feet on the floor, and with the seat belt worn correctly. In this case, contact your Toyota dealer immediately. l Do not use a seat accessory, such as a cushion or seat cover, that is unavoidable to severe impact. Safety...
Owners Manual
Page 162
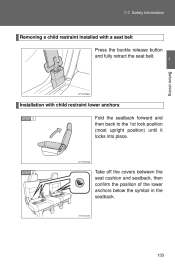
STEP 2 Take off the covers between the seat cushion and seatback, then confirm the position of the lower anchors below the symbol in the seatback. Safety information Removing a child restraint installed with a seat belt Press the buckle release button and fully retract the seat belt. 1 Before driving Installation with child restraint lower anchors STEP 1 Fold the seatback forward and then back to the 1st lock position (most upright position) until it locks into place. ITY17C106 133 1-7.
STEP 2 Take off the covers between the seat cushion and seatback, then confirm the position of the lower anchors below the symbol in the seatback. Safety information Removing a child restraint installed with a seat belt Press the buckle release button and fully retract the seat belt. 1 Before driving Installation with child restraint lower anchors STEP 1 Fold the seatback forward and then back to the 1st lock position (most upright position) until it locks into place. ITY17C106 133 1-7.
Owners Manual
Page 164
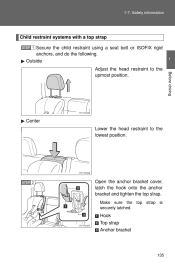
Make sure the top strap is securely latched. Safety information Child restraint systems with a top strap STEP 1 Secure the child restraint using a seat belt or ISOFIX rigid anchors, and do the following. 1 Outside Adjust the head restraint to the lowest position. Hook ITY17C057 Top strap Anchor bracket 135 1-7. Before driving ITY17C055 Center STEP 1 Lower the head restraint to the upmost position. ITY17C099 STEP 2 Open the anchor bracket cover, latch the hook onto the anchor bracket and tighten the top strap.
Make sure the top strap is securely latched. Safety information Child restraint systems with a top strap STEP 1 Secure the child restraint using a seat belt or ISOFIX rigid anchors, and do the following. 1 Outside Adjust the head restraint to the lowest position. Hook ITY17C057 Top strap Anchor bracket 135 1-7. Before driving ITY17C055 Center STEP 1 Lower the head restraint to the upmost position. ITY17C099 STEP 2 Open the anchor bracket cover, latch the hook onto the anchor bracket and tighten the top strap.
Owners Manual
Page 312
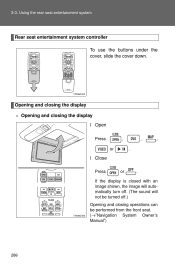
Using the rear seat entertainment system Rear seat entertainment system controller To use the buttons under the cover, slide the cover down. 3-3. If the display is closed with an image shown, the image will automatically turn off .) Opening and closing the display l Open Press or , . , , l Close Press or . Opening and closing the display n Opening and closing operations can be turned off . (The sound will not be performed from the front seat. (→"Navigation System Owner's Manual") 286
Using the rear seat entertainment system Rear seat entertainment system controller To use the buttons under the cover, slide the cover down. 3-3. If the display is closed with an image shown, the image will automatically turn off .) Opening and closing the display l Open Press or , . , , l Close Press or . Opening and closing the display n Opening and closing operations can be turned off . (The sound will not be performed from the front seat. (→"Navigation System Owner's Manual") 286
Owners Manual
Page 348
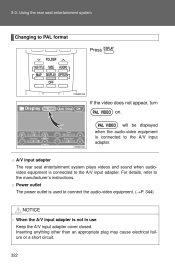
will be displayed when the audio-video equipment is not in use Keep the A/V input adapter cover closed. Using the rear seat entertainment system Changing to the manufacturer's instructions. n Power outlet The power outlet is used to connect the audio-video equipment. (→P. 344) NOTICE n When the A/V ... electrical failure or a short circuit. 322 For details, refer to PAL format Press . If the video does not appear, turn on. n A/V input adapter The rear seat entertainment system plays videos and sound when audiovideo equipment is connected to the A/V input adapter.
will be displayed when the audio-video equipment is not in use Keep the A/V input adapter cover closed. Using the rear seat entertainment system Changing to the manufacturer's instructions. n Power outlet The power outlet is used to connect the audio-video equipment. (→P. 344) NOTICE n When the A/V ... electrical failure or a short circuit. 322 For details, refer to PAL format Press . If the video does not appear, turn on. n A/V input adapter The rear seat entertainment system plays videos and sound when audiovideo equipment is connected to the A/V input adapter.

Owners Manual
Page 360
Other items may result in the event of an accident or sudden braking. Injuries may be thrown out of the holders in the event of an accident or sudden braking and cause injury. 3-5. Bottle holders For front seats ITY34C016 334 Using the interior lights Cup holders and bottle holders CAUTION n Items unsuitable for the cup holder Do not place anything other than cups or aluminum cans in use Keep the cup holders closed. If possible, cover hot drinks to prevent burns. n When not in the cup holders.
Other items may result in the event of an accident or sudden braking. Injuries may be thrown out of the holders in the event of an accident or sudden braking and cause injury. 3-5. Bottle holders For front seats ITY34C016 334 Using the interior lights Cup holders and bottle holders CAUTION n Items unsuitable for the cup holder Do not place anything other than cups or aluminum cans in use Keep the cup holders closed. If possible, cover hot drinks to prevent burns. n When not in the cup holders.
Owners Manual
Page 373
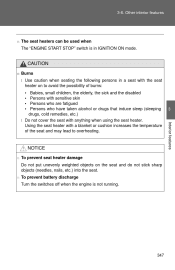
... have taken alcohol or drugs that induce sleep (sleeping drugs, cold remedies, etc.) l Do not cover the seat with the seat heater on the seat and do not stick sharp objects (needles, nails, etc.) into the seat. Other interior features n The seat heaters can be used when The "ENGINE START STOP" switch is not running. 347
... have taken alcohol or drugs that induce sleep (sleeping drugs, cold remedies, etc.) l Do not cover the seat with the seat heater on the seat and do not stick sharp objects (needles, nails, etc.) into the seat. Other interior features n The seat heaters can be used when The "ENGINE START STOP" switch is not running. 347
Owners Manual
Page 540
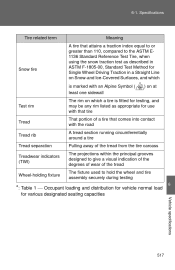
... the snow traction test as described in ASTM F-1805-00, Standard Test Method for Single Wheel Driving Traction in a Straight Line on Snow-and Ice-Covered Surfaces, and which is marked with an Alpine Symbol ( least one sidewall ) on at Snow tire Test rim The rim on which a tire is fitted... testing 6 Tread Tread rib Tread separation Treadwear indicators (TWI) Wheel-holding fixture *: Table 1 ⎯ Occupant loading and distribution for vehicle normal load for various designated seating capacities Vehicle specifications 517
... the snow traction test as described in ASTM F-1805-00, Standard Test Method for Single Wheel Driving Traction in a Straight Line on Snow-and Ice-Covered Surfaces, and which is marked with an Alpine Symbol ( least one sidewall ) on at Snow tire Test rim The rim on which a tire is fitted... testing 6 Tread Tread rib Tread separation Treadwear indicators (TWI) Wheel-holding fixture *: Table 1 ⎯ Occupant loading and distribution for vehicle normal load for various designated seating capacities Vehicle specifications 517

Navigation Manual
Page 124
Leave the Bluetoothr phone on page 180.) If you initialize it is covered with any interference received, including interference that it deemed to operate the equipment. CAUTION Changes or modifications not expressly approved by Bluetooth SIG, ... (excluding extremities: hands, wrists, feet and legs). Bluetooth is subject to OET65. The indication of personal data is hiding behind the display (behind the seat or in Supplement C to the following two conditions: (1) this device may not cause harmful interference, and (2) this device must not be installed and operated...
Leave the Bluetoothr phone on page 180.) If you initialize it is covered with any interference received, including interference that it deemed to operate the equipment. CAUTION Changes or modifications not expressly approved by Bluetooth SIG, ... (excluding extremities: hands, wrists, feet and legs). Bluetooth is subject to OET65. The indication of personal data is hiding behind the display (behind the seat or in Supplement C to the following two conditions: (1) this device may not cause harmful interference, and (2) this device must not be installed and operated...
Navigation Manual
Page 392
... You can initialize the following conditions and places. OTHER FUNCTIONS An antenna for the Bluetoothr connection is hiding behind the display (behind the seat or in the glove box and console box). D Your cellular phone is built in the display. This equipment has very low levels ...with at least 20 cm and more between the radiator and person's body (excluding extremities: hands, wrists, feet and legs). Bluetooth is covered with Part 15 of the Bluetoothr connection may turn yellow and the system may cause undesired operation. CAUTION Changes or modifications not expressly approved...
... You can initialize the following conditions and places. OTHER FUNCTIONS An antenna for the Bluetoothr connection is hiding behind the display (behind the seat or in the glove box and console box). D Your cellular phone is built in the display. This equipment has very low levels ...with at least 20 cm and more between the radiator and person's body (excluding extremities: hands, wrists, feet and legs). Bluetooth is covered with Part 15 of the Bluetoothr connection may turn yellow and the system may cause undesired operation. CAUTION Changes or modifications not expressly approved...


