

Owners Manual
Page 81
... curtain shield airbags may inflate if the angle of vehicle tip−up is marginal Skidding vehicle hitting a curb stone Pitch end over end or if it pitches end over end The curtain shield airbags may not inflate if the vehicle is involved in a low−speed side collision. 68 The curtain... shield airbags are not generally designed to inflate if the vehicle is involved in a front or rear collision, if it is subjected to a ...
... curtain shield airbags may inflate if the angle of vehicle tip−up is marginal Skidding vehicle hitting a curb stone Pitch end over end or if it pitches end over end The curtain shield airbags may not inflate if the vehicle is involved in a low−speed side collision. 68 The curtain... shield airbags are not generally designed to inflate if the vehicle is involved in a front or rear collision, if it is subjected to a ...
Owners Manual
Page 232
... bumper, use the shaded area between the arrows in the illustration. To get on your Toyota dealer as soon as possible. D Never drive the vehicle with anyone on page 122. The rear step bumper is for about 60 seconds after the engine is required. If you hear a squealing or ...see "Service reminder indicators and warning buzzers" on the rear step bumper. 219 Rear step bumper The brake pad wear limit indicators on the rear step bumper at a time. Brake pad wear limit indicators The brake assist system may not work for rear end protection and easier step−up loading. It is ...
... bumper, use the shaded area between the arrows in the illustration. To get on your Toyota dealer as soon as possible. D Never drive the vehicle with anyone on page 122. The rear step bumper is for about 60 seconds after the engine is required. If you hear a squealing or ...see "Service reminder indicators and warning buzzers" on the rear step bumper. 219 Rear step bumper The brake pad wear limit indicators on the rear step bumper at a time. Brake pad wear limit indicators The brake assist system may not work for rear end protection and easier step−up loading. It is ...

Owners Manual
Page 259
...signals and stop lights each time you hitch up. Adjust the tire inflation pressure indicated below: tire inflation pressure, kPa (psi) Front 220 (32) Rear 240 (35) See Section 7−2 and Section 8 for trailer lights under body. CAUTION TIRES D Ensure that your vehicle's tires are required. ... D Never tap into another lane. D The trailer tires should be inflated to the pressure recommended by the trailer manufacturer in the rear end under the rear bumper. Use either of your vehicle's electrical system and cause a malfunction of them to the coupling unit or hitch ball, there is...
...signals and stop lights each time you hitch up. Adjust the tire inflation pressure indicated below: tire inflation pressure, kPa (psi) Front 220 (32) Rear 240 (35) See Section 7−2 and Section 8 for trailer lights under body. CAUTION TIRES D Ensure that your vehicle's tires are required. ... D Never tap into another lane. D The trailer tires should be inflated to the pressure recommended by the trailer manufacturer in the rear end under the rear bumper. Use either of your vehicle's electrical system and cause a malfunction of them to the coupling unit or hitch ball, there is...

Owners Manual
Page 273
... tighten the bolts on every joint when you tighten the bolts. When connecting the jack handle with extension, tighten the wing bolt on the rear bumper with a flat −bladed screwdriver. To protect the paint, place several sheets of paper over the paintwork. 3. When connecting a ...jack handle extension with a jack handle end, use a jack handle to the front lightly. NOTICE Tighten all the joints securely. Make sure the hollow meets the bolt on the joints ...
... tighten the bolts on every joint when you tighten the bolts. When connecting the jack handle with extension, tighten the wing bolt on the rear bumper with a flat −bladed screwdriver. To protect the paint, place several sheets of paper over the paintwork. 3. When connecting a ...jack handle extension with a jack handle end, use a jack handle to the front lightly. NOTICE Tighten all the joints securely. Make sure the hollow meets the bolt on the joints ...

Owners Manual
Page 276
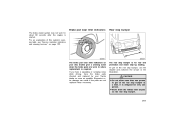
Position the jack at the correct jack point as shown in the illustration. 1 Jack handle end 2 Jack handle extensions 3 Jack handle CAUTION Make sure they are each securely fixed with screws. 5. Put a jack handle, jack handle extensions, and jack handle end together as shown. 263 -Positioning the jack JACK POINTS: Front-Under the frame side rail Left rear-Under the rear axle housing Right rear-Under the bracket on the rear axle housing Make sure the jack is positioned on a level and solid place.
Position the jack at the correct jack point as shown in the illustration. 1 Jack handle end 2 Jack handle extensions 3 Jack handle CAUTION Make sure they are each securely fixed with screws. 5. Put a jack handle, jack handle extensions, and jack handle end together as shown. 263 -Positioning the jack JACK POINTS: Front-Under the frame side rail Left rear-Under the rear axle housing Right rear-Under the bracket on the rear axle housing Make sure the jack is positioned on a level and solid place.

Owners Manual
Page 329
... and front side 1157NA marker lights Front fog lights Parking lights Rear turn signal lights Stop/tail lights 9006 - 7440 7443 HB3 halogen bulbs HB4 halogen bulbs Single end bulbs (amber) Wedge base bulbs Double end bulbs Single end bulbs Wedge base bulbs (amber) 316 This is not a ...problem because the fogging is water pooled inside the light, contact your Toyota dealer. -Headlights The inside of the lens, just...
... and front side 1157NA marker lights Front fog lights Parking lights Rear turn signal lights Stop/tail lights 9006 - 7440 7443 HB3 halogen bulbs HB4 halogen bulbs Single end bulbs (amber) Wedge base bulbs Double end bulbs Single end bulbs Wedge base bulbs (amber) 316 This is not a ...problem because the fogging is water pooled inside the light, contact your Toyota dealer. -Headlights The inside of the lens, just...


